In this article, I’m going to show you how to install macOS High Sierra on VirtualBox on PC. macOS High Sierra’s 10.13.6 (17G14019) latest update was released on July 15, 2020. It is been a while since that macOS High Sierra is released. In this guide, you will learn the complete step by step pictorial tutorial to run macOS High Sierra 10.13 latest version on Windows operating system. As our previous articles, we’ve shown you how to install macOS High Sierra on VMware. So in this post, I’ll install it on VirtualBox on Windows PC.
Update: Before we get started, let me mention that several versions of macOS have come out since macOS High Sierra and we have already created a step by step guides to install them on VMware or VirtualBox. So if you want to install the newer versions of macOS then please check out the links below:
- Guide to Install macOS Big Sur on VMware (macOS 11)
- Guide to Install macOS Big Sur on VirtualBox (macOS 11)
- Guide to Install macOS Catalina on VMware (macOS 10.15)
- Guide to Install macOS Catalina on VirtualBox (macOS 10.15)
- Guide to Install macOS Mojave on VMware (macOS 10.14)
- Guide to Install macOS Mojave on VirtualBox (macOS 10.14)
System Requirements
Before we start, make sure to read the following requirements. Please do not skip this step because it’ll help you to successfully install macOS High Sierra on VirtualBox on Windows 10 PC.
- Minimum 2 GB memory (Recommended 8GB or higher)
- Minimum 2 cores of processors (Recommended 4 cores or higher)
- Hard disk free space 20 GB (Recommended 100GB or higher)
- Your system should support Intel or AMD VT (Virtualization Technology)
- Intel/AMD VT (Virtualization Technology) Should be enabled from BIOS setup
Required: If you haven’t already then you should enable Virtualization Technology (aka Intel VT or AMD-V).
Furthermore, it’s highly recommended that you install macOS High Sierra on SSD (Solid State Drive) instead of HDD (Hard Disk Drive) because you will have a much faster performance with SSD rather than HDD
Steps to Install macOS High Sierra on VirtualBox Using VMDK
- Download the Prerequisites
- Install VirtualBox on Windows PC
- Install & Update VirtualBox Extension (Optional)
- Create a New Virtual Machine for macOS High Sierra
- Execute the VirtualBox Code
- Perform a Clean Installation of macOS High Sierra
- Update macOS High Sierra to the Latest Version (Optional)
To install macOS High High Sierra on VirtualBox on Windows PC, you must download the following files and read the step by step guide to avoiding any problems.
Step 1: Download the Prerequisites
- Download macOS High Sierra VMDK (Required)
- macOS High Sierra 10.13.6 (17G66) Latest
- macOS High Sierra 10.13 (17A365) Stable
- Download VirtualBox & VBox Code (Required)
Step 2: Install VirtualBox on Windows 10
From the “Download the Prerequisites” section of this post, you should have downloaded VirtualBox and if you didn’t, download VirtualBox latest version and install it on your Windows system. If you’ve already installed VirtualBox, then you can skip this step. Otherwise, follow the steps below to install VirtualBox on your Windows machine.
- On the welcome Wizard page, click Next.
- Keep the default setting on the Custom Setup page and click Next.
- Again Click Next to accept the default options unless you want to change something.
- On the warning Network interface page, just click Yes to process with Virtualbox installation.
- Click the Install button to install VBox. Again click Yes if required.
- While installing VBox, you might see a security warning about “Oracle Corporation”. You need to click Install on this page to process with the installation. If you click Don’t install, the installation process will be terminated here and you can’t go ahead. If you see the security warning again click the Install button
- Finally, click Finish.
-
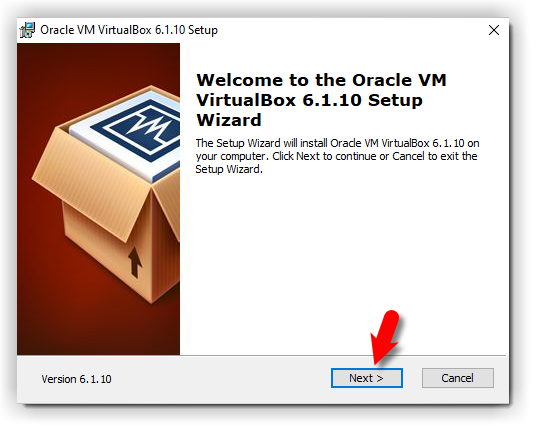
- Virtualbox Setup Welcome Wizard
-
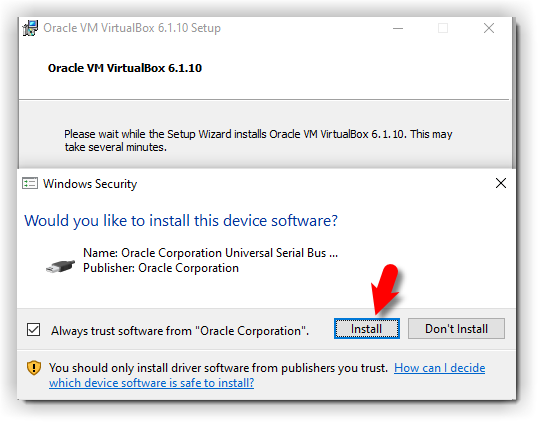
- Windows Security
-

- Virtualbox Setup Completed
Step 3: Install & Update VirtualBox Extension (Optional)
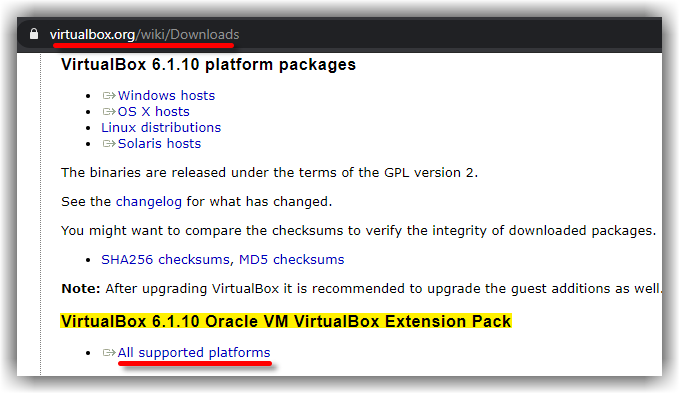
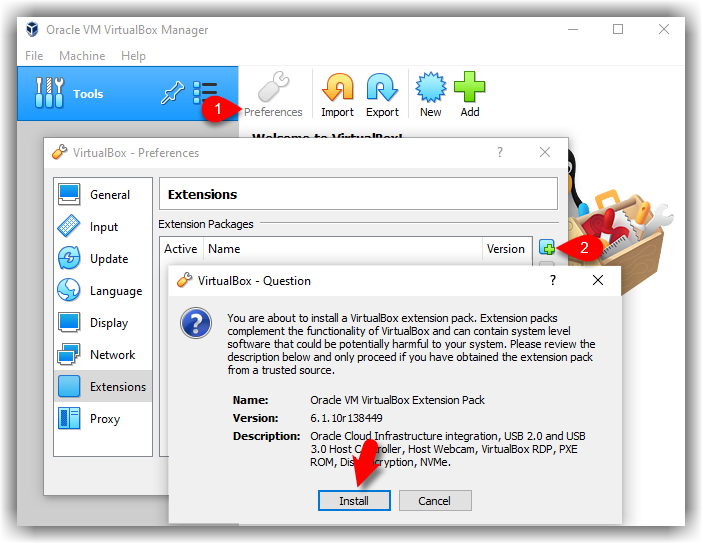
This step is not 100% necessary but it’s highly recommended to do this step because macOS High Sierra might not function properly on VirtualBox. For this reason, it might cause problems during the installation. Go to the Virtualbox download page. Under VirtualBox 6.1.10 Oracle VM VirtualBox Extension Pack section, click All supported platforms to download the latest version of Virtualbox Extension Pack.
Download Virtualbox Extensions
Once you’ve downloaded the Extension pack. Now, follow the steps below to update the Virtualbox extension pack.
- Open up VirtualBox, navigate to Tools>Pereferences>Extensions.
- Click on Plus (+) icon and select VirtualBox extension which you’ve downloaded at the beginning of this section. Click Install or Upgrade and then Agree to the terms and conditions. Click the OK button.
Finally, you should see something like the screenshots below.
-
- VirtualBox Extension Install
-
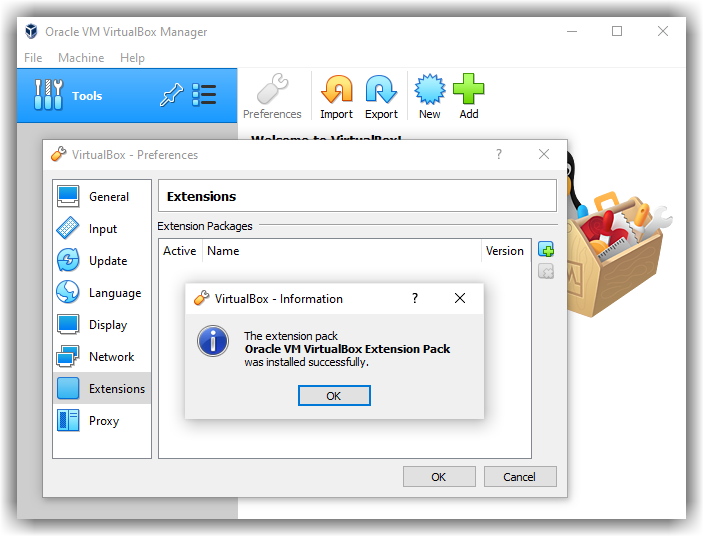
- Oracle VM VirtualBox Extension Pack
-
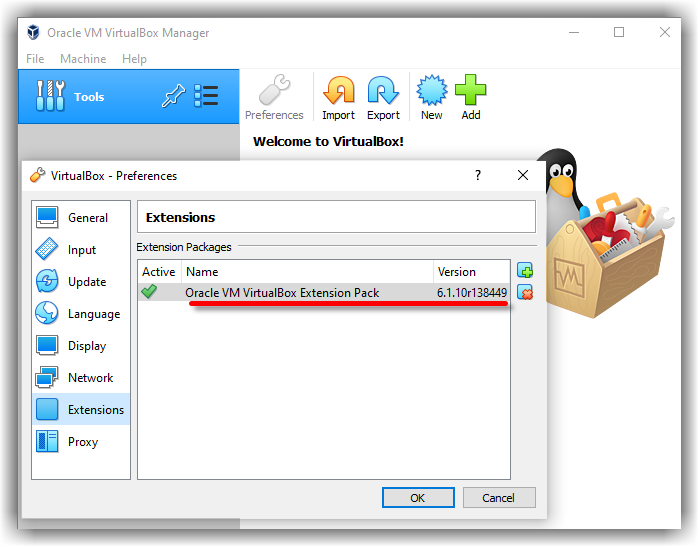
- Oracle VM VirtualBox Extension Pack Installed
Step 4: Create a New Virtual Machine for macOS High Sierra
After installing VirtualBox, now you will need to create a new virtual machine on Virtualbox. Creating a virtual machine for macOS High Sierra is kind of the same as you create a VM for the Windows Operating system or Linux but with some minor changes. In this post, I’ll outline those changes. Follow the steps below to create a new virtual machine for macOS High Sierra using the VMDK file.
-
- Open up your VirtualBox application and click New.
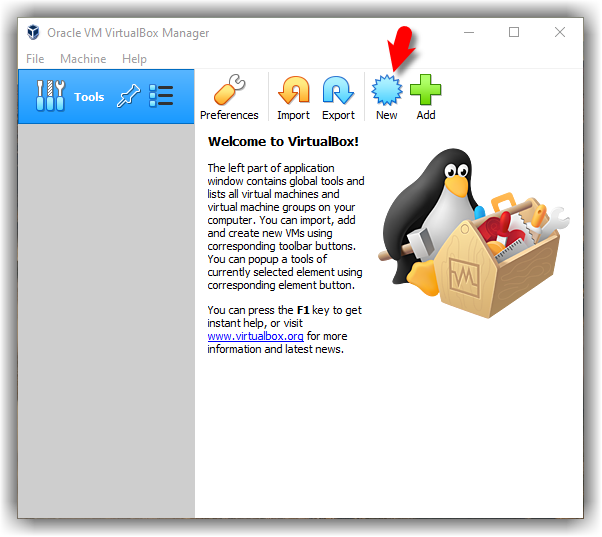
Create a New VM
- Click Expert Mode and select the following options then click Create.
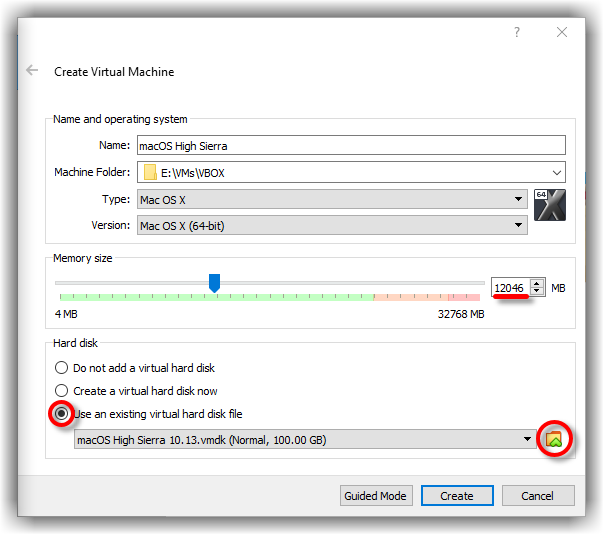
- Type a suitable Virtual Machine Name.
- Virtual Machine Location (a separate drive is recommended).
- Type (Mac OS X).
- Version (Mac OS X 64-bit).
- Memory 4 GB (recommended 8 GB or higher).
- Hard Disk: Select Use an existing virtual machine hard disk file. Click on the Folder icon to browse the macOS High Sierra VMDK file.
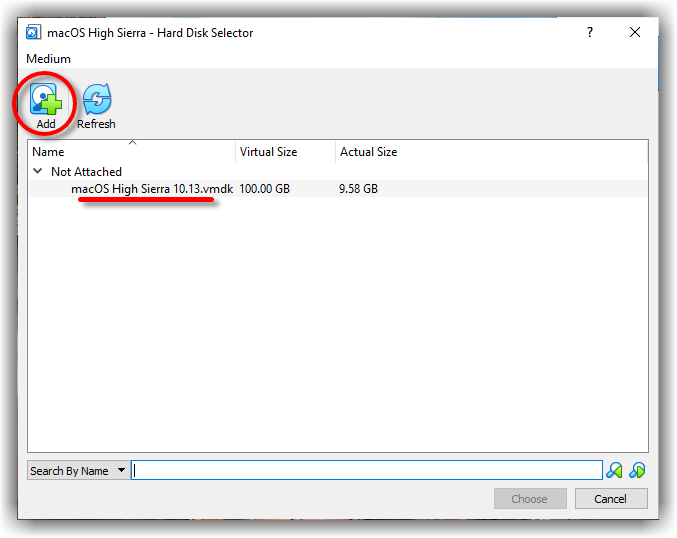
- Click Add and select the Sierra VMDK image
-
- Select macOS High Sierra VMDK
-
- Attach macOS High Sierra VMDK Image
-
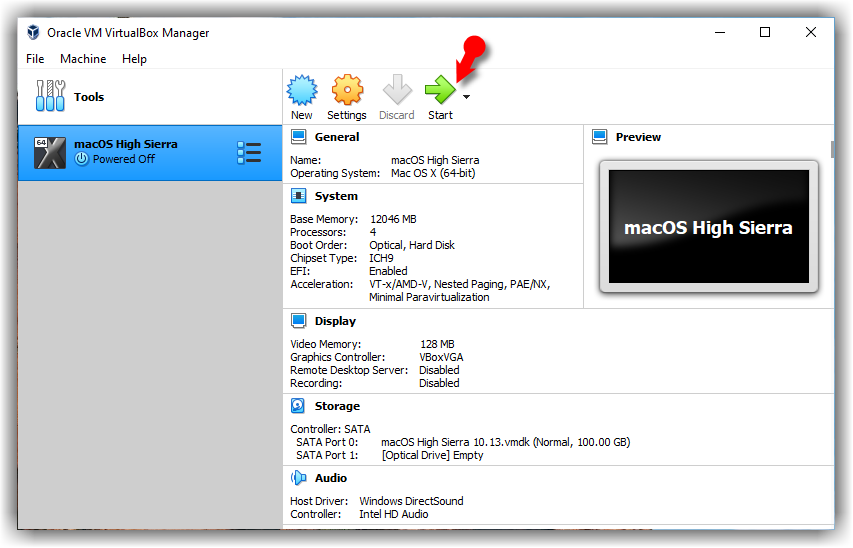
- It’s time to edit the virtual machine to make it works. Select macOS High Sierra VM and click on Settings. Now, bring the following changes to macOS High Sierra VM.
- Under System>Motherboard, increase the Base Memory to 12048MB. However, you can use a bit lower memory if your system doesn’t have this much RAM.
- Uncheck Floppy from the Boot Order section.
- Under the Processor tab, increase the processors to 4 or higher.
- On the Display window, increase the Video Memory to 128MB.
-
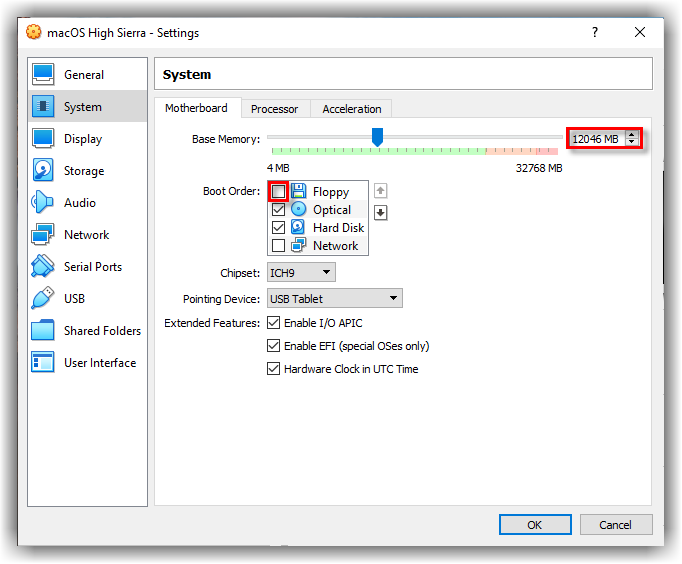
- Uncheck High Sierra Boot Order
-
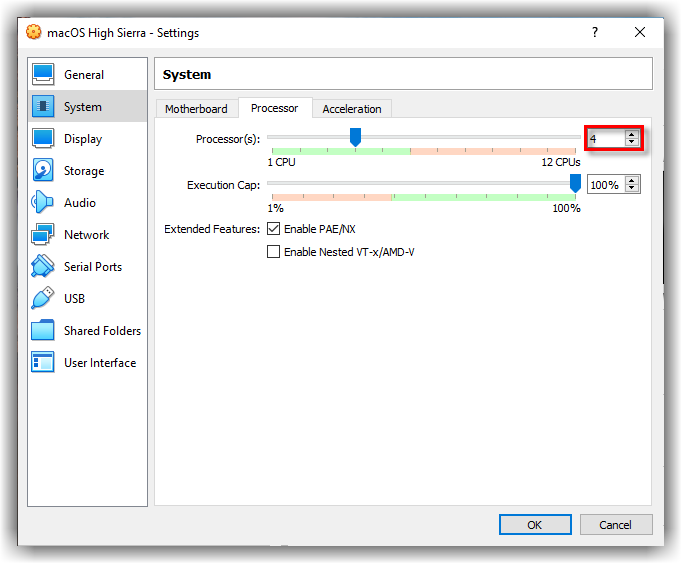
- Increase macOS High Sierra Processors
-
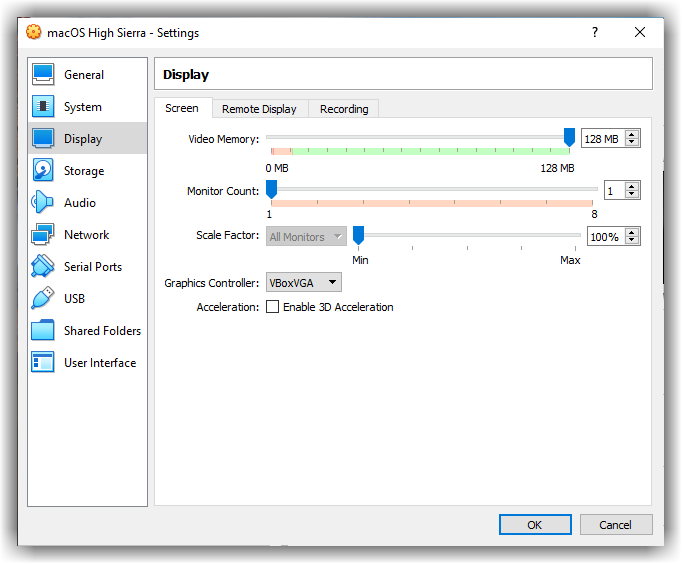
- Increase High Sierra Video Memory
-
- Open up your VirtualBox application and click New.
Step 5: Execute the VirtualBox Code
Once you’ve created and customized your virtual machine, it’s time to run some codes in order to install macOS High Sierra on VirtualBox. First, you should note your virtual machine name because later on, we will use it. Open the VirtualBox code which you should have downloaded from the “Download the Prerequisites” section of this post. If you’ve not downloaded, doesn’t matter. Just use the following code.
Note: Before, you execute the code by command prompt. You should read the following steps.
cd "C:\Program Files\Oracle\VirtualBox\"
VBoxManage.exe modifyvm "VM Name" --cpuidset 00000001 000106e5 00100800 0098e3fd bfebfbff
VBoxManage setextradata "VM Name" "VBoxInternal/Devices/efi/0/Config/DmiSystemProduct" "iMac19,1"
VBoxManage setextradata "VM Name" "VBoxInternal/Devices/efi/0/Config/DmiSystemVersion" "1.0"
VBoxManage setextradata "VM Name" "VBoxInternal/Devices/efi/0/Config/DmiBoardProduct" "Mac-AA95B1DDAB278B95"
VBoxManage setextradata "VM Name" "VBoxInternal/Devices/smc/0/Config/DeviceKey" "ourhardworkbythesewordsguardedpleasedontsteal(c)AppleComputerInc"
VBoxManage setextradata "VM Name" "VBoxInternal/Devices/smc/0/Config/GetKeyFromRealSMC" 1- When you opened VirtualBox code via notepad or any other text editor, use the replace function of the program to Replace the “VM Name” with your virtual machine name. See the picture below to get an idea of how to do it.
- Now, you’ve two choices. First, if you want to fix your macOS High Sierra screen resolution in the first place. You should also execute the following code. You have to change “VM Name” with your virtual machine name and HxV with a screen resolution such as “1280×720“. For more supported screen resolution on VirtualBox and detailed guide, visit fix macOS Catalina screen resolution on VirtualBox.
VBoxManage setextradata "VM Name" VBoxInternal2/EfiGraphicsResolution HxVImportant Note: We highly recommend to quit the VirtualBox program before executing the code. If you don’t do it, your virtual machine might not proceed to the installation step.
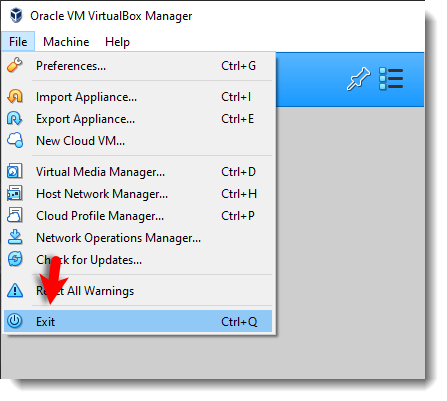
Exit VirtualBox
- Once you replaced the “VM Name” with your virtual machine name, then run the code one by one via command prompt (CMD). You can open the command prompt by pressing the Windows+X key in Windows 10 and select Command Prompt from the list. Or simply press Windows key and type CMD. Click Run As Administrator and click Yes.
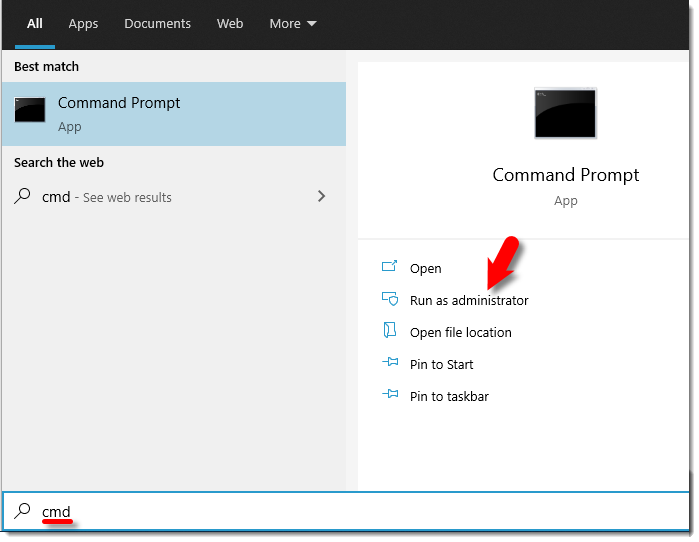
Run CMD as Admin
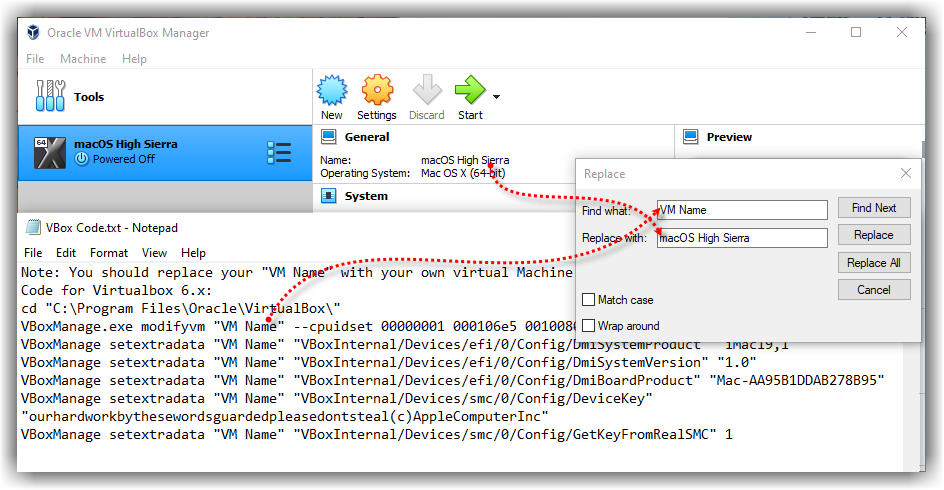
Replace the VM Name
- Now, that you’ve executed the macOS High Sierra VirtualBox code. Open the VirtualBox app then click the Start button to power on the VM. A black screen with a lot of white text will appear on the screen. Just wait for a few minutes and the macOS High Sierra installation will start.
Start macOS High Sierra VM

High Sierra Code Running
Step 6: Perform a Clean Installation of macOS High Sierra
Once you hit enter, a whole bunch of code will run on the screen, but you should not worry about it. Wait for a few minutes, and you should see the macOS High Sierra installation window. Have a cup of coffee until the installation complete. It’s going to take around 15 minutes to finish.
- Choose your Country and click on Continue.
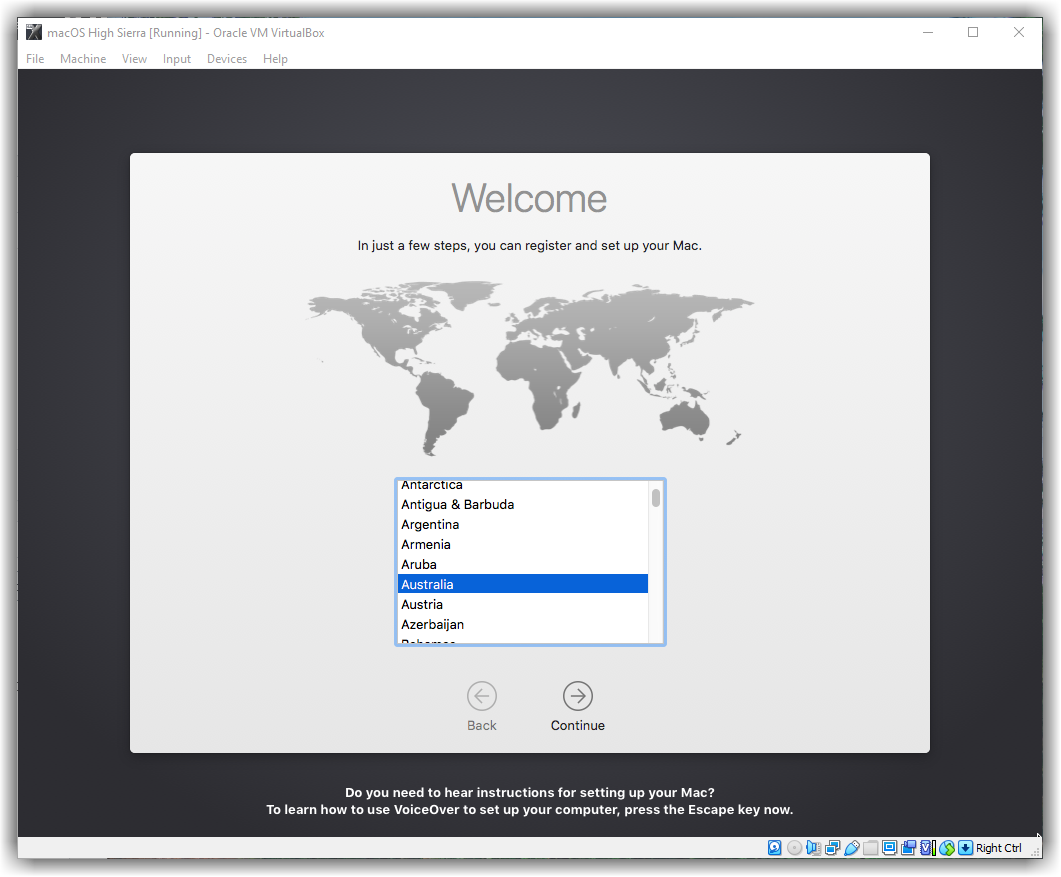
High Sierra Welcome Page
- Pick a keyboard Layout and click on Continue.
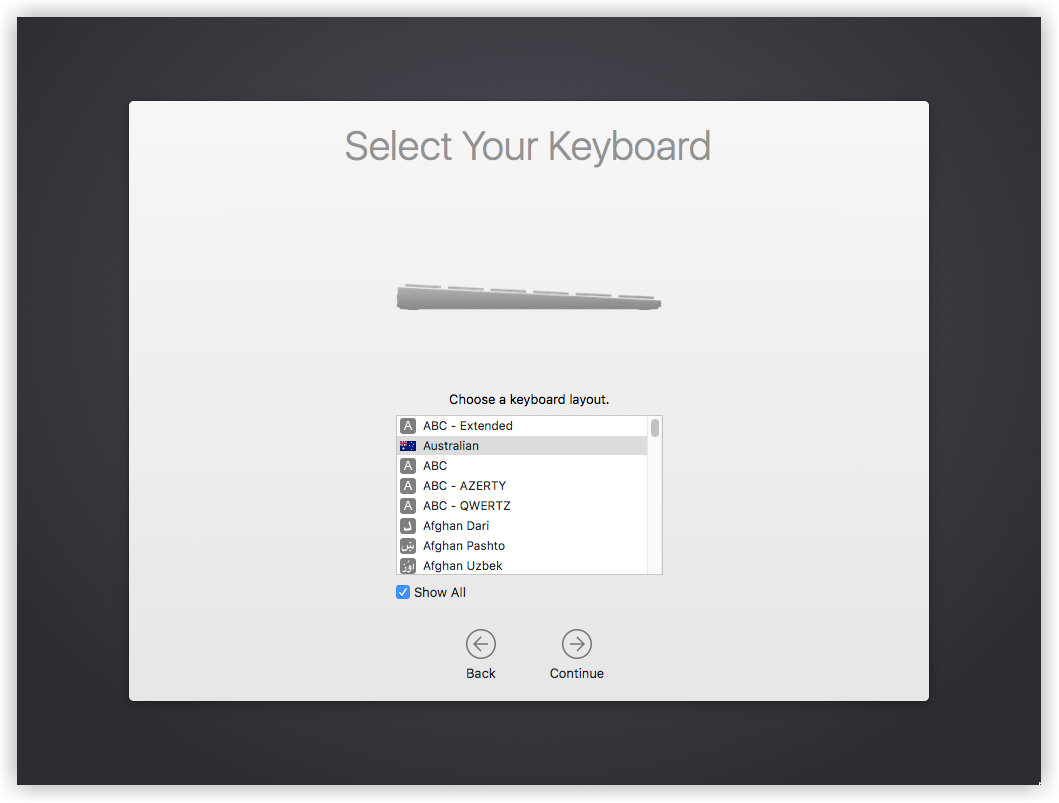
Select Your Keyboard
- Now, select Don’t transfer information to this Mac and click on Continue.
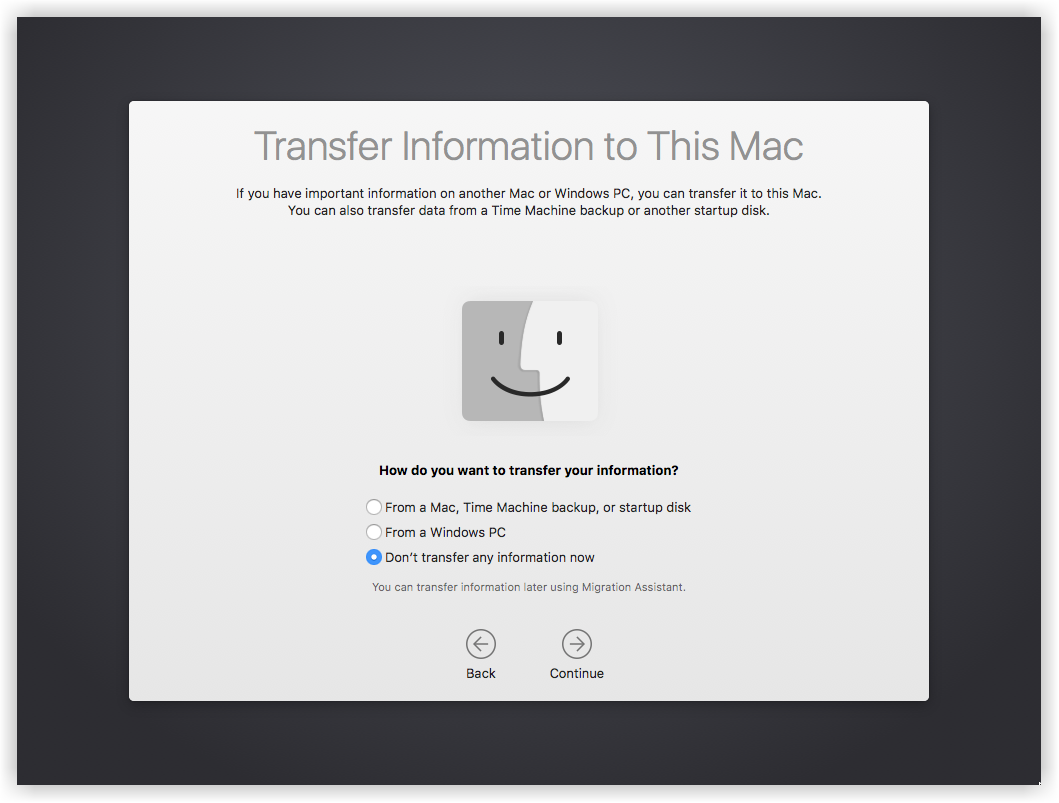
Don’t Transfer any Information Now
- In this step, you can Sign in with your Apple ID. If you don’t have one, create a free Apple ID by following this article, “how to create an Apple ID on iPhone, iPad or iPod Touch”. We recommend to not log in with your Apple ID at this point. Just select Don’t Sign in and click on Continue and Skip.
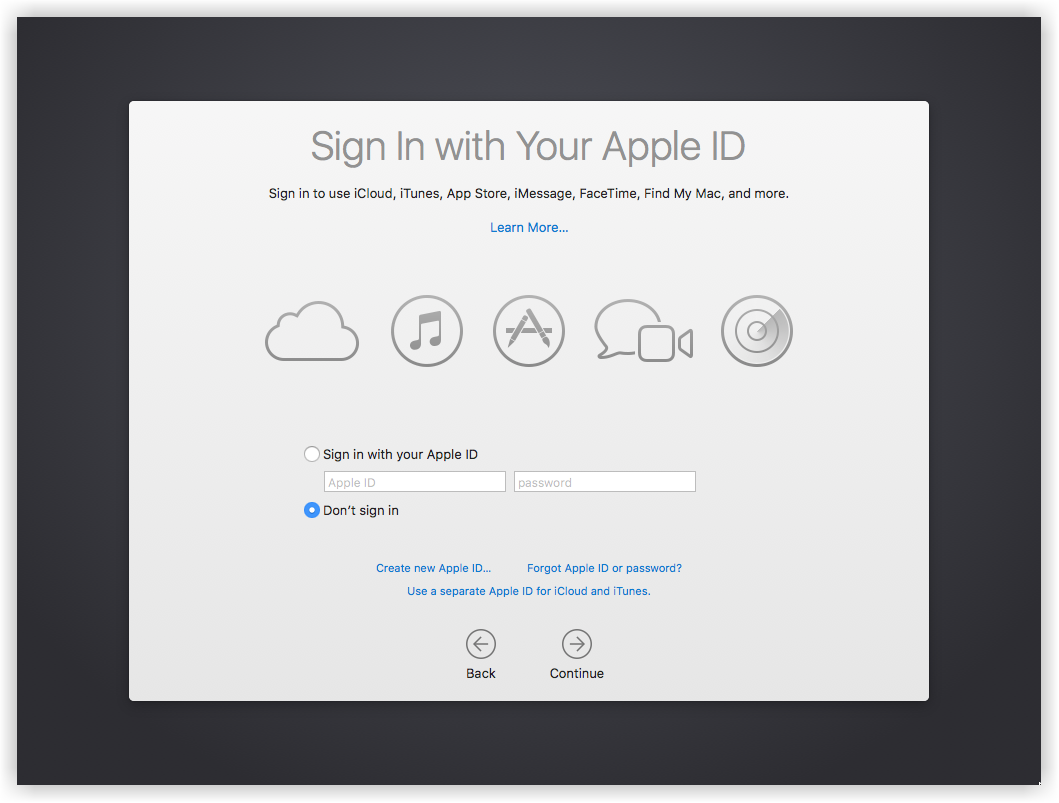
Sign in with Your Apple ID
- Agree to the Terms and Conditions.
- Fill out the Full name, Account name, Password, Hint, and click Continue to create your user account for macOS High Sierra.
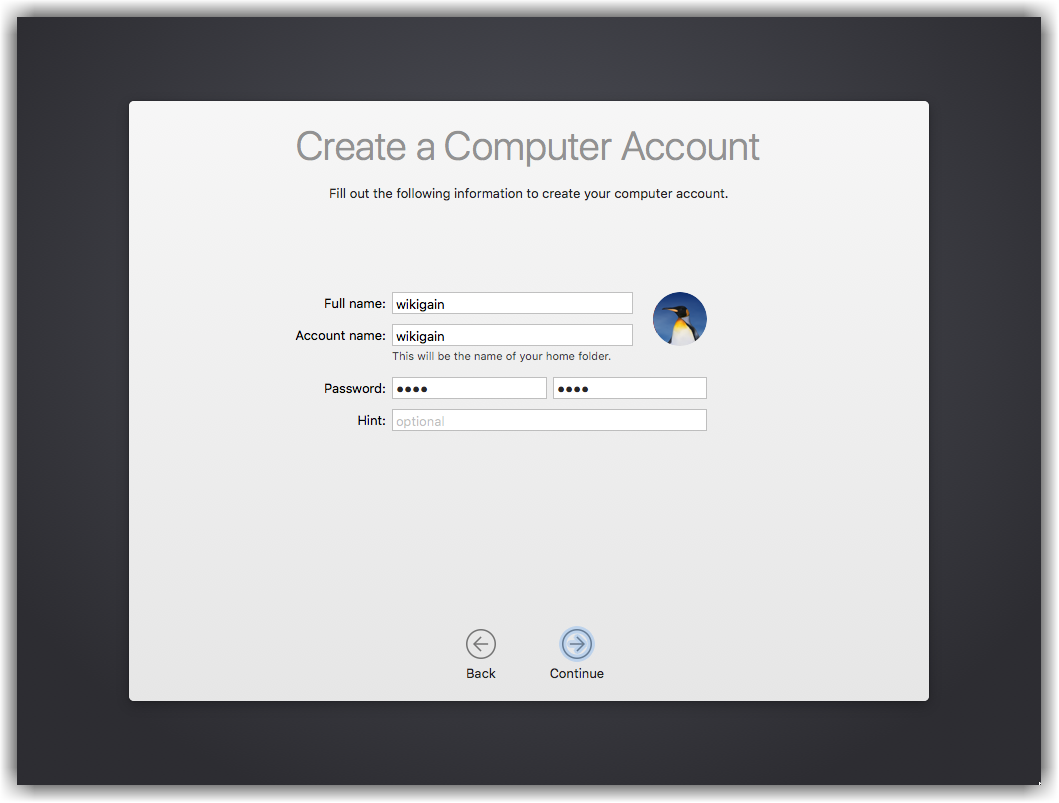
Create a Computer Account for High Sierra
- Click Continue on Express Set Up page. Wait a little while to Setting Up Your Mac. Then it will run on the desktop of the macOS High Sierra.
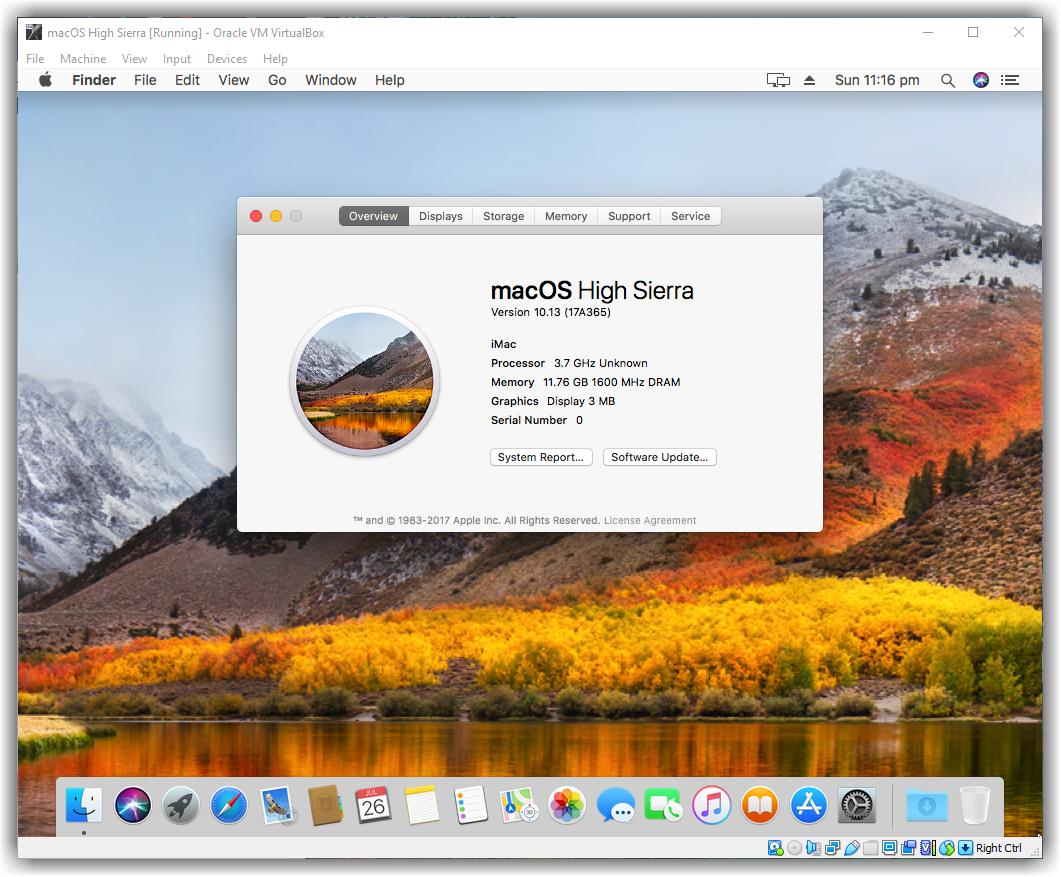
Installed macOS High Sierra on VirtualBox
Important: For any kind of error while installing Mac OS X El Capitan and macOS High Sierra visit this article.
Step 7: Update macOS High Sierra to the Latest Version (Optional)
You should do this step if your macOS High Sierra is not updated and not the latest version. So, you can update it by following the instructions below.
- Click on the Apple logo at the top-left corner of your screen and click on the App Store.
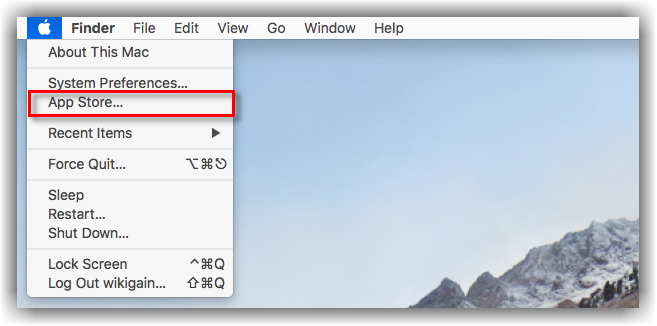
High Sierra App Store
- On the App Store window, click on Update. You’ll see Software Updates are available.
- Now, you should see different kinds of updates are available. Just click Update All. Click Download & Restart.
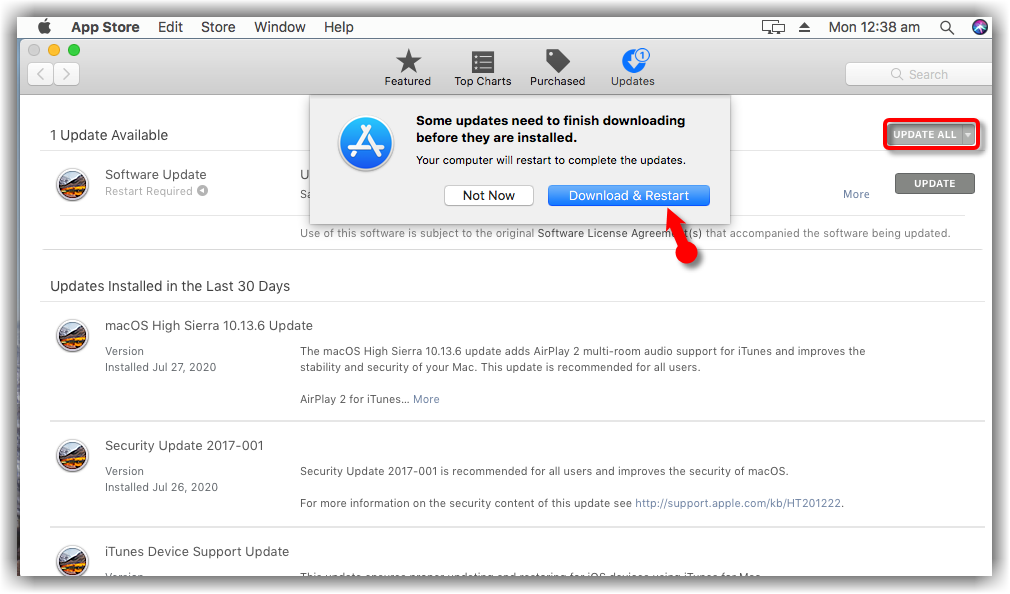
Software Update Available for High Sierra
- Wait for a couple of minutes so that the update should be installed. It might take 5-15 minutes to download all updates. However, it depends on your internet speed.
- Once the update is downloaded, your system will restart automatically. Again wait for 15-20 minutes for update installation.
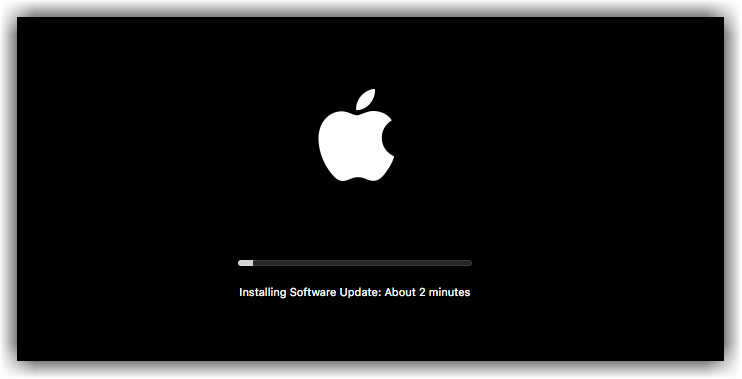
Installing Updates
- Once the installation update process finishes, you’ll see the macOS High Sierra login page. Type your user account name and password and log in. If you check our below screenshot with the one on Step #6 of this guide, the last screenshot. You can check that our macOS High Sierra (17G14019) July 15, 2020, is updated to the latest version.
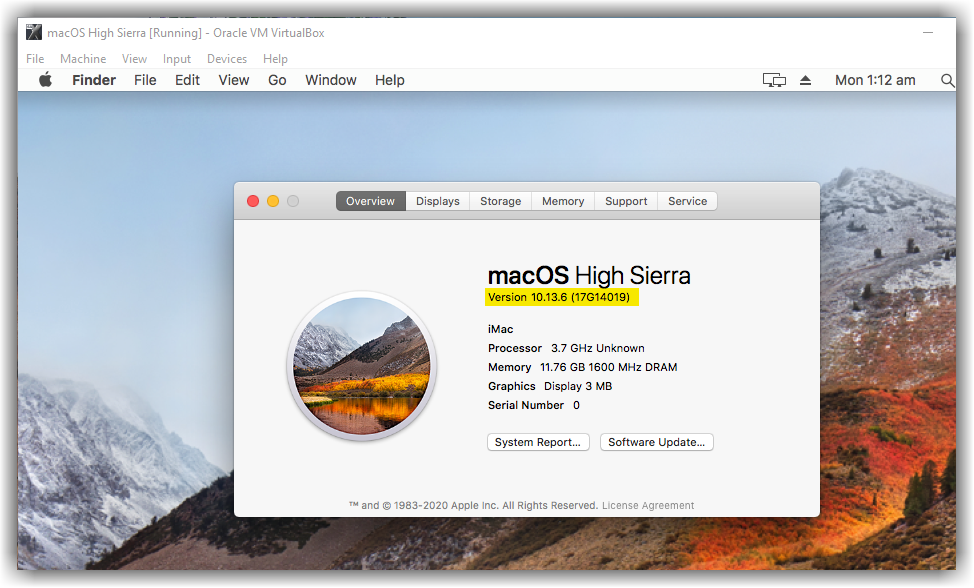
macOS High Sierra Updated to the Latest Version
See Our other Useful Guides:
- Fix macOS Sierra Screen Resolution on VirtualBox
- Install macOS High Sierra on VirtualBox
- Install macOS High Sierra on PC Hackintosh 2018
- How to Install macOS Sierra on PC
- How to Dual Boot Windows 10 & macOS Sierra on PC
- Post Installation of macOS Sierra on PC
Summary
In this guide, we have covered the following steps. These are the summarised of the above steps.
- Download the Prerequisites
- Install VirtualBox on Windows PC
- Install & Update VirtualBox Extension (Optional)
- Create a New Virtual Machine for macOS High Sierra
- Execute the VirtualBox Code
- Perform a Clean Installation of macOS High Sierra
- Update macOS High Sierra to the Latest Version (Optional)
If you have any kinds of questions or have suggestions on how to install macOS High Sierra on VirtualBox, feel free to leave a comment down below this post and will answer your every question and get your suggestion for our future works. Thanks for being with us.
i followed all instructions carefully, but when i start it up, there is white text, but it loads indefinitely!
For me it seems that the newest version of High Sierra: 10.13.6 won’t work with VirtualBox. I tried two things:
* First the install of the file: “macOS High Sierra 10.13.6 (17G66) Latest”, but I got the start shell. Somebody mentioned that It is possible to select the boot device. I tried that, but I got: “mac os could not be installed on your computer installer resources have expired”
* Then I tried “macOS High Sierra 10.13 (17A365) Stable”. This worked. Afterwards, I did the update, but the system didn’t boot again.
So, I guess VirtualBox is not compatible with that macOS. I’m using VirtualBox version: 6.1.16.r140961
just boots internal shell instead of choosen vmdk file – any advice??
I am slowly getting closer and closer to having it work on my machine… so far I have had to do the following:
I have a Ryzen 5 3600 CPU and that seems to be incompatible. Next to all the code mentioned in the guide, I also ran:
VBoxManage modifyvm “VM Name” –cpu-profile “Intel Core i7–6700K”
After that, I did the following:
1. At UEFI prompt: Type exit
2. Select Boot Maintenance Manager
3. Select Boot From File and click
You should see some entries, select macOS HD -> macOS Install Data -> -> Boot Files -> boot.efi
I get all the way to a screen that says “mac os could not be installed on your computer installer resources have expired”
Maybe you will have better luck though.
I have an Intel i7-7700HQ, but it didn’t work as well, so, I did what you said. There is a slight difference on step 3. On my case it should be:
* Select Boot From File > macOS HD > macOS Install Data > Locked Files -> Boot Files -> boot.efi
I guess you forgot “Locked Files”. On my case, it started to install macOS, but it ended with:
“mac os could not be installed on your computer installer resources have expired”
Same thing happens when not using the cpu-profile option.
I could solve my problem. This is what I did:
* Instead of “macOS High Sierra 10.13.6 (17G66) Latest”, I chose: “macOS High Sierra 10.13 (17A365) Stable”
* When creating the VM, if you name it like: “macOS HIgh Sierra”, it will suggest you: “macOS 10.13 High Sierra (64-bit)” unter “Version”. There, I changed it by: “Mac OS X (64-bit)”
I’m not sure, which of those options fixed the problem. I think it may be the second one, but since it takes long time to download the latest High Sierra version, I won’t tried this.
Ok, I gave a try to: “macOS High Sierra 10.13.6 (17G66) Latest”, but it didn’t work, so, I guess that image may be defect. With the file: “macOS High Sierra 10.13 (17A365) Stable” works on my case.
Hello,
I followed all the steps to install the file from this link: https://www.mediafire.com/file/pcc32brhn50x6uk/macOS_High_Sierra_10.13.vmdk/file
But when I start the VM, it isn’t installing.
See the print of the screen here: https://ibb.co/19Rp0xV
Can you help me?
Regards!
I have exactly the same problem is there any way I can fix this issue
this message Appear when start the Moc “BSD PRpcess Name corresponding to current thread :ernal _Task
attempting system restart Mach reboot
this message Appear when start the Moc “BSD PRpcess Name corresponding to current thread :ernal _Task
attempting system restart Mach reboot
It does not work for me. I use VB 6.1. When I start the machine I get the cmd line screen with Mapping table BLK0 and BLK1 and Shell> but notthing else!!!!!
hi , i have the same problem ! did find the solution ? if so please help me bro i’m struggling here <3
See my reply to the parent comment, I hope it helps.
I am slowly getting closer and closer to having it work on my machine… so far I have had to do the following:
I have a Ryzen 5 3600 CPU and that seems to be incompatible. Next to all the code mentioned in the guide, I also ran:
VBoxManage modifyvm “VM Name” –cpu-profile “Intel Core i7–6700K”
(apparently its incompatible with certain CPUs and you have to trick it)
After that, I did the following:
1. At UEFI prompt: Type exit
2. Select Boot Maintenance Manager
3. Select Boot From File and click
You should see some entries, select macOS HD -> macOS Install Data -> -> Boot Files -> boot.efi
I get all the way to a screen that says “mac os could not be installed on your computer installer resources have expired”
Maybe you will have better luck though.
Can you upload the iso file again, please?? Because when I click on the one at the top of the guide it says that it has already been downloaded too many times
am running mac os high sierra but i cant connect my ifone to high sierra i have installed all usb setting and extension but cant see my ifone in high sierra……..any suggestionss ?????
why my devices are not recognized on the VB ! pls help
Hi, I started vm but I see a black screen and it doesn’t appears the white words , how can I do?
I am having difficulty upgrading from macOS High Sierra 10.13 to macOS High Sierra 10.13.6 on Virtualbox. The upgrade appears to finish installing, but nothing changes. This update is needed for XCode 10 installation.
Hi i get this error
(VERR_NEM_MISSING_KERNEL_API).
VT-x is not available (VERR_VMX_NO_VMX).
Result Code:
E_FAIL (0x80004005)
Component:
ConsoleWrap
Interface:
IConsole {872da645-4a9b-1727-bee2-5585105b9eed}
Can i install mac os high sierra on 32 bit virtualbox
I’m pretty good with this stuff, but this has me stumped … I went through your process VERY specifically (even deleted and started over) … but no matter what OS I select, it still starts to a black screen … nothing moves.
I’m on an 8 core Windows box with 64GB RAM so I allocated it 32GB ram and put the vmdk file on the local SSD drive. Should have plenty of resources…
Any thoughts?
hi how to update high sierra 10.10 to 10.13.6 ???
any help is appreciated
First, make sure that your system is compatible with macOS High Sierra 10.13.6. If the answer is Yes follow the steps below.
1. Go to App store and Download macOS High Sierra latest version.
2. After the download has completed then a window will appear that telling you to install.
3. Follow the window instruction.
Follow this guide if you hesitate.
And where are the requirements of macOS High Sierra 10.13.6 in terms of Intel processors? I only found the requirements for 10.13, which is at least an i7 of the sixth generation.
i having problem is bootloop!
Updating macOS 10.13 to 10.13.6 under VirtualBox seems to require the method described here.
https://tobiwashere.de/2017/10/virtualbox-how-to-create-a-macos-high-sierra-vm-to-run-on-a-mac-host-system/Friends, I configured 128MB of video memory in VirtualBox but the Mac OS only recognizes 4MB.
Does anyone know how to solve it?
I followed the hole tutorial and after starting the vm it gets looped with gI0ScreenLockState 3………..
hi , ho can i decreasery space on drive cause 100Go is too muche for me
Hey dear, you can’t do that, for that we have to create a new file, which is very time consuming for us. Sorry for that but now we can’t do it.
I am not able vmdk file from download1.hfsx
hi Friend after running commands, i click on start button on virtual box and its just showing me blank screen without any information. Please help me on this
Hello,
i: Change the Video Memory Size to 128 MB from Virtual machine settings
ii:Change operating system version from macOS 10.13 High Sierra (64-bit) or macOS 10.12 Sierra (64-bit) to just the Mac OS X (64-bit)
Is there a way to transfer files to this macOS from my windows host?
Thank you.
Not on VirtualBox but you can transfer files from your windows host to macOS on VMware. https://www.wikigain.com/install-macos-mojave-on-vmware-windows/
Hi does anyone know if it is possible to run this on older CPUs? I would be interested to know.
In my testing I could only get this booting on a system with an Intel Coffee Lake CPU, otherwise it would just give a blank screen, or hang at the line Got boot device =
Did you select Mac OS X 64 bit as a version??
Yes I changed the version to Mac OS X (64-bit) but get the same issue
Get help from this article: https://www.wikigain.com/fix-macos-high-sierra-error-virtualbox-installation-proccess/
Then run the code properly. Change your VM name in the code. Quit VirtualBox before executing the code.
Hi I have followed the article and used the code but still have the same issue.
Hello dear, What the error you faced so we can suggest you, what to do?
Hi,
Thank you for the tutorial, it is really great. Though, I have a problem: I can start my VM and use it normally, but it is painfully slow.
VirtualBox and my VM are on a SSD disk. I give more than 6 Go of RAM to the VM, and it is still really slow.
What can I do for that?
Thanks for the guide.
But I have a problem. I just download macOS 10.13.5 High Sierra iso file from another source and searched through the internet for an installation guide and found your page. And during following the guide, found out that I don’t have any ‘vmdk’ file. Could you give some download link or email me only the vmdk file, please? Or I have to download the whole 5-6 gigabytes again?
Here is the link for macOS High Sierra VMDK File.
This worked great. I have tried before with other systems and had problems, but this was very easy to get MacOS up and running. The only problem is the reason I wanted MacOS is to run Xcode, but the current Xcode requires at least 10.13.2 but the image here is only 10.13(.0)
I haven’t yet worked out how to update the OS nor how to get a new later version image. It would be great if you could do an update or another article about how to upgrade.
Try this .iso, its 10.13.4: https://drive.google.com/uc?id=1NCYqmwqgbt_PahzmVmiTtYw59lpArjV7&export=download
Hi Alvin, I cant install it, could you please make vmdk for this please
does this have any kind of malware or a keylogger?? I don’t wanna get hacked
I get this error on boot, can I have some help?
Error allocating 0x1835 pages at 0x0000000001c95000 alloc type 2
Error loading kernel cache (0x9)
Any help will be appreciated
I have this same issue, did you figure it out?
Excellent guide. Thanks for the resources and instructions!
You’re welcome
I have install mac OS Sierra 10.13 on my Pc windows 10. We require xcode on it but it tell require 10.13.4 version. when I try to update 10 10.13. 4. It restart after update and show me same version. kindly guide me how to upgrade Mac to 10.13.4. It very urgent.
Thanks
I need Xcode to be installed on the virtual Mac, but it needs at least High Sierra 10.13.2. I tried to update it to 10.13.4 in the app store, but after restart I got the original 10.13.0. Any help could be a big one. Thx
I have done every step tried different version of tb new old and then old and new again tried multiple time of reinstalling and im still stuck on a black screen that has nothing on it
this was incredibly useful
Thank you!
Thank you very much.
Easy process that worked really well on Linux too, just having to tweak the VBoxManager commands a little. Thanks for the guide!
You’re welcome and thank you for sharing your feedback.
Hi nobodei,
How did you do step 5 on your linux system? I will be lgad if you can explain this to me.
Okay guys so I manage to go through step 5 and it worked well. Thanks
Hi saint,
Virtualbox’s network settings should be identical whether on Windows or Linux, and on both platforms, using the guide’s defaults (also the Virtualbox defaults for me) worked.
Does the machine work, but you simply lack an internet connection? If so, it could be as simple as ticking the “connect network adapter” box on the VM’s panel. Otherwise, and this might sound dumb if you already did it, but make sure you added the extension pack to Virtualbox since things probably won’t work/show up without it. Odds are you’ve tried these already but good luck!
Hi there! I’d like to install the Xcode App but it asks for a v10.13.2 or later, and when I try to upgrade it doesen’t work. Can you help me, please? Thanks in advance.
Did you figure this out?
Could you find solution for the upgrade issue?
I did all necessary steps needed to do after that the booted it worked perfectly but when it finished everything it rebooted again resulting in the codes coming back
Same here…
Same here.
Is there any fix?
My fault. Names on step 5 were not the same.
Thank you for feedback. Good luck
Has someone already connected and used with iTunes his iPhone to the High Sierra virtual machine?
OK. having an issue with amd ryzen 3 cpu running on win 10 professional. vm loads but only see a black screen. already changed all of the video settings to ones stated before. any suggestions for a fix?
You can follow this updated guide: https://www.wikigain.com/fix-virtualbox-macos-high-sierra-screen-resolution-1920×1080-4k-5k/
I have a problem with the USB devices.
The VM has been perfectly installed. Everything is working. I’ve installed xCode. However, I can not connect my iPhone to this VM. Indeed, I have activated all the options in USB (2.0), I mounted my iPhone and when I launch the VM, the iPhone is well captured however I do not access to it.
Itunes tells me that no device is connected to my VM.
I do not know where the problem may come from. I tried everything, but to no available.
I use as host Windows 7. The version of virtual box that I use is 5.2.8. I installed the oracle extension which has the same version of virtual box.
If anyone could help me.
I’ve tried many sites macos high Sierra installing on virtualbox 5.2.x but got same error: I start the vbox, then it shows virtualbox logo, then it shows codes in black screen, then it restarts the VM and again the same process repeats. I’ve tried many solutions and many other sites macos. Please give me any solutions for this problem to fix. Thanks in advance. From regards Chandra Das
Select the version Mac OS X 64 from VirtualBox Settings.
Also done not helped
I cant find the 64bit stuff on virtualbox. help
You need to enable Intel VT or AMD VT from your computer BIOS.
“Welcome” instalation screen freezes when I try to choose a language… :/
The VM is slow even if I’ve set all the memory and processor settings. Any idea?
The virtual machine it’s really slow. Is this normal? I’ve set 128MB video memory and 4GB RAM and 4 CPU and I have 16GB RAM on my host. Any idea?
How can I increase VRAM (Display ram from within iOS)?
Umm.. so for those of us with unstable internet connections, any chance of getting a .torrent version of this 5GB+ file. Thanks if it’s doable.
when I paste this command line(
VBoxManage setextradata “MAC” “VBoxInternal/Devices/smc/0/Config/DeviceKey”
“ourhardworkbythesewordsguardedpleasedontsteal(c)AppleComputerInc”)
tells me it is not recognized as internal or external command
What’s your Virtual Machine Name that you’ve created?
virtualbox showed the error at startup, it was enough to disable it in the USB options 🙂
All virtual box versio code is same are not?
No, they are different. You’ve to run all the code to cmd one by one. Make sure quit VirtualBox before running the code.
Thank you so much! It just works)
Welcome and thanks for sharing your positive feedback dear.
Great work. The install works fine. For going full screen I used next command: VBoxManage setextradata “VM station name” VBoxInternal2/EfiGraphicsResolution 1920×1080
But I’m wondering if there is a fix for following issues which I am facing:
Location service: seems to fail. However my windows host is able to perform this without any issue. I guess this is the reason why Maps remains black as well.
iMessage and Facetime : unable to log in.
Mail and Safari: whenever I hover over a hyperlink, the full frame becomes black.
Currently, There is no fix to this issues on VirtualBox because macOS do not support it and but in VMware, there are not this issues.
Remember that iMessage and Facetime don’t work on VMware too because Apple knows that it’s not real MacBook or iMac then it can’t authenticate.
It worked! Thank you so much for providing this tutorial.
I am experiencing 1 problem, cannot log in to itunes for use of imessage.
Any insight on how to correct?
Hey dear, I am sorry but everyone has this issue, and it can’t be fixed right now.
It worked!
But i cannot connect to the internet.
I cannot select NAT Network…
Thanks for sharing your feedback. Quit VirtualBox and reopen then go to the VM settings and you should be able to select NAT.
P.S. make sure the Virtual Machine or macOS is shut down.
Internet is working after restarting and following Faiz Orz directions.
then I suggest you install macOS High Sierra on VMware because it’s supported there and work very well.
Step by step article: https://www.wikigain.com/install-macos-high-sierra-vmware-windows/
Step by Step video tutorial:
https://www.ytb.com/watch?v=34wxjQ8m_KsUpdated:
The video is removed from YouTube 'Sorry guys'Installed fine but no sound and is slow (6 gb ram assigned), any fix?
Thank you!
increase the process, and if you still didn’t get high performance, then I suggest you install macOS High Sierra on VMware because it’s supported there and work very well.
Step by step article: https://www.wikigain.com/install-macos-high-sierra-vmware-windows/
Step by Step video tutorial:
Updated: The video is removed from YouTube 'Sorry guys'For sound install unmodified AppleHDA.kext from 10.13.1 using Kext Utility 2.6.6. Remember to disable SIP first as you can’t change system kexts with SIP on. It should also speed things up little bit.
Thank you for the great job! Once installed, can it be updated within the guest machine/virtualbox?
Yeah it can be updated, but sometimes it doesn’t work then I don’t suggest you to update it, in that case, we will try to update the file to the latest version as soon as possible.
Very Helpful! I now have maxOS and Xcode running on my Windows 7 after following the steps and using the files provided here! Thank you very much!
Welcome and thanks for sharing your feedback. It really motivates other visitors.
finally a solution. this article is best for people who want to run x code developer tool on the system.
I f anyone has a query regarding this .please emai to test5@addnip.com
Hello, I have VirtualBox installed on Linux Mint distro, do you know the right terminal commands for linux?
The commends are different for Linux.
Doesnt work with AMD A10-7860K
My VM only reboot and reboot.
Never start the instalation.
Follow this guide: https://www.wikigain.com/fix-macos-high-sierra-error-virtualbox-installation-proccess/
Hi,
First, thank you for these guides, they are really helpful.
Unfortunately I’m still blocked before instalation. The VM only reboot again and again.
I followed every steps in your guide but still have the issue.
Do you have any other way to fix this?
Thank you!
Ok. Don’t know why but it works… I had just shutdown VM Oracle. Re-open CMD and enter each line one by one. Close it.
Start VM Oracle again and launch the Mac OS Virtual Machine and I can now reach the instalation. 🙂
Thank you again !
It’s great that you fixed the problem and shared your feedback with other visitors.
its work fine but its so slowly when i try to press anything its take a a time. plz hekp
There are several ways to fix slow performance of High Sierra but unfortunately, we don’t have the guide just search on google how to fix macOS High Sierra slow performance.
I am having a problem of boot looping of mac OS High Sierra in virtualbox and also In VMWare.
I am follow every step and also reinstall Virtualbox and VMware. But no solution yet.
First problem in my virtual box having black screen but it is solved changing mac 10.13 to mac 10x 64x selection, but bootlooping arises every time.
pls give me solution.
and very important thing why we not run this by dmg file of mac if we done this so giving me a new tutorial for this topic.
Is there a guide to installing High Sierra as guest OS, in VirtualBox that is running on a CentOS7 host? I am able to complete everything in this guide except for the commands run in a dos box in the windows environment. I am not sure how to translate those commands to Linux.
Thank you.
If you want to install macOS Sierra on your host system follow this guide:
How safe is this MacOS image? Any malware or keylogger installed on it?
I don’t think so. The Malware installed on MacOS
Installation was successful, but cant log into iCloud. Can you help?
Follow cat and Andrew video on youtube. It might help you
No matter what I do I can fix the black screen, ive tried everything, I mean everything and it wont fix it..
Once check out this guide it may help you. https://www.wikigain.com/fix-macos-high-sierra-error-virtualbox-installation-proccess/
I have follow all steps but it me this erorr after start the machine.
First i have select this version – http://prntscr.com/h30prb
but it show same error – http://prntscr.com/h30ova
then i have tried with this – http://prntscr.com/h30pnf
but same issue again.
please help me.
Select the VMDK file and try again
VBoxManage setextradata “macOS High Sierra” “VBoxInternal/Devices/smc/0/Config/DeviceKey” “ourhardworkbythesewordsguardedpleasedontsteal(c)AppleComputerInc”
that command give me error
Follow this guide and fix your issue
https://www.wikigain.com/fix-macos-high-sierra-error-virtualbox-installation-proccess/
Hi guys,
I have installed macOS according to all steps.
Here is Virtual Box ss (http://prntscr.com/h2lupc),
But it show black screen from last 10 min (http://prntscr.com/h2lvco).
Please help me to run the macOS my system.
My system Requirements are –
# OS – Windows 10 Pro
# Processor: AMD FX(tm)-8350 Eight-Core Processor 4.00 GHz
# RAM – 8.00GB
Get help from this guide: https://www.wikigain.com/fix-macos-high-sierra-error-virtualbox-installation-proccess/
Black screen problem by changing mac OS 10.13 high sierra(x64) to mac X (x64) in General Setting.
Hi there, thanks for this tutorial, it worked for me under Windows 7, i have a quick question, not sure if there is a solution for this:
Is there a way to change to make the screen bigger, i guess to run in full screen mode so that it can cover the whole screen, i found several methods online but none of them seem to work, any ideas?
Thanks,
Walter
That’s awesome and here is the guide to fix screen resolution: https://www.wikigain.com/fix-macos-high-sierra-screen-resolution-virtualbox/
I’ve followed the instructions, but the install screen goes through the inital white lines of text and then it reboots. Never gets to the Mac OS install splash screen.
The problem is this that you did not quit the VirtualBox before adding the code to cmd.
Also visit this guide for more info: Fix macOS High Sierra Issue
Anyone know how to fix Apple ID issues? I always get the same response:
“This action could not be completed. Try again.”
Help please!
Did you install macOS or No??
Yes, it worked fine. But logging to iTunes or App store fails with Apple ID. Any ideas?
I’m also having this issue!
Hi Rok,
Do you ever fine a fix to this problem?
Thanks,
Tim
No, no idea on how to solve it. It connects to the store, so it shouldn’t be a blocking issue… I don’t know.
Hello,
After I follow all the instructions, the VM turns and a screen flashes to a logo for an instant and then goes black. Windows 10 Pro, AMD Ryzen 1700, 16gb RAM, nVidia GTX1080, Gigabyte Gaming 5 AM4 motherboard
Follow the guide below to fix any issue on macOS High sierra.
https://www.wikigain.com/fix-macos-high-sierra-screen-resolution-virtualbox/
Hi, I followed all the instructions and tried everything in the comments concerning the ‘black screen’. When i start the VM some white logo pops up real quick in the VM monitor, and then it goes black and doesn’t do proceed to boot. I’m not sure if it enters POST or not.
You can fix your issue by following this guide
Hey man, I can not connect to the internet help-me!
Enable NAT network adapter from your VirtualBox settings.
My Mouse Works fine but Keyboard doesn’t but worked during setup
Once connect and disconnect your keyboard. It must work because other people do not have this issue.
I have the same issue! How did you fix it Akshit?
Hello!
I’m trying to connect my iPhone to the virtual machine and I have an error like the following:
Failed to create a proxy device for the USB device. (Error: VERR_PDM_NO_USB_PORTS).
Code d’erreur : NS_ERROR_FAILURE (0x80004005)
Composant : ConsoleWrap
Interface : IConsole {872da645-4a9b-1727-bee2-5585105b9eed}
Then when I disconnect the iPhone from the computer it restarts.
Do you have any suggestions regarding to this problem?
Thanks!!
Hello,
Go to your VirtualBox settings then find USB section. Click on it and make sure you select USB 1.1 (OCHI) Controler. If that does not work for you just check the other one.
Hello, I have a small issue with the macos, the install work fine, but when i try 2 modification, any modification like move a file or remove a program from the dock, the hole vm freeze and i don’t know why maybe something i miss somewhere. pls help me ^^
Follow this guide dear Psyka to fix your problem: https://www.wikigain.com/fix-macos-high-sierra-screen-resolution-virtualbox/
Thanks for the wonderful job, the only problem i have is about the audio and it crackles like a robotic voice. How can i sole this issue..
How to changer te resolution ?
To have 1920×1080 ?
Thanks
This guide to fix macOS High Sierra screen resolution will come soon. Stay up to date with us.
http://www.wikigain.com
facebook.com/wikigain
youtube.com/c/wikigain
Please post link here when you update how to fix screen resolution!
Stay up to date with us. Today or tomorrow. I’m going to post this (Fix screen resolution on macOS High Sierra on VirtualBox) article.
1 i downloaded the parts how do i combined them?
2 will macos uppdate automaticly?
Just right-click on one of the parts then extract it via Winrar or 7zip.
ok, i will try again today. can you tell me whats about old and new code? do we use just the new code? or both maybe?
First, use the old one if it didn’t work then give a try to the new code.
Use:
cd /D “C:\Program Files\Oracle\VirtualBox\”
(note the added /D to also change drive) in case you run the vbox code from a different drive such as D:
Also, I found that choosing just “Mac OS X (64-bit)” instead of macOS 10.13, etc, cured the black screen issue for me.
Thanks for sharing your feedback.
This actually worked for me. Thanks!!
Good 😀
How great you people are. I loved the way you share your opinion with other visitors.
How does one update such an installation? I’m on 10.13 beta 1 (17A264c), App Store sees an update to beta 6, but I tried installing twice, and it remains on beta 1.
I have tried to install this a couple times. I get to the screen with the coding installing it then it gets to the point where is says boot-args =usb=0x800 keepsyms=1 -v -serial =0x1 as the last line and it freezes from there and doesn’t move.
Do you quit VirtualBox before adding the code to CMD?
No i had virtual box open. Is that maybe my problem?
Yeah, You did not read the article carefully. Exit the VirtualBox before adding the code to cmd.
I thought it meant the virtual machine itself not the whole program. I will try that though. Thanks
Good luck
when i am trying to put the code in cmd i keep getting errors that these are not recongnised as commands
Did you change the Virtual Machine Name in the code?
I am not getting the white coding on the black screen. please guide me
Set your video memory to 128 MB, and change the operating system version to OS X (64).
Works, a little unstable at times but works. Cheers
This is the beta version. Some problems it has.
I know, was merely to make sure other people were aware
How to get imessages working?
Follow this guide to fix iMessage and Facetime
is it suppose to work, did you test it ?
We’ve not tested yet but this guy tested and has the video published. You can give it a try.
Worked like a charm. The only problem i had was VM was not giving me the option to implement a 64 bit virtual machine. All i had to do was to enable “virtualization” in the BIOS. Thanks!
Thanks for sharing your positive feedback dear and It would help a lot of other people also.
Sven, black screen indicate that 128 MB has NOT been assign to the Display. Make sure to slide the Video Memory indicator from left all the way to the right.
Regards
For Black Screen set your Video Memory to 64 MB and Chipset = PIIX3.
Got it working on VirtualBox on my first try! Great job man!
Thanks for sharing your positive feedback dear.
Did all steps multiple times. All ended with apple logo loading and then unresponsive grey screen. Please help.
Hey dear, you need to wait for a couple of minutes on the gray screen after that It will be live. Watch the video tutorial and make sure you didn’t miss any step: https://www.youtube.com/watch?v=Ig7ENAUY470
The links download a virtual disk file for VMWare, not Oracle Virtual Box.
It works for both VirtualBox and VMware.
did all steps two times, same result. a black screen with no code . running win 10 enterprise, amd a10 , 16gb ram
Something is going wrong, I’m pretty sure.
Again watch this video
Had the same problem. Try to change “Type” to “Mac OS X 64 bit”, worked for my Kaby Lake processor.
Thanks for sharing your Feedback dear Mark.
It worked for me too. Thanks.
You’re welcome dear and thanks for sharing your feedback 😀
Same Problem solved it like Mark thanks for this Hint
That’s great it worked for you.