Apple has announced the next major release of macOS at WWDC 2020. Available today in developer beta and coming to all users in fall 2020. macOS Big Sur will be a free software update later this year. In the meantime, the developer beta is available on https://developer.apple.com/macos/ and for public beta in July.
This OS has new features that include an all-new iOS inspired design, Control Center arriving for Mac, a revamped Safari with greater privacy controls, Apple’s new translation software that uses on-device processing, and more.
Macs compatible with macOS Big Sur (macOS 11):
- 2015 and later MacBook
- 2013 and later MacBook Air
- Late 2013 and later MacBook Pro
- 2014 and later iMac
- 2017 and later iMac Pro
- 2014 and later Mac mini
- 2013 and later Mac Pro
And Accordingly, the following models capable of running macOS Catalina will not be able to be upgraded to macOS Big Sur:
- 2012 and Early 2013 MacBook Pro
- 2012 MacBook Air
- 2012 and 2013 iMac
- 2012 Mac mini
Tip: before reading the rest of the article, it’s recommended to navigate to the Required File section of this post and download macOS Big Sur then you’ve time to read the item until the downloading gets complete.
Steps to Install macOS Big Sur on VirtualBox on Windows
- Install VirtualBox on Windows PC
- Install/Update VirtualBox Extension
- Create a New Virtual Machine & Customize it
- Run VirtualBox Code to the Command Prompt
- Start the Virtual Machine
- Perform Clean Installation of macOS Big Sur
- Summary
Important Note:
Before we get started, make sure your system can support Virtualization Technology (VT), and it is enabled from BIOS so that you should be able to run Virtualization software like Virtualbox or VMware. Also, you should have a 64-bit Windows operating system with at least 2 GB Ram and 20 GB of free storage, however, we recommend you at least 4 GB of RAM or higher so you can store more files and install more apps on macOS Big Sur.
Furthermore, if you have an SSD, it’s highly recommended to use it as storage because SSD is much faster then mechanical hard drive (HDD ) and macOS run on SSD very smooth. Anyway, it is not 100% compulsory but if you have, don’t hesitate to use it.
Required Files
- Download Virtualbox
- Download Virtualbox Code
- macOS Big Sur Beta 11.0 (20A4299v) Dev Beta 1
- macOS Big Sur Beta 11.0 (20A4300b) Dev Beta 2
- macOS Big Sur Beta 11.0 (20A5343j) Dev Beta 4/Public Beta 1
- macOS Big Sur 11.0.1 (20B29) Initial public release Latest
Note: You can create macOS Big Sur ISO Image.
Recommendation: It’s highly recommended to create a new drive on your Windows PC and install macOS Big Sur on that drive.
Step 1: Install VirtualBox on Windows PC
From the “Required File” section of this post, you should have downloaded VirtualBox as well and if you didn’t, download VirtualBox’s latest version and install it on your Windows system. If you’ve already installed VirtualBox, then you can skip this step. Other than that, double click on VirtualBox Setup and click Next for a couple of times and you’re done with the installation.
Step 2: Install or Update VirtualBox Extension
This step is not 100% percent necessary but it’s highly recommended to do this step because macOS Big Sur might not be compatible with VirtualBox and for this reason, it will cause a problem during the installation. Download VirtualBox Extension and follow the steps below.
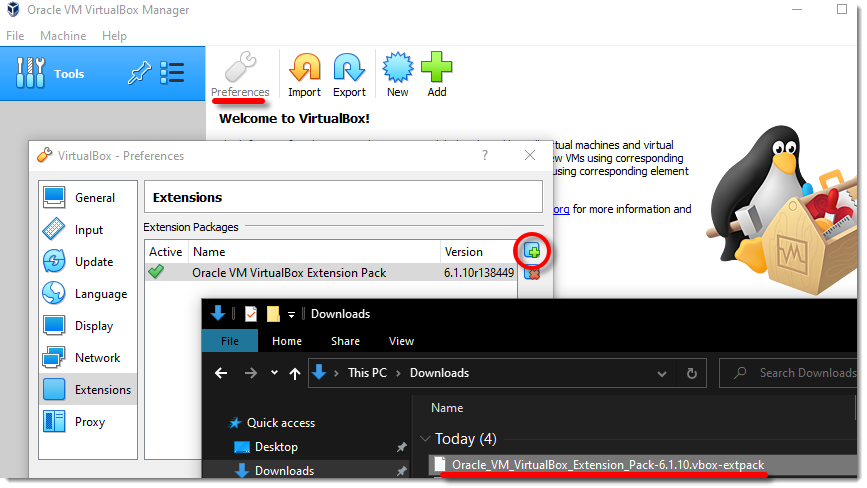
#1. Open up VirtualBox, navigate to Tools>Pereferences>Extensions.3
#2. Click on Plus icon and select VirtualBox extension which you’ve downloaded at the beginning of this section. Click Install or Upgrade and then click OK button.
#3. Finally, you should see something like the screenshot below.
Update Virtualbox Extension
Step 3: Create a New Virtual Machine & Customize it
Creating a virtual machine for macOS Big Sur is the same when you create a virtual machine for the Windows Operating system or Linux. We will use the ISO image of macOS Big Sur to do the installation process.
Note: We’ll make the VMDK as well if we receive lots of requests for that. Otherwise, there is no point because you can install macOS Big Sur with iso image as well.
#1. Open up your VirtualBox application and click New.
#2. Type a name for your Virtual Machine. Click Expert Mode and choose the following options then click Create.
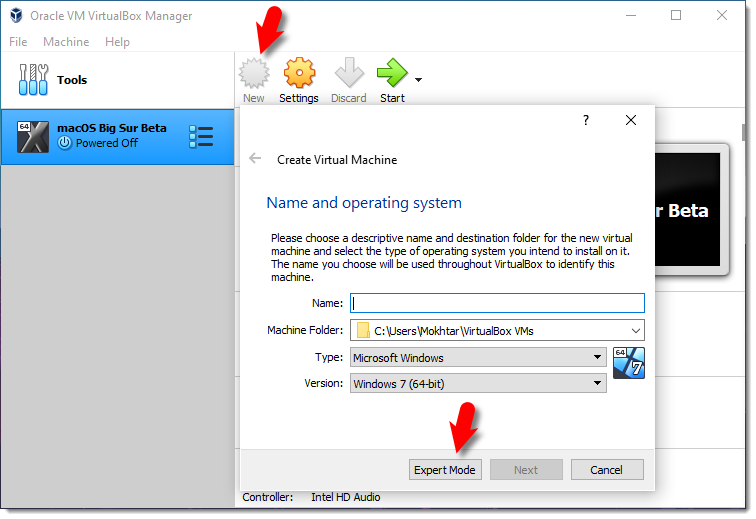
Expert Mode
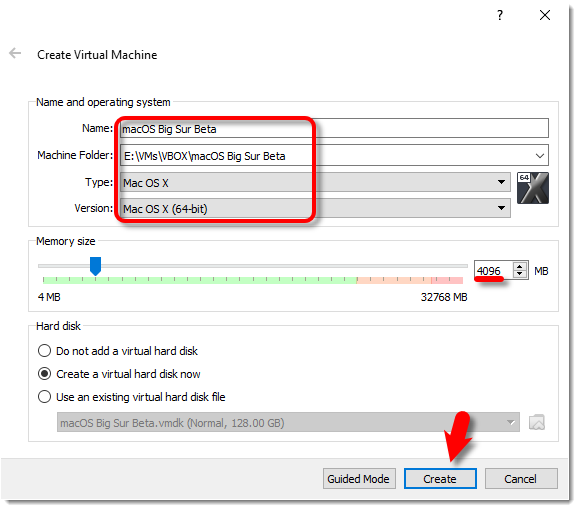
- Name the VM
- Virtual Machine Location (a separate drive is recommended)
- Type (Mac OS X)
- Version (Mac OS X 64-bit)
- Memory 4 GB (recommended 8 GB or higher)
- Create a virtual hard disk
Create New Virtual Machine
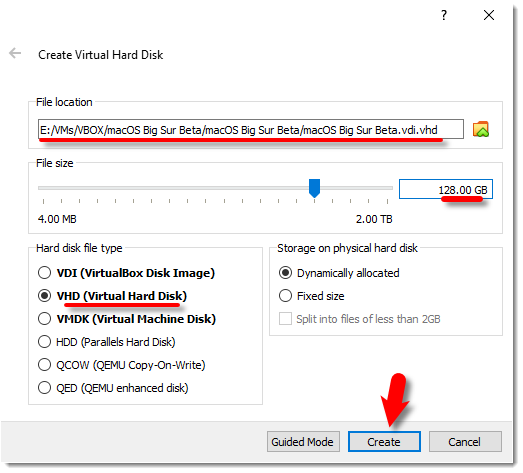
Create Virtual Hard Disk
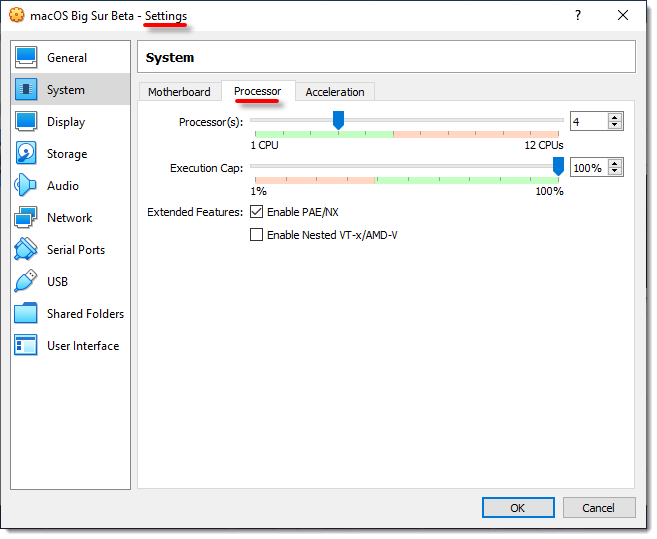
Increase the Processor
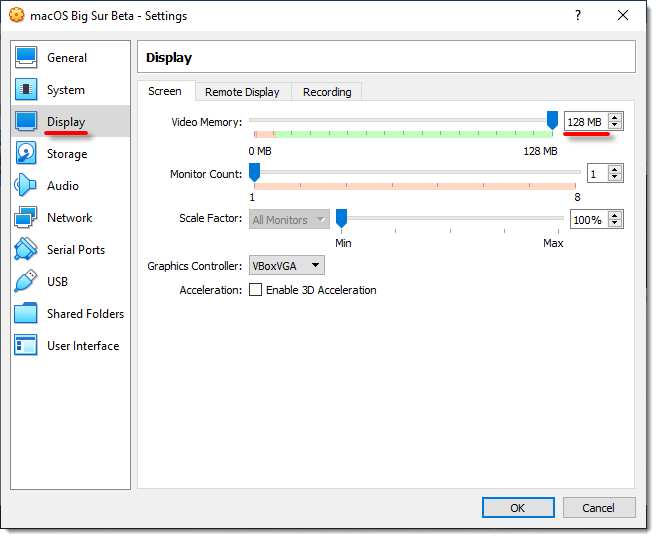
Increase Video Memory
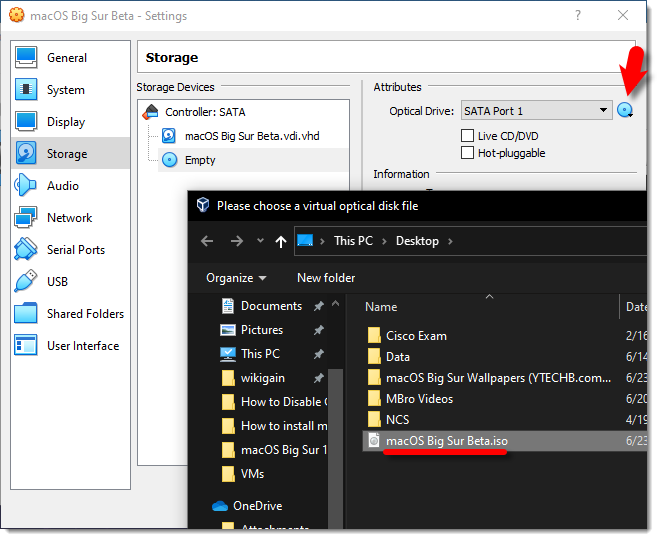
Select ISO Image
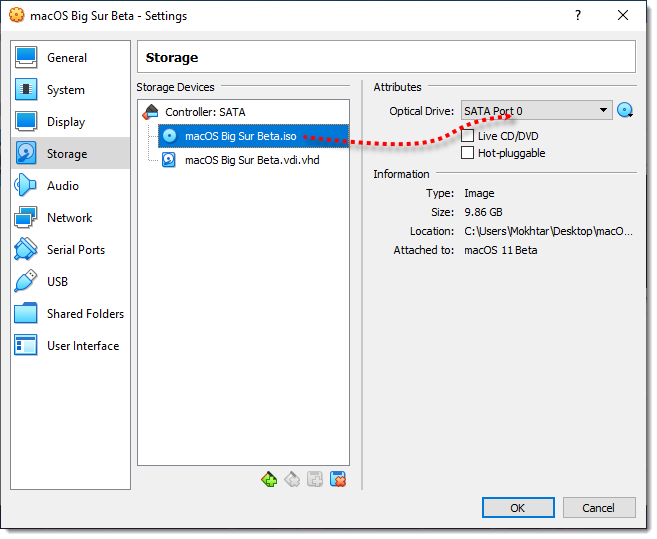
ISO Image SATA 0
Once you’ve created and customized your virtual machine, it’s time to run some codes in order to install macOS Big Sur on VirtualBox.
First, you should notice your virtual machine name because later on, we will use it. Open the VirtualBox code which you should have downloaded from the Required File section of this post.
#1. When you opened VirtualBox code via notepad or any other text editor, use the replace function of the program to replace the VM Name to your virtual machine name. See the picture below to get an idea of how it’s done.
cd "C:\Program Files\Oracle\VirtualBox\"
VBoxManage.exe modifyvm "VM Name" --cpuidset 00000001 000106e5 00100800 0098e3fd bfebfbff
VBoxManage setextradata "VM Name" "VBoxInternal/Devices/efi/0/Config/DmiSystemProduct" "iMac19,1"
VBoxManage setextradata "VM Name" "VBoxInternal/Devices/efi/0/Config/DmiSystemVersion" "1.0"
VBoxManage setextradata "VM Name" "VBoxInternal/Devices/efi/0/Config/DmiBoardProduct" "Mac-AA95B1DDAB278B95"
VBoxManage setextradata "VM Name" "VBoxInternal/Devices/smc/0/Config/DeviceKey" "ourhardworkbythesewordsguardedpleasedontsteal(c)AppleComputerInc"
VBoxManage setextradata "VM Name" "VBoxInternal/Devices/smc/0/Config/GetKeyFromRealSMC" 1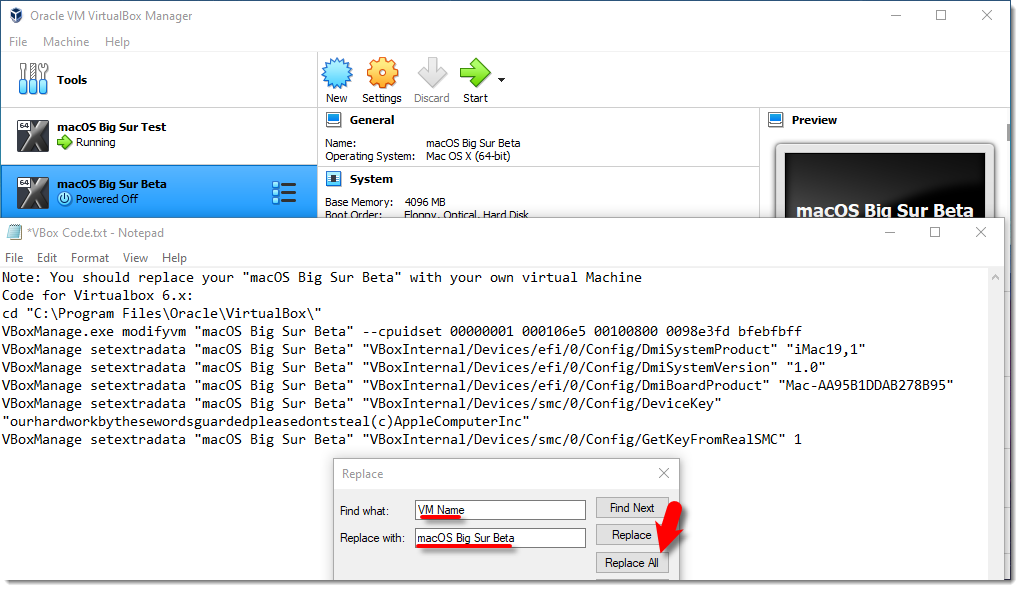
Replace VM Name
Tip: It’s highly important that you should quit the VirtualBox program before executing the code. If you don’t do it, your virtual machine might not proceed to the installation step.
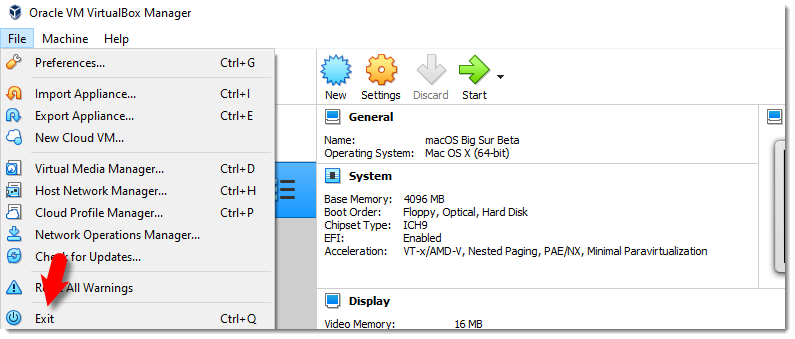
Exit VirtualBox
#2. Once you replaced the “VM Name” with your virtual machine name, then run the code one by one to the command prompt (CMD). You can open the command prompt by pressing Windows+X key in Windows 10 or click windows key and type CMD and run command prompt as administrator.
Step 5: Start the Virtual Machine
Starting macOS Big Sur with the older version of the Mac Operating system was a bit different, but with new macOS Big Sur still, it’s easy to set it up.
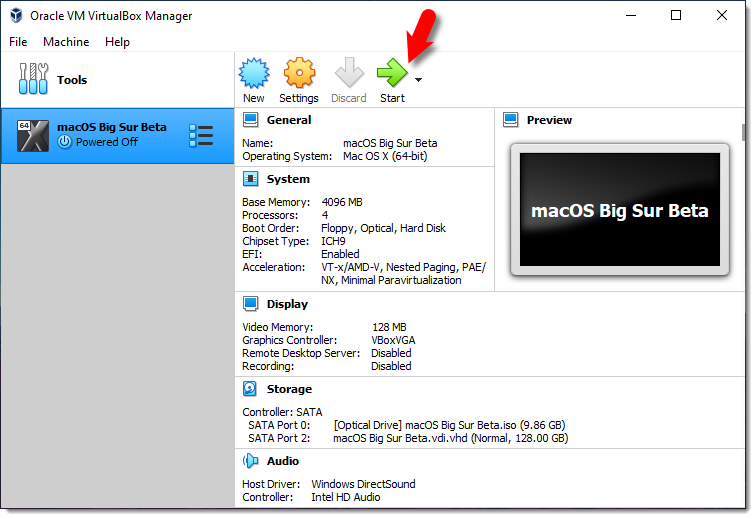
#1. Open the VirtualBox app then click the Start button. A black screen with a few yellow & white text will appear on the screen.
Start Virtual Machine
#2. Once you started the VM then you’ll see some code running in the background. Just wait until you see the Apple logo.
#3. Select a Language and click Continue arrow.
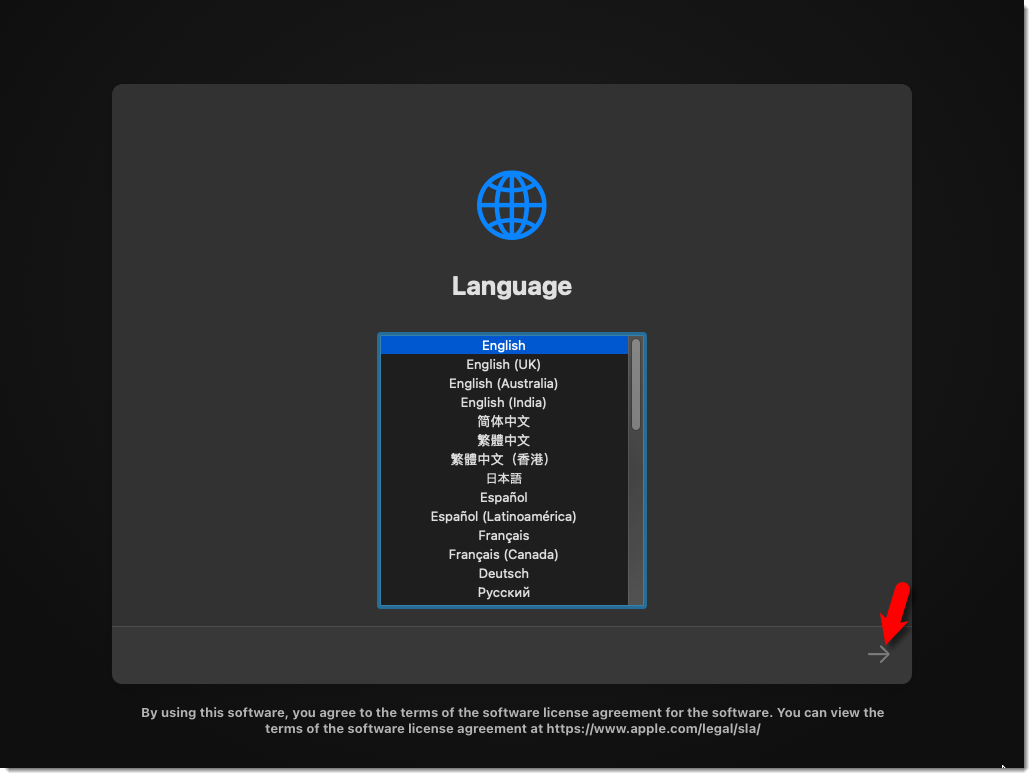
Select Language
#4. Select Disk Utility and click Continue.
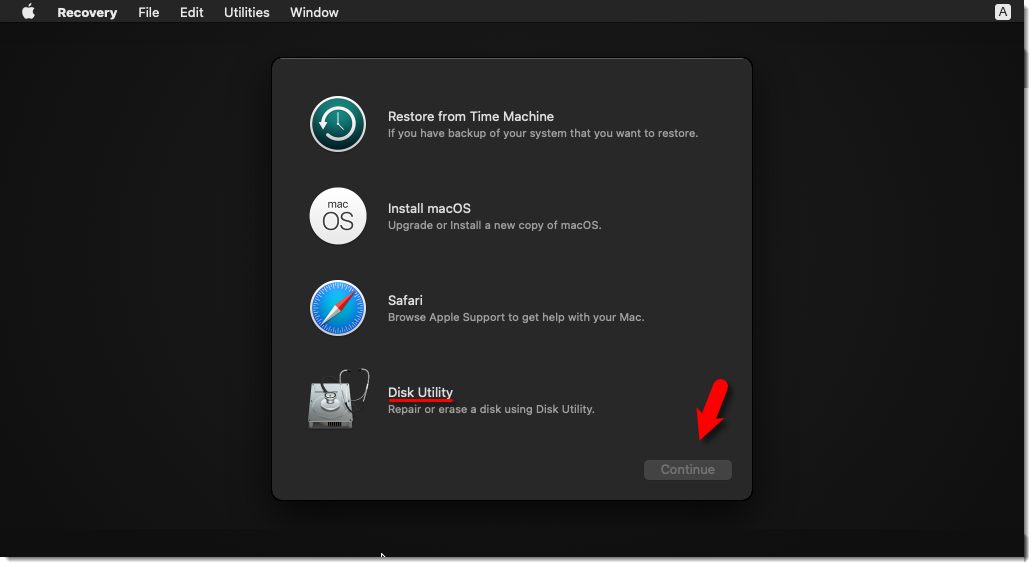
Select Disk Utility
#5. Select your main Virtual Disk and click the Erase button. Make sure to check the size of the disk and you should not erase the wrong disk.
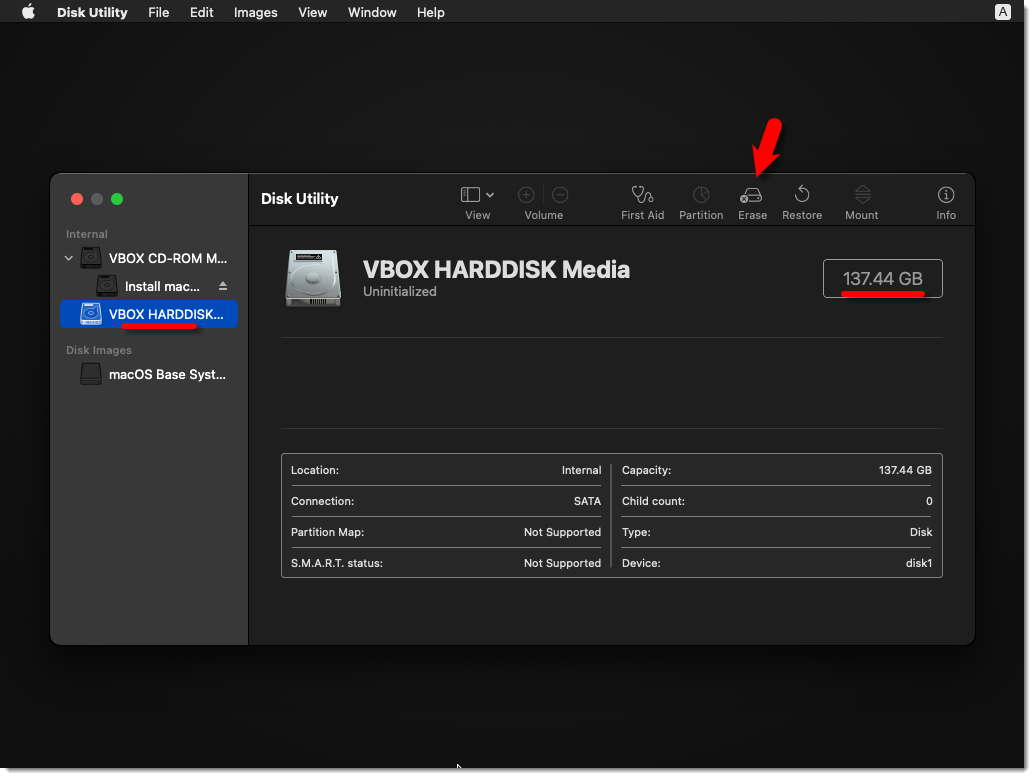
Erase Virtual Disk
#6. Name your Disk that you want to install macOS Big Sur on it. I’ll name here macOS HD. Once typed a name then click the Erase button.
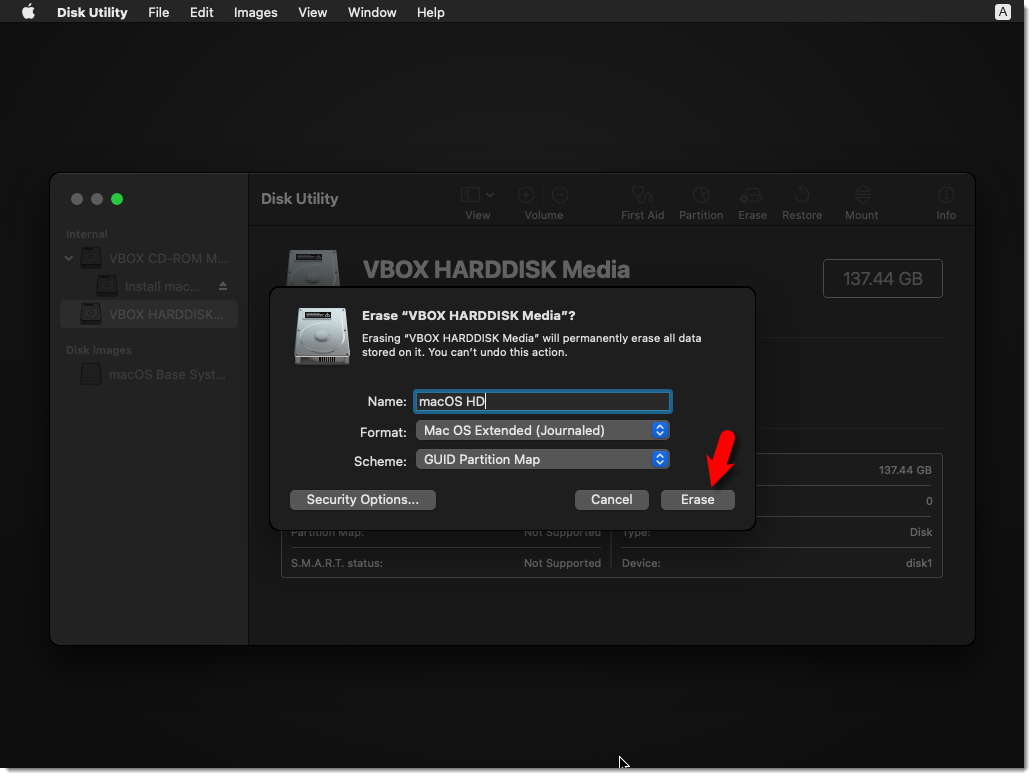
Name the Virtual Disk
#7. Close Disk utility.
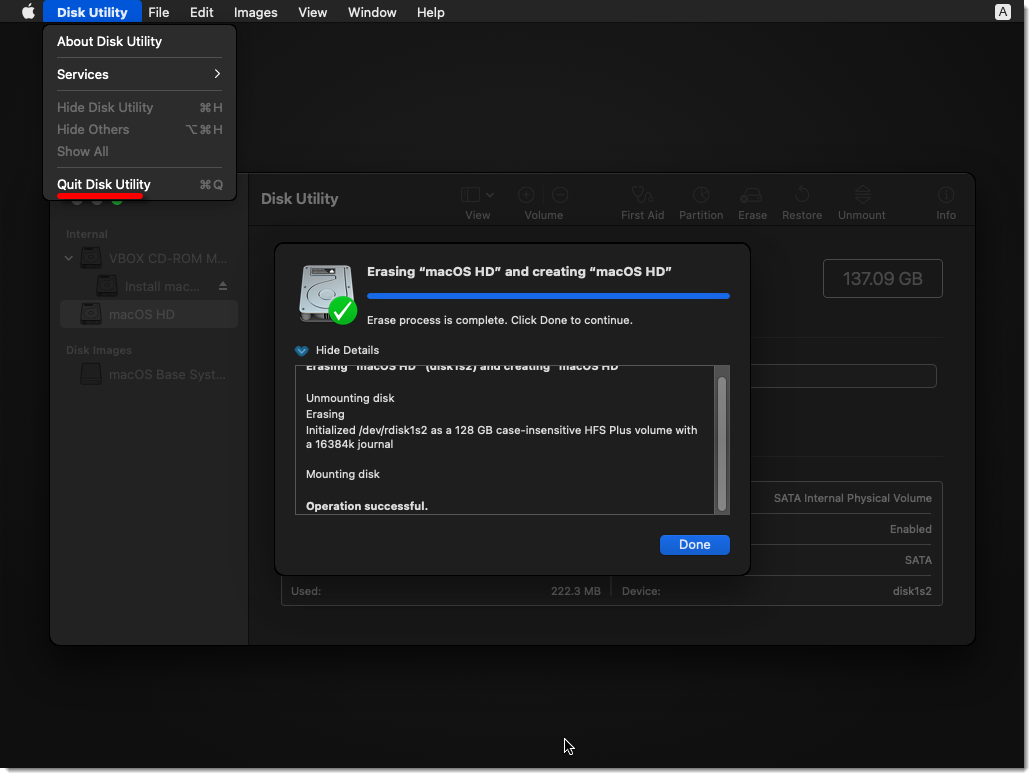
Close Disk Utility
#8. Select Install macOS and click Continue.
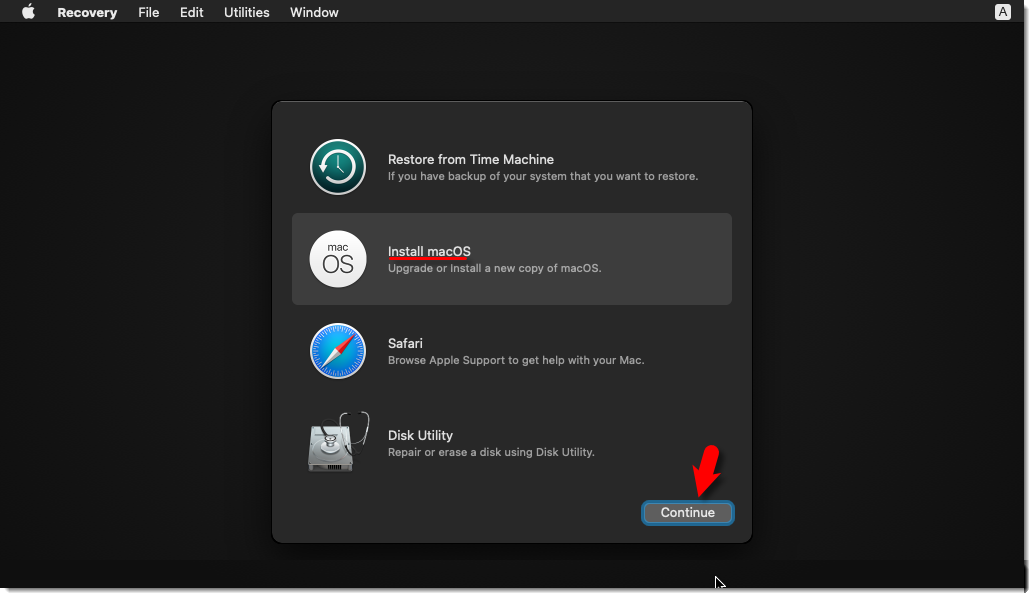
Install macOS
#9. Click Continue.
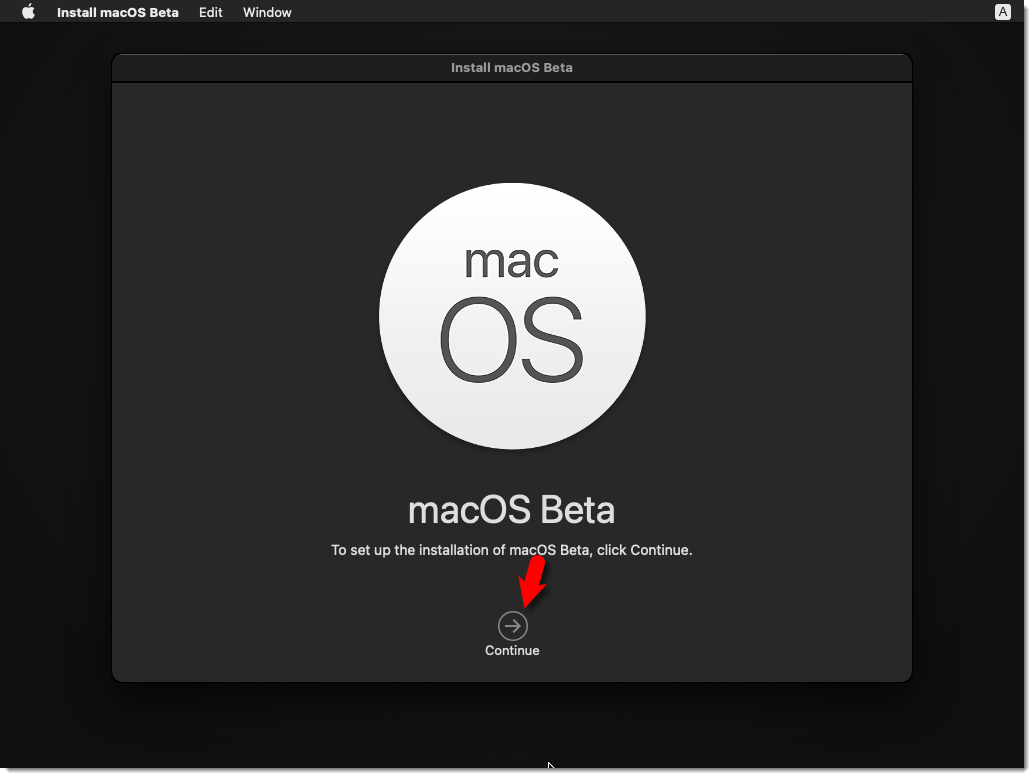
macOS Big Sur Beta
#10. Agree to terms and Conditions.
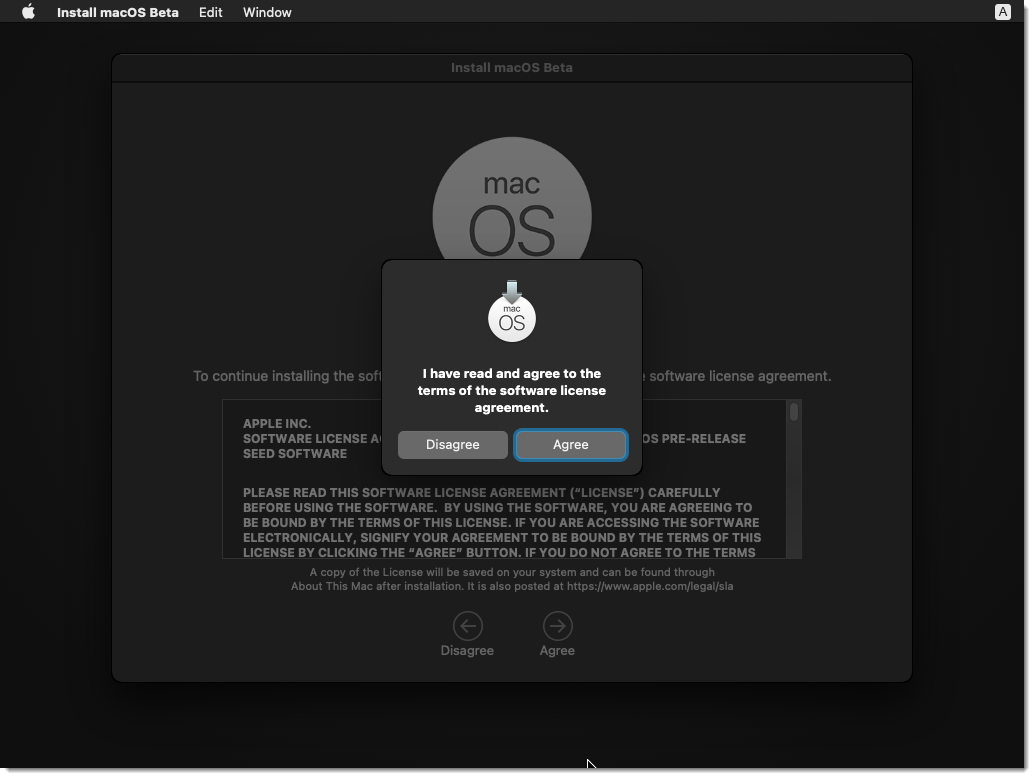
Agree to the Terms & Conditions
#11. Select the installation disk and click Continue. Once you click continue it’ll take around 29 minutes to complete the first part of the installation.
NOTE: If you get the Operation Couldn’t be Completed BiErrorDomain Error 3 then follow this step by step guide below.
Fix the Operation Couldn’t be Completed BiErrorDomain Error 3
This is a very common error with macOS Big Sur beta version 1 that most people have faced. Just use our VirtualBox code and it should work without any error.
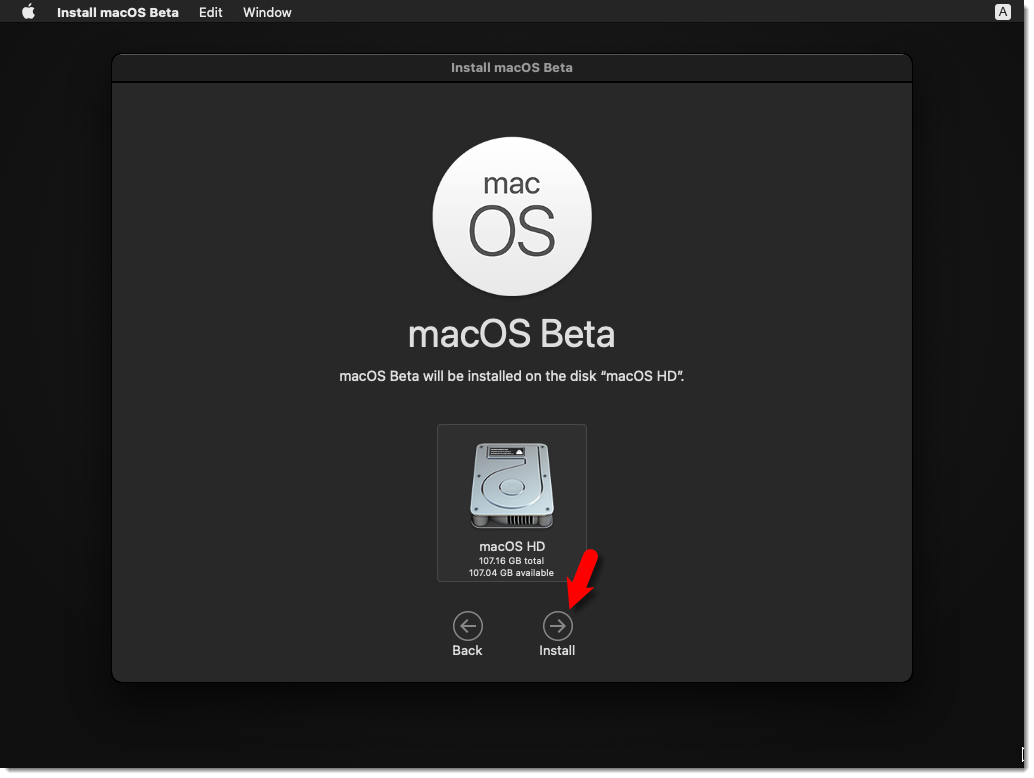
Installation Disk
Step 6: Perform Clean Installation of macOS Big Sur
- Once you hit enter, a whole bunch of code will run on the screen, but you should not worry about it. Wait for a few minutes, and you should see the macOS Big Sur installation window. Have a cup of coffee until the installation complete because it’s going to take around 29 minutes to finish.
- Once the installation part complete, your system will reboot, and after the restart, you should see macOS Big Sur Welcome page.
- Select the following options. You can change most of the settings later on, so don’t worry about that for now.
- Select your Country and click Continue.
- Choose a Keyboard Layout and click Continue. If you don’t agree with preset options then you customize it. Just click Customize Settings.
- You can turn on the Accessibility features now with macOS Big Sur. You’ve several options with accessibility like vision, motor, hearing, and cognitive. If you don’t want to set up right now just click Not Now button to skip them.
- Read Data & Privacy and click Continue.
- Now, you can transfer your data from your previous Mac or from your Windows PC. If you don’t want to transfer anything right now, just click the Not Now button to continue.
- Click on Set Up Later then Don’t Sign In. You can add your Apple ID later.
- Click Agree to the Terms and Conditions and click Continue.
- Fill out the Full name, Account name, Password, and Hint then click Continue.
- If you want to customize Express Set Up, you can click on Customize Settings otherwise click on Continue.
- On the Analytics page click Continue.
- On-Screen Time, click Set up Later.
- Select an appearance theme and click Continue. Here you choose your dark mode if you want.
- Wait for a few seconds and you’ll see the login screen now.
- Well done 👍👌😮 you’ve installed macOS Big Sur on VirtualBox Successfully.
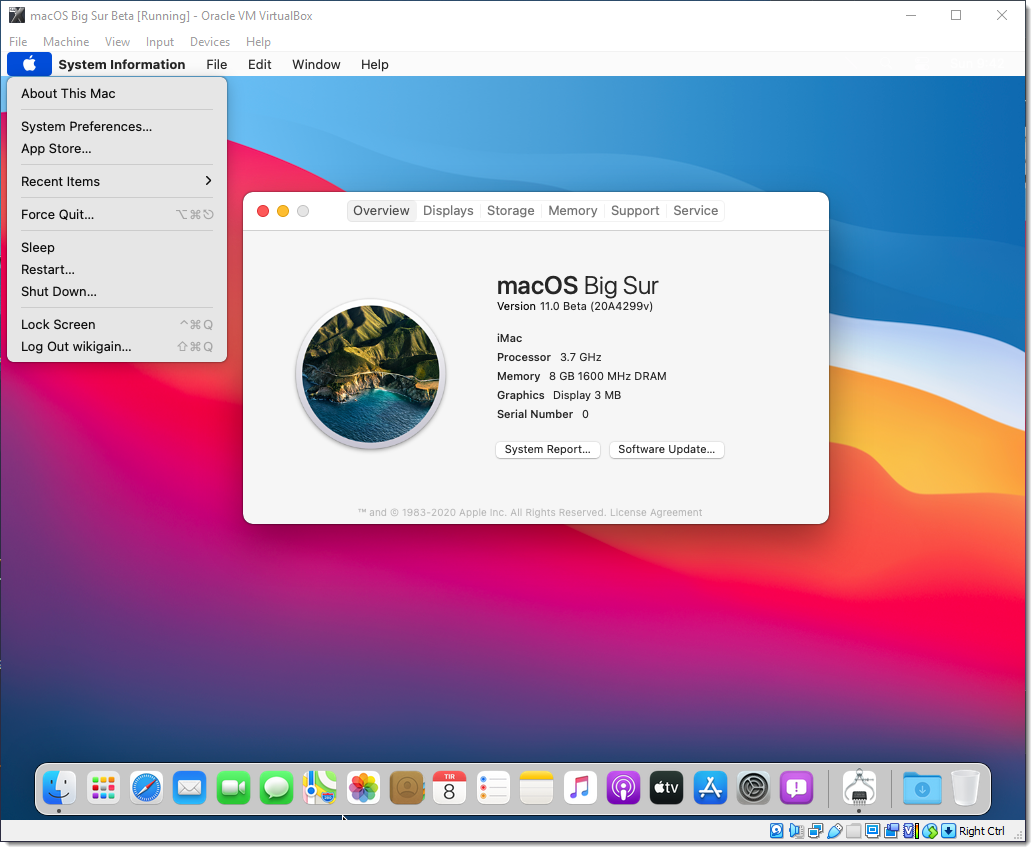
Welcome to macOS Big Sur VBox
Click on the image below to see the full resolution
Summary
Basically, in this article, I’ve shown you the step by step pictorial guide on how to install macOS Big Sur on VirtualBox on Windows computer. After reading and following this guide, you should have done the following;
- Downloaded VirtualBox with its Extension
- Installed VirtualBox on your system
- Installed & upgraded VirtualBox extension
- Created a new virtual machine for macOS Big Sur
- Customized macOS Big Sur VM
- Executed the VirtualBox code to the CMD
- And finally performed a clean installation of macOS Big Sur.
Related: How to install macOS Big Sur on VMware on Windows.
We are ready to keep receiving your feedback about this article, and other posts on wikigain. Your suggestion and feedback are highly appreciated.
Warning: All the content of this site is copyright protected, and no-one has the right to copy-paste our materials.
good
Help please. I followed the instructions but when I start it I get an error. I tried several times always with same result. I get this error:
Failed to query SMC value from the host (VERR_INVALID_HANDLE).
Result Code:
E_FAIL (0x80004005)
Component:
ConsoleWrap
Interface:
IConsole {872da645-4a9b-1727-bee2-5585105b9eed}
thanks
-ryan
Hi – same issue for me – someone please help!! 🙂
I also get the same:…..
Failed to open a session for the virtual machine macOS Big Sur.
Failed to query SMC value from the host (VERR_INVALID_HANDLE).
Result Code: E_FAIL (0x80004005)
Component: ConsoleWrap
Interface: IConsole {872da645-4a9b-1727-bee2-5585105b9eed}
Can anyone help?!
Just an additional point to mention.. I’m not sure if it will help in anyway, but basically I initially tried this a few weeks ago, and although I can’t remember what the issue was back then, it obviously didn’t work at the time.. I came back to it tonight and just instantly clicked to start the machine that was still there since my last attempt (I’ve messed about with many VM’s lately – but brand new to it)… After clicking start, the machine started straight away in the exact way that it shows that it will in this guide – i.e. a few seconds of code and then the language screen, followed by the 4 recovery options whereby we should choose “disk utility”… obviously I was very happy with that after many wasted hours attempting it before, but decided I had better first shut down the machine and double check the settings were correct… since then it’s just nothing but the above error shortly after clicking the start option… I have tried allsorts, and at this point have deleted the previous virtual drive and started again a few times…
Really, really hoping that some very kind and helpful readers are able to suggest a way to get past this – the appreciation would be incalculable!!!!!!!
Stuck at [EB|#LOG:EXITBS:START]
Cpu: AMD A8 7600
I can not login in App Store for download apps (i need the apple configurator). i received the message: unsupportet device..
The most common reason is you have 0 in the serial number, you need to change it.
Here you will see how to change that: https://superuser.com/a/1167425
Does anyone solve this issue ? I am getting the same problem here after turn off and turn on the vmware.
Just few tips for those, who still can not make it work:
My setup:
CPU: AMD Ryzen Threadripper 3970X , 32Gb RAM, VGA: RX5600XT
VirtualBox configuration ( version: 6.1.26 ):
— General: —
Operating System: “Mac OS X (64-bit)”
Base Memory: 8192MB
Processors: 4
Boot Order: Optical, Hard Disk
Chipset Type: ICH9
EFI: Enabled
Acceleration: VT-x/AMD-V, PAE/NX
— Display: —
Video Memory: 128 MB
Graphics Controller: VboxVGA
Acceleration: 3D
— Storage: —
Controller: SATA
Port 1: Optical Drive macOS Big Sur 11.0.1 ( 20B29 ).iso ( 16.00 GB )
Port 2: MacOSBigSir.vhd ( Normal, 120Gb)
— Everything else is default…
——– Virtual Box Code: ——
cd “C:Program FilesOracleVirtualBox”
VBoxManage.exe modifyvm “MacOSBigSir” –cpuidset 00000001 000106e5 00100800 0098e3fd bfebfbff
VBoxManage setextradata “MacOSBigSir” “VBoxInternal/Devices/efi/0/Config/DmiSystemProduct” “iMac19,1”
VBoxManage setextradata “MacOSBigSir” “VBoxInternal/Devices/efi/0/Config/DmiSystemVersion” “1.0”
VBoxManage setextradata “MacOSBigSir” “VBoxInternal/Devices/efi/0/Config/DmiBoardProduct” “Mac-AA95B1DDAB278B95”
VBoxManage setextradata “MacOSBigSir” “VBoxInternal/Devices/smc/0/Config/DeviceKey” “ourhardworkbythesewordsguardedpleasedontsteal(c)AppleComputerInc”
VBoxManage setextradata “MacOSBigSir” “VBoxInternal/Devices/smc/0/Config/GetKeyFromRealSMC” 1
VBoxManage setextradata “MacOSBigSir” “VBoxInternal/Devices/efi/0/Config/DmiBoardProduct” “Mac-AA95B1DDAB278B95”
VBoxManage setextradata “MacOSBigSir” “VBoxInternal/Devices/efi/0/Config/DmiSystemSerial” “CK1156I6DB6”
VBoxManage setextradata “MacOSBigSir” “VBoxInternal2/EfiGraphicsResolution” “1920×1080”
VBoxManage modifyvm “MacOSBigSir” -–cpu-profile “Intel Core i7-6700K”
bcdedit.exe /set hypervisorlaunchtype off
Installation tips:
Disk: format as: Mac OS Extended ( Journaled ) / AFPS will not work
This configuration works for me, good luck.
Hey Vasil. Do these steps work with a Ryzen 5600x? I can’t seem to be able to install bigsur on Virtualbox, got it working somewhat yesterday in VMWare but its very slow, hoping it will be faster in VB
Thank you. I’ve worked on this too many times in the last 3 weeks. This was the only step-by-step instructions that actually worked.
I got the answer of Forcing cs_runtime for entitlement: com.apple.rootless.restricted-block-devices stuck. Just wait for a long time.I solved this for 4.5 hours
I got the answer of Forcing cs_runtime for entitlement: com.apple.rootless.restricted-block-devices stuck
Just wait for a long time.
I solved this for 4.5 hours
If I just download 11.1 only will it work?
Well I Ran The codes through the windows command prompt (ADMIN MODE) and when i run the codes 1 by 1 through the command prompt i think something is wrong because when i started the VM it rebooted and did a kernal panic I Saw this message in the codes that i knew it was a kernal panic
THE SYSTEM REBOOTED AFTER PANIC
Isnt there a way to fix this
After installing I get stuck on less than a minute remaining…can’t pass this step…I have waited more than 3 hours and nothing
I had the same problem too. Left it like that for about 4 hours and finally sprang to life. It seriously tests your patience. For checking whether the installation is going well, go to libraries and click on my computer. you will see that the space in C drive will gradually decrease this indicates that your the installation is still in process.
Just wait.
macOS Big Surr is huge and take hours for installation (about 3hrs)
I’ve had the sane problem for months no fix I can see, i installed it under VM Player 16 it works but cant connect to apple store etc
Thank you . Its very helpful.
Please help me with the root password for this Big Sur mac
First of all, thank you so much for this it’s really detailed and helpful
after I ran VBox code, and started the virtual machine, This error appeared :
VT-x is not available (VERR_VMX_NO_VMX).
Can you please help?
You need to enable virtualisation in the bios
You must enable VT-x from BIOS
Hi,
I’m stuck on this. I tried multiple installs. First I did what it says on this tutorial. After I tried by exporting a MacOs Vm from a Mac to my windows, same issue. Can someone help ?
https://i.imgur.com/SBaLRBk.png
https://i.imgur.com/ihK3QLw.png
Hi,
I got stuck on the reboot screen.
It says less than a minute remaining
https://www.screencast.com/t/6DNmYMMmH0Q
I have been waiting for 15-20 mins. How long should I still wait ? Or I did something wrong?
Hi,
Thank you for this excellent guide!
I have however the following problems:
– SLOW: Big Sur runs incredibly slowly. 20 minutes to boot and 30-60 seconds to open Safari for instance. The installation itself took several hours.
I dedicated 16GB of memory (my windows 10 host has 64gb). My system is a dual CPU Xeon E5 32-core machine.
Reading Jordan’s recommendation above I checked and hyper-V is disabled on my machine. DeviceGuard and Core Isolation Details (Windows Defender) were also turned off.
– Unable to use more than 2 cores. I tried defining 4 or 8 cores and the system will not boot. It will only boot when I define 2 cores.
Running Virtualbox 6.1.20 on windows
i guess intel is your problem hahahah
Amazing, Thank YOU!
Whenever i try to install macOS Big Sur in the virtual machine i keep on getting the message “Installation cannot proceed because the installer is damaged. Re-download the installer and try again.” Any tips on how to fix this?
Can I update the system automatically or it get stuck If so?
I need help. Can you review this image and tell me what to do?
https://imgur.com/a/BIH4sDH
I did everything instructed. I have an ASUS x570-F motherboard with an AMD Ryzen 7 3700x processor and an NVIDIA RTX 2070 GPU. I get this error after the Big Sur installation is complete. Instead of getting a welcome page, it gets stuck here: https://imgur.com/a/MbDlhjI PLEEEEASE HELPPP
After installing I get stuck on less than a minute remaing…can´t pass this step…I´ve waited more then 2 hours and nothing
From what I’ve heard, that step alone can take over 3 hours on some machines. It’s painful, but you’ll just have to wait it out.
Try to install on the other hard drive, i had the same issue and I solved by installing VM at external SSD with more then 200Gb free space. Was successfully installed in around hour and a half. After installation works fine.
Excellent, thank you!!!
I’m getting this after executing all the commands in prompt and starting the machine:
https://imgur.com/EX2fYMA
Did it work? How did you resolve it
I get this screen too and haven’t been able to get any further with installing macos on virtual box.
anyone come up with a solve for this? i followed everything exactly and have no idea what the fuck this screen even is
type install.nsh
Does anyone solve this issue ? I am getting the same problem here after turn off and turn on the vmware.
That drove me insane for hours. Turns out it’s VirtualBox being an idiot.
Type “Exit” at that prompt, you’ll end up in the VM “BIOS”.
Select the Boot Manager -> UEFI VBOX CDROM
Now it should start properly. I have zero idea why the issue happens, btw.
does the “Install macOS Big Sur” disk need to stay or can it be ejected?
it worked the first time i created a vm but then i had problems and needed to delete the vm and start again and now it will not work i do al the same steps but it just doesnt work the same any ideas
can you please mention the recommended pc specifications in order to install and use macOS properly?
Excellent tutorial- I was able to install mac OS on my PC.
Outstanding job!
Many thanks!
Thanks for the manual, everything was installed and working. I also managed to change the screen resolution to the one I needed.
The only thing is that the system is working very slowly, although I allocated 10GB of RAM and SSD of physical memory to it. Can you tell me how you can solve this problem.
For Ryzen 5 3600, it’s work :
VBoxManage modifyvm “Mac OS” -–cpu-profile “Intel Xeon X5482 3.20GHz”
Anyone stuck at [EB|#LOG:EXITBS:START] :
Try
VBoxManage modifyvm “macOS” -–cpu-profile “Ryzen 5 3500U”
in CMD
SORRY it’s
VBoxManage modifyvm “macOS” -–cpu-profile “Intel Core i7-6700K”
Thanks
It works! I can see an apple now 🙂
Note: You should replace your “macos” with your own virtual Machine
Code for Virtualbox 6.x:
run all of these commands with VirtualBox app closed and as admin in windows 10
cd “C:\Program Files\Oracle\VirtualBox\”
VBoxManage.exe modifyvm “macos” –cpuidset 00000001 000106e5 00100800 0098e3fd bfebfbff
VBoxManage setextradata “macos” “VBoxInternal/Devices/efi/0/Config/DmiSystemProduct” “iMac19,1”
VBoxManage setextradata “macos” “VBoxInternal/Devices/efi/0/Config/DmiSystemVersion” “1.0”
VBoxManage setextradata “macos” “VBoxInternal/Devices/efi/0/Config/DmiBoardProduct” “Mac-AA95B1DDAB278B95”
VBoxManage setextradata “macos” “VBoxInternal/Devices/smc/0/Config/DeviceKey” “ourhardworkbythesewordsguardedpleasedontsteal(c)AppleComputerInc”
VBoxManage setextradata “macos” “VBoxInternal/Devices/smc/0/Config/GetKeyFromRealSMC” 1
C:\Windows\System32\bcdedit.exe /set hypervisorlaunchtype off
VBoxManage modifyvm “macos” -–cpu-profile “Intel Core i7-6700K”
you must use VBoxManage modifyvm “VM NAME” -–cpu-profile “Intel Xeon X5482 3.20GHz”
for amd cpus
I can no longer boot on a Ryzen 5 3600. This used to work about 3 months ago, which is when I last booted macOS Catalina. I get the following print at the end:
[EB| LOG:EXITBS:START]
I did the commands mentioned in addition to VBoxManage modifyvm “macOS” –cpu-profile “Intel Core i7-2635QM”
I’m thinking some Windows 10 updates messed things up.
Not sure if this will help anyone …
Im running a Ryzen 5 3600 and i had to use the following to get to apple logo:
VBoxManage modifyvm “VM_NAME_HERE” –cpu-profile “Intel Core i7-2635QM”
Cant get to work in Ryzen:
Ryzen 5 3500
Virtualbox: 6.1.16 with extensions
The initial boot exits with (Error image: https://ibb.co/LN2WwdY)
“`
[EB.LD.OFS|OPEN!] Err (0xE)
..
[EB| LOG:EXITBS:START]
“`
Code Ran:
“`
VBoxManage.exe modifyvm “mac” –cpuidset 00000001 000106e5 00100800 0098e3fd bfebfbff
VBoxManage setextradata “mac” “VBoxInternal/Devices/efi/0/Config/DmiSystemProduct” “iMac19,1”
VBoxManage setextradata “mac” “VBoxInternal/Devices/efi/0/Config/DmiSystemVersion” “1.0”
VBoxManage setextradata “mac” “VBoxInternal/Devices/efi/0/Config/DmiBoardProduct” “Mac-AA95B1DDAB278B95”
VBoxManage setextradata “mac” “VBoxInternal/Devices/smc/0/Config/DeviceKey” “ourhardworkbythesewordsguardedpleasedontsteal(c)AppleComputerInc”
VBoxManage setextradata “mac” “VBoxInternal/Devices/smc/0/Config/GetKeyFromRealSMC” 1
VBoxManage setextradata “mac” “VBoxInternal/Devices/efi/0/Config/DmiBoardProduct” “Mac-F22589C8”
VBoxManage setextradata “mac” “VBoxInternal/Devices/efi/0/Config/DmiSystemSerial” “CK1156I6DB6”
VBoxManage modifyvm “mac” –cpu-profile “Intel Core i7-6700K”
VBoxManage setextradata “mac” “VBoxInternal2/EfiGraphicsResolution” “1600×900”
VBoxManage modifyvm “mac” –paravirtprovider default
“`
On Windows you have to run this command and the rest should be fine in your additional config.
C:\Windows\System32\bcdedit.exe /set hypervisorlaunchtype off
Yes!! This finally fixed my VM after hours of trying! Thank you so, so much!
Hello! I tried installing the OS in Virtualbox, but after the code that I had to input in the CMD, it just showed me the following:
UEFI Interactive Shell v2.2
EDK II
UEFI v2.70 (EDK II, 0X00010000)
Mapping Table
FSO: Alias (s) :F0b65535a : ; BLK1:
and so on…
At the end it says:
Press ESC in 6 seconds to skip startup.nsh or any other key to continue. (None of these buttons do anything) and that is it, it is not booting, NOTHING! Can you help me? Thanks
try different iso file
Hi, when I try to access my iCloud account it makes me mistake .. so I ask, within virtualization: is it possible to enter my Icloud account so as to use the services and synchronize my Apple data, as if I had an original Mac? For example the use of apps such as Photos, Notes, Mail, Calendar..ect.
Also, despite a PC with i7-6700 2.60GHz with 16RAM and still 50GB free, using BigSur turned out to be very slow up to having simple mouse pointer delay, what could it be?
So I have been trying to install this for 5 days now with no success. I am trying to do in on a Dell XPS 9560 (i7-7700HQ, GTX 1050 4GB, 16GB RAM, 512GB NVMe SSD). Could it be because my VirtualBox is set to run with the nVidia GPU instead of the integrated one (Did that as a fix to the Ubuntu VM visual stuttering problem)?
For additional info: I am trying to install with the latest BigSur from the link at the top of the post.
Just to check were not deleting windows by erasing the disk right
it would never do that
can anyone help me . when i was boot up from iso the mouse pointer stucks and do not moves please help me,
Hello, Is there any way that I can make the sound work? My guest Mac is showing no output devices available and I don’t know how to solve this. Please help me with this if anyone knows the way out. Also, thanks a lot for giving such information, Big Sur worked for me : )
You need to enable in Devices > Audio
Hello! I tried installing the OS in Virtualbox, but after the code that I had to input in the CMD, it just showed me the following:
UEFI Interactive Shell v2.2
EDK II
UEFI v2.70 (EDK II, 0X00010000)
Mapping Table
FSO: Alias (s) :F0b65535a : ; BLK1:
and so on…
At the end it says:
Press ESC in 6 seconds to skip startup.nsh or any other key to continue. (None of these buttons do anything) and that is it, it is not booting, NOTHING! Can you help me? Thanks
I did everything you explained. But, when I started booting VM, it was stuck at #[EBILOG:EXITBS:START] (current date). What should I do?
i’m able to repeat this as well :(. Works on my Intel laptop but failed on my AMD desktop, Strange
Same for me…
For those of you getting the error “LOG:EXITBS:START”, you need to be using the latest version of VirtualBox with the extensions. If you’re using Virtualbox <6.1, it wont launch.
I have latest VirtualBox (6.1.16 r140961) and got the Extensions install today, so also newest. I did the –cpu-profile “Intel Core i7-6700K” as well, and still cannot get it to boot on my AMD Ryzen 5 3600XT PC.
Hi Mukhtar,
Thanks for the nicely constructed instructions. Awesome work mate!
For you and anyone else interested in trying this procedure with Linux/Ubuntu, here’s what I did, and after a bit of stuffing around, found a process that works, as follows.
I used your exact process with Big Sur as a VirtualBox Client, but instead, used Ubuntu 20.4 LTS as the VirtualBox Host.
I created the Big Sur VM client on an external USB3.0 drive.
I also stored the Big Sur macOS ISO file on the same external USB3.0 drive in a separate folder.
I named my Big Sur VM image: macOS Big Sur-20201217
I followed your procedure quite closely except used the following linux commands in an ubuntu Terminal window:
—–
$ cd /bin
$ VBoxManage modifyvm “macOS Big Sur-20201217” –cpuidset 00000001 000106e5 00100800 0098e3fd bfebfbff
$ VBoxManage setextradata “VM Name” “VBoxInternal/Devices/efi/0/Config/DmiSystemProduct” “iMac19,1″^C
$ VBoxManage setextradata “macOS Big Sur-20201217” “VBoxInternal/Devices/efi/0/Config/DmiSystemProduct” “iMac19,1”
$ VBoxManage setextradata “macOS Big Sur-20201217” “VBoxInternal/Devices/efi/0/Config/DmiSystemVersion” “1.0”
$ VBoxManage setextradata “macOS Big Sur-20201217” “VBoxInternal/Devices/efi/0/Config/DmiBoardProduct” “Mac-AA95B1DDAB278B95”
$ VBoxManage setextradata “macOS Big Sur-20201217” “VBoxInternal/Devices/smc/0/Config/DeviceKey” “ourhardworkbythesewordsguardedpleasedontsteal(c)AppleComputerInc”
$ VBoxManage setextradata “macOS Big Sur-20201217” “VBoxInternal/Devices/smc/0/Config/GetKeyFromRealSMC” 1
—–
Then I created a snapshot of the VM using VirtualBox so that I can revert back to this snapshot if needed.
Then I performed the disk erase process you explained, and named the virtual disk which was 128GB in size as: macOS HDD
I also used a ‘MacOS Extended (Journaled) with case-sensitivity’ option for the erase process, and used the scheme: GUID Partition Map. Now, I’m not sure if selecting the case-sensitive alternative will be an issue down the track, but it’s a VM so I can always revert to a snapshot and try it again without case-sensitivity later if there are problems with this for the OS.
Then when I installed the OS, the installer just hung after about 60 seconds. Well damn, that’s linux. Upon inspecting the error logs these said something about an (… isCSFusionDrive:] failed to get LVG for diskls3) and (… invalid LVGUID) and would not proceed with the install. I googled the error and could not find anything specifically useful on this error message to resolve the hang.
So, I then erased the virtual disk again with the exactly the same process above, but then used the same disk management tool to perform a partition of the virtual disk volume. So what this means is that I split the original 128GB volume into 2 equal volumes of 64GB each. I named the second volume partition: macOS HDD2
Now I effectively have 2 hard disks of 64GB each: macOS HDD, and, macOS HDD2.
Then I exited the erase tool and ran the ‘Install macOS’ process as you described, then selected the 64GB disk volume named ‘macOS HDD’, continue, and you bloody ripper, it proceeded with the install just fine, but took about 45 minutes to complete. My external drive is an older spinning disk, not an SSD, so it’s very slow, but it means I can watch/read the Apple scripts used to install macOS which is super interesting.
I’ve no idea why this split volume technique solved the logical volume GUID issue I hit originally, but this split volume process worked.
I figure that I can go back and resize the macOS HDD volume back to 128GB later and blow away the macOS HDD2 volume in the process.
I hope this helps others trying to do the same with Linux/Ubuntu as a host and installing on an external USB3.0 disk.
Cheers,
nanohaxor
Hi that all did the Job in some Way – Its now working :-).
VBoxManage.exe modifyvm “Mac2” –cpuidset 00000001 000106e5 00100800 0098e3fd bfebfbff
VBoxManage setextradata “Mac2” “VBoxInternal/Devices/efi/0/Config/DmiSystemProduct” “iMac19,1”
VBoxManage setextradata “Mac2” “VBoxInternal/Devices/efi/0/Config/DmiSystemVersion” “1.0”
VBoxManage setextradata “Mac2” “VBoxInternal/Devices/efi/0/Config/DmiBoardProduct” “Mac-AA95B1DDAB278B95”
VBoxManage setextradata “Mac2” “VBoxInternal/Devices/smc/0/Config/DeviceKey” “ourhardworkbythesewordsguardedpleasedontsteal(c)AppleComputerInc”
VBoxManage setextradata “Mac2” “VBoxInternal/Devices/smc/0/Config/GetKeyFromRealSMC” 1
VBoxManage setextradata “Mac2” “VBoxInternal/Devices/efi/0/Config/DmiBoardProduct” “Mac-F22589C8”
VBoxManage setextradata “Mac2” “VBoxInternal/Devices/efi/0/Config/DmiSystemSerial” “CK1156I6DB6”
VBoxManage modifyvm “your VM name” –cpu-profile “Intel Core i7-6700K”
VBoxManage setextradata “mac2” “VBoxInternal2/EfiGraphicsResolution” “3840×2160”
VBoxManage modifyvm “Mac2” –paravirtprovider none
after back to
VBoxManage modifyvm “Mac2” –paravirtprovider default
Everything is OK. Big Sur was installed successfully following your instructions. But there is a problem with the audio. It is not enabled. I have ALC622, could you give me a solution pls ?
How to get passed “ICLOUD_UNSUPPORTED_DEVICE”??
Thanks. Following these instructions worked perfectly for me. However, previous MacOS installs on Virtualbox have always allowed me to log in to the Apple store. It’s the primary purpose for me to have MacOS on VM. Is there any way to get past the “ICLOUD_UNSUPPORTED_DEVICE” error when attempting to login into the Apple store? This error was also reported in a couple of other comments. This error will constantly block access to Apple Store and has been accessible via previous MacOS versions installed via Virtualbox. I realize the VM is not authentic Mac OS and/or Mac OS hardware. But this has worked in the past. I am only looking for a solution.
Hello, I’m having an issue, and I’m not sure if I should just keep waiting or if there’s something wrong. I followed the guide to the letter, and also did that extra CPU ID code to get where I am. I tried adding the screen fixed resolution code and that didn’t do anything. Currently, I have 2 cores assigned to the VM as I have 4 cores in total, and 4 GB of RAM as I have 11.2 GB usable. My CPU is AMD A10-5750M APU with Radeon(tm) HD Graphics.
Here’s the link to my VM: https://imgur.com/a/zdv0hlf
Despite it not seeming to be doing anything, the VM’s currently using 27-38% of my CPU, but I’ve waited almost 20 minutes now for it to do anything, as I write this it’s still in the background doing.. nothing.
Any help would be much appreciated! Oh, I’m also trying to install Big Sur 11.0.1
Same here! Got any solution?
Just a word to thanks the team.
It worked fine for me
Thank you
I have a acre i5 8th gen 8 gb ram, i have followed this guide to the letter.
Setup VM with 3076mb ram 128mb gpu 128gb vhd, everything goes well upto the point where it is installing macOS to the less then a min remaining and it just sites there (been trying for over an 1.5hrs to get this setup.
I’m having the same issue. Did you get anywhere with it?
same, following
Now I am stuck on 5.2, it’s running code but is like is rebooting, and reloads the code, however is not moving to the Apple logo screen. Help needed. Thanks!
Hello, after I run the code and open back VirtualBox and hit start I get a UEFI Interactive Shell v2.2. How can I fix this? Thanks in advance.
Can you help how to make sound work in virtual machine after installing big sur(Which i successfully done)
Could not get to the Apple logo phase until change the number of processors from 4 to 2 in the VM settings
Correct
Same – it took a while to workout that was the problem.
Anyone know a way of upping processors beyond two?
To change the resolution use the following command:
VBoxManage setextradata “VM Name” VBoxInternal2/EfiGraphicsResolution RES
Where RES = one of the following:
5120×2880
2880×1800
2560×1600
2560×1440
1920×1200
1600×1200
1680×1050
1440×900
1280×800
1024×768
640×480
Can I go back to windows and macOS without losing data?
thank you so much! Everything works till the installation of macos Big Sur. after a couple of minutes installation fails with message “installation cannot proceed because the installer is damaged”. I already re-downloaded the ISO file without help.
Error while signing into apple id
Is there any way to enable audio
Thanks. ISO installation works. However, sound output device is not available in VM. Can you tell how to make it work
any solution for sound
For display settings use following code(say for 1600×900)
vboxmanage setextradata “bigsur” “VBoxInternal2/EfiGraphicsResolution” “1600×900”
My own experience, using macOS Big Sur 11.0.1 (20B29).iso, on a Linux Mint machine, running 19.3 Mate, on an older Dell XPS with an intel i7 and 24gigs total memory.
Basically, everything is the same as it is with Windows, and the instructions are sterling, all the way through. One difference with Linux is that you open a terminal instead of a command prompt, and with VirtualBox already installed, simply typing in “VBoxManage” followed by whatever instruction(s) might be at hand on the very same input line and then hitting the ‘Enter’ key, works in exactly the same way. So that’s easy enough to deal with.
In the beginning, things went really fast, and that kind of mislead me, and later on, when things slowed waaaaay down, it caused me to make a couple of mistakes, so give it time, ok? Be patient with it.
My first stumbling block occurred when it was time to erase the “installation disk” with the Disk Utility, and almost immediately VirtualBox threw an error and the process froze up. Not knowing what the fuck to do, I did the wrong thing.
Of course.
I tried to figure out the freeze-up, but could not, and said “The hell with it,” to myself, and WIPED IT CLEAN.
Fresh start. From dead scratch, creating an new VM.
When I got to the “erase” point once again, if promptly locked back up, once again, same place. Prior to that, I noticed that it defaulted to a Format of APFS file system, with a GUID Partition Map Scheme instead of Format as Mac OS Extended (Journaled), which is what’s showing in the screenshot above, in the instructions, and I decided to leave that alone, but it froze anyway, and I was right back where I started, and this time, putzing around with things, I just kind of happened to notice that the machine state, in the VirtualBox Manager, was showing as “Pause” so I clicked that button, and low and behold, it lit right up, and kept on stroking, from there, as if nothing had ever happened.
For a looooong time. And there was a lot of stuff, but it all went well enough without any alterations from my obedient little self, so we’re not gonna talk about it. Except for additional lockups with a VirtualBox Manager showing “Pause” so if you get any of that crap, be sure and give that one a look, ok?
And when it got to where the Apple logo showed up, but before a cursor arrow could appear against the blackness of the install background, and the little bar was creeping along, I noticed that the damn bar only made it about a quarter of the way across, where it steadfastly refused to move from, even as the timer kept counting down, to “less than a minute” and from there….. nothing. I let it sit for fifteen minutes or so, and foolishly decided it was frozen, and killed the Virtual Machine without saving the state.
Started it back up, and as a reward for being stupid, I got to once again watch the bar, and the countdown timer, do the exact same thing again, but this time I left it strictly alone, over there on my second monitor, and busied myself with other pursuits, and after a pretty good while, it suddenly lurched back into life, and proceeded to throw lots of white gobbledygook across the black background, gave me another status bar (which thankfully did not last as long), went back to gobbledygood, and the goddamned thing TOOK FOREVER. During which forever it would occasionally “hang” for interminable lengths of time, but finally it kicked all the way through.
And a few more “Pause” events along the way, but it never stopped the process.
And now it’s working, and I could not be happier.
Altering the screen resolution was another weird item too, though, and I had to do a LOT of playing around with that, and for some reason, it would refuse to take a given resolution, boot into the default low resolution, and this annoyed me greatly, until, for reasons I do not know myself, i decided to slide the damn thing from one monitor to another (they’re different sizes, different resolutions), and in the process of sliding across, the VM jerked into the proper resolution, and I’m gonna leave it right where it is, lest I fuck it up further, by trying too hard with it.
Gonna let it rest. It’s earned it, right?
Most of a day, spent.
Every minute of which was worth it.
Cannot thank you enough, Mukhtar. Your work is The Best, and it is greatly appreciated.
Again, my utmost praise and thanks, Mukhtar.
You’re a credit to the force.
I really appreciate the time you’ve spent writing this comment.
Thanks for spending your time to give a feedback
haha, man, you’re good!
and actually thanks to the length of your story now I appreciate my own thoughtfulness of taking the snapshot titled “less than a minute”.
yeah, it took forever, but it goes somewhere this time.
God bless you, man! I spent 2 hours deleting, creating a new VM due to the fact that it did not “hang” when erasing the disk at the beginning of the installation. but i read your answer and hit that fu ** ing pause!
be happy!
Just ahead up that macOS Big Sur 10.0.1 is now available to download from the download section of this post.
Link: Download macOS Big Sur ISO Image
me too :! less than a minute fpr several hours of wait than … it is already alocated 28.5 GB so it is proably done intalling but even after several tries always stuck there. please help asap. thanks win10 hp pavilion laptop
Just ahead up that macOS Big Sur 10.0.1 is now available to download from the download section of this post or the link below.
Download the latest version of macOS big Sur and try if it works!
Link: Download macOS Big Sur ISO Image
It seems that it takes a long time to install the image, so could you upload the same file but in zip to unzip it?
Check your email, I’ll send you a link for Onedrive 🙂
Can you also do the same for me? It’s pretty slow.
Hi there, could you send one to me too? Thank you!
Wow, I asked for the link too and my comment was deleted.
Could you maybe send me a mega link for it media fire is so slow.
me too please 🙂 it says the downloaded file is corrupted when installing. thanks a bunch Faiz.
the image of big sur or the iso file will download very slowly you could upload the same file worse in zip because it is too heavy and it takes hours to download it is more I have been trying to do it for a month and it does not work because there is a network error when it takes so long It would be cut in half if you gave us the zip file for us to unzip
Hi,
I have an AMD Ryzen 7 3700X and I have ran all the commands:
cd “C:\Program Files\Oracle\VirtualBox\”
VBoxManage.exe modifyvm “macOS Big Sur Beta” –cpuidset 00000001 000106e5 00100800 0098e3fd bfebfbff
VBoxManage setextradata “macOS Big Sur Beta” “VBoxInternal/Devices/efi/0/Config/DmiSystemProduct” “iMac19,1”
VBoxManage setextradata “macOS Big Sur Beta” “VBoxInternal/Devices/efi/0/Config/DmiSystemVersion” “1.0”
VBoxManage setextradata “macOS Big Sur Beta” “VBoxInternal/Devices/efi/0/Config/DmiBoardProduct” “Mac-AA95B1DDAB278B95”
VBoxManage setextradata “macOS Big Sur Beta” “VBoxInternal/Devices/smc/0/Config/DeviceKey” “ourhardworkbythesewordsguardedpleasedontsteal(c)AppleComputerInc”
VBoxManage setextradata “macOS Big Sur Beta” “VBoxInternal/Devices/smc/0/Config/GetKeyFromRealSMC” 1
VBoxManage modifyvm “macOS Big Sur Beta” –cpu-profile “Intel Core i7-6700K”
But it gets stuck at “LOG:EXITBS:START” + timestamp. Check screenshot
https://imgur.com/a/15hBDAE
It’s double dash before cpu-profile!
I’m also getting the same issue, even though I already set cpu-profile with the two hyphens. I have an AMD Ryzen 5 2600. Any suggestions?
I eventually installed the Big Sur OS via virtualBox. The vmware 16 can’t work on AMD platform:/
THANK YO SO MUCH! I’ve been trying for the last 4 hours with multiple images with no sucess and changing the cpu profile resolved the issue!
Can the download links be saved onto something like Mega instead of Mediafire? MF is garbage. Even on premium I’m still getting 100Kbps like it’s 2001.
Thanks
Hi
i have an AMD ryzen 3900 and even after adding your line (with my vm name), it says [EBI#LOG:EXITBS:START]
I have this problem too on a Ryzen 3700
same
When I do this, it works until the final stage of installation. The screen shows the Apple logo and the loading bar, but it is stuck on “Less than a minute remaining”. I must be doing something wrong, but what?
iam also getting this error.
Not a problem. Just be patient. As far as I can tell (based on gkrellm showing my actual disk activity), it counts down while *just* reading the installer (probably doing a checksum on it), then does the ENTIRE install claiming “less than a minute remaining.” I quit waiting for it after like 20-30 minutes, checked quite a while later and it was done.
I’m also getting same error to.
Mine was stuck there for a while as well but did eventually continue.
https://i.imgur.com/uEpk2KB.jpg
I tried installing the linked iso on linux virtualbox following these instructions.
I do in fact have an intel i7, but tried the suggested –cpu-profile and it changes nothing.
YOUR SITE CANT BE COPYWRITTEN, YU AND 4 OTHER SITES
ALL HAVE THE SAME IMAGES W TEXT
N 1 CLICK WORDPRESS WEBPAGES SLIGHTLY DIFFERENT
THIS INFO IS NOT ” COPYWRITTEN ‘
APPLE DIDNT GIVE YOU PERMISSION DONT
lie to the public
I Am, A DEVELOPER 4 APPLE
No you are not
If you are a “DEVELOPER 4 APPLE” why would you come to this site seeking for installation
Have followed the whole guide but here the installation restarts again and again. what could be wrong
VBoxManage: error: Could not find a registered machine named ‘“MacOS”’
VBoxManage: error: Details: code VBOX_E_OBJECT_NOT_FOUND (0x80bb0001), component VirtualBoxWrap, interface IVirtualBox, callee IUnknown
VBoxManage: error: Context: “FindMachine(Bstr(a->argv[0]).raw(), machine.asOutParam())” at line 547 of file VBoxManageModifyVM.cpp
I found this error while running the commands in command prompt
COMMANDS :-
VBoxManage.exe modifyvm ”MacOS Big Sur” –cpuidset 00000001 000106e5 00100800 0098e3fd bfebfbff
VBoxManage setextradata ”MacOS Big Sur” “VBoxInternal/Devices/efi/0/Config/DmiSystemProduct” “iMac19,1″
VBoxManage setextradata ”MacOS Big Sur” “VBoxInternal/Devices/efi/0/Config/DmiSystemVersion” “1.0”
VBoxManage setextradata ”MacOS Big Sur” “VBoxInternal/Devices/efi/0/Config/DmiBoardProduct” “Mac-AA95B1DDAB278B95″
VBoxManage setextradata ”MacOS Big Sur” “VBoxInternal/Devices/smc/0/Config/DeviceKey” “ourhardworkbythesewordsguardedpleasedontsteal(c)AppleComputerInc”
VBoxManage setextradata ”MacOS Big Sur” “VBoxInternal/Devices/smc/0/Config/GetKeyFromRealSMC” 1
What’s your VM name? Is it “MacOS Big Sur” or “MacOS”?
You should type exactly the same because macOS is case sensitive
I get basically the same error. it tells me
“C:\Program Files\Oracle\VirtualBox>VBoxManage.exe modifyvm “macOS BigSur” –cpuidset 00000001 000106e5 00100800 0098e3fd bfebfbff
VBoxManage.exe: error: Could not find a registered machine named ‘macOS BigSur’
VBoxManage.exe: error: Details: code VBOX_E_OBJECT_NOT_FOUND (0x80bb0001), component VirtualBoxWrap, interface IVirtualBox, callee IUnknown
VBoxManage.exe: error: Context: “FindMachine(Bstr(a->argv[0]).raw(), machine.asOutParam())” at line 524 of file VBoxManageModifyVM.cpp
I have checked that my vm name is exactly the same as it is in the command. Do you have any idea what I’m doing wrong, or where it thinks the vm should be so I can check if its not putting in in the right spot?
Anyone able to login to iCloud? All I get is “ICLOUD_UNSUPPORTED_DEVICE”
It’s because you’re not really using a Mac… It’s a Windows, so it’s not in the list of supported devices. I don’t know if exists any solution for this but you can search for it.
There is a solution.
You need to assign a valid mac’s serial number to your virtual machine.
VBoxManage setextradata “MacOS Big Sur” VBoxInternal/Devices/efi/0/Config/DmiSystemSerial ““
I have a Core Duo mac mini that I no longer use, and instead assign that serial number to my VM.
If you use the mac App Store you can sign in there. You still cannot use iCloud but your VM will be logged into your account so you can use the app store ect.
Ok, so followed all directions, but when i try to login to my account, i get an error. “ICLOUD_UNSUPPORTED_DEVICE” Now, i have reinstalled multiple times, a couple different ways and i continue to get this error. Any help to fix would be appreciated
Thanks so much Mukhtar. Followed your steps and have Big Sur Beta 11 up and running. However, that 30 minute wait at “Forcing CS_RUNTIME for entitlement” is a killer. Any way to get around this issue?
Every time I tried to download Mac Big Sur on virtualBox, I got stuck here. Either way to downloads straightly Big Sur on virtualbox or upgrading from Catalina. Please help.
It says on the last line “ Forcing CS_RUNTIME for entitlement: com.apple.rootless.restricted-block-devices
I have the same problem! any leads on how to get past this point?
It work, thanks!
Hey thanks so much for this guide. I tried it on my Ryzen machine (3970x) but I’m getting stuck at the EXITBS:START error like a few people above…I tried the VBoxManage modifyvm “macOS Big Sur” –cpu-profile “Intel Core i7-6700K” command (and did it with virtualbox closed), but it still stops the install…any ideas how to fix? Mobo is a TRX40 Creator, tried this with Hyper-V both on and off, same results…
Thanks for the help and the guides!
Can you please show me your executed code on the cmd? An image of the full code should be OK.
Hi, I’m running into the same problem on the latest release 11.0.1
Below is the code I executed:
cd “C:\Program Files\Oracle\VirtualBox\”
VBoxManage.exe modifyvm “MacOS Big Sur 11.0.1” –cpuidset 00000001 000106e5 00100800 0098e3fd bfebfbff
VBoxManage setextradata “MacOS Big Sur 11.0.1” “VBoxInternal/Devices/efi/0/Config/DmiSystemProduct” “iMac19,1”
VBoxManage setextradata “MacOS Big Sur 11.0.1” “VBoxInternal/Devices/efi/0/Config/DmiSystemVersion” “1.0”
VBoxManage setextradata “MacOS Big Sur 11.0.1” “VBoxInternal/Devices/efi/0/Config/DmiBoardProduct” “Mac-AA95B1DDAB278B95”
VBoxManage setextradata “MacOS Big Sur 11.0.1” “VBoxInternal/Devices/smc/0/Config/DeviceKey” “ourhardworkbythesewordsguardedpleasedontsteal(c)AppleComputerInc”
VBoxManage setextradata “MacOS Big Sur 11.0.1” “VBoxInternal/Devices/smc/0/Config/GetKeyFromRealSMC” 1
VBoxManage modifyvm “MacOS Big Sur 11.0.1” –cpu-profile “Intel Core i7-6700K”
How long would it take for the initial “#2. Once you started the VM then you’ll see some code running in the background.” to complete.
Mine seems to keep running for more than 20 minutes.
its stuck at
[EB|#LOG:EXITBS:START] 2020-08-22T01:21:00
Definitely not more than 5 minutes on my system. If you are doing this on AMD CPU then: if you have an AMD CPU then Add this code to your VM:
thanks,
first i was stuck on [EB|#LOG:EXITBS:START] error but your suggestion help to move some further steps.
i am still stuck at similar screen but last string is following
#[EB.BST.FBS|+]
my system have following config
AMD A6-5200 with 8gb RAM and 1TB hdd
Thanks man the background code was frozen, I added this code because i have an AMD Ryzen 9 3900x. It worked 😉
This should definitely show up in the initial How-To guide! I search way to long for this solution, just because I use an AMD cpu.
Still thanks for the help!
Thank you very much helped me with an AMD Ryzen 5 2600X!
To me just stuck here, i made reboot to my machine but is do the same all time. https://imgur.com/m5yZFfe
How long did you wait here?
Did you change the default VM settings like RAM, Processor and Video Memory?
I wait here 15 minutes, i changed ram to 4gb but i can use 5gb processor 2 cores but can use 4 and video memory to 128mb.
I have Same issue , any resolution please
Thanks, buddy works perfectly. Is there any way to make it faster with cursor and mouse pointer.
Thank you for this! I just used these instructions to install macOS 11.0 Big Sur (beta 4) on a VirtualBox 6.1.12 virtual machine (using my MacBook Pro as a host). Here’s what went wrong and how I fixed it:
1. You can use any SATA port numbers for your devices, just make sure the .iso file/drive is first. I ended up with BigSur.iso (SATA Port 5), macOS-11-beta.vdi (SATA Port 10), and a DVD (SATA 20) which ultimately ended up having the VBoxGuestAdditions.iso. (After I was all done I used VirtualBox Settings/System to change the boot order to boot from the hard drive before the BigSur.iso.)
2. The instructions are written for Windows, so you’ll need to run the VBoxManage utility (as shown in the “VirtualBox Code” section) from a different location. So instead of:
cd “C:\Program Files\Oracle\VirtualBox”
use this:
cd /Applications/VirtualBox.app/Contents/MacOS
and remove the “.exe” from the first VBoxManage command. So the commands I used were like this:
cd /Applications/VirtualBox.app/Contents/MacOS
VBoxManage modifyvm “macOS-11-beta” –cpuidset 00000001 000106e5 00100800 0098e3fd bfebfbff
(etc)
3. After starting the virtual machine, I hit a huge problem where it booted into the UEFI “shell” and just left me at a prompt saying “Shell>”. FYI, look at the first lines of this screen and you’ll probably see that “FS0:” is an “alias” to a CD-ROM drive. I found instructions online about typing “fs0:” and then “edit startup.nsh” but this failed with an “Access denied” message because it was trying to edit a file on FS0: (which is a read-only CD-ROM .iso). I also found instructions online about installing an “APFS EIF Boot Image.iso”. But I found an easier workaround. When you get to the UEFI “Shell>” prompt, just type “exit”. (Extra tip: type “help -b” to see available UEFI commands.) Typing “exit” will get you to a BIOS startup screen. Choose “Boot Manager” and it should provide a list of available devices. Choose each of them in order until you find one that works. As I recall, my first device was “EFI (something)” and choosing it didn’t do anything. My second device was a SATA device (as I recall), and it was mapped to the BigSur.iso install image that I was trying to install; choosing it worked!
4. Once I managed to choose the correct boot device image as discussed above, it started to install. You’ll see a ton of text scroll by. Just let it work.
5. The entire installation process will need to reboot a bunch of times (5?), even after you’ve done the main 29-minute installation part.
6. At one point I thought the installation was frozen because it was stuck on a line that read:
Forcing CS_RUNTIME for entitlement com.apple.rootless.restricted-block-devices
It seemed to be stuck on this FOREVER, but it finally continued after about 30-45 minutes.
7. When doing the initial Apple ID and iCloud setup, it got the error “ICLOUD_UNSUPPORTED_DEVICE”. I gave up on signing into iCloud for the time being. (I’ll try to figure it out later.)
8. The machine seemed to not recognize the host MacBook Pro’s keyboard. It had me press Z and / to determine that it was a US ASCII keyboard.
9. I couldn’t get the VirtualBox Guest Additions to install. The installer package seemed to run OK but at the end it gave an error message. The largest effect of this is that VirtualBox can’t capture the keyboard, so when I press Command-Q (for example) it gets passed through to the host. Also, the trackpad doesn’t seem to scroll; I assume it’s the same problem due to the missing Guest Additions.
10. Since I didn’t want to update my MacBook to the Big Sur beta, I removed the “profile” described near the start of this article. To do so, go into System Preferences / Software Update. On the left side, underneath the gear, you’ll see a message that your computer is enrolled in the beta seed program. Click the link to get a little window which will let you confirm that you want to remove that profile and revert to your existing (non-beta) config.
BTW, I created a 100GB hard drive (in VirtualBox), and there were 87GB free after I finished installing Big Sur, so macOS 11 took about 13GB to install.
I hope this helps someone!
We really appreciate your time to spend on this command and wrote it. Thank you @Ken
Thanks a lot Ken…. Finally, I think my installation is not stuck, I just have to wait
Any news on the iCloud error? i am trying to figure this for a week but no luck so far
Have you fixed an apple ID signing in issue “ICLOUD_UNSUPPORTED_DEVICE”?
Just ahead up that macOS Big Sur Beta 4 is now available to download from the download section of this post.
Link: Download macOS Big Sur Beta ISO Image
I get stuck at this “Forcing CS_RUNTIME for entitlement: com.apple.rootless.restricted-block-devices” message.
Can you please take a screenshot and give me the link for it?
As mentioned above, wait for 30-45 mins. I’m doing the same.
If you do not want to get stuck at loading or anything it is strongly recommended to download the VirtualBox extension pack on their website.
i also get stuck at “Forcing CS_RUNTIME for entitlement: com.apple.rootless.restricted-block-devices”
Hi ! Thanks a lot for this pretty useful guide, which helped me to install Big Sur on VirtualBox on Windows 10 (rel 1909). I’m however facing two issues, whose resolution got me into some trouble and i’m seeking advice to get back to a workable situation.
1) Belgian French Keyboard is not recognized by Big Sur, which made me provide all setup inputs with a wrong keyboard, but I somehow got through it I guess.
– I’m using in the meantime a French keyboard layout but all keys don’t match, sadly :'(
– I hoped that adding the Guest Additions (Darwin) could help, but when I tried to install the dpkg file it failed at the end and I’m not even sure it caused a trouble or not :-O
– When looking into the System Info I checked for Updates of Big Sur and see there is one pending… which I’m downloading now — hopefully the belgian keyboard has been added ?
2) The actual performance is really poor in my opinion. The mouse pointer is stuttering all the time when moved and starting an application takes several seconds (3-10). So I’ve looked into that and I’m doing the following:
– upgraded VM RAM from 4 GB to 8 GB, but kept the 2 processors only (my i5-4690system has only 4, but they are actual cores, and my PC is otherwise very smooth in games, other VM’s and anything)
– I admit I selected as disk (70GB) the VDI type instead of VHD and it is of dynamic type… my bad. Q1: Firstly, there seem no option or process to convert a dynamic to fixed length format, supposedly faster ? Any hint or tip here ? Secondly, when I used VBox’s media manager to copy the VDI to VHD format, MacOS would not boot anymore : the VM would immediately display a screen full of status info with hex code and status values all over the place a stop with a “Shell >” prompt. When typing Exit, I’m entering a boot manager setup displaying 4 entries, none of which are working when leaving the boot manager (I’m back to the Shell prompt each time). Any pointers to what might be the issue here ? I still have the VHD disk (though I have reconnected to the VDI now, which is pretty slow but works at least)
Thanks in advance for your advice !
PS: I’ve read you’re recommending VMware instead of VBox but I’d really like to push it to the maximum of tuning before adding one more virtualisation software and having to learn its specificities.
I’ve tried to install it right away to a VHD of fixed size but it fails the same way : it cannot start after installation and I’m left with a Shell prompt without knowing what is wrong or what to do next.
When ‘exiting’ I’m reverted to the Boot manager with much more clues…
Please help ?
PS: see attached screenshot https://i.imgur.com/T9UhBAA.png
Do you use our File or downloaded from another website?
I used your file. Did even the download twice in case it got corrupted but did a file compare by content and it was ok.
Thx for writing this article.
I actually get a problem that I did successfully installed the macOS Big Sur into Virtual Box, but after I created the Account and trying to login, the screen turns black for a while and then skip back to the login menu again. Is there any idea about this problem?
I’m pretty sure that I had followed every steps being mentioned in the article. Also I’m using the latest version VirtualBox and the iso file in this post.
Hello, sorry I do not speak English I am Italian, the guide and excellent is working for me, the only flaw and that you do not hear the audio, solutions? Thank you
Francesco
(translated with google)
https://imgur.com/YWuhI1z
Been stuck on this and it won’t seem to go past. This would normally be the boot in to the menu for setting up account, country, etc.
What is your system specs? if you have an AMD CPU then Add this code to your VM:
P.S It’s highly important that you should quit the VirtualBox program before executing the code.
If no then try the Fix the Operation Couldn’t be Completed BiErrorDomain Error 3 article.
If no success then I highly recommend you to Install macOS Big Sur on VMware on Windows 10 because it works much better than VirtualBox.
my vm is stuck at LOG:EXITBS:START and a timestamp
Hi, im having issues downloading the MacOS Big Sur beta ISO, when it finish downloading it give an error saying the file is damaged, i tired downloading again but it keeps giving me the same error every time.
if could help me out.
Hi,
Can you try this the beta 2 version, please? However, we don’t have problem with downloading and damage issues that you’ve mentioned.
Do you have this error “The Disk Image file is corrupted“?
stuck on code page with white text and black background https://imgur.com/NvjXH2C
What is your system specs? Is it an AMD CPU or Intel?
I have the same issue, running an amd ryzen 2700x with 16bg ram.
How to solve this problem?
https://imgur.com/a/gDUdi8L
Hi, I am not sure but to double-check, Is your Virtualbox the latest version (6.1.10)? Have your installed the VirtualBox Extension?
Hi guys. Doesn’t work for me because i’ll always get an error “VBoxMana.exe: error: Could not find a registered machine name ‘Mac OS Big Sur’. I found out that my machine is in a different folder. It’s in my user folder. What to do right now?
When you opened VirtualBox code via notepad or any other text editor, use the replace function of the program to replace the VM Name to your virtual machine name (this should be exact).
Also, make sure to use CMD (As admin) not Powershell.
That’s what i did exactly. Always the same problem:…..
Did you CD to “Program Files\Oracle\VirtualBox\”?
If you have installed Virtualbox in another folder then you may have to cd to that folder.
https://imgur.com/ky3Fw9I
What’re your system’s specs?
Asus Tuf FX 505 AMD Ryzen 5 3550H with integrated Radeon Vega 8 graphics+Nvidia GTX 1050 3Gb 8Gb RAM
Add this code to your VM:
P.S It’s highly important that you should quit the VirtualBox program before executing the code.
To me stops at installation, always show 3 minutes remaining but nothing is happening.
https://drive.google.com/file/d/1Khe9KeXKTwhP36nonEUh0kYT9bTk8pjF/view?usp=drivesdk
Hi, Please upload the screenshots here https://imgur.com/upload and share the URL with us.
To me stops at installation always show 3 minutes remaining but nothing is happen
hi
a am to long boot blocking for ” com.apple.rootless.restricted-block-devices” put how to repair boot ?
thank you
Roromac
Hi, I have the same error. After installing macOS and partitioning the drive on the recovery screen successfully, and then waiting 29 minutes on the apple logo code scrolls on the screen and seems to get stuck on:
CS_RUNTIME for entitlement: com.apple.rootless.restricted-block-devices
I followed the steps exactly and it was working up until there, does anyone have any suggestions? I already tried deleting and re-doing the VM and it is still the same.
Warning: All the content of this site is copyright protected, and no-one has the right to copy-paste our materials.
What are you gonna do, sue someone?
lol
There are other ways that can help the original creator to protect their works without a lawsuit. A lawsuit can be the last option as it might be an expensive and long process to go. I encourage you to read this article on how we can protect our content online.
I am stuck in a black screen, written install.nsh and it is not going ahead. What should I do?
What ISO image do you use? Did you download it from our link or somewhere else?
I have exact same problem, I installed it using your dmg file and converting it to iso.
Why you don’t use our iso file because it’s ready to use. We’ve tested the iso and it’s working without any issue
Huh? File is down and Mediafire, I had issues downloading it from there before.
File is down now but before I had issues downloading it from Mediafire. Can you add link to some better hosting or torrent protocole for it?
INSTALLATION CANNOT PROCEED BECAUSE THE INSTALLER IS DAMAGED, what can i do.
is there any way i can fix the screens ratio, it stays at a 4:3 ratio and i cant change it to my monitors ratio, so it has 2 giant black bars on both sides
If you mean the screen resolution you can use this guide to fix it.
I managed to get through the installation steps, but when the system boots, it gets stuck at this “Forcing CS_RUNTIME for entitlement: com.apple.rootless.restricted-block-devices” message. Tried searching for it but couldnt find anything related to restricted-block-devices.
https://imgur.com/a/uPf0GNX
Actually I just had to wait like 5 hours and then It worked. It is very laggy but Its usable. Thanks for the tutorial!
You can visit this guide to fix your issue.
However, you should give your VM more RAM and Processors in the first place.
Do you have the May 2004 version update of Windows 10?
If yes read my comment on how to fix the laggy issue with this version. It will be fast as normal again.
After getting it to work with VMWare I tried booting my Catalina version on Virtualbox but this really doesn’t start at all and is very slow as well.
I have the Windows10 May Update:
Windows 10 – Version 2004 OS Build 19041.329
So it could well be that everything depending on virtualbox doesn’t work as it should due to the Windows 10 may update. BlueStacks Android emulator doesn’t work any longer as well due to the May Update.
So I found this as well: https://dev.to/bobnadler/virtualbox-6-1-x-windows-10-2004-upgrade-problem-resolution-4i39
So a lot is not functioning 100% after Windows 10 – Version 2004 OS Build 19041.329 with virtualbox.
Fix the Operation Couldn’t be Completed BiErrorDomain Error 3
I did everything as explained but I don’t see the APPLE logo showing after x minutes waiting while booting from the Big Sure iso file.
I get this error:
https://i.imgur.com/r77JHhv.png
It’s virtualbox: Version 6.1.10 r138449 (Qt5.6.2)
If you’ve followed our guide thoroughly, we’ve said the virtualbox doesn’t completely support the new macOS Big Sur at this time but we’ll update the post once everything works fine.
Also, if you really need to up and running macOS Big Sur, we recommend you to use our Install macOS Big Sur on VMware guide because it’s working.
Okay….. I do get this now after long waiting:
https://i.imgur.com/yyNtxjS.png
But I don’t go passed the Disk Utility screen. Mouse is really not responding and screen is very slow with Virtualbox.
So I got somewhat further but this takes too long.
I don’t like VMware as i always get the 64bit remark that the hosts needs to be 64bit as well otherwise you can’t run a 64 bit virtual machine. But of course my host is 64bit and I set all settings correctly. It’s an i9 processor that won’t work together with VMware for now. I tried everything. That’s why I am sticking to virtualbox as this is working nicely on windows and with catalina for example.
You’re totally right but at this point, we also looking for a better solution to get passed from selecting the disk. When you select the disk then you can’t actually select it because it won’t let us do that unless we change some code in the configuration file of the virtual machine. It’s quite challenging but we’re working on it to find a solution. We’ll update our guide as soon as we come up with a good solution.
Btw VMware is working for us very well but I’m not sure why it’s not working for you?
I’m using VMware 15.5. You can download VMware latest version from this website but the language is Persian. If you don’t trust them then you can download from its official website.
It’s working 100% now, see: https://i.imgur.com/e3zf5yV.png
I had to do this: It’s due to the Windows 10 Version 2004 May Update !
If you do the following if you have the same issues than it will work again:
1. Control panel -> Programs and Features -> Turn Windows Features on or off -> Uncheck Hyper-V and Windows Hyper-Visor Platform
Additional Notes for Windows Hosts
2. To check the status of Hyper-v in Windows 10, | Run | OptionalFeatures.exe, and look for the “Hyper-V” option. The box should be empty, not checked or shaded. If you want to be absolutely sure that Hyper-v is gone then open an administrator command console and type “bcdedit /set hypervisorlaunchtype off”. Make sure to fully power down and reboot the host after changing the Hyper-v setting.
3. On some Windows hosts with an EFI BIOS, DeviceGuard or CredentialGuard may be active by default, and interferes with OS level virtualization apps in the same way that Hyper-v does. These features need to be disabled. On Pro versions of Windows you can do this using gpedit.msc (set Local Computer Policy > Computer Configuration > Administrative Templates > System > Device Guard > Turn on Virtualization Based Security to Disabled. CredentialGuard is a subset of DeviceGuard, so disabling the former should be enough. If you cannot use gpedit for some reason then the equivalent registry hack is to find the key
and set it to 0.
4. On Win10 hosts, check Windows Defender > Device Security > Core Isolation Details and make sure settings in this panel are turned off, reboot the host from power down if you needed to make changes. “Core isolation [includes] security features available on your device that use virtualization-based security” …which is why they can interfere with VirtualBox.
Thanks for you time for submitting this solution. We really appreciate your time Jordan.
Also, you’ll be able to fix the slow performance of macOS Big Sur or any other version of macOS by giving it more RAM, and Processor and it’ll perform much better.