
In this article, I’m going to show you how to install macOS High Sierra on VMware on Windows 10. In WWDC17, Apple has announced its new products and some cool features. macOS High Sierra 10.13 is one of the announcements at WWDC 2017. This year’s version of macOS is more of a maintenance release than a full-on new version. Called High Sierra, the new operating system is more about refinements than new features, as it aims to make your Mac more reliable, capable, and responsive while laying the foundation for future innovations in the worlds of VR (virtual reality) and AR (augmented reality).
But of course, there will be cool stuff to play with right away. Even if there aren’t any significant new features, High Sierra is still packed with a ton of cool things. To test the Apple new Mac operating system macOS High Sierra. You can only do that if you have an Apple computer (Mac) laptops or an iMac but there in this article, I am going to show you how you can install macOS high Sierra on Windows on VMware, so you don’t need to buy an expensive Apple computer.
Related Post:
- How to Install macOS Sierra on VMware
- How to Install macOS Sierra on VirtualBox
- How to Install macOS Sierra on PC
- How to Install macOS High Sierra on Windows via VirtualBox
- Download and Install macOS High Sierra for free
Install macOS High Sierra on VMware on Windows
Before you get started to install macOS High Sierra on VMware on Windows, there are some requirement and tasks to do.
Requirements:
- Minimum 2 GB Memory
- Minimum 2 cores of processors
- Hard disk free space 80 GB
- Graphics memory 256 MB
- Your system should support Intel or AMD VT (Virtualization Technology)
- VT (Virtualization Technology) Should be enabled from the BIOS setup.
As mentioned in the section above, your system should have the virtualization technology, and after that, you should enable that from your system BIOS. First, you should boot into your system BIOS then find the VT option and enable that. You can find how to boot into your system BIOS by this guide. Enable Virtualization Technology from the host machine.
To get started you need to download the following materials in order to install macOS High Sierra on VMware on Windows.
- Download VMware Workstation
- Download macOS High Sierra Final (1 Part)
- Download macOS High Sierra Final (8 Parts)
- Download Patch Tool Folder
Step #1: Extract macOS High Sierra Image
Once you have downloaded the macOS High Sierra image file, then you should extract it via WinRAR or 7zip after that you can use this image. To unzip the file, just right-click on the file, then select“Extract Here.“ It will take around 5 minutes.
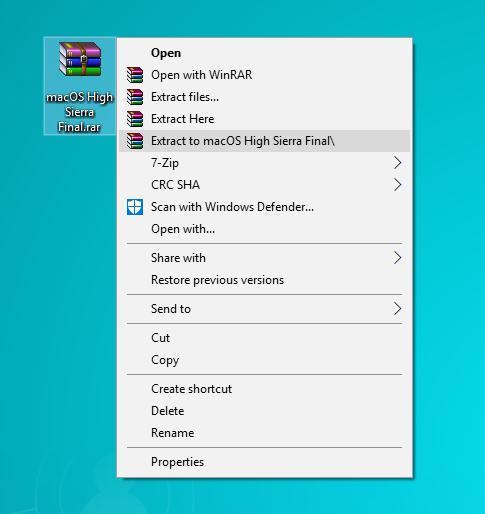
Extract macOS High Sierra Final Image
Step #2: Install VMware on Your PC
Get the VMware from the link above. Once you have downloaded the VMware Workstation, then Install it on your Windows PC. To install VMware, just click on the setup then hit Next and Next. Finally, click “Finished.” If you have installed already, then skip this step.
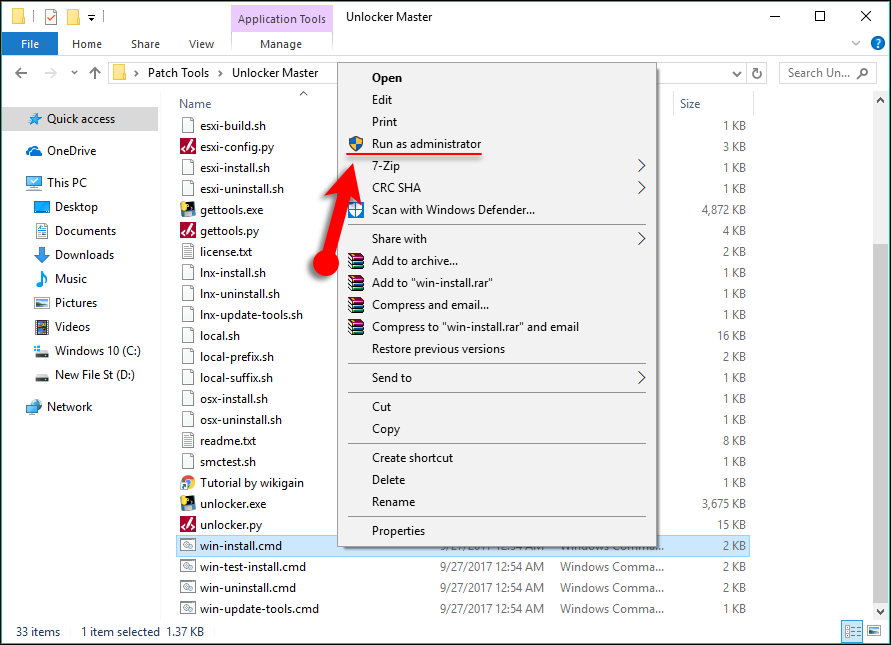
Step #3: Unlock VMware via Patch Tools
Firstly, make sure you download the latest version of Patch tools from the link mentioned above. Then Extract the file from Zip format. Open “Patch Tool > Unlocker Master” then right-click on win-install.cmd and select Run as Administrator. It will install the patch file in the VMware for macOS High Sierra and older versions in order to unlock VMware and let you install macOS on it.
Patch VMware to Unlock macOS Option
Wait for a little while then the command prompt window will disappear automatically when the VMware is patched or unlocked.
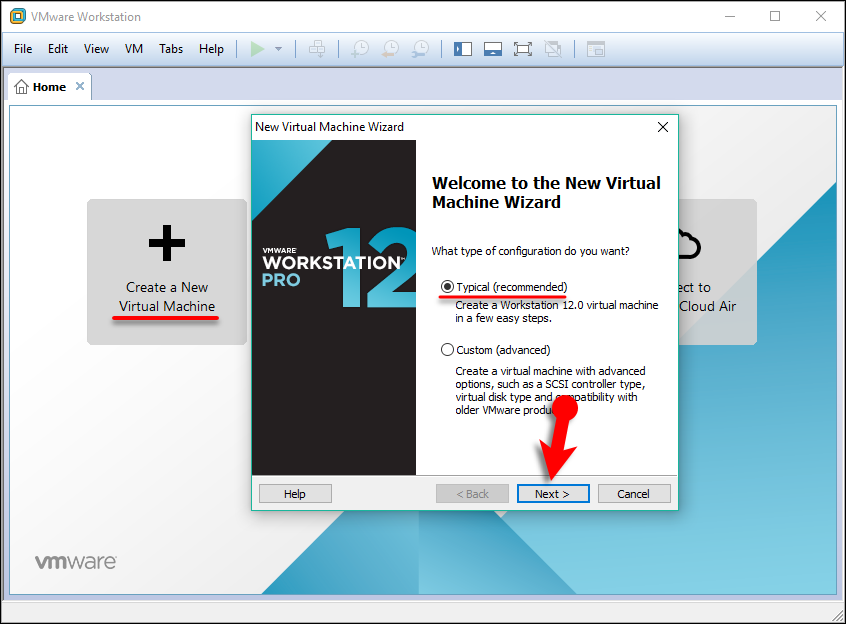
Step #4: Create & Edit New Virtual Machine
#1. Now open VMware and click on “Create a New Virtual Machine”(Ctrl+N) then select Typical (Recommended) and click Next.
Create A New macOS VM
#2. Select“I will install the operating system later” and click Next.
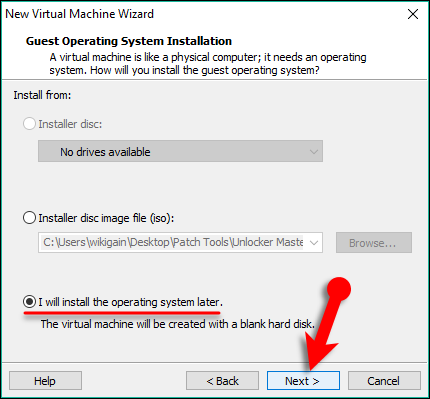
Select Install From
#3. Now choose“Apple Mac OS X” from operating system list then select macOS 10.12 from version and click Next.
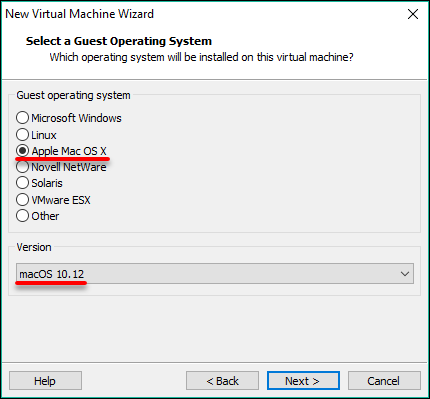
Choose macOS Guest OS
#4. Name the virtual machine macOS High Sierra or any other name that you like then browse a location to save virtual machine files like the VMX file and click Next. I suggest you leave the location as default and name it as shown in the shot below if it’s your first time.
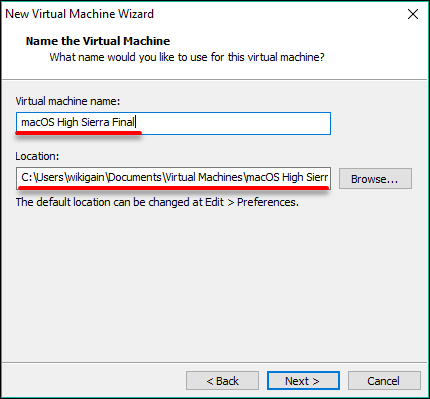
Name the VM macOS High Sierra
Note: You need to save it somewhere you remember and in a separate folder because later on, you will need to edit one of this file.
#5. Don’t Specify the disk space just select Store virtual disk as a single file and click Next.
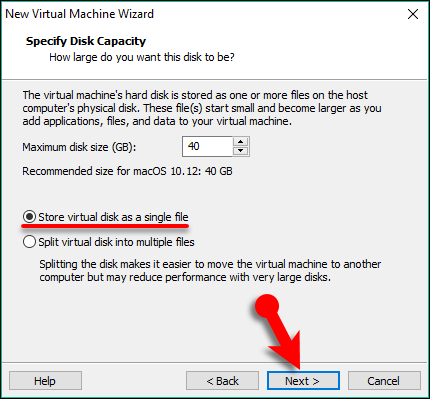
Specify Disk Capacity
#6. The essential VM files for macOS High Sierra has been created, so go ahead and click Finish.
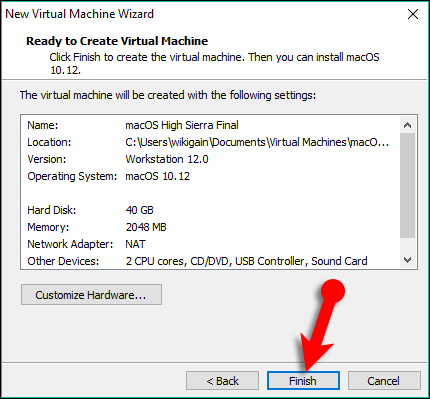
Ready to Create the VM
#7. Open the macOS High Sierra VM window on VMware workstation or player then click on Edit virtual machine settings.
Note: Don’t run the Virtual Machine until you made the essential steps.
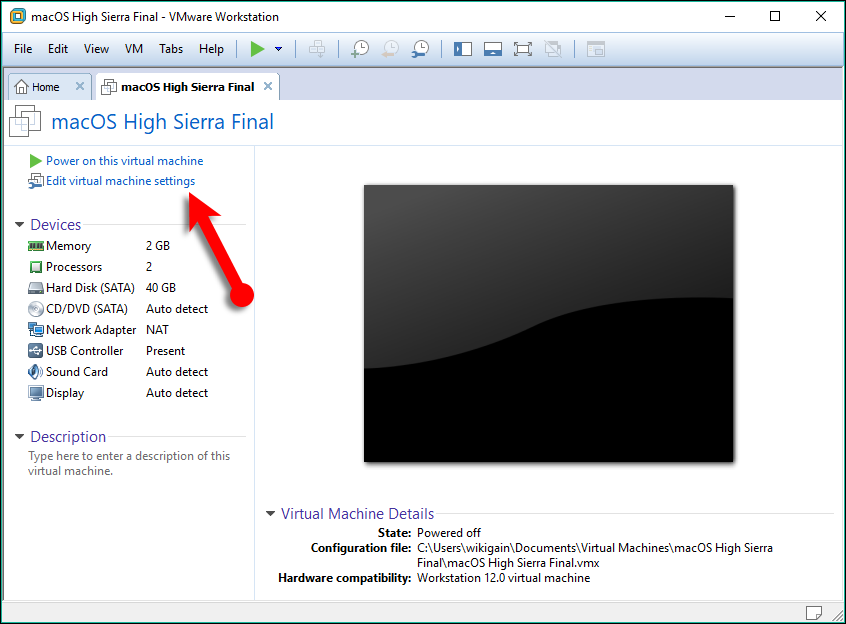
Edit the Virtual Machine Settings
#8. Increase the Memory from 2 GB to 4 or higher GB of RAM for better performance.

Increase Memory
#9. Increase the CPU processor core from 2 cores to 4 or Higher cores for better performance. Finally, Click OK to save all the changes that you made virtual machine settings.
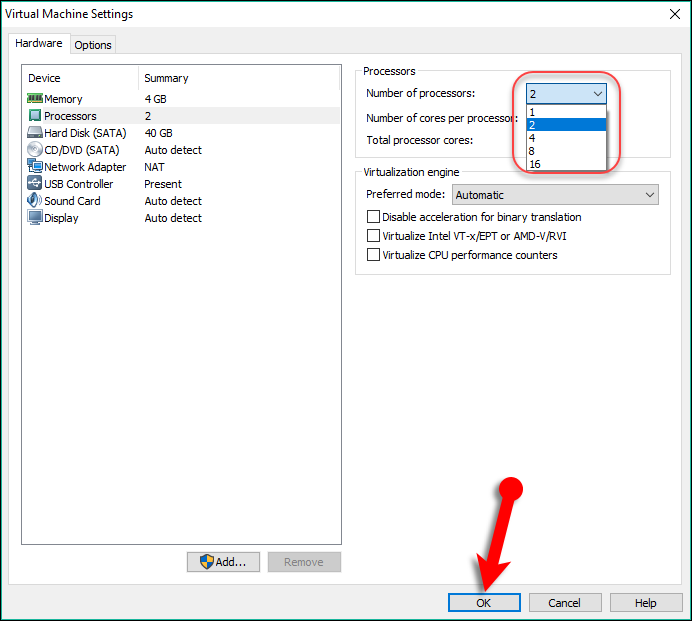
Increase Processors
Step #6: Manage macOS High Sierra VMDK and Virtual Machine VMX file
#1. Now go to macOS High Sierra virtual machine files that you browsed and located in step 4.4. If you have left that steps as default then the files are saved in this location: This PC > Documents > Virtual Machine > virtual machine Name. Here you need to replace the macOS High Sierra Image(8.87GB) with this existing VMDK (5 MB). Just drag the macOS High Sierra Image that you download and extract in step #1 then drop it on the Virtual machine files. If you get a replace or skip files dialog box, then click on Replace them in the destination.
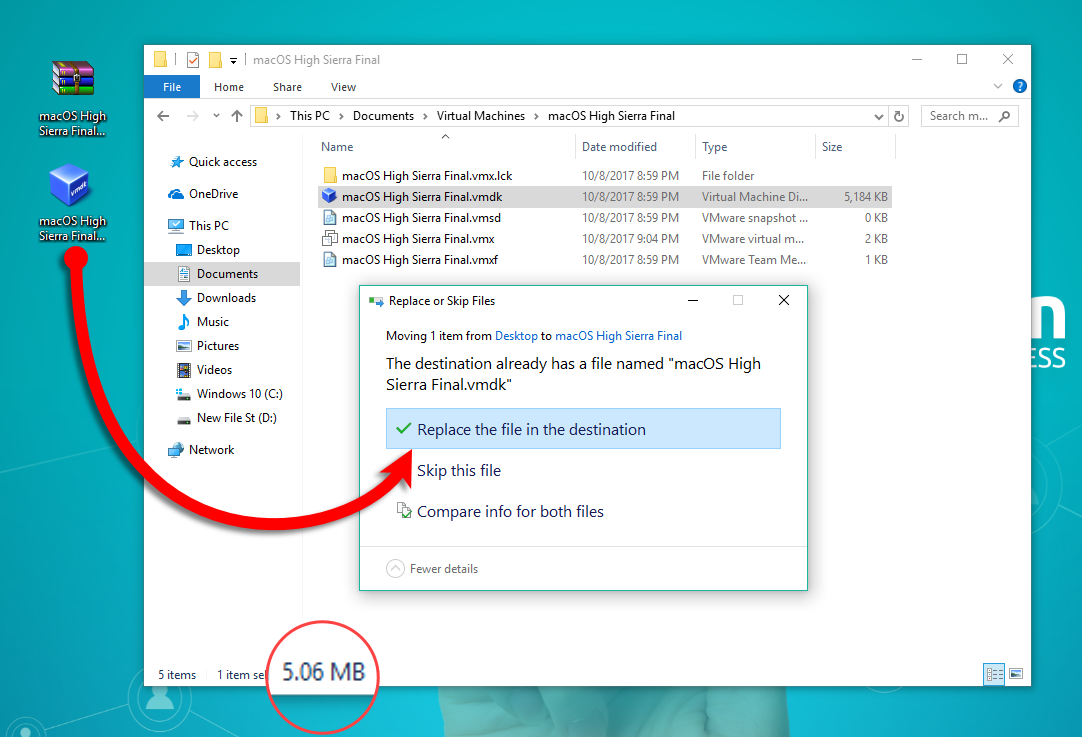
Replace the Virtual Machine VMDK
Note: You have to name the macOS High Sierra Image as your virtual machine name. It should be the same in order to be replaced and make it work otherwise; you need to add the image manually. Also, the size should change from 5 MB to 9.57 GB after you replaced the VMDK.
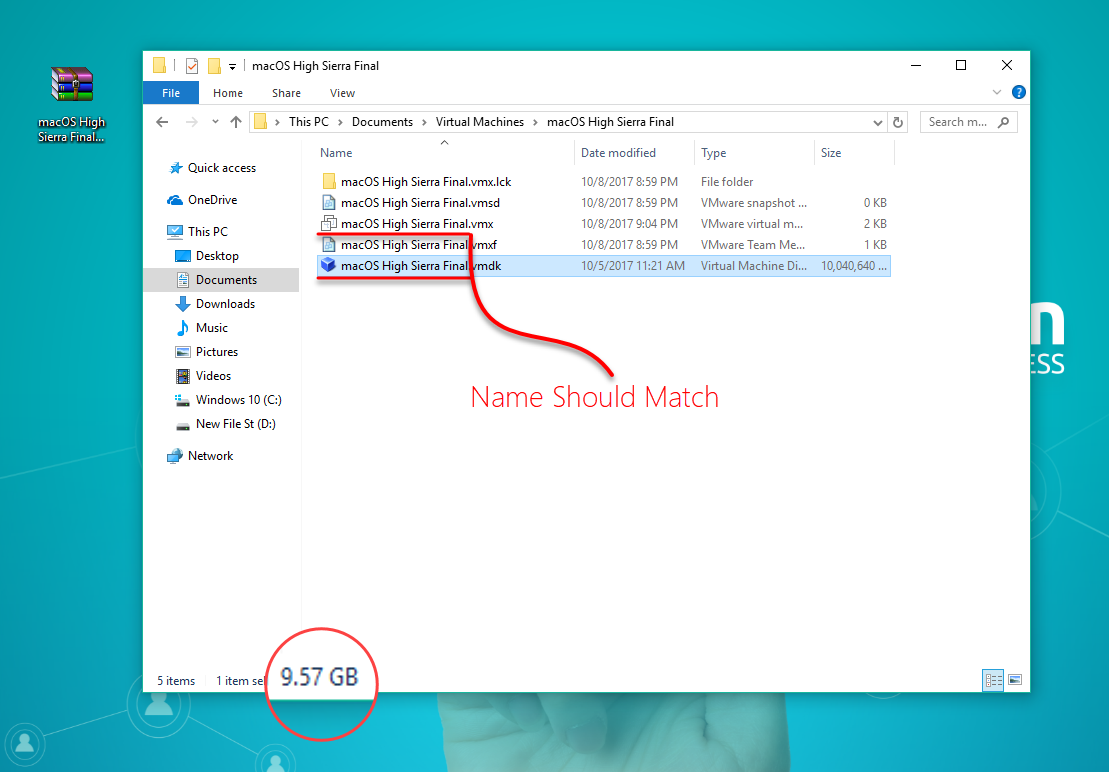
Match the Name and Size
#2. Now right-click on macOS High Sierra VMX and open it with Notepad.
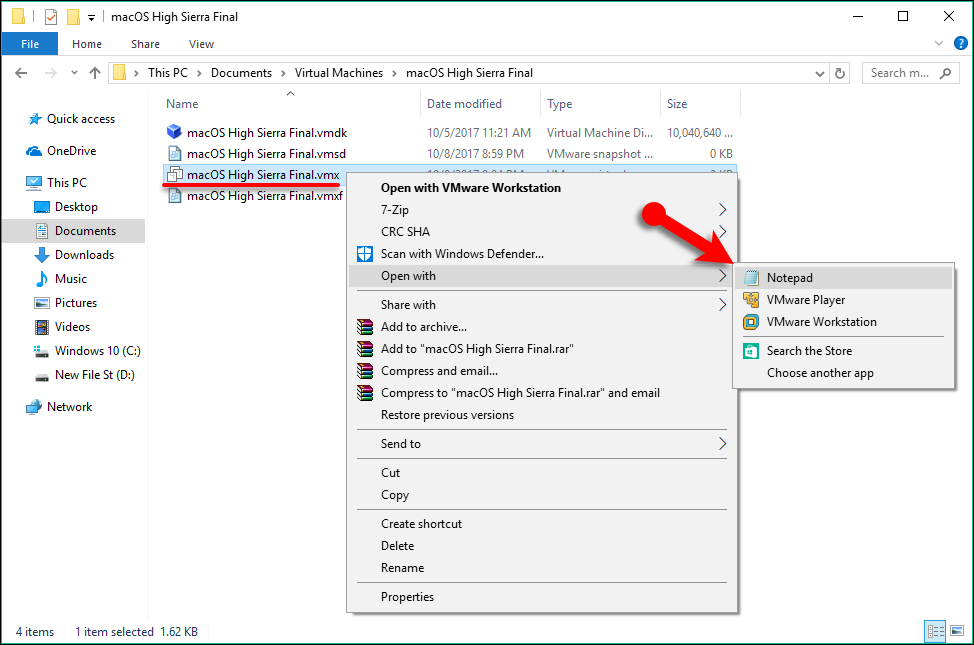
Open the VMX with Notepad
#3. Scroll down to the end, and type (smc.version = “0”) or (“smc.version = 0″as alternative) then press Ctrl+S to save it.”
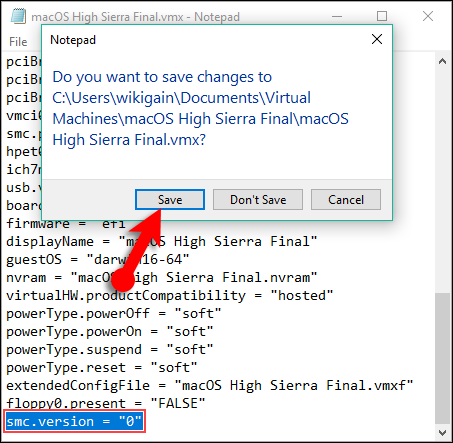
Edit VMX & Save
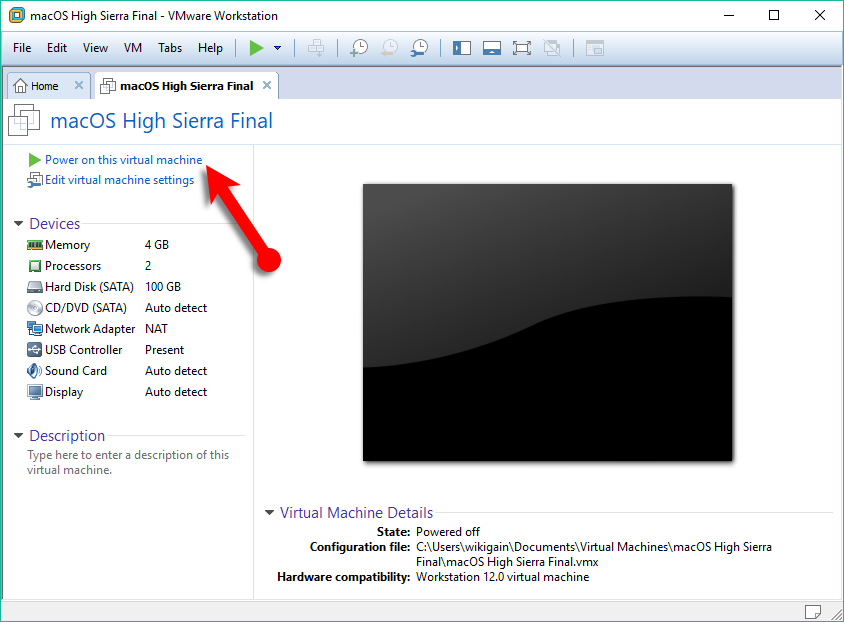
Step #7. Play the macOS High Sierra Virtual Machine
#1. Open macOS High Sierra VM window then click Power on this virtual machine.
Power on The VM
Here you go, and you don’t need to install macOS High Sierra because we have done that for you to save time, It is already installed on a virtual disk (VMDK). All you need to do now, perform a clean installation of macOS High Sierra to set it up as your needs. When you played the VM, then it should take you to the next step setting up macOS High Sierra in VMware.If no then you may miss any action or fail in any move, comment below and we will try our best for you.
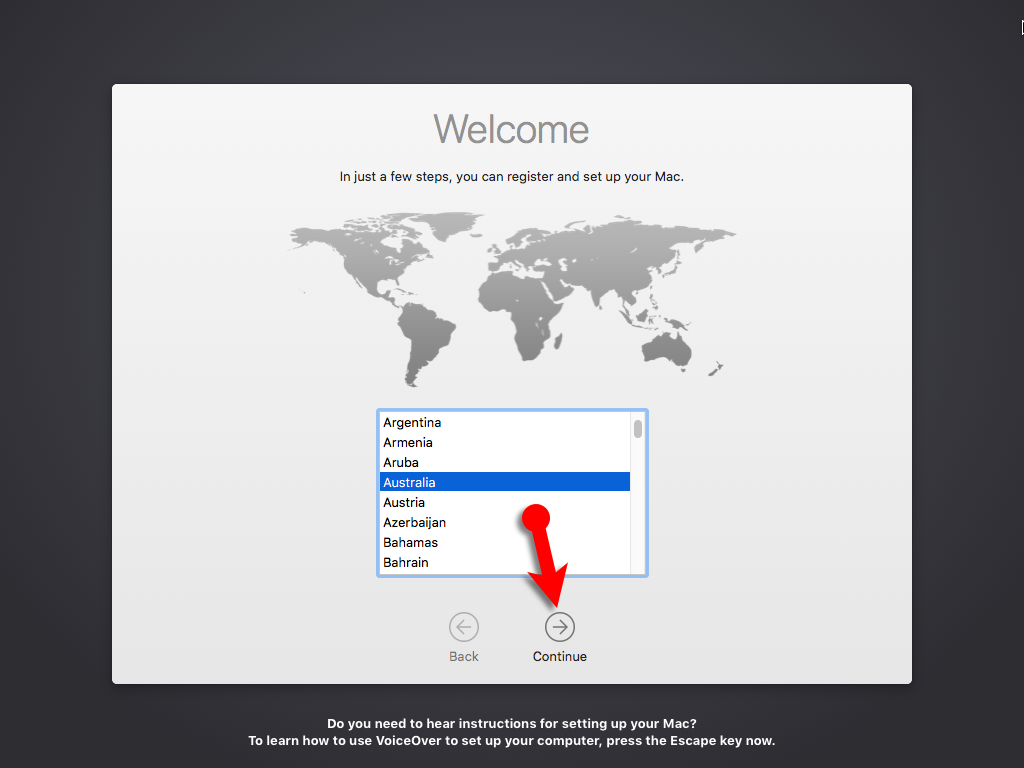
#2. Choose your Country and click on Continue.
Choose your Country
#3. Pick a keyboard Layout and click on Continue.
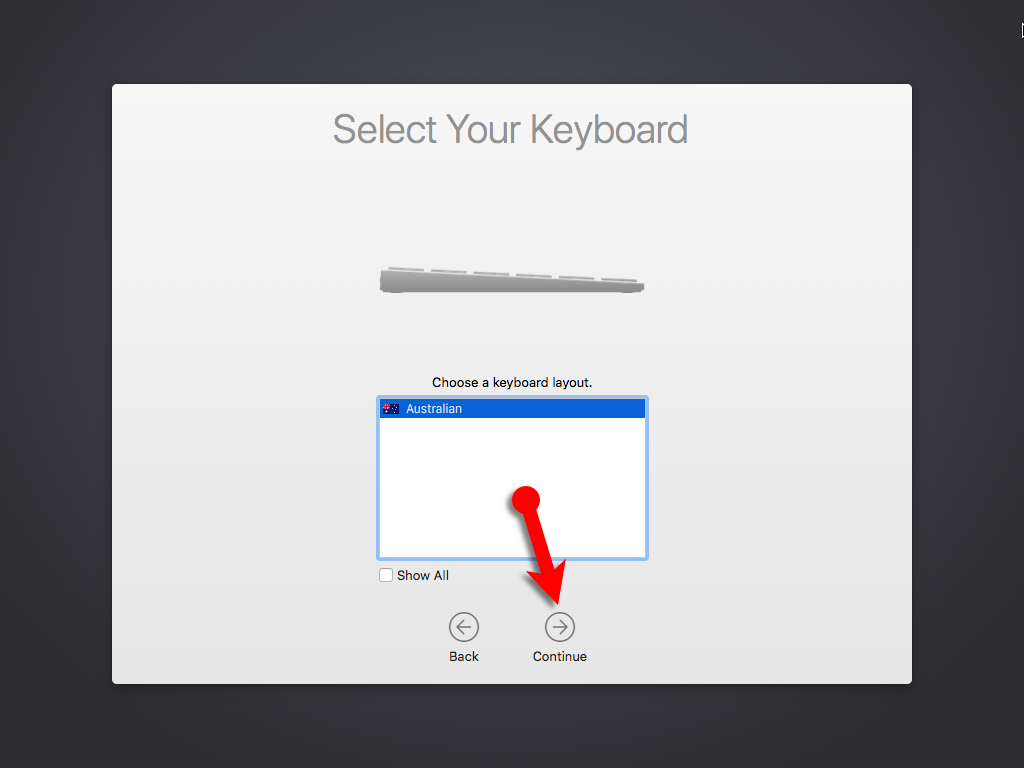
Select Your Keyboard Layout
#4. Now choose your method to transfer information to this Mac and click on Continue. Here I don’t want to transfer any information.
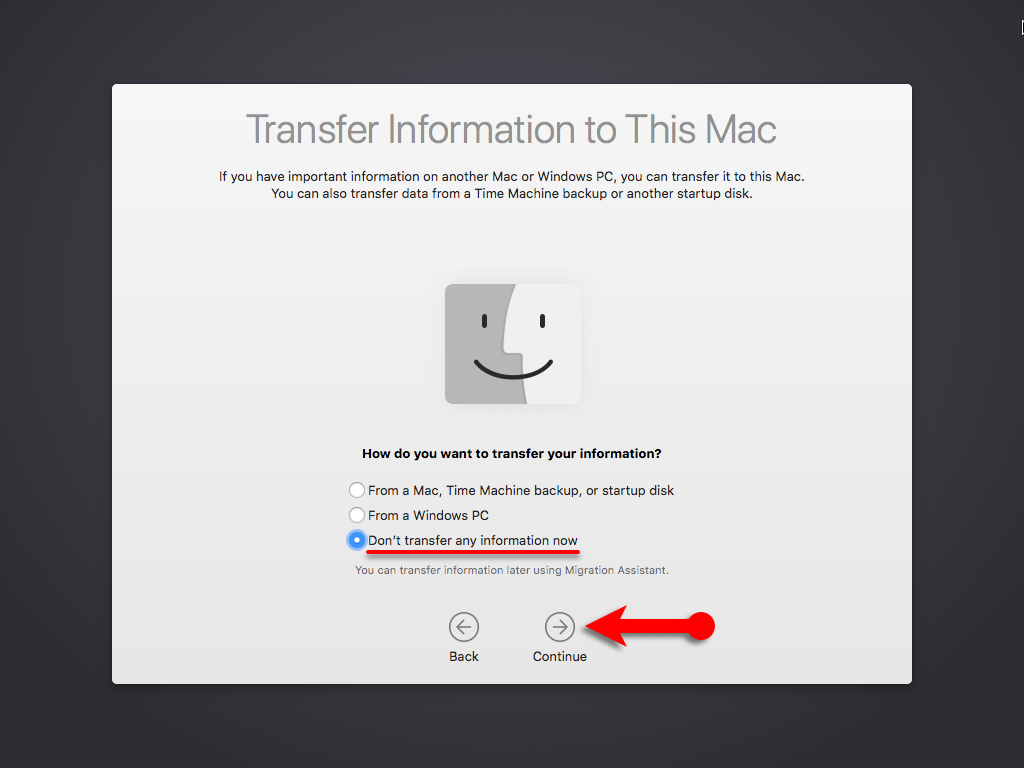
Transfer Information to this Mac
#5. In this step, you can to Sign in with your Apple ID. If you have one, then create a free Apple ID via the article, how to create an Apple ID on iPhone, iPad or iPod Touch. If you don’t want to sign in with Apple ID or it doesn’t work, then Choose Don’t Sign in and Click on Continue.
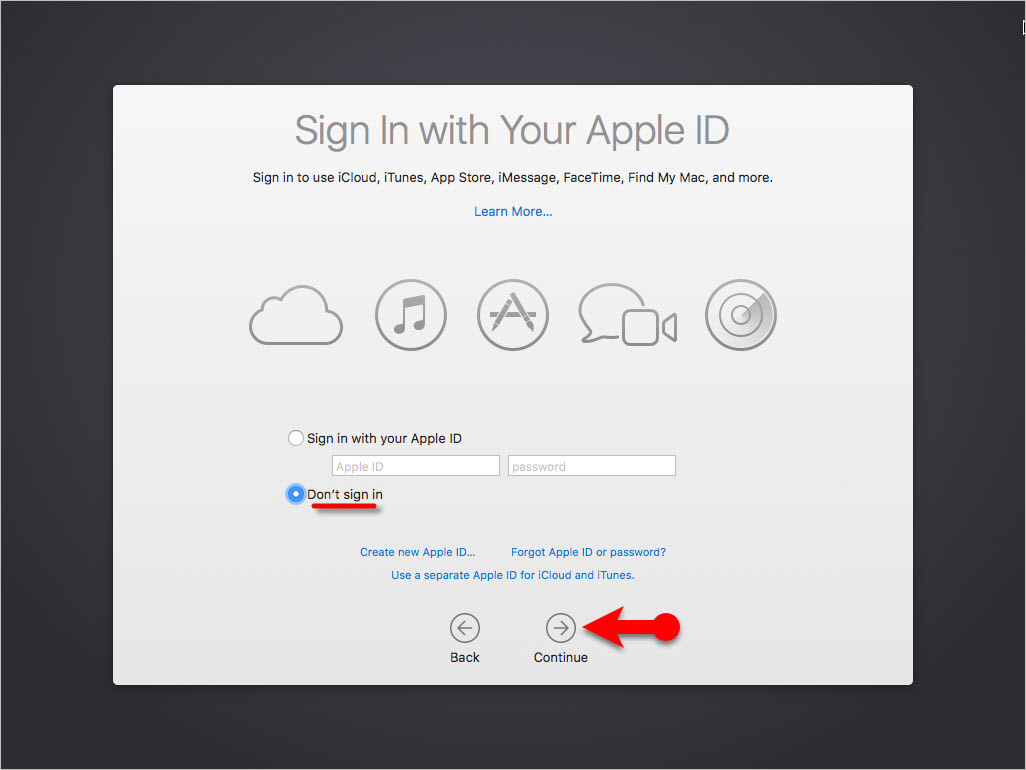
Sign in with Your Apple ID
#6. Agree to the Terms and Conditions.
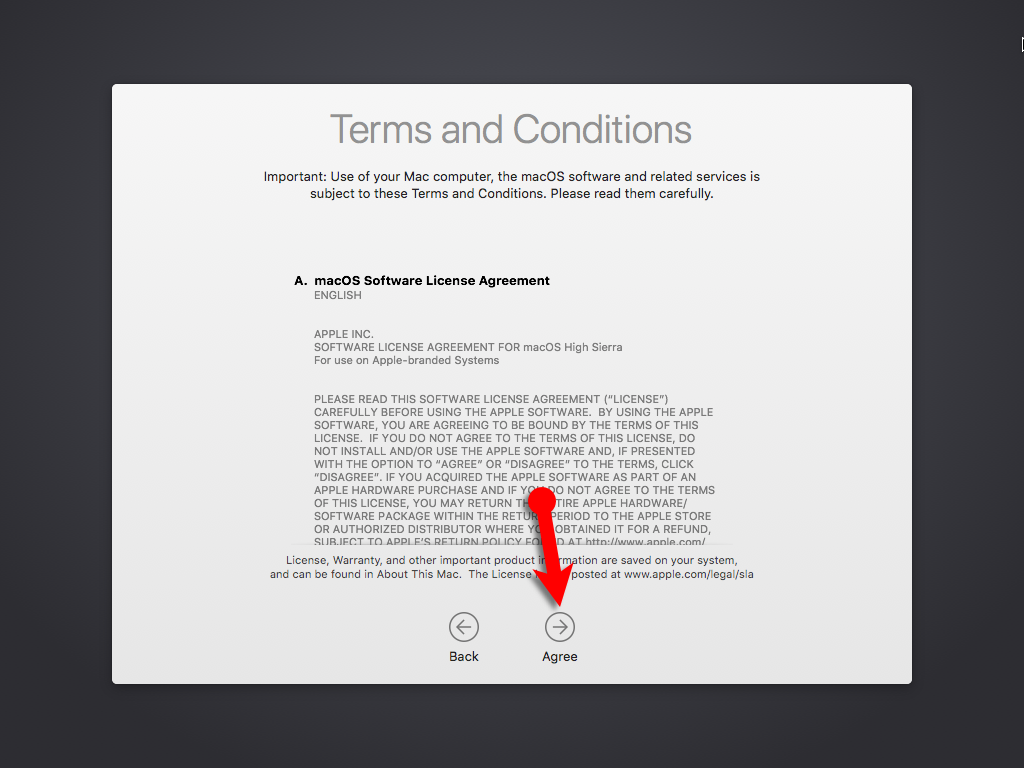
Agree to the Terms and Conditions
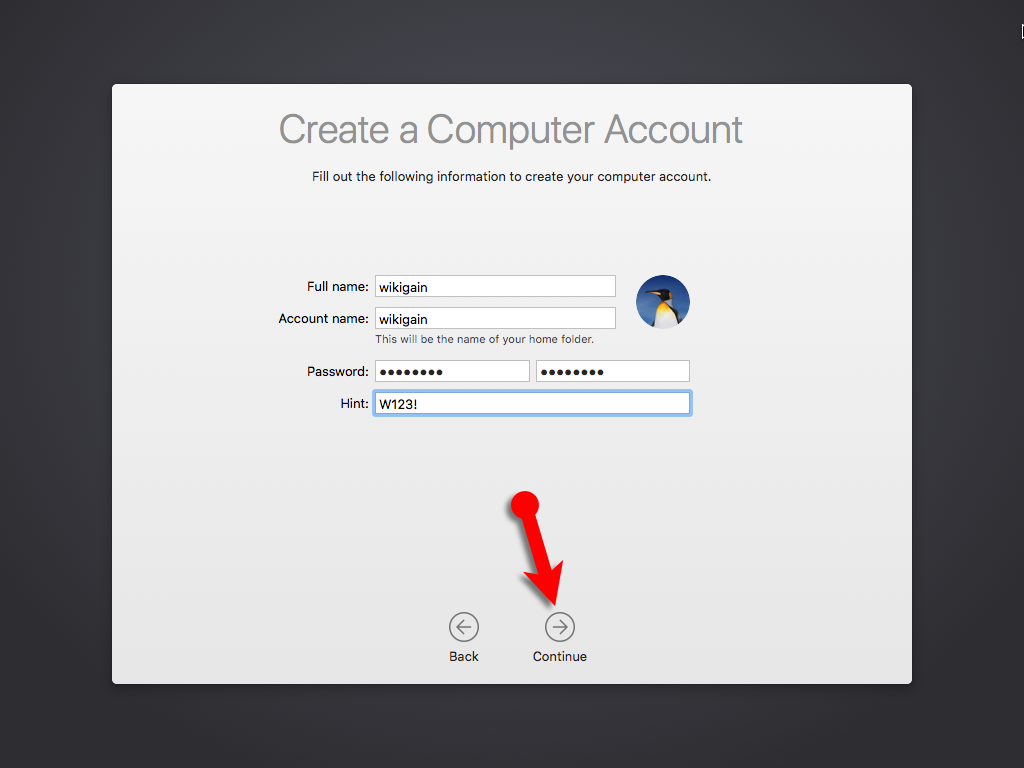
#7. Fill out the Full name, Account name, Password, Hint and check the box of Set time zone based on Current location. Then finally click on Continue to create your user account for macOS High Sierra 10.13, which will be installed.
Create a User Account
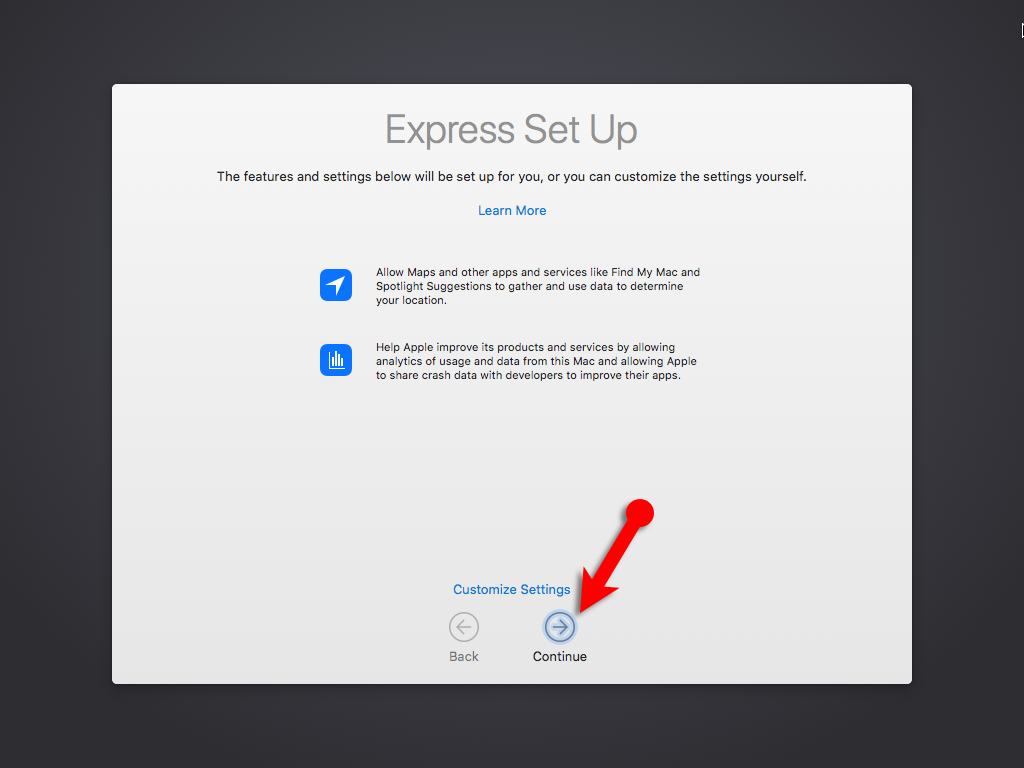
#8. On the Expres Set Up page, you don’t want to do something just click Continue.
Set Up Express
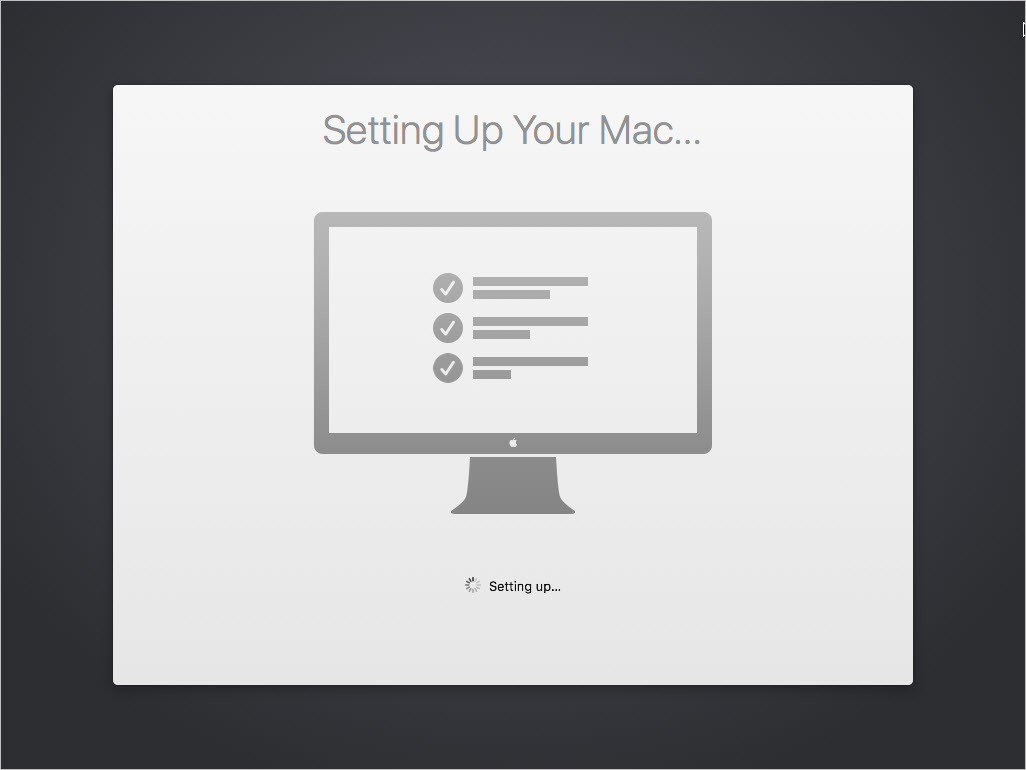
#9. Wait a little while to Setting Up Your Mac. Then it will run to the desktop of macOS High Sierra.
Setting Up Your Mac
Finish Installation of macOS High Sierra
After performing a clean installation and Set upping your macOS High Sierra then you should see your final result that, macOS High Sierra has successfully installed on VMware.
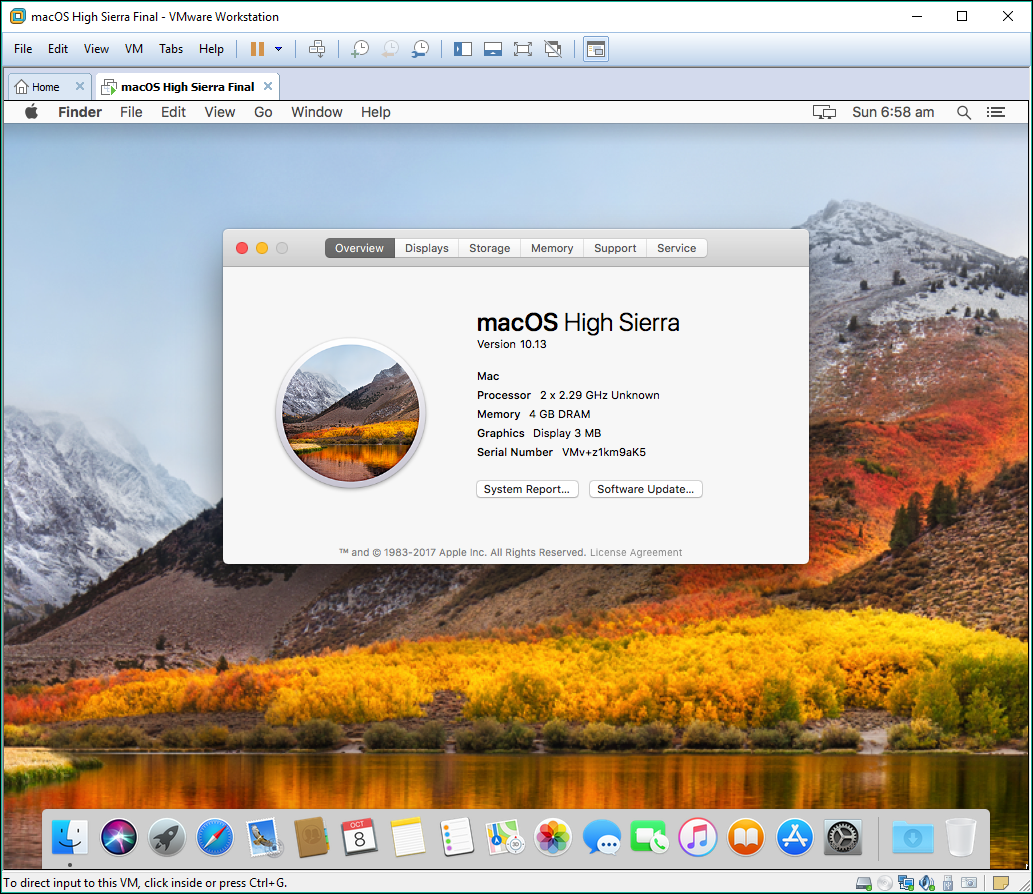
macOS High Sierra Finally Installed on VMware
Further Guide
I hope you guys have gotten something from this step by step guide. If you have any kinds of problem or question, feel free to share via comment section down below. Also, in the section below, there are more guides that may help you out. So go ahead and check out them, thanks for being with us.
Install VMware tools to Fix Screen Resolution
Now that you have, install macOS High Sierra on VMware on Windows successfully still there are many things need to fix manually. One of the most important ones is the VMware, and you need to install the VMware tool on macOS High Sierra to get the most of macOS High Sierra on Windows. Many features like drag & Drop, fix screen resolution, network and other issues will be fixed after you install VMware tool. We have a create a simple guide to do that so follow the step by step guide.
It was all about, how to install macOS High Sierra on VMware on Windows. If you faced any problem, tell us below by comment, feel free to say us. We’re waiting for your suggestion.
The message CPU has been disabled by the guest operating system, usually means that the unlocker was not correctly installed.
Doesn’t power on! Followed above perfectly
Hello, like some Ryzen users, I have encountered a problem with ‘CPU Has been disabled by the guest operating system’. After a short research, I found that you should add these lines to the * .vmx file at the end of the file:
cpuid.0.eax = “0000: 0000: 0000: 0000: 0000: 0000: 0000: 1011″
cpuid.0.ebx = “0111: 0101: 0110: 1110: 0110: 0101: 0100: 0111”
cpuid.0.ecx = “0110: 1100: 0110: 0101: 0111: 0100: 0110: 1110”
cpuid.0.edx = “0100: 1001: 0110: 0101: 0110: 1110: 0110: 1001”
cpuid.1.eax = “0000: 0000: 0000: 0001: 0000: 0110: 0111: 0001”
cpuid.1.ebx = “0000: 0010: 0000: 0001: 0000: 1000: 0000: 0000”
cpuid.1.ecx = “1000: 0010: 1001: 1000: 0010: 0010: 0000: 0011”
and change Hardware compatibility to Workstation 10.x (right click on VM Machine> Menage> Change Hardware Compatibility).
Rest installation is done like in this tutorial (Download, Install, Unlock VMware via Patch Tools, Create Machine, add to *.vmx line smc.version = “0” and so on)
Also, need to mention that I tested this solution on VMware Workstation Pro 15 version 15.5.7 (to this version you need to use Path Tool in version 3.x) and my CPU is Ryzen 5 2500U and I don’t know that this will work on newer version or VMw Player
Hello. I followed the guide, but got an error message “This copy of the Install macOS application is damaged, and can’t be used to install macOS”. What should I do? Please help!
Use VMware Workstation pro 15 and Macos Hight Sierra installed on Windows 7 64bit.
When the installation is clicked on Power on this virtual machine is presented
first the window of VMware and then the one with Apple’s apple and the progressive bar that starts to scroll.
However, the VNware window is immediately reintroduced and again with the Apple apple again
the progressive bar starts again from zero and the cycle continues to repeat without reaching the conclusion. Where should action be taken to remedy the problem or the normal practice of installing Macos?
Hi there, Faiz Orz!
Fantastic job! Yesterday I followed your instructions and emulated a Mac Sierra with VMWare, and then upgraded it to High Sierra, with its ‘tools’. It works perfectly.
However, today I wanted to try it on another ‘Windows 10’ computer, following the same instructions, and I can’t get past the startup. The error is the classic one: ‘CPU Has been disabled by the guest operating system’.
I added ‘smc.version =’0” to VMX.
Both my CPU (Intel Core2 Quad Q6600) and my board (ASUS P5K-e) support VT and are BIOS-enabled.
SecurAble says OK: 64 bit, Hardware DEP Yes, Hardware Virtualization Yes.
I don’t know what else to do or check anymore.
Any idea?
Thank you!
Hi there,
Try again but this time add smc.version = 0 to VMX without the quotation.
Hopefully that it solves the issue.
Thanks, Faiz.
Already tried, but without effect.
If I send you any log, will it help you find the problem?
Regards.
No dear, I am sorry in this cause your system might not be compatible with macOS or something but i can’t your any other tips to fix the issue. So far i have faced this issue then adding the sms.version code to the VMX file has fix the issue but in your cause i don’t know what’s wrong.
You have to find smc.present = “TRUE” from .vmx file and change value to FALSE. Then try again
Does not work with VM Workstation Pro 14.1.2. The option to select MAC OS is not an option when selecting guest op system.
Did you install (Win-install) script?
I know this is like 2 years later and may not mean anything anymore, but your issue is because this article only has the toolkit for Workstation 12 and 13. I tried this toolkit with workstation 15.5, and had the same issue. Do some searching online for your version then try to install the tools again.
Awsome man, You made my day
Thanks for sharing your feedback dear 🙂
Hi guys.
I have a problem in step 7. when I click Power on this virtual machine, after a few seconds this massage appears : ” The CPU has been disabled by the guest operating system. Power off or reset the virtual machine. ” and after I click OK there’s just the logo of apple and there’s no any installing process or something. I don’t know what to do next. please help !
same I keep getting the same error
I am using vmware player in windows 10 and macoshigh sierra is installed.
My total memory is 16 GB and i allocate 10 GB for vmware player (i.e) macoshighsierra, but it continously freezes when i work for long hours.
Hey, done with all steps and required setups but while starting VM machine it is serching for network boot option and ends with no os found..
also changed the harddisk as guided in video …
no luck….plz help
I don’t find the selection for mac 10.12 I only find 10.11 even after the unlocker!!
Did you try restarting VMWare? I did and it appeared right away!
Hello,
If somebody installs the vmware patch tools for macOS 10.12, can they just install the patch tools for macOS High Sierra or does VMWare need to be reinstalled first?
(Note I haven’t actually done this, I’m just asking for information purposes)
I can’t get iMessage to work no matter what I do… but all the iCloud stuff works fine. Is there a setting that can be made or something else done to make iMessage work?
Hi, i successfully installed sierra, and i increased size from 80 gb to 180gb in vmware but it doesn’t reflect in mac os.
I am unable to increase the partition size from disk utilities in sierra, i was able to do it successfully in elcapitan..
My os sierra disk size keeps on filling day after day and it becomes slow after few days.
Do you know any solution for this?
After updating guest to 10.13.4, network card doesn’t work anymore. Any suggestion?
I upgraded from VMWare 12 to VMWare 14 Pro, and I cannot seem to get MacOS to show up. I’ve run the patch and made sure to enable Intel Virtualization in the BIOS. I also had an older VMWare MacOS Sierra image that still plays. I just cannot create the new system using this VMWare image.
VMware 14 is not fully compatible with macOS High Sierra. We’ve tried to install high sierra on VMware 14 but we couldn’t succeed.
Hello!
I couldn’t run my virtual machine. With this kind of thing. https://goo.gl/u2NV4N
Is there anyone could help me
My PC
Intel Pentium G4600
Integrated Intel HD Graphics 530
RAM 8 Gb
What did you select for Version while creating a new virtual machine? You should select Mac OS X 64
Hi!
I have only such kind of option in VMWare https://goo.gl/51tV2c
And there is no any option to select Mac OS X 64
Thank you
Enable Virtualization Technology from your BIOS Setup then you’ll see Mac OS X 64
I have the same problem.
I see you don’t monetize your site, don’t waste your traffic,
you can earn extra bucks every month because you’ve got high
quality content. If you want to know how to make extra money, search for: Ercannou’s essential tools best adsense alternative
Any plan to make it support VMWare 14?
We can’t do anything. VMware team should work and make the VMWare 14 Compatible with macOS.
Runs fine on VMware Workstation 14.1.1.
Followed this guide with no problems.
I got a problem. I could start the MacOS, but I can’t chose the Language because the click of my mouse isn’t working. I can scroll up and down, but the left and right click don’t do anything
Hi, I got a problem. the click of my mouse didn’t work. I can scroll up/down but my left and right click don’t do anything
Does not work for AMD machine and VMW 12. No error but stuck at apple logo screen. I think error is same as Jay Andrews’ but I seem to have disabled the notification.
Hello, I need your help. I installed vmtool, but when it arrives with .vmware.fusion.tools.darwin. the screen glue, has already opened the VMware Workstation 14 Player and does not appear the Apple Mac OS x option. what do I do
It’s no working well on VMware Player 14 but it works on VMware 12
Well after I ran the win-install.cmd nothing happens. The window opens and closes immediately. Therefore cant add Mac OS X in my Workstation 14….
First, you need to close VMware completely and run Win-Install as administrator. Once done you can open VMware and Mac OS X will be on the list
Thank you very much for this great work. It works like a charme.
You’re welcome and thanks for sharing your feedback
Was able to update successfully to 10.13.2 thru the App Store.
Tried the Combo Update first because I already had it downloaded but it failed because of the Fusion drive issue with the Beta of 10.13.
Thanks for sharing your awesome feedback
Looks like you can’t upgrade this image 10.13.2.
https://beta.apple.com/sp/betaprogram/apfsfusion
“If you installed a beta version of macOS High Sierra, the Fusion Drive in your Mac may have been converted to Apple File System. Because this configuration is not supported in the initial release of macOS High Sierra, we recommend that you follow the steps below to revert back to the previous disk format.”
Worked great after a pair of adjustment of the VMware machines settings. I also succeeded in upgrading to 10.13.1 via Apple Store Updates (not without some problems). Great!
Thanks for sharing your awesome feedback.
Here is download link for macOS High Sierra 10.13.1 ISO Installer on Google Drive.
https://goo.gl/DhsHTy
Help, my setup is boot looping between the Apple logo and the VMware logo! I am using macOS 10.13 High Sierra as guest OS, Windows 10 as host OS, VMware Workstation Player as hypervisor, guest type macOS 10.12, smc.version = “0”, SATA interfaces for both ISO and vmdk; and hypervisor is patched with unlocker.
Hello dear, Watch the video tutorial and make sure you followed all the steps correctly like the video.
Updated: The video is removed from YouTube 'Sorry for the inconvenience guys'Make sure your quotation marks match the rest of the VMX file. I noticed when I copy pasted smc.version = “0” into the VMX it was “curly” quotes, which didn’t match the other lines. Changing the quotation marks worked for me.
Thank you for sharing your great feedback dear Zinc Whiskers.
The exact same problem with me
Might want to update this how-to to mention VMware hardware level compatibility. When using Typical to create VM you don’t get the option to specify and I had mine set to Version 8 as default using Workstation 12.5.5. (Got stuck on white apple logo with no progress bar)
Don’t know what the minimum is but after right-clicking VM and upgrading it to Hardware Version 12, it booted right up afterwards.
Ok, thanks for sharing your feedback dear.
dear admin,
can upload the VMware pro 12 , the link provide here just link to official VMware 14, tq
You can, Here is the link for both (VMware Pro 12, 14)
I tried “Patch Tool” with VMWare 14 and it didn’t work, Also, I couldn’t see “Apple Mac OS X” between the OS Types even after installing “Patch Tool” with administrator. It was working fine with VMWare 12.5 but with VMWare 14 it doesn’t. 🙁
This is not working with VMware 14 it works with VMware Pro 12
I’m coming to this a bit late, but there seems to be a problem with versions. I have installed VMWare Workstation 12 from the link. I downloaded the macOS High Sierra Final (1 Part) and it delivered macOS High Sierra Final.vmdk. When I got to your Step #4, #3, VMWare looked for a .vmx file, so didn’t install. I’m stuck, please help.
Can you take a screenshot and paste the link here.
Works fine, thanks you!
You’re welcome
Hi and thanks for your job,
Could you please put a file in another place instead of GOOGLE DRIVE, i can not download it from there.
Why? what the problem? Right now we don’t have enough storage and we will buy online storage for our files. Till that time you download from google drive. If you have any problem just let us know
I tried to leave a reply now my next try:
Great tutorial THX
I got a problem, my virtual disk is getting slightly full after some hours, system freezes cause of a full disk. I am using vmware workstation pro 14 now I am trying BIOS settings instead of UEFI and I placed vmdk i another folder looks better. I had some time machine stuff, disabled also because this could be also a problem. Anyone same issues?
Great website go further on
Greets zellibiged
Great tutorial, THX
I Got one strange issue and I have not read all comments, I will do.
The VM with OSX Sierra fills the virtual disk slightly with some stuff, did not know what, problem is that than VM is hanging up and freezes cause of full disk.
Maybe a time machine issue or something else.
Got anyoe of you same difficulties, all worked fine wit VMware workstation pro 14 and I got also after installing VMware tools a big screnn, I am using a tripple screen setup with 3240×1920 Pixels and it was nice to look at, a little anoying is that no 3D acceleration is working out of the box, are there any known projects?
THX for posts cya
I have followed your instructions to the letter and those of every other source I could find (all pretty much saying the same), but nothing works. I have the current release of VMware Workstation 12 Pro running on Win 7 Ult. x64, with virtualization enabled in the BIOS. Following your instructions, I get to the initial macos boot with a white Apple logo on a black background, then a Windows message box appears saying:
“The CPU has been disabled by the guest operating system. Power off or reset the virtual machine.”
Any thoughts?
Jay
Some of the people had like this issues and we created a step by step guide to Fix VirtualBox Error During Installation Process of macOS High Sierra. Just click the blue link and fix your issue. If again you had any problem. Let me know.
yeah man! worked great. my first try was on virtualbox and won’t work. but thiss here is working fantastic. many thx!!!!
now i ‘ll try bravely a hackintosh on my zenbook ux310u. 😉
Good luck and have fun 😀
Hi Mukhtar,
thank you very much for this tutorial, however I find some problems patching VMWARE 14, perhaps the patch doesn’t work with version 14? have you any update about this?
All the best
Right now We don’t have the update patch tool for VMware 14. We also have tried to install macOS High Sierra on VMware Pro 14 so the patch tool did not work. We will find any solution for this don’t worry.
Hi, good tutorial.
By the way, where is there macOS High Sierra final release version?
Don’t worry dear, we will update the whole article including High Sierra latest version
Hi,
I had the beta of high sierra running and just updated to the final version but now the OS doesn’t boot anymore. I actually tried it from scratch again and got the same result. Any ideas ?
Thanks
Don’t worry we will create a new guide for high sierra on VMware. Stay up to date on http://www.wikigain.com
Does Imessages and Facetime work with this version? I was able to successfully follow your guide and setup everything.
It might work for somebody but not all. You need to fix it manually if it’s not working for you. For now, you can follow this guide on youtube.
Updated: The video is removed from YouTube 'Sorry for the inconvenience guys'can you download app store apps with this version?
Yeah, you can download anything present in the app store
What do you do with the 1-8 parts?
i have tried the one file download but I Couldnt edit the file with any editor because it was too big.
BTW I’m using AMD Ryzen 5 1600 with SVN mode enabled
Please follow the video tutorial:
Updated: The video is removed from YouTube 'Sorry for the inconvenience guys'What do you do with the 1-8 parts?
do you put them in the same folder?
I tried the 1 part one but I wasn’t able to edit the file with any editor
VMWare patch not working and trial period expire. some update perhaps?
The download link is not working or the setup?
Hey you didn’t mentioned this image is compatible with which system?Does it only supports Intel or AMd or both or does it work only with sse 4.1 or sse 4 ?
Please mentioned it because it don’t not work in AMD system with sse4 ( Phenom x4 9650)
It works with both but some of AMD processors do not support.
Hello Muktar
I had download vmware and one of macOS High Sierra part 8 and part tool…But when I try to install vmware on my laptop , vmware can not installed because not suppport..can you helpme mukhtar..
I Have spek my laptop as like this…
processor intel core i-5 3317U CPU@1.70GHz
Ram 2,000
operations sytem : 32 bit
What must I do? soon I can install Mc Os Sierra in my laptop…Please help me
Download all parts not only part 8 then I will tell you what to do next step.
howdo I extract the parted rar files(1-8)..?
It’s very easy and simple. Download all 8 parts and right click on one the part and choose extract. Make sure that you should have Winrar or 7zip.
Hi admin, i must say you have very interesting articles here.
Your blog should go viral. You need initial traffic only.
How to get it? Search for; Mertiso’s tips go viral
Good afternoon
Hello Muktar
May I download your file but I want to ask to you about install here
1.I have laptop speck inter core i-5 32 bit thosiba satteliite..can I install in mylaptop..
2.I’m confused many file Download macOS High Sierra 10.13 Beta on part 1 and part 8..so I must dowload all file ..or choise on of file
Thanks
We have two download links. One for those who have high-speed internet connection. They can download one part. If you have a slow internet connection so you may download 8 parts. It’s necessary to download all parts. I have not tried before on this system. You can try once.
In virtual machine,mac os installation loading large amount of time.not open home page.
You’ve done something wrong. Increase the Memory to 128 and also increase the processor.
hello, please clarify. do we increase “Number of processors” or “Number of cores per processor”? Because the screenshot above seems wrong.
Yes dear, increase the number of processor for better performance. I have just 4 cores so I can use 2 of them for better performance, but if you have 8 cores then you need to increase it to 4.
Any chance to make GPU work?
It depends on your Motherboard that support macOS or No?
It depends on your Motherboard that supports macOS or No?
My computer is thinkpad T460p and I think it should support macOS, as I’ve seen people hackintosh on T460. I do not want to partition my hard disk, so I prefer the VMware, but the VMware seems not supporting 3D acceleration.
Yeah, 3D acceleration isn’t supported but you can install VMware Tools on the VM to get the most out it on VMware without 3D acceleration.
Watch this guide:
Updated: The video is removed from YouTube 'Sorry for the inconvenience guys'Excellent tutorial, thanks. However, I need to test the Beta 3 version and when I try to perform an update the Beta 3 update is downloaded but the OS freezes after the machine restarts. I’m left with the black screen and white apple and the white progress bar is stuck at about 25%.
Do you have any suggestions that might help me?
Thanks again for a great tutorial.
The beta version has like this issue. For now, I don’t have any suggestion but I do investigate about this error.
Hi Bro, I followed your instructions completely but my macOS High Sierra is going to bootloop at first booting. I download all your vmdk files excluding single rar, I downloaded your 8 parts and while I was following your instructions I just selected one of the following vmdk files, What’s wrong with me..? However, I want to know the process of complilation of the given vmdk files
Hey dear, If you have downloaded the 8 parts then bring all the parts in one folder then right-click on one the parts and select Extract Here. If you have downloaded the one part then just select and right-click then select Extract Here.
Mac OS X is not supported with binary translation. To run Mac OS X you need a host on which VMware Workstation supports Intel VT-x or AMD-V.
Hey dear, Alex you need to enable Virtualization Technology (VT) from your system BIOS to fix this, and If your system doesn’t support (VT), then you can’t install macOS.
I seem not be able to have it in full screen, follow all the steps and even search coments in this post and earlier version one ans i still end up with vertical bars in each side .. i have an wide monitor of 32 inch 2560×1080 is there any way to solve it?
Yeah dear, You need to install VMware tools on macOS High Sierra and then click on the full-screen button from VM tab to get the resolution. It explicitly mentioned in the video guide:
Updated: The video is removed from YouTube 'Sorry for the inconvenience guys'Thanks Faiz but it doesnt work, i tried vmware knowladge base also and no sucess… and yes i have the resolution avaiable in my desktop that i need… probably what we are missing is some other program to add memory for video and add resolutions… shame it didnt worked on my side…
That’s okay, but there is one more way to get any resolution you want. It’s by installing a bootloader on macOS.
Please tell me more 🙂
So here, I can’t guide step by step, but soon I will create a bootloader file and a step by step article. It takes much time so you can use tell that time the VMware tools to get the most out your mac.
Hello Guide,
I’m follow your step success but when I’m install vmtool and restart it hang
Hey dear, Please watch the video tutorial:
Updated: The video is removed from YouTube 'Sorry for the inconvenience guys'Same issue as sankar, and yes I have added smc.version – “0” to vmx file
Please add the code (smc.version = “0”) or (sms.version = 0) to macOS High Sierra VMX file again and it will slove the issue.
I have watched the steps clearly and executes as shown in the above steps. However, am afraid to say, got the following error. Kindly advise.
Thanks so much in advance.
VMware Workstation unrecoverable error: (vcpu-0)
vcpu-0:VERIFY vmcore/vmm/main/physMem_monitor.c:1180
A log file is available in “C:\Users\raka\Documents\Virtual Machines\macOS High Sierra\vmware.log”.
You can request support.
To collect data to submit to VMware support, choose “Collect Support Data” from the Help menu.
You can also run the “vm-support” script in the Workstation folder directly.
We will respond on the basis of your support entitlement.
Did you add the code smc.version = “0” to macOS High Sierra VMX file?
Sorry, I have a little problem with a fullscreen mode. I have this thing https://drive.google.com/open?id=0B1Dnbl6lt4wMS3RuUHJ5UDBLQ1E (my screen resolution is 1440×900 and yeah I’ve installed VMWare Tools but it didn’t help)
You have to download VMware Tools from our link
Because it is compatible with macOS High Sierra
Sorry, I have a little problem with a fullscreen mode. I have this thing (my screen resolution is 1440×900 and yeah I’ve installed VMWare Tools but it didn’t help)
Did you download VMware tools from our link?
@Faiz Orz , inside your tools there are 2 iso : darwin.iso and VMware Tool.iso , what is the right one ? I tried the 2 but don’t have fullscreen…
Select VMware tool.iso and also don’t forget to watch video down below the post.
Select VMware tool.iso and also don’t forget to watch the video down below the post.
after click on i’ll install The operating system .. i can’t find apple mac os x
Because you have skipped Step #3.
Run win-install then you will get macOS 10.12
Thank You Guys,
These instructions worked well, The original patch tools download asked for a password but the rar file in the link in the comments worked fine.
I now have a mac working full screen on my XPS15.
You were a tremendous help, thank you again
Thanks for sharing your feedback.
Thank you but I did not need this to do anything with the problem I had, 3D acceleration of the video and full screen (1920×1080) I already had these tools. My vmware is unlocked then to install it 10.13 I started
From 10.12 and instead of updating I did a new installation by creating another vmdk HD VHD but I have now resolved by installing another vmware tool (7)
Many thanks bye bye
Thanks for sharing your feedback 🙂
VMware tool no function no full screen …
Use this tool, and it’s compatible with macOS High Sierra: https://drive.google.com/open?id=0Bxz8D-fNAunPcVd5NGI1UjU3OWc