In this article, I am going to show you how to install macOS Mojave on VirtualBox on Windows using the ISO image. If you are interested in Apple’s new Mac operating system macOS 10.14 Mojave and want to try it, then you are in the right place because here you will find any kind of files that you will need to install macOS Mojave on VirtualBox on Windows. Please follow the step by step pictorial tutorial below.
macOS latest versions are out, So check the guides below to install them:
- Guide to Install macOS Catalina on VMware on Windows
- Guide to Install macOS Catalina on VirtualBox on Windows
- Guide to Install macOS Big Sur on VMware on Windows
- Guide to Install macOS Big Sur on VirtualBox on Windows
System Requirements
Before we get started, make sure to read the following requirements. Please do not skip this step because it’ll help you to successfully install macOS Mojave on VirtualBox on Windows 10 PC.
- Minimum 2 GB memory (Recommended 8GB or higher)
- Minimum 2 cores of processors (Recommended 4 cores or higher)
- Hard disk free space 20 GB (Recommended 100GB or higher)
- Your system should support Intel or AMD VT (Virtualization Technology)
- Intel/AMD VT (Virtualization Technology) Should be enabled from BIOS setup
Required: If you haven’t already then you should enable Virtualization Technology (aka Intel VT or AMD-V).
Furthermore, it’s highly recommended that you install macOS Mojave on SSD (Solid State Drive) instead of HDD (Hard Disk Drive) because you will have a much faster performance with SSD rather than HDD.
Steps to Install macOS Mojave on VirtualBox on Windows Using ISO
- Download the Prerequisites
- Install VirtualBox on Windows on PC
- Install & Update VirtualBox Extension (Optional but important)
- Create a New Virtual Machine for macOS Mojave
- Edit the New Virtual Machine
- Execute the VirtualBox Code by command prompt
- Create macOS Mojave a Bootable Disk
- Perform a Clean Installation of macOS Mojave
Step 1: Download the Prerequisites
To install macOS Mojave on VirtualBox on Windows, you must download the following files and read the step by step guide to avoid any problems. If you miss any of the steps below, then you might be unsuccessful in running the macOS.
- Download macOS Mojave ISO
- macOS Mojave 10.14.6 (18G103) ISO Latest
- Download VirtualBox & VBox Code
If you want to install macOS Mojave on VirtualBox using VMDK, visit “How to install macOS Mojave on VirtualBox on Windows Using VMDK” guide.
Step 2: Install VirtualBox on Windows on PC
From the “Download Prerequisites” section of this post, you should have downloaded VirtualBox and if you didn’t, download VirtualBox latest version and install it on your Windows system. If you’ve already installed VirtualBox, then you can skip this step. Otherwise, follow the steps below.
- On the welcome Wizard page, click Next.
- Keep the default setting on the Custom Setup page and click Next.
- Again Click Next to accept the default options unless you want to change something.
- On the warning Network interface page, just click Yes to process with Virtualbox installation.
- Click the Install button to install VBox. Again click Yes if required.
- While installing VBox, you might a security warning about “Oracle Corporation”. You need to click Install on this page to process with the installation. If you click Don’t install, the installation process will be terminate here and you can’t go ahead. If you see the security warning again click the Install button.
- Finally, click Finish.
-
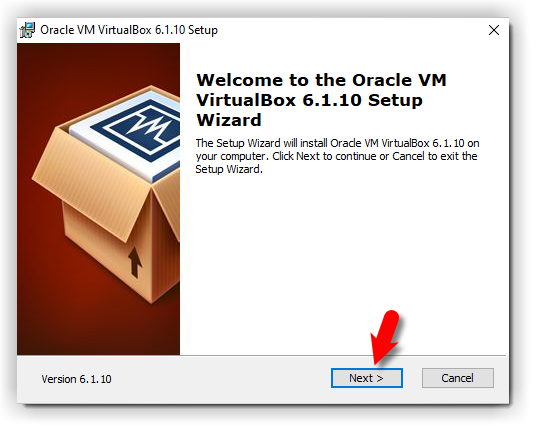
- Virtualbox Setup Welcome Wizard
-
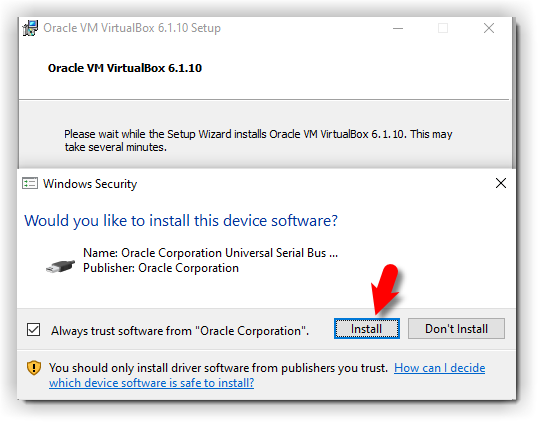
- Windows Security
-

- Virtualbox Setup Completed
-
Step 3: Install & Update VirtualBox Extension (Optional)
This step is not 100% necessary but it’s highly recommended to do this step because macOS Mojave might not function properly on VirtualBox. For this reason, it might cause problems during the installation. Go to the Virtualbox download page. Under VirtualBox 6.1.10 Oracle VM VirtualBox Extension Pack section, click All supported platforms to download the latest version of Virtualbox Extension Pack.
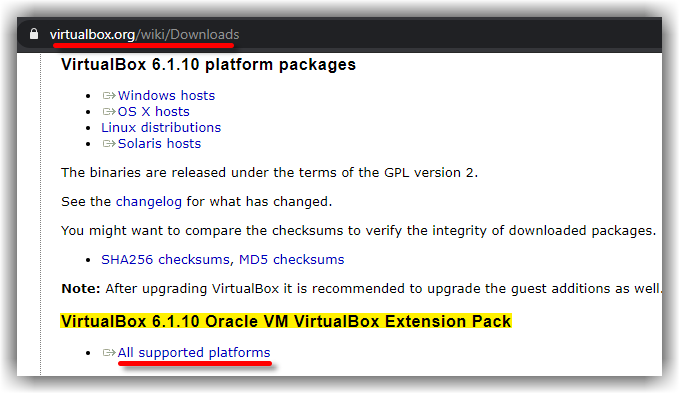
Download Virtualbox Extensions
Once you’ve downloaded the Extension pack. Now, Follow the steps below to update the Virtualbox extension pack.
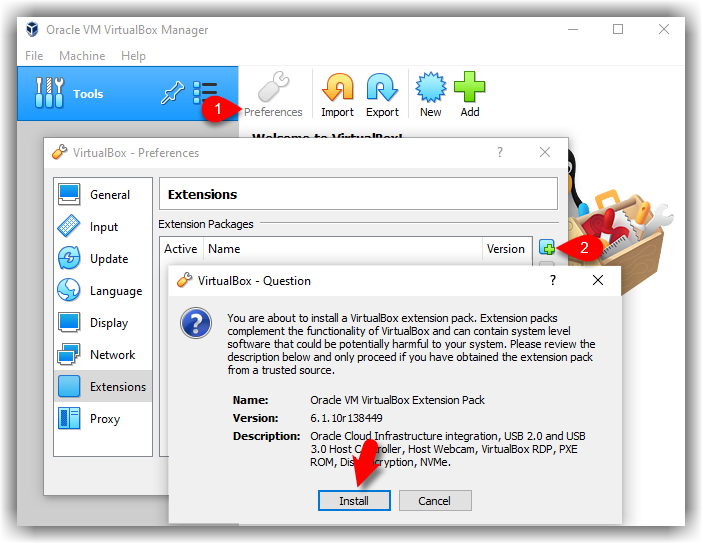
- Open up VirtualBox, navigate to Tools>Pereferences>Extensions.
- Click on Plus (+) icon and select VirtualBox extension which you’ve downloaded at the beginning of this section. Click Install or Upgrade and then Agree to the terms and conditions. Click the OK button.
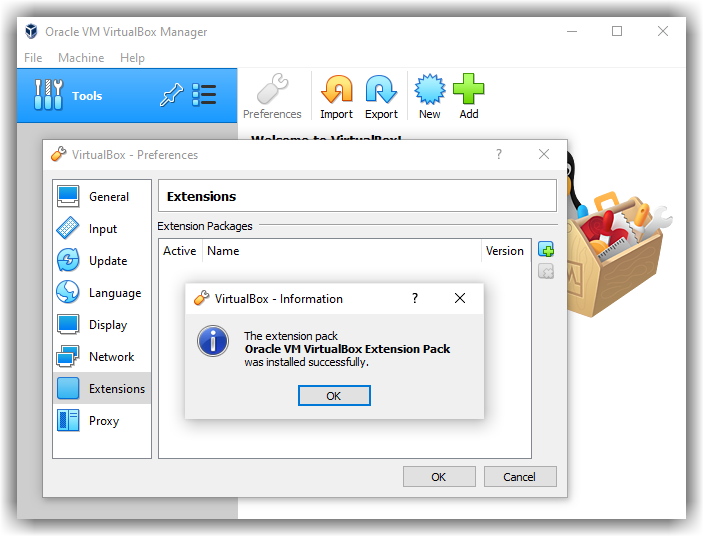
Finally, you should see something like the screenshot below.
-
- VirtualBox Extension Install
-
- Oracle VM VirtualBox Extension Pack
-
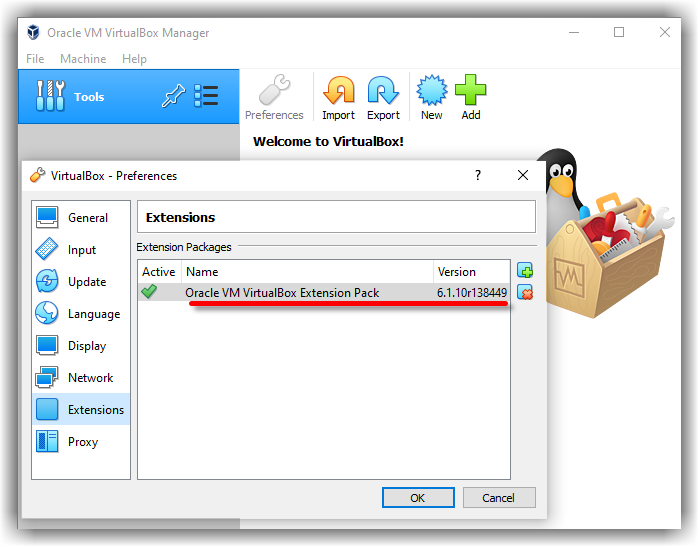
- Oracle VM VirtualBox Extension Pack Installed
Step 4: Create a New Virtual Machine for macOS Mojave
After installing VirtualBox, now you will need to create a new virtual machine on Virtualbox.
Creating a virtual machine for macOS Mojave is kind of the same as you creating a virtual machine for the Windows Operating system or Linux but with some minor changes. In this post, I’ll outline those changes. Follow the steps below to create a new virtual machine for macOS Mojave using the ISO file.
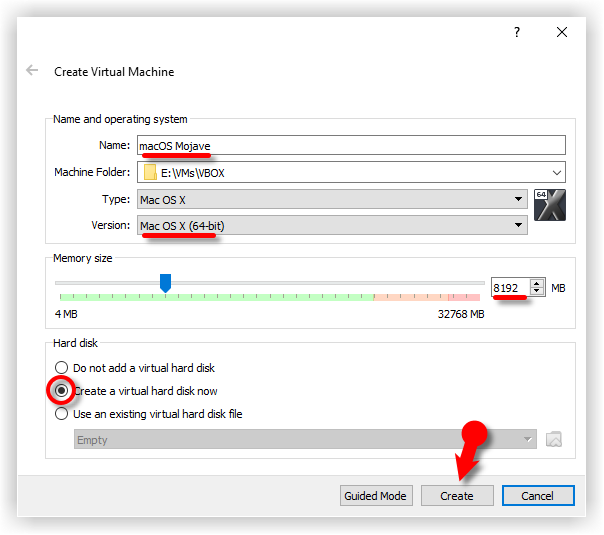
- Open up your VirtualBox application and click New
- Click Expert Mode and select the following options then click Create.
- Type a suitable Virtual Machine Name.
- Virtual Machine Location (a separate drive is recommended).
- Type (Mac OS X).
- Version (Mac OS X 64-bit).
- Memory 4 GB (recommended 8 GB or higher).
- Hard Disk: Select Create a virtual disk now.
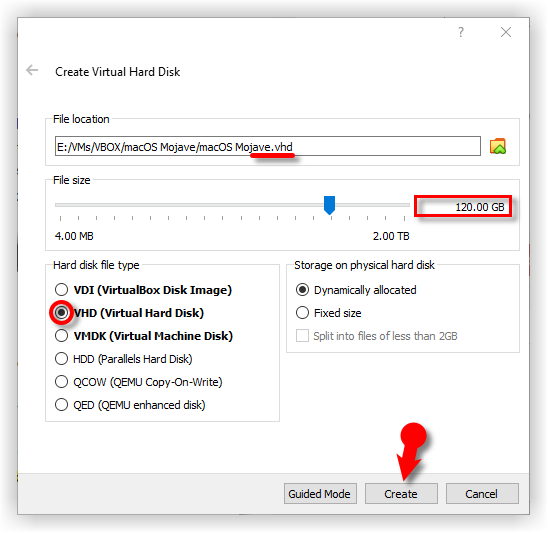
- On the create virtual hard disk window, choose the following options.
- Disk Location: The default location should be fine unless you want to change to a new location.
- File Size: You can specify the disk size here.
- Hard disk file type: Select VHD (Virtual Hard Disk) format.
- Storage on physical hard disk: Select the Dynamically allocated option. However, if you want to have a better performance disk then choose a fixed disk. Fixed disk, will allocate the specified size from your host machine immediately. Read more about the dynamic vs fixed-size disk.
-
- Create macOS Mojave New VM
-
- Create macOS Mojave VHD Disk
Step 5: Edit the New Virtual Machine
It’s time to edit the virtual machine to make it works. Select macOS Mojave VM and click on Settings. Now, bring the following changes to macOS Mojave VM.
-
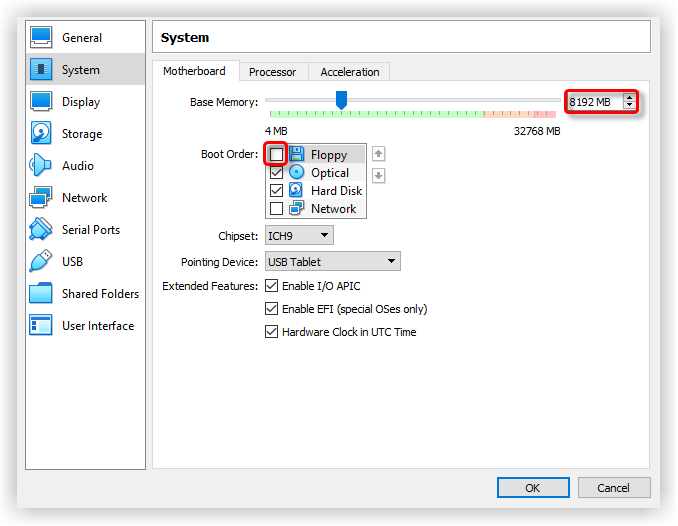
- Under System>Motherboard, increase the Base Memory to 8192MB. However, you can use a bit lower memory if your system doesn’t have this much RAM.
- Uncheck Floppy from the Boot Order section.
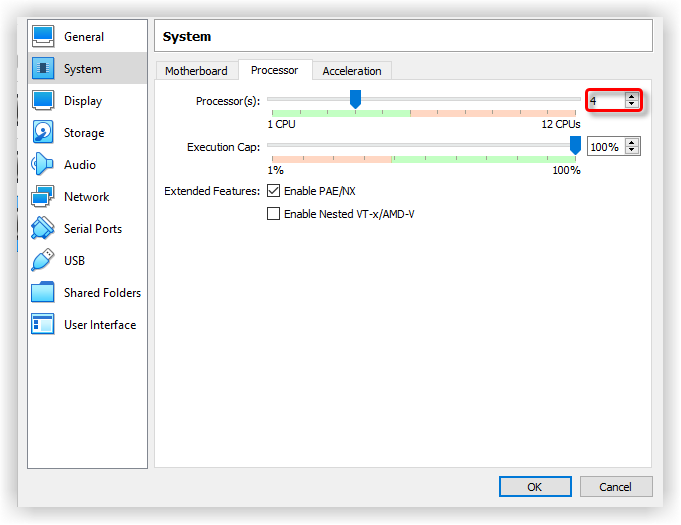
- Under the Processor tab, increase the processors to 4 or higher.
-
- macOS Mojave Boot Order
-
- increase macOS Mojave Processor
-
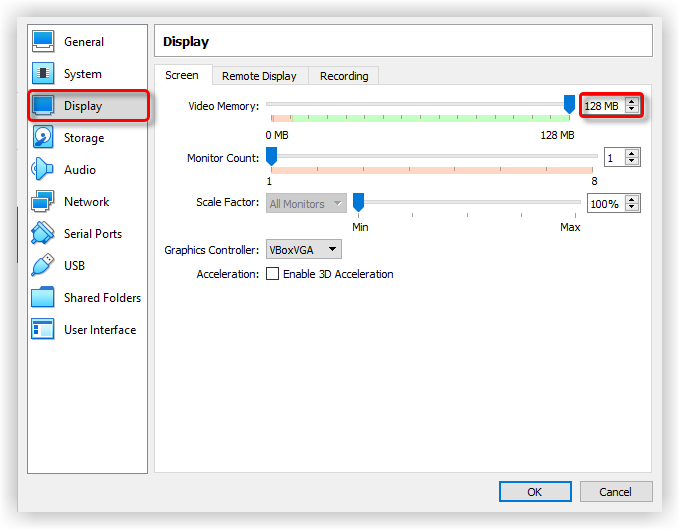
- On the Display window, increase the Video Memory to 128MB.
Increase macOS Mojave Video Memory
- From the Storage section, click on the Empty>DVD icon. Click on Choose a disk file. You should select the macOS Mojave ISO image which you’ve downloaded from the “Download Prerequisites” section of this post. Finally, click OK to close the macOS Mojave Settings window.
-
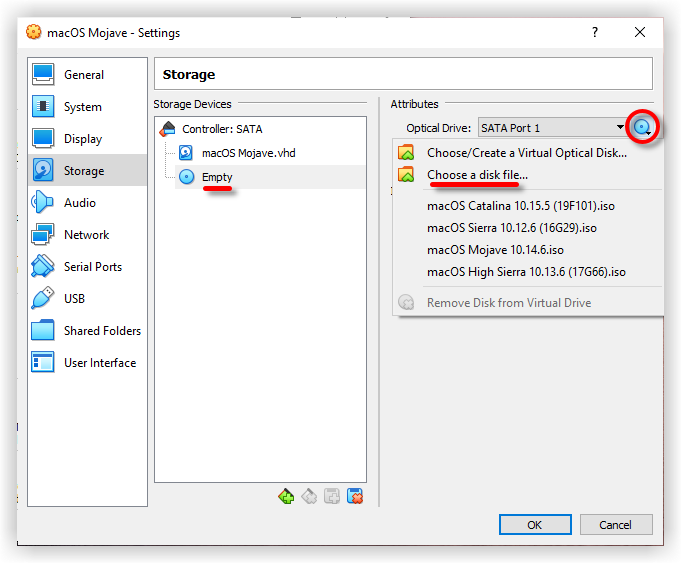
- Browse macOS Mojave ISO Image
-
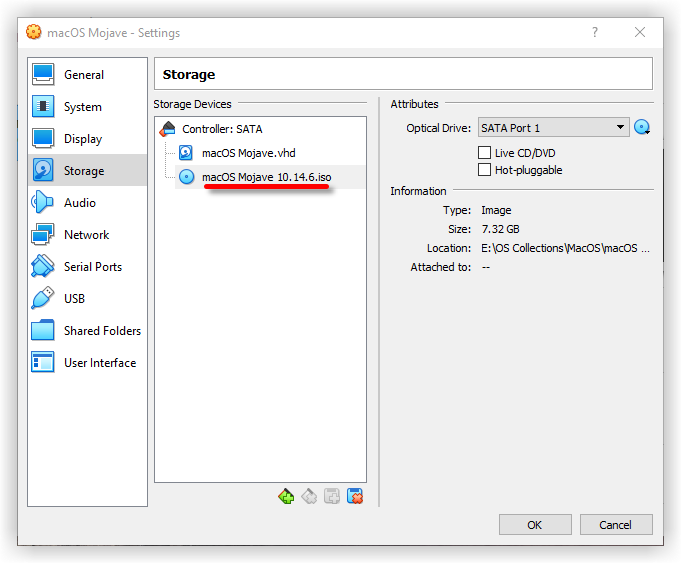
- Browsed macOS Mojave ISO Image
-
Step 6: Execute the VirtualBox Code by CMD
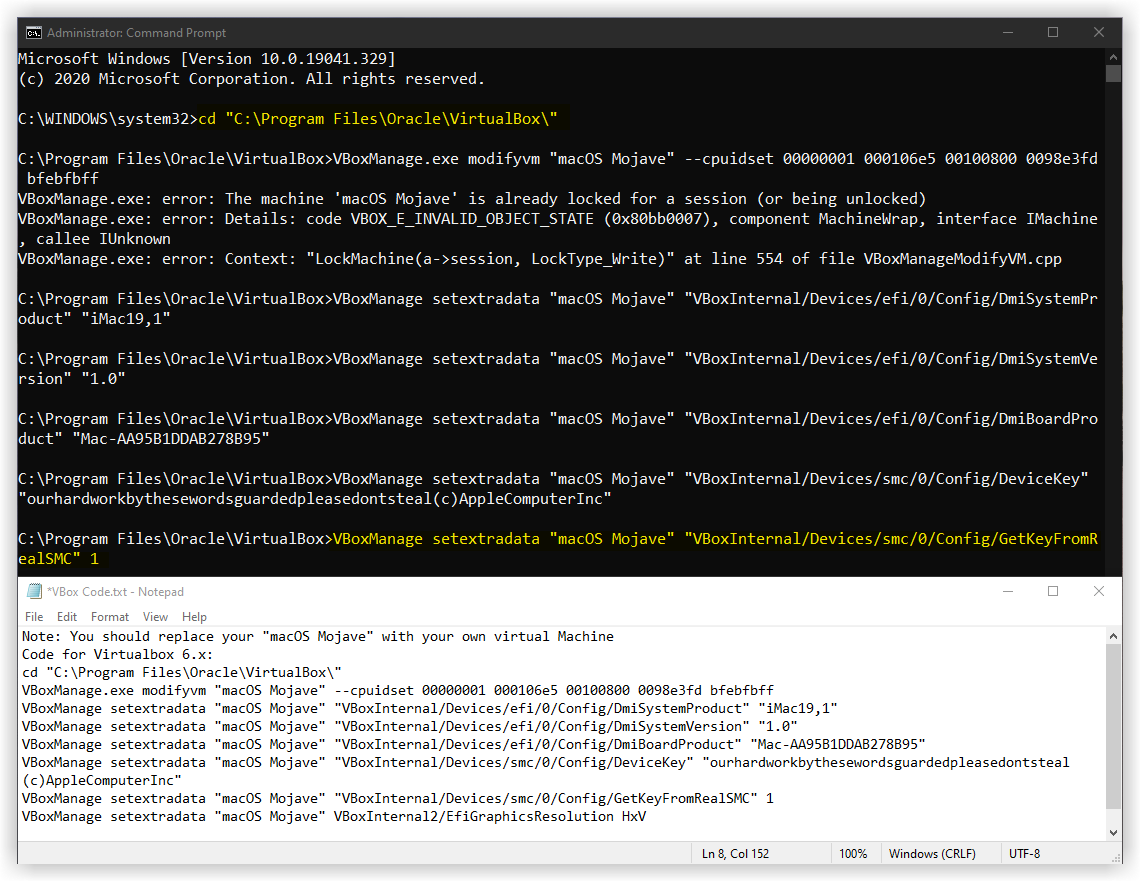
Once you’ve created and customized your virtual machine, it’s time to run some codes in order to install macOS Mojave on VirtualBox. First, you should note your virtual machine name because later on, we will use it. Open the VirtualBox code which you should have downloaded from the “Download Prerequisites” section of this post. If you’ve not downloaded doesn’t matter. Just use the following code.
Note: Before, you execute the code by command prompt. You should read the following steps.
cd "C:\Program Files\Oracle\VirtualBox\"
VBoxManage.exe modifyvm "VM Name" --cpuidset 00000001 000106e5 00100800 0098e3fd bfebfbff
VBoxManage setextradata "VM Name" "VBoxInternal/Devices/efi/0/Config/DmiSystemProduct" "iMac19,1"
VBoxManage setextradata "VM Name" "VBoxInternal/Devices/efi/0/Config/DmiSystemVersion" "1.0"
VBoxManage setextradata "VM Name" "VBoxInternal/Devices/efi/0/Config/DmiBoardProduct" "Mac-AA95B1DDAB278B95"
VBoxManage setextradata "VM Name" "VBoxInternal/Devices/smc/0/Config/DeviceKey" "ourhardworkbythesewordsguardedpleasedontsteal(c)AppleComputerInc"
VBoxManage setextradata "VM Name" "VBoxInternal/Devices/smc/0/Config/GetKeyFromRealSMC" 1- When you opened VirtualBox code via notepad or any other text editor, use the replace function of the program to Replace the “VM Name” with your virtual machine name. See the picture below to get an idea of how to do it.
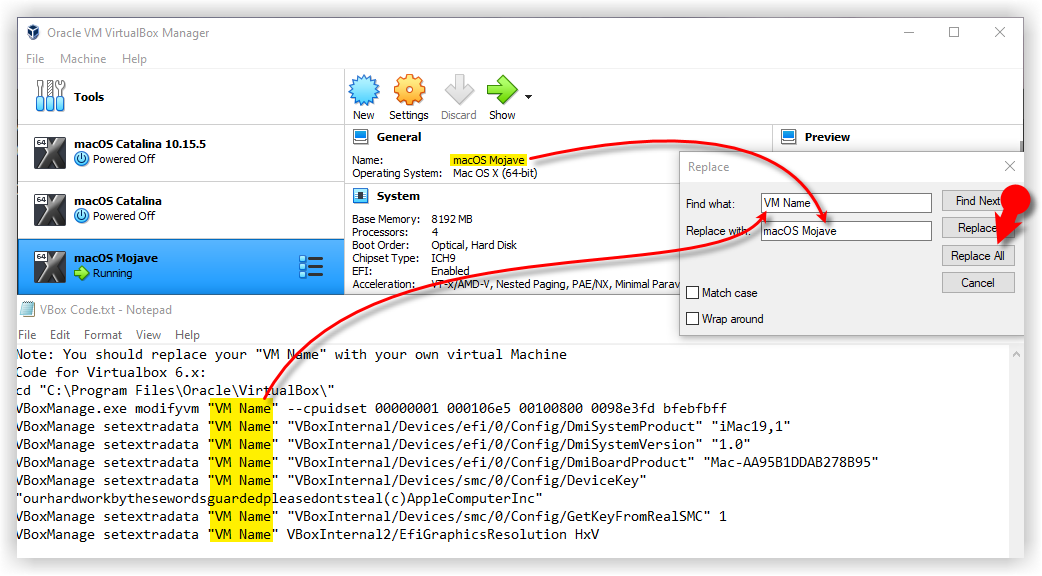
Replace macOS Mojave VM Name
- Now, you’ve two choices. First, if you want to fix your macOS Mojave screen resolution in the first place. You should also execute the following code. You have to change “VM Name” with your virtual machine name and HxV with a screen resolution such as “1920×1080“. For more supported screen resolution on VirtualBox and detailed guide, visit fix macOS Catalina screen resolution on VirtualBox.
VBoxManage setextradata "VM Name" VBoxInternal2/EfiGraphicsResolution HxVImportant Note: We highly recommend to quit the VirtualBox program before executing the code. If you don’t do it, your virtual machine might not proceed to the installation step.
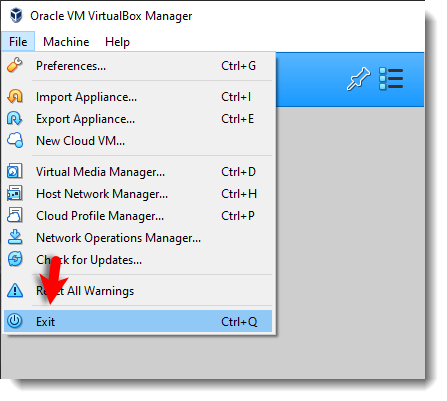
Exit VirtualBox
- Once you replaced the “VM Name” with your virtual machine name, then run the code one by one via command prompt (CMD). You can open the command prompt by pressing the Windows+X key in Windows 10 and select Command Prompt from the list. Or simply press Windows key and type CMD. Click Run As Administrator and click Yes.
Execute macOS Mojave VirtualBox Code
- Now, that you’ve executed the macOS Mojave VirtualBox code. Open the VirtualBox app then click the Start button to power on the VM. A black screen with a lot of white text will appear on the screen. Just wait for a few minutes and the macOS Mojave installation will start.
Step 7: Create macOS Mojave Bootable Disk
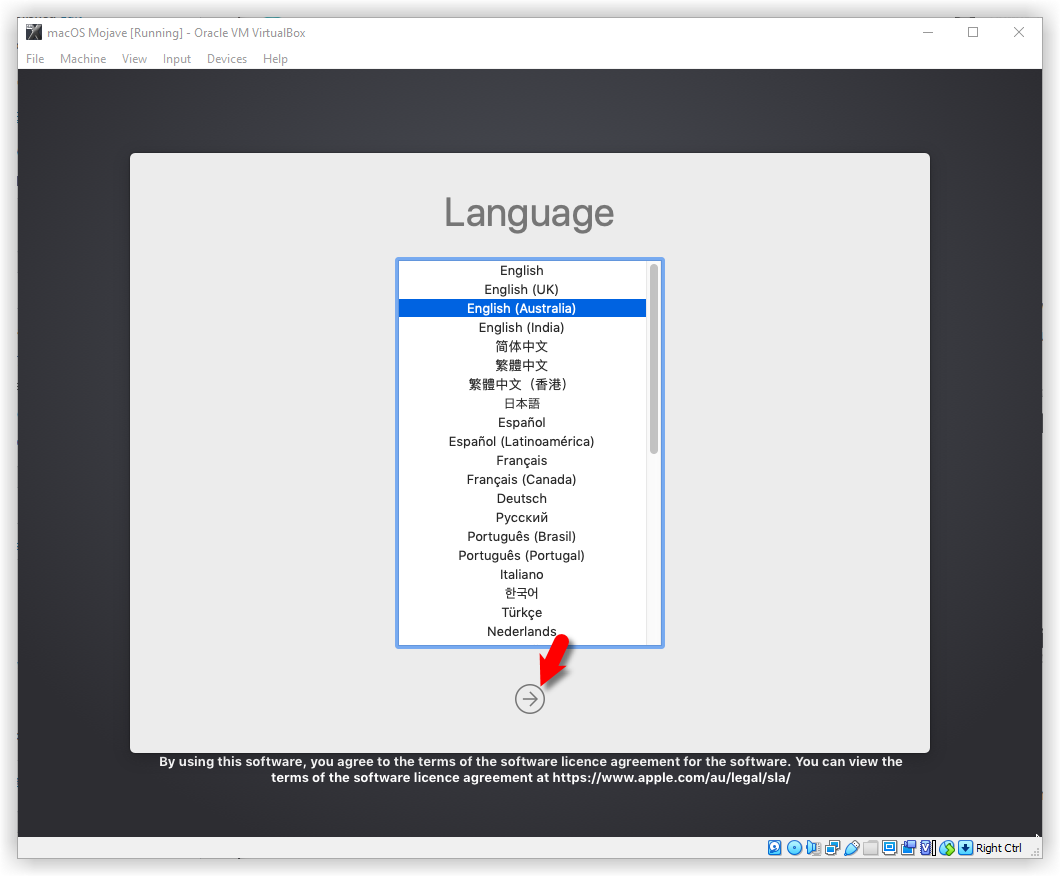
Once you start your VM, a whole bunch of code will run on the screen, but you should not be worried about it. Wait for a few minutes, and you should see the macOS Mojave Language window.
- Select your Language and click Continue arrow.
Select macOS Mojave Language
- Now, you’ll see macOS Utilities Window. From the list, select Disk Utility and click Continue.

Select Disk Utility
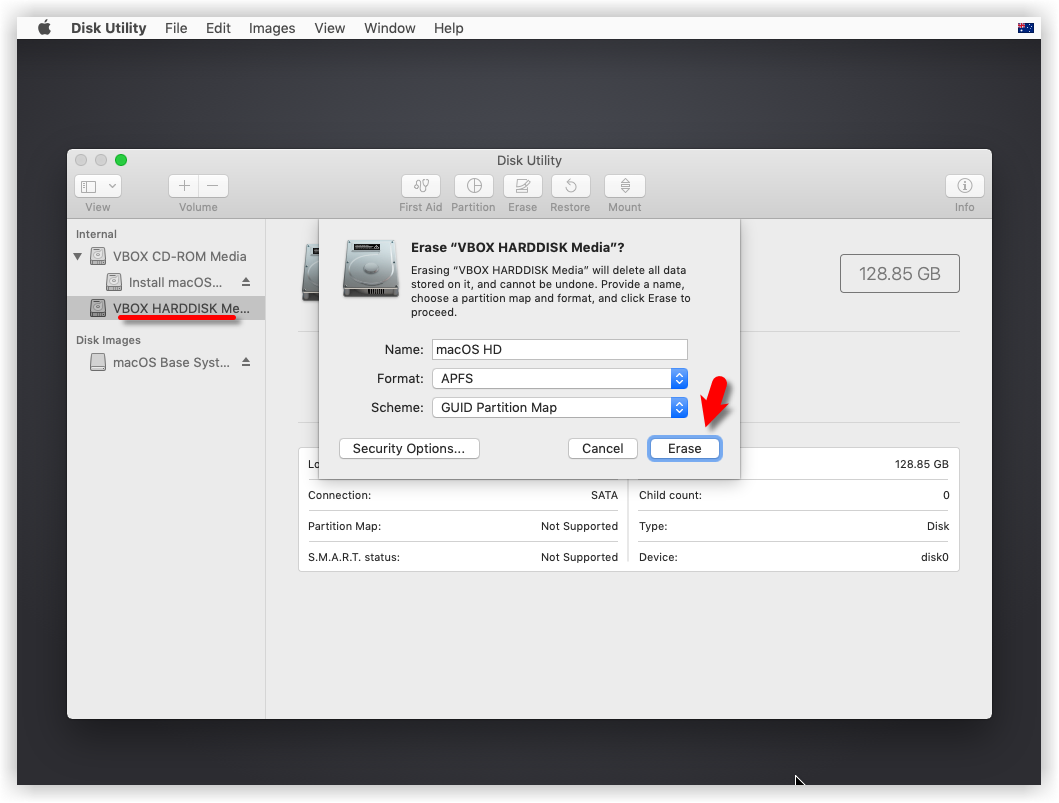
- Select your main VHD Disk and click the Erase button. Choose the following options and again click Erase.
- Name: macOS HD (You can type any name you want)
- Format: APFS (If you get an error, select Mac OS X Extended Journaled)
- Scheme: GUID Partition MAP
Erase VBOX Hard Disk Media
- Now, Quit the Disk Utility window.
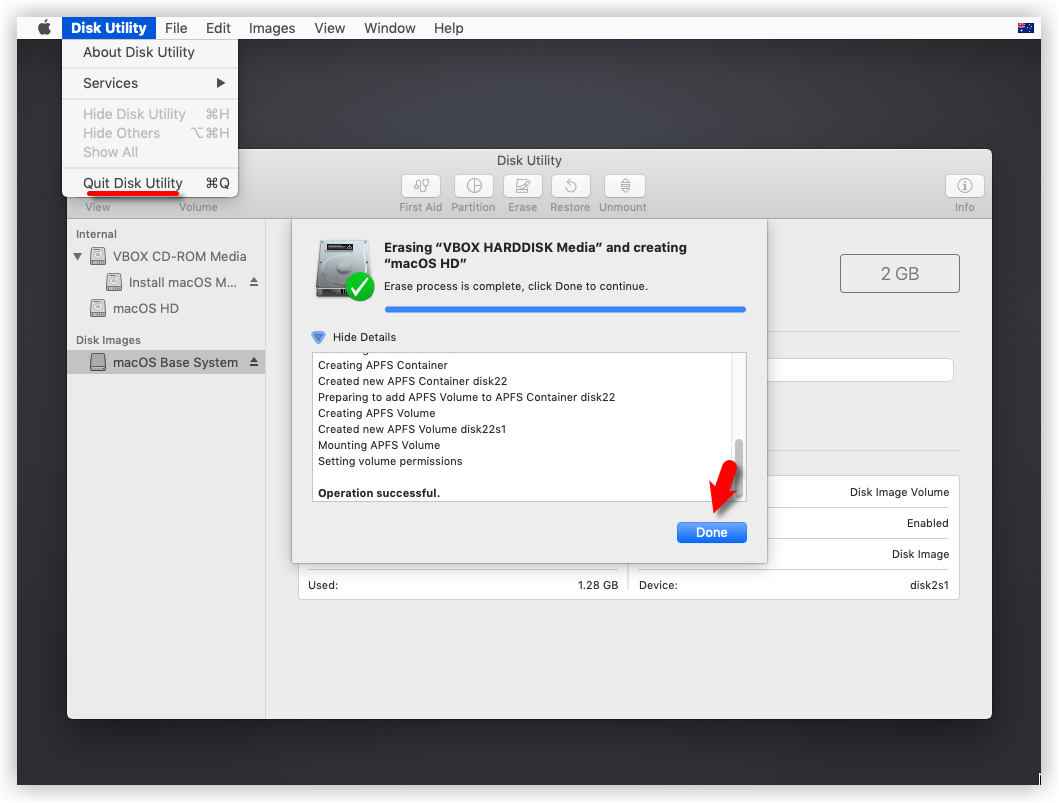
Quit Disk Utility
- From macOS Utilities, select Install macOS and click Continue.
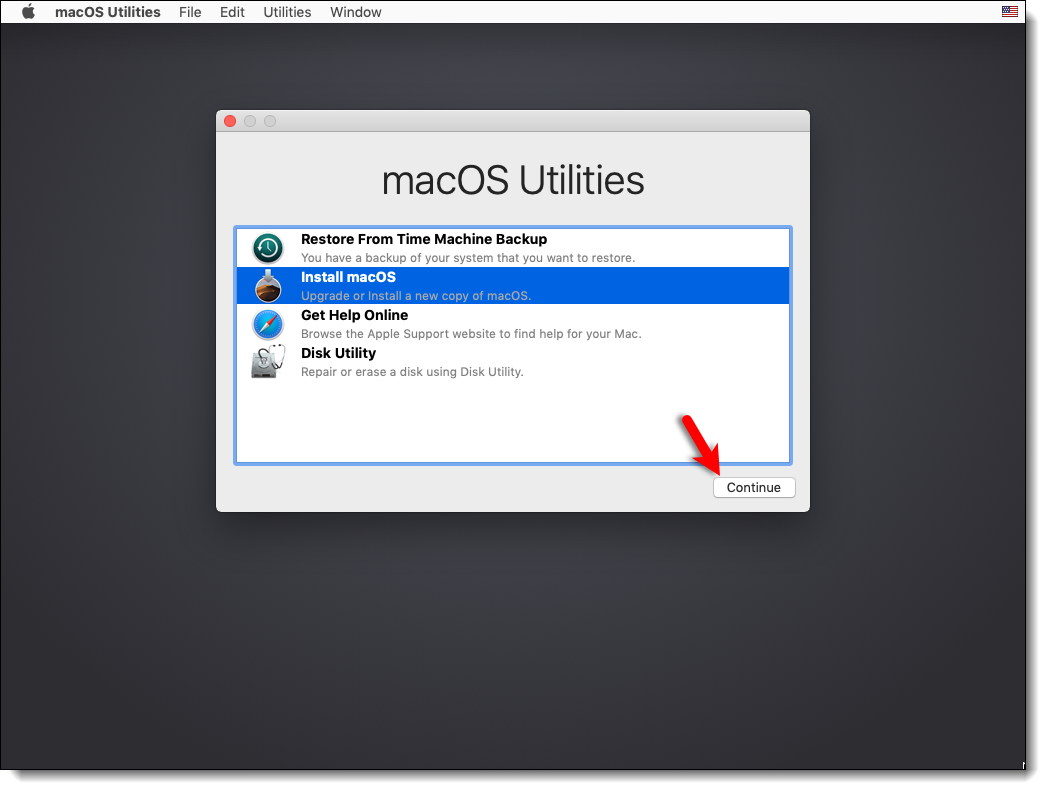
Select Install macOS Mojave
- Click Continue on Install macOS Mojave screen.
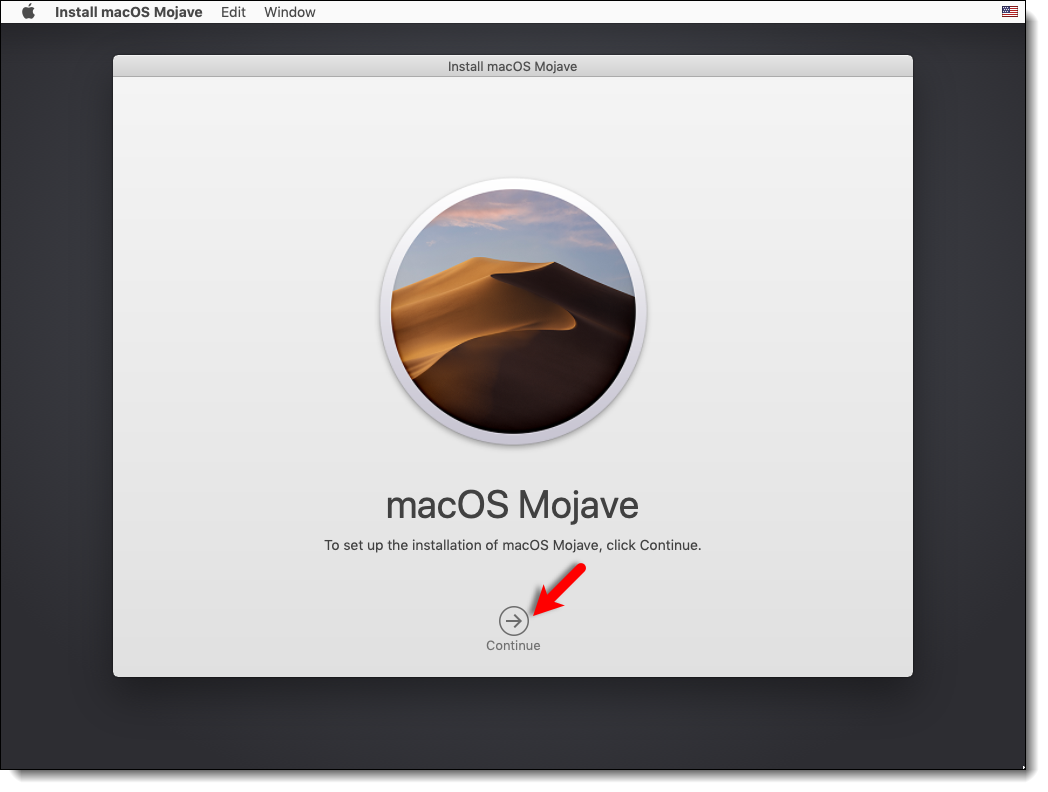
Install macOS Mojave
- Agree to the macOS Mojave License agreement.
- Select macOS HD and click Install
-
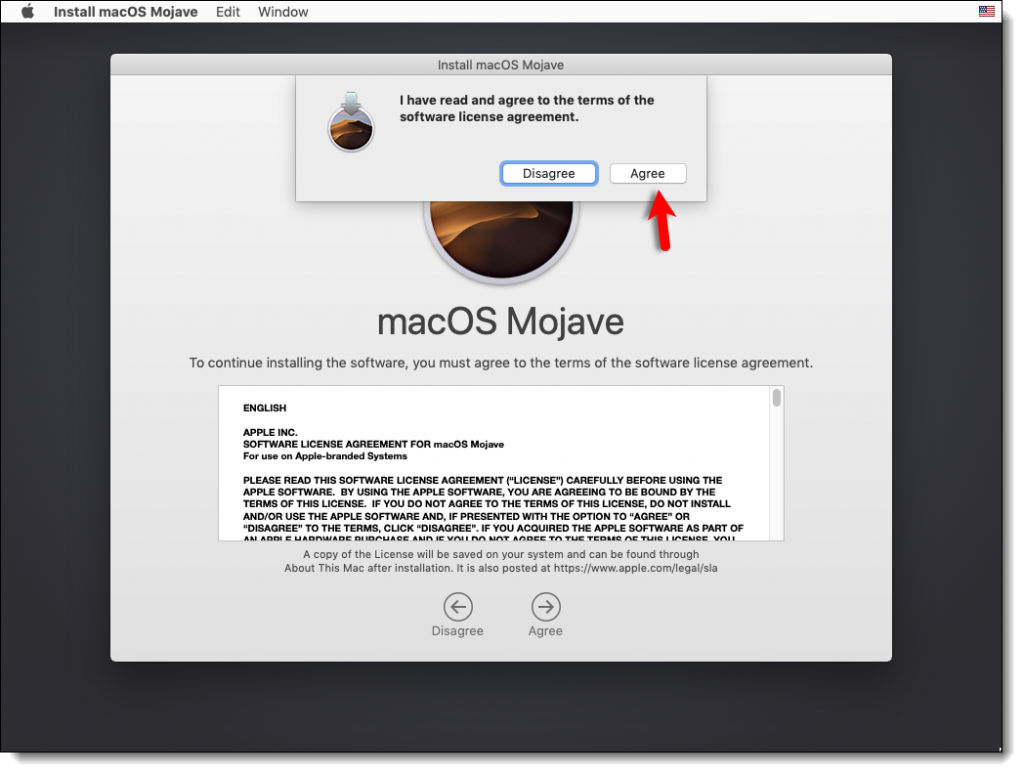
- Agree to the macOS Mojave License agreement
-
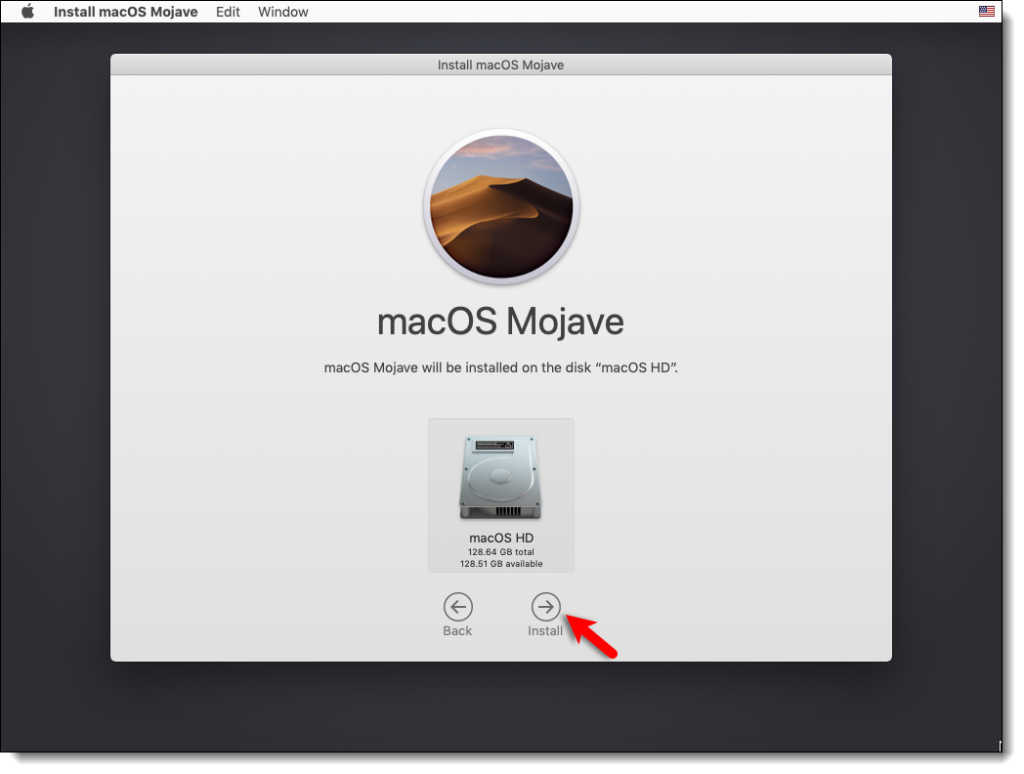
- Install macOS Mojave On the VMDK
-
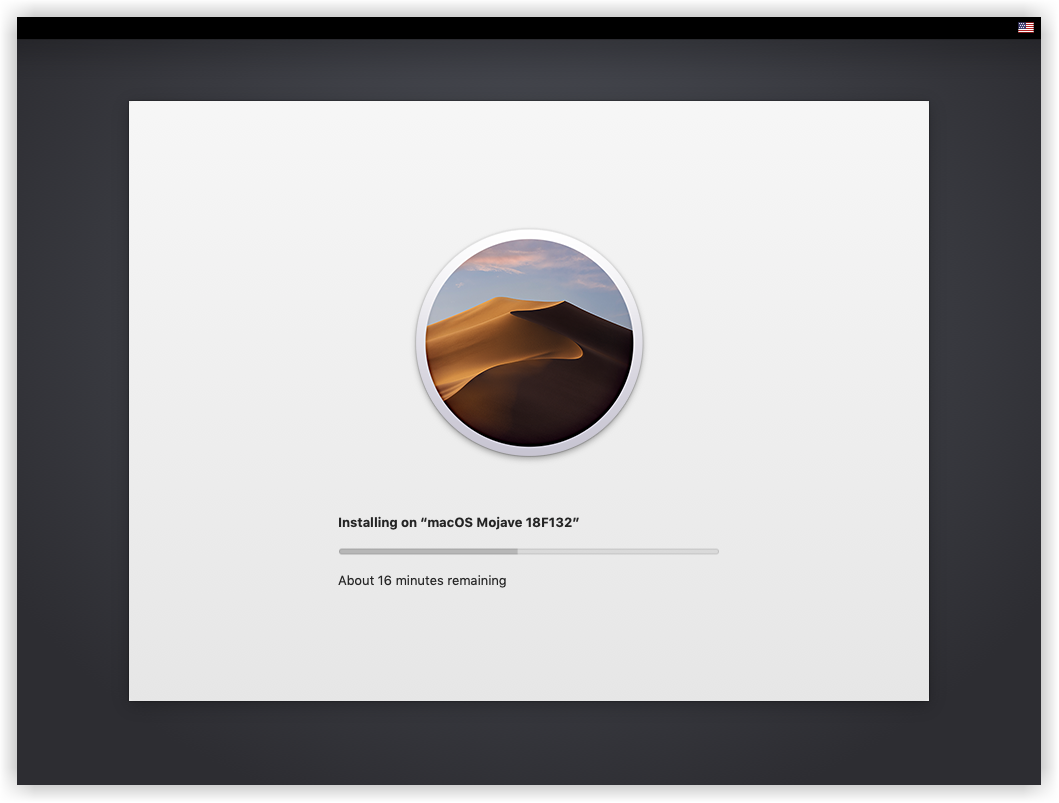
- Now, wait for 3-7 minutes and your VM will restart. macOS Mojave will be installed on your Disk. Next, you should not do anything. You’ll see another 15-29 minutes installation window. Be patient till the macOS Mojave gets installed.
-
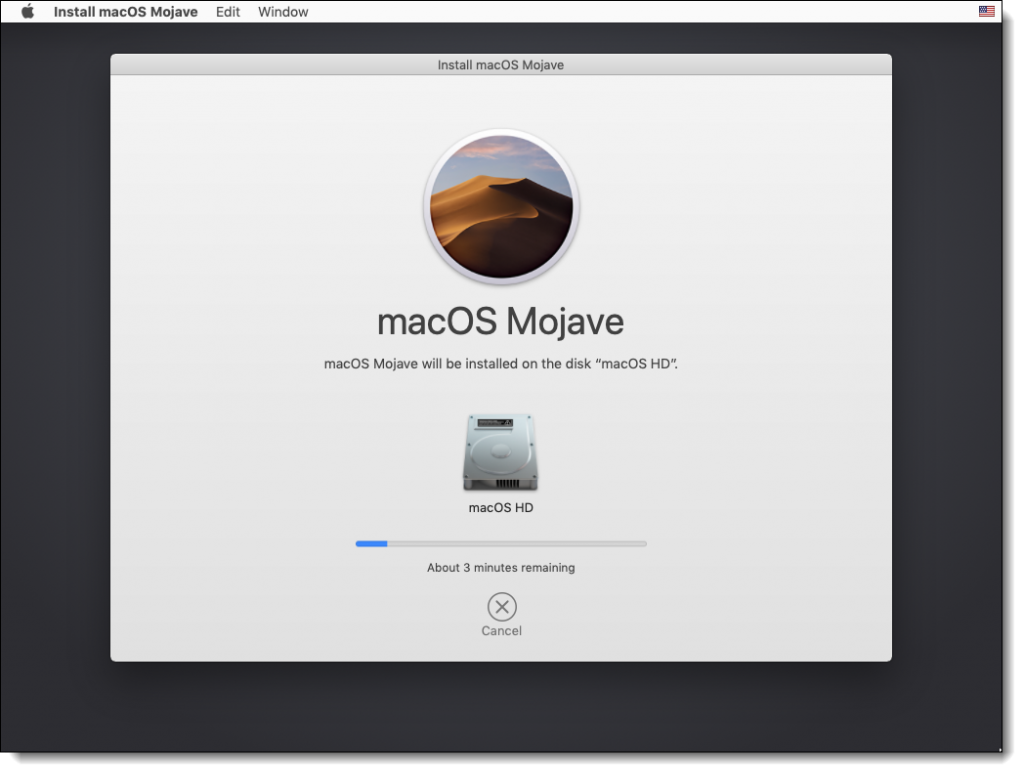
- Installing macOS Mojave On the VMDK
-
- Installing macOS On the VMDK
-
Step 8: Perform a Clean Installation of macOS Mojave
Once you’ve passed the step #9. You’ll see the macOS Mojave Welcome window. Select the following options. You can change most of the settings later on, so don’t worry about it for now.
-
- Select your Country and click Continue.
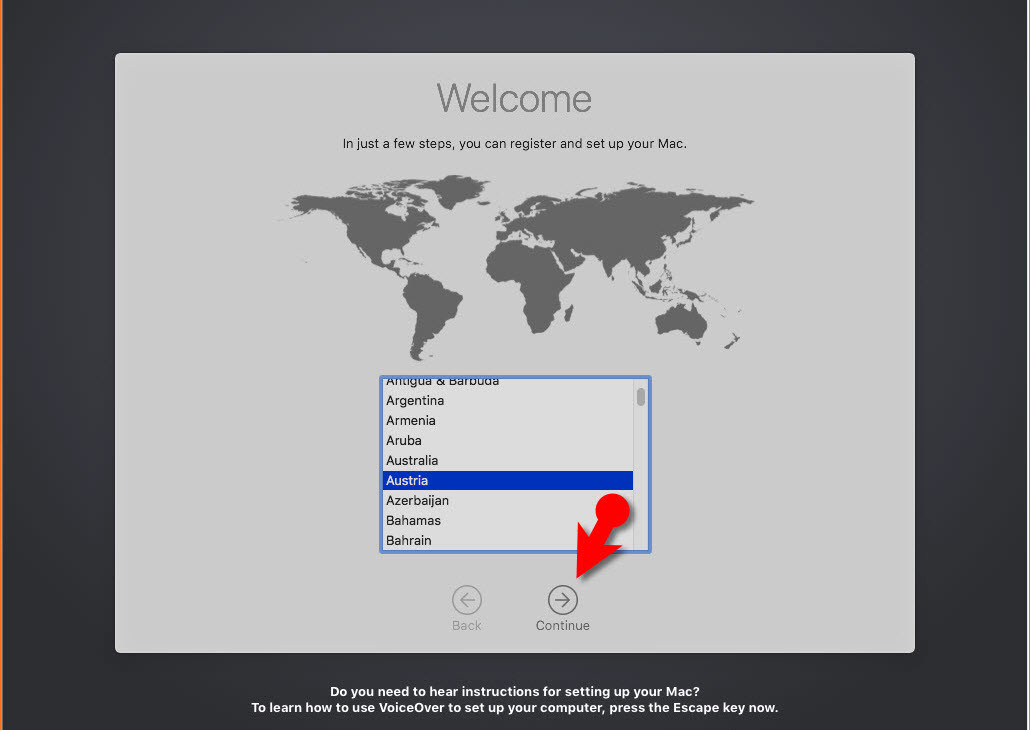
Select your Country
- Choose a Keyboard Layout and click Continue.
- On the “Data & Privacy” window, click Continue.
- Select Don’t transfer any information now and click Continue.
- Click on Set Up Later then Don’t Sign In. Click Skip. You can add your Apple ID later.
- Click Agree to the Terms and Conditions and click Continue.
- Fill out the Full name, Account name, Password, and Hint then click Continue.
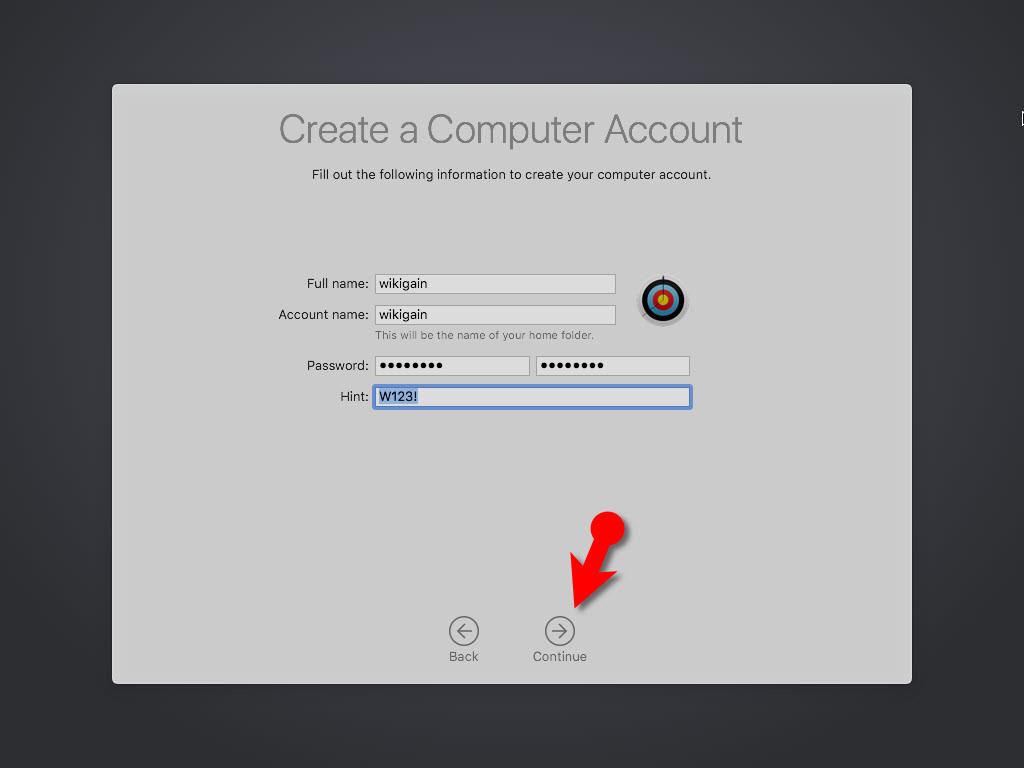
Create macOS Mojave Computer Account
- If you want to customize Express Set Up, you can click on Customize Settings otherwise click on Continue.
- Dark mode feature is added newly to macOS Mojave 10.14 so you can select Light or Dark mode then click Continue.
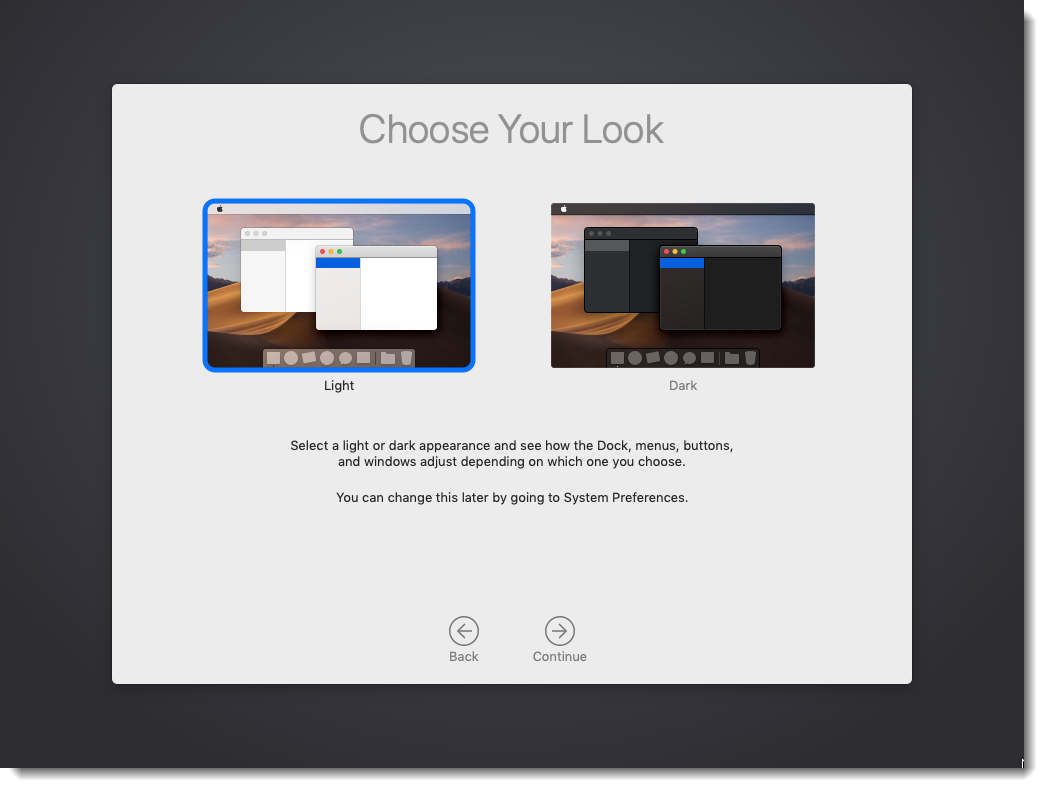
Choose macOS Mojave Look
- Wait a little while to Setting Up Your Mac. Then you should end up on the desktop of macOS Mojave.
Successfully Installed macOS Mojave on VirtualBox using ISO Image
- Select your Country and click Continue.
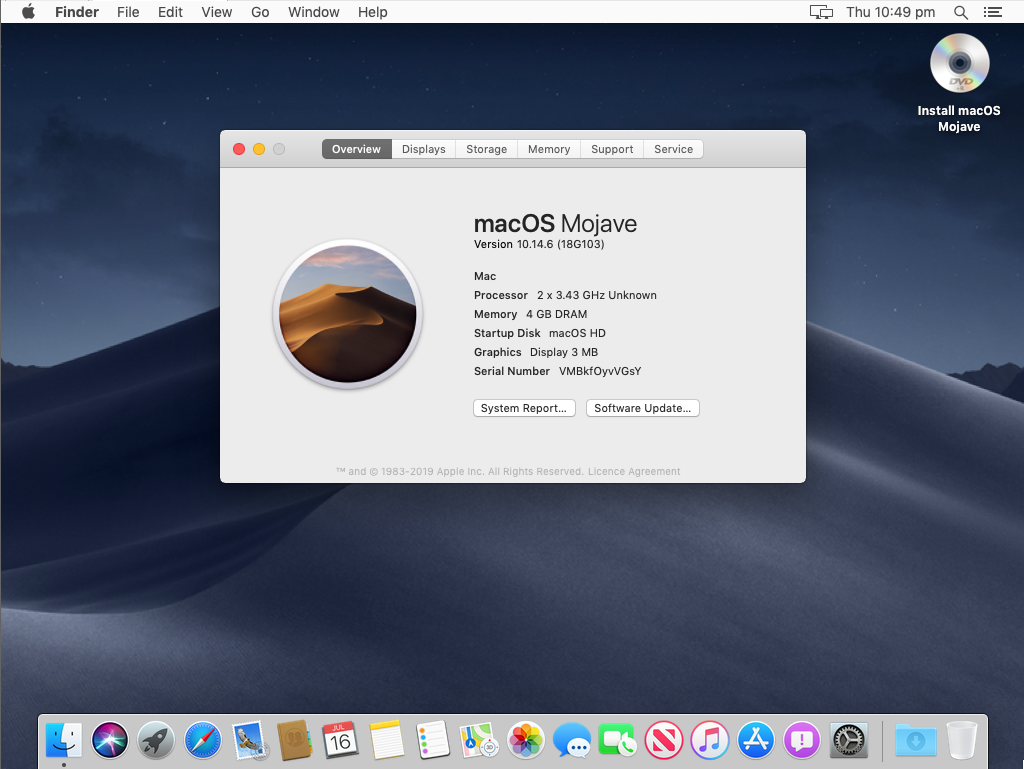
Related: How to Install macOS Mojave on VMware on WindowsFinally, you should see the macOS Mojave Wallpaper, and it successfully installs on VirtualBox.
Conclusion
In this guide, we have covered the following steps. These are the summaries of the above steps.
- Downloaded the Prerequisites
- Installed VirtualBox on Windows on PC
- Installed & Updated VirtualBox Extension (Optional but important)
- Created a New Virtual Machine for macOS Mojave
- Edited the New Virtual Machine
- Executed the VirtualBox Code by command prompt
- Created macOS Mojave a Bootable Disk
- Performed a Clean Installation of macOS Mojave
If you have any kinds of questions, suggestions or inquiries on how to install macOS Mojave on VirtualBox on Windows, please feel free to leave a comment down below this post. We will answer your every question and get your suggestion for our future works. Thanks for being with us.
Hello. I just completed accepting terms and conditions and on step 8. My screen doesnt show any disk to select where to install macOS. No disks to select and only option is back button to agreements step. Please help…
I’ve tried running this tutorial… have made sure to follow every step precisely, other than for am running VirtualBox v.6.1.x with extensions installed. Am able to format the VHD volume to APFS successfully. However, I am not able to get a successful macOS install… the Apple status bar almost completes, and then just quits, returning one back to the macOS Utilities screen with the Disk Utility and Install macOS options.
Anyone else getting any joy? Thanks!
Full Screen or automatic resize is works for anybody guys? GA installed. Please come in?
When I start the machine a lot of running code/script starts flowing on the display
It stucks somewhere and a prohibitory sign appers
I dont know what to do plzz help!
Maybe you’ve not executed the code properly. Execute the code again and try. This should work.
I’ve been trying to install this to get on iMessage but it doesn’t work. It won’t let me log in with my appleid and when I try to create a new apple account it says this mac has been used too many times for creating apple Id. So I change the board serial with VBoxManage setextradata “Mac OS X” VBoxInternal/Devices/efi/0/Config/DmiSystemSerial “some serial number from internet” and it still won’t let me. So I’m stuck, locked out of iMessage and every other service 🙁 I just needed to use vbox temporarily until I can buy a new Mac but this is ridicus. I won’t ever buy a new mac after this. they have too much proprietary security nonsense.
Does this iso file work on linux VM?
Hello I am getting this error:
Unknown configuration value ‘/DeviceKey’ found in the configuration of efi instance #0 (VERR_CFGM_CONFIG_UNKNOWN_VALUE).
Fehlercode: E_FAIL (0x80004005)
Komponente: ConsoleWrap
Interface: IConsole {872da645-4a9b-1727-bee2-5585105b9eed}
I followed all the steps but still it seems to be the wrong key, Can anyone help ?
Thanks !
Help! My mouse doesnt work! But still, this helped.
Stuck on the “Select the disk where you want to install MacOS” there are no options 😐
Because you havent formatted the disk yet.
hi. how do you format the disk? i have the same issue
Mine is stuck on End RandomSeed. Here’s my specs if that helps. I know, it’s not much.
Asus M4A77TD motherboard
AMD Phenom II X4 965
12 GB ram
NVidia Geforce GT 545
500 Gb hdd
120 Gb ssd
I’m going to let this sit overnight, but for now, no luck.
Please help, I really want this to work.
Great tutorial, thank you!
For me after seeing the apple loading screen, VirtualBox (V6.1) crashes. Find here more details:
https://drive.google.com/file/d/1BeFLbYSzX44zCEvk1pfYnhV1boVzorqd/view?usp=sharing
https://drive.google.com/file/d/10Q3u6glVn4U9XrAv-LIsRa9FuYHfbY6N/view?usp=sharing
Maybe somehow has already solved the issue?
can’t download files. it says, the download limit exceeded
Hi
Do you know the solution for Finder crashes issues? Every time when I try to open Finder I´m getting this below error.
1.- Finder quit unexpectedly. Click Reopen to open the application again. This report will be sent to Apple automatically.
I just trying to fix this issue.
Hope somebody help me!!
Was able to install Majave, it is the beta version. I had the issues with no mouse or keyboard and was able to get control back with the USB3 fix, but then you lose control of the mouse for the host PC until you close the VM.
Graphics can be jittery and it is very slow. I was hoping to check out Xcode, but I could not find it in the app store. Maybe not available for the Beta?
why is this post still up? I spent all day getting this to work and it’s a f&**&* beta version of Mojave. Totally useless!
Give us some times, please. We update all the necessary articles and links. There some issues with images as well.
New articles will be coming soon with updated versions of Mac OSX.
Sorry I was frustrated. Appreciate the guides. You might want to make it clearer what the downloads are though.
It’s Okay, we apologize for the inconvenience
…when? It would be nice to include a disclaimer on this article or steps to upgrade the image to full Mojave
On bootup it displays the Apple and the progress bar and Joel is happy then it goes to a grey screen forever and Joel is sad.
I previously successfully setup High Sierra with a wikigains guide. I already had extension pack installed. I’ve tried various suggestions re usb3, Use Host I/O Cache etc to no effect. I am using VirtualBox 5.2.12.
Any suggestions?
I have followed all instructions and Mohave starts. But Finder just keeps flashing on and off repeatedly. I cannot stop it or access any folders e.g. Applications. Is this as good as it gets? (I have been using your solution for Sierra and High Sierra previously and they worked very well)
Any suggestions regarding this?
right now latest version of virtual box is 6.0.4… but the commands are for 5th version.. i couldn’t install using those commands…… can anyone help
Hi, same problem but I entered the 5th version.. it loads up to 1st apple page (choose your country) and thats it, think I have the mouse and keyboard problem but the videos are not working…
creating an account just to say i had the grey/gray screen that didnt do anyting. i powered off the VM, closed VBox, issued the commands again, re-launched and it began to boot as expetcted
Issue where booting logs ends with:
start randomseed
end randomseed
If you are having issues with AMD try:
VBoxManage modifyvm “MacOS Mojave” –cpu-profile “Intel Core i7-6700K”
I am reciving error with this command
VBoxManage.exe: error: Unknown option: -cpu-profile
any idea why ? i am running ryzem 1600x
it needs double dash -at cpu like this VBoxManage modifyvm “MacOS Mojave” –cpu-profile “Intel Core i7-6700K”
I have a Ryzen 5 2600 and the double dash (–) command line helped. I was able to install Mojave after that adjustment. Thanks.
Hi Cris, this command returns me this error;
VBoxManage.exe: error: Invalid parameter ‘-cpu-profile’
My CPU is an AMD 1100T Phenom II (x6), running Windows 7 Ultimate x64.
Thx a lot for your valuable time.
What is the solution for the mouse & keyboard problem? Because the video from youtube is no longer available
I’d also love to know! I get to the setup section then I’m unable to interact. Keyboard and mouse have no effect. Also getting the 401 error
I found that I had to install that Guest Additions package. Then enable USB3 (requires the optional pack) then unplug and plug mouse back in.
Where did you install that from?
Hi! i have same problem with finder that crash every time i want to access to file system. i read the aprouch about deleting preferencies files but i cant access to them. Any suggestion?
did you found the solution? I have the same problem here and didn´t see any suggestion/solution :/
Same here, finder keeps crashing and can’t solve the issue.
Just like Jack I followed all steps (I’ve tried many time) and I get this:
end openvolume
start processoptions
end processoptions
registerrestartdataprotocol: called. 0xdb146398
restartdata protocol installed successfully.
start setconsolemode
end setcosoleprotocall
start readkernalcache
end readkernalcache
you get it and the last to lines that were displayed are start randomseed
end randomseed
I have the latest version on VirtualBox (6.0)
Can anybody help?
cd “E:\VirtualBox\”(change location where u have installed vbox)
VBoxManage modifyvm “MacOS” –cpu-profile “Intel Core i7-6700K”
(change on MacOS to your vm name )
Ran everything successfully, but when I start – i just get a Mac mouse on the top left of my virtual box and nothing seems to be happening? Someone help please
Hi there,
I was hoping you could share some more information on a problem you solved.
If I setup two identical Virtual Machines, and execute the vbox manage command to set those extra attributes accordingly, I can get mojave up and running with the disk image you provided where Mojave was already installed.
I can see you created the disk with Mac Journled with no special partitions or other bootloaders.
On my 2nd machine the only difference is, I would like to install Mojave from an official Mojave iso I created from the Mojave package distributed by apple.
In this 2nd case, the iso boots, I create the disk, and begin the installation, but partway through the install it crashes and reboots.
Could you provide the steps for how you created the disk image you are providing here please.
This is a very helpful and valuable post. Thank you.
To improve performance I am trying to disable TAILSPIND and SPINDUMP.
Unfortunately, these instructions (
https://www.macobserver.com/community/tips-tricks/disable-tailspind-spindump-macos-cpu-speed/) aren’t working. The first command I am trying to run is:launchctl unload -w /System/Library/LaunchDaemons/com.apple.spindump.plist
First, it says “sudo: command not found” Surely sudo is available.
Next, the command without sudo results in, ” … No such file or directory”
I did run “csrutil disable” and reboot prior to trying the commands.
I have problems uncompresing the files… said that is damage both… only one or in parts… have any other the same issue???
Not working here, mouse appears but i can’t move and screen is dark grey
hi there, i’m success to installed it into my computer. But the problem is the sound not work at all. Is there any trick to solve this problem?
I Just have tested on Windows 10 Pro 64bits, Virtual Box 5.2.22; (i7-3770 3.40Ghz / 24GBRAM / AMD Radeon HD 7870) ;
Followed the steps and worked well.
Download of files is ok.
Thank you very much for share your knowledge.
Not working for me – gets stuck in the EFI boot screen
the link to download mojave image says “sorry too many downloads….” but it happens since days now 🙁
take it
https://techsviewer.com/fix-download-limit/Hello, thanks for the article.
I’m trying to install Mojave in Virtualbox inside Mojave. I’ve done everything suggested but im stuck at a grey screen after a quick “Apple Logo” loading.
I can only move the mouse.
What can i do?
Hello, thanks for the article. Im trying to install Mojave on VirtualBox inside Mojave.
I’ve done everything suggested in this guide but i’m stuck at a gray screen after a quick “Apple Logo” loading. I can only move the mouse. What can i do?
Did you quit VBox before executing the code in the CMD??
I got it to work no problem, but is it me or is the general performance on virtualbox and wmware quite poor.
on previous versions I could install xcode, but here it will not run. anyone else have that ?
On VMware install VMware tools to fix slow performance and display issue.
Really helpful, thanks a lot.
I have followed all instructions and Mohave starts. But Finder just keeps flashing on and off repeatedly. I cannot stop it or access any folders e.g. Applications. Is this as good as it gets? (I have been using your solution for Sierra and High Sierra previously and they worked very well)
Bilbo
I followed every step but its just coming up with a small amount of text that says
end openvolume
start processoptions
end processoptions
registerrestartdataprotocol: called. 0xdb15d118
restartdata protocol installed successfully.
start setconsolemode
end setcosoleprotocall
start readkernalcache
end readkernalcache
you get it and the last to lines that were displayed are start randomseed
end randomseed
so please help I really want this tx
I do have a grey (Apple Screen) Screen only..
No setup etc…
I had to wait 10 mins, then this worked. I also set CPU from 6 to 4.
Tried it out on Linux Mint. Does not start. Error thrown after Starting the Machine in step 6.
I can’t send files to the VM. I’m pretty much builiding this VM because there is a tool I need that exists only on OSX, and If I can’t send 30gb of data to the VM the effort was useless to me. I can’t install guest additions. I can’t send the files to the VM anyways. What to do?
Is Mac OS Mojave image final?
No, it’s not the latest version.
Do you have plans to upgrade it?
unfortunately the “In VM (macOS Mojave) settings > usb > Enable usb controller > select USB 3.0 xHCI Controller. Then start VM it will work.” It doesnt work with a SurfaceBook Pro and a Kensington trackball, USB1, 2, or 3. Both trackball and keyboard locks up.
hello ,, plz tell ,,, after down lode than i extract file but it say ” file is damaged or corrected ” … i don’t know what happen ,,,,,,any solution?
Make sure you have downloaded and placed all the parts in the same folder (if your are download them in parts). Also try to download the file with IDM.
I have downloaded the files in parts and now i am trying to extract it and as extraction form winrar compleates a popup appears askin to replace the file or skip because of same name what should i do plaease help
Watch the video guide for help:
Updated: The video is removed from YouTube 'Sorry for the inconvenience guys'I can’t download any app from App Store it keeps saying “There was an error connecting to the Apple ID Server”
It is because apple can’t find the OS as real Mac, so it just don’t allow to install any app. Install macOS Mojave on VMware and then install VMware tools and try to install apps from App Store and it should work. https://www.wikigain.com/install-macos-mojave-on-vmware-windows/
Finder is not not working and also it’s not accepting any Apple ID (existing or newly created) saying: This mac is no longer eligible for creating Apple ID accounts.
so it’s not usable.
Yeah dear because apple doesn’t recognize it as a real mac so you can’t really use it as a real mac but still there are a lot of things that you can try on it.
Actually, I have a mac OS High Sierra 10.13 on a VM VirtualBox working fine as a real mac, with Developer Apple ID, connected to my network to support windows clients running Xamarin Forms and that’s why I expect these versions to be the same.
BTW, what’s the point of trying something with lack of some important primary functions?
P.S. this is not to undermine your efforts on this matter, it’s appreciated.
Yeah, you are right. Making macOS to work fine on VirtualBox on Windows is not easy for people who are new to it. So you can fix everything but it requires lots of time and effort.
It worked perfectly for me. Not so fast but works. The only problem is finder does not open at all.
Hello Faiz Orz & Mukhtar, dear readers,
Thanks for this work, it took me a while but it’s a complete and working tuto, probably the best I’ve found & tried on the internet.
To all readers, you have to follow carefully and strictly this tuto step by step, and don’t be shy when giving RAM to the VM. I’m using the machine on my laptop (light Asus) and gave it 8Gb out of 16Gb and it’s not perfectly fluid. I’ve had to plug additional mouse and keyboard to have controls.
Don’t expect it to work fully, many things haven’t been designed in purpose … for example on my config the only thing not working (so far) is … displaying Finder, which is blocking …. Also my additional mouse & keyboard are only usable on the VM when the VM is running, but it’s part of the deal.
Don’t worry about these issues because they might be fixed when Apple officially release macOS Mojave. It’s just the developer preview.
This doesn’t work. Tried everything several times. Came as far as the “Choose Country” but could never get the mouse or keyboard integration to work. Tried both MAC OSX versions and with and without the Host cache selected. No difference. This just doesn’t work. Windows guest OS works just fine, and MAC OSX Sierra worked just fine, so there’s nothing wrong with my VB setup.
Download VirtualBox Extension pack from VirtualBox website. Open up VirtualBox, go to File> Preferences and select Extension. Click on the + icon and select Extension Pack. Install it then go to Virtual Machine settings. From right-hand side click on USB and add your mouse and keyboard then try again.
This doesn’t work. After the verbose startup is loads to a grey screen with the mouse being stuck in the top left. I allocated 4096 MB of Ram, made sure to inject the code into virtualbox (without it being open) and made sure my settings matched. I also made sure to try both Mac OS (64 Bit) and Mac OS X High Sierra (64 Bit) modes on virtualbox, with neither working and showing the exact same screen.
Select the Version Mac OS X 64 bit and also check out “Use Host I/O cache” from Storage section on VirtualBox Settings.
Still doesn’t work. I ticked it and I still get the exact same error 😛
Download VirtualBox Extension pack from VirtualBox website. Open up VirtualBox, go to File> Preferences and select Extension. Click on the + icon and select Extension Pack. Install it then go to Virtual Machine settings. From right-hand side click on USB and add your mouse and keyboard then try again.
@Ethan
I was also facing same problem and it was resolved by going to virtual machine (macOS Mojave) settings > usb > Enable usb controller > select USB 3.0 xHCI Controller.
Then start VM it will work. But do install extension pack and other remedies suggested by Mukhtar.
I’ve managed video guide for you guys that you can watch in case you get any confusion.
Updated: The video is removed from YouTube 'Sorry for the inconvenience guys'In VM (macOS Mojave) settings > usb > Enable usb controller > select USB 3.0 xHCI Controller.
Then start VM it will work. But do install extension pack and other remedies suggested by Mukhtar.
Thanks for the info after it installs I can see the choose language window but my mouse and keyboard are unresponcive I have installed the extention pack?
Select the Version Mac OS X 64 bit and also check out “Use Host I/O cache” from Storage section on VirtualBox Settings.
In VM (macOS Mojave) settings > usb > Enable usb controller > select USB 3.0 xHCI Controller.
Then start VM it will work. But do install extension pack and other remedies suggested by Mukhtar.