It’s been a while that macOS Catalina 10.15 is released and this is the latest Apple Mac Operating system up to now. In this article, I’m going to show you step by step to install macOS Catalina on VirtualBox on Windows PC. Indeed, installing macOS on VirtualBox on a Windows PC is not technically legal according to Apple terms of use, but here we only use it for testing and educational purposes. If anyone misuses it, that’s not our responsibility.
Tip: before reading the rest of the article, it’s recommended to navigate to the Required File section of this post and download macOS Catalina 10.15 then you’ve time to read the item until the downloading gets complete.
Steps to Install macOS Catalina on VirtualBox on Windows
- Download macOS Catalina ISO
- Install VirtualBox on Windows PC
- Install & Update VirtualBox Extension
- Create a New Virtual Machine & Customize it
- Run VirtualBox Code via Command Prompt
- Start the Virtual Machine
- Create macOS Catalina Bootable Disk
- Perform a Clean Installation of macOS Catalina
- Summary
Important Note
Before we get started, make sure your system can support Virtualization Technology (VT), and it is enabled from BIOS so that you should be able to run Virtualization software like Virtualbox or VMware. Also, you should have a 64-bit Windows operating system with at least 2 GB RAM and 20 GB of free storage. We recommend you 4 GB of RAM or higher and more room so you can store more files and install more apps on macOS Catalina disk.
Furthermore, if you have an SSD, it’s highly recommended to use it as storage because SSD is much faster then mechanical hard drive (HDD) and macOS run on SSD very smooth. Anyway, it is not 100% compulsory but if you have don’t hesitate to use it.
Download the Prerequisites
All the necessary files are linked in the article below, and you should be able to download them without any issues.
- Download macOS Catalina ISO
- VirtualBox Code
- Virtualbox 6.1.10 Setup (Direct Link)
- Download Virtualbox 6.x Setup
- Download Virtualbox Extension
Step 1: Download macOS Catalina ISO
You’ve to download macOS Catalina ISO from the link provided. If you’ve not downloaded, you should download the macOS Catalina ISO image. We’ll be using the ISO image of macOS Catalina in this guide. Please read the guide step by step. If you miss any step, then the installation might not work. So read all the steps because all of them are important.
Recommendation: It’s highly recommended to create a new drive on your Windows PC and install macOS Catalina on a separate drive.
Step 2: Install VirtualBox on Windows PC
From the “Required File” section of this post, you should have downloaded VirtualBox and if you didn’t, download VirtualBox latest version and install it on your Windows system. If you’ve already installed VirtualBox, then you can skip this step. Other than that, follow the steps below.
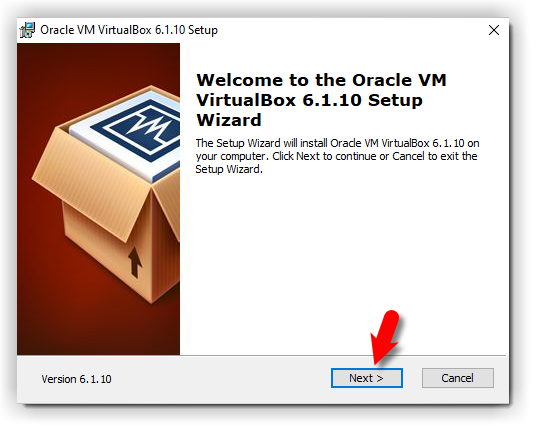
- On the welcome Wizard page, click Next.
- Keep the default setting on the Custom Setup page and click Next.
- Again Click Next to accept the default options unless you want to change something.
- On the warning Network interface page, just click Yes to process with Virtualbox installation.
- Click the Install button to install VBox. Again click Yes if required.
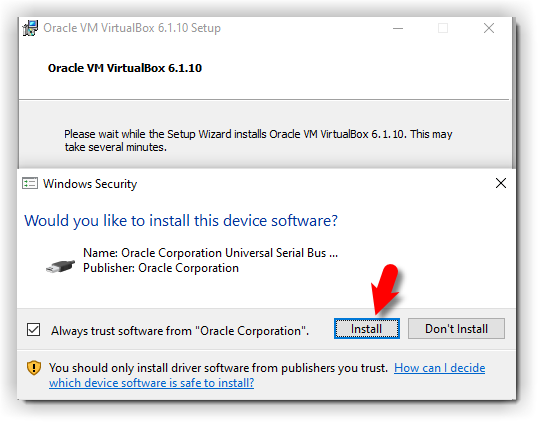
- While installing VBox, you might a security warning about “Oracle Corporation”. You need to click Install on this page to process with the installation. If you click Don’t install, the installation process will be terminate here and you can’t go ahead. If you see the security warning again click the Install button.
- Finally, click Finish.
-
- Virtualbox Setup Welcome Wizard
-
- Windows Security
-

- Virtualbox Setup Completed
-
Step 3: Install & Update VirtualBox Extension
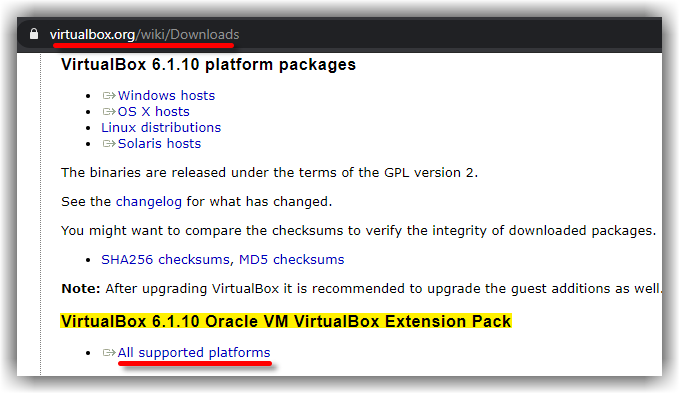
This step is not 100% necessary but it’s highly recommended to do this step because macOS Catalina might not be compatible with VirtualBox and for this reason, it might cause problems during the installation. Go to the Virtualbox download page. Under VirtualBox 6.1.10 Oracle VM VirtualBox Extension Pack section, click All supported platforms to download the latest version of Virtualbox Extension Pack.
Download Virtualbox Extensions
Once you’ve downloaded the Extension pack. Now, Follow the steps below to update the Virtualbox extension pack.
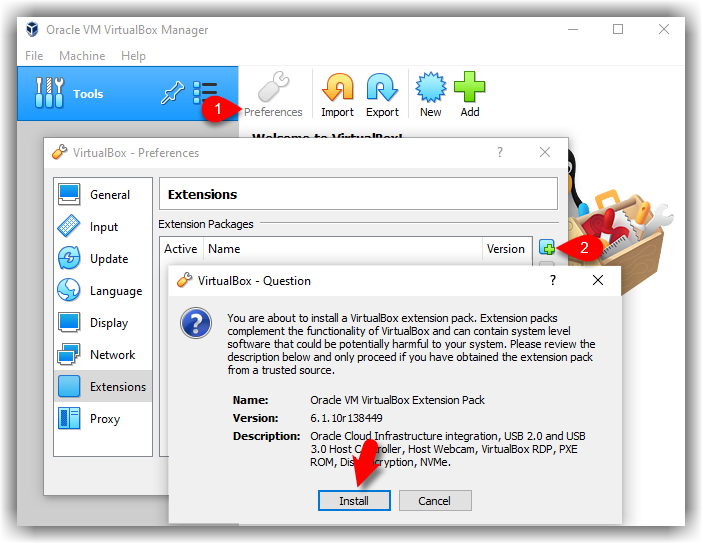
- Open up VirtualBox, navigate to Tools>Pereferences>Extensions.
- Click on Plus (+) icon and select VirtualBox extension which you’ve downloaded at the beginning of this section. Click Install or Upgrade and then Agree to the terms and conditions. Click the OK button.
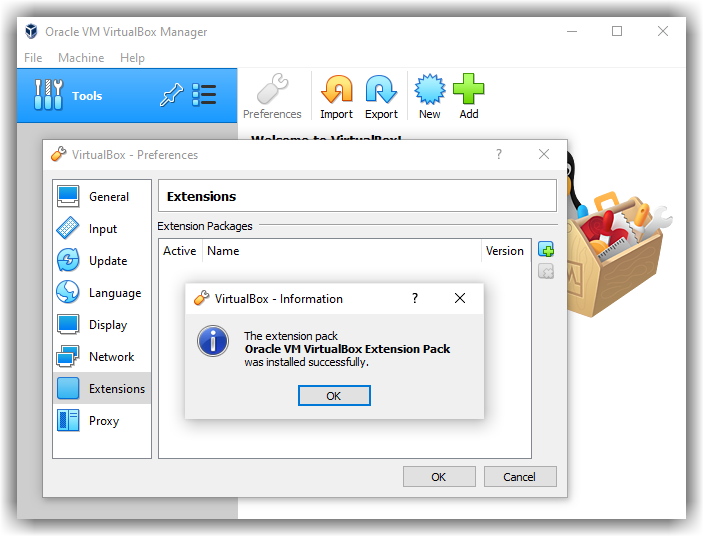
Finally, you should see something like the screenshot below.
-
- VirtualBox Extension Install
-
- Oracle VM VirtualBox Extension Pack
-
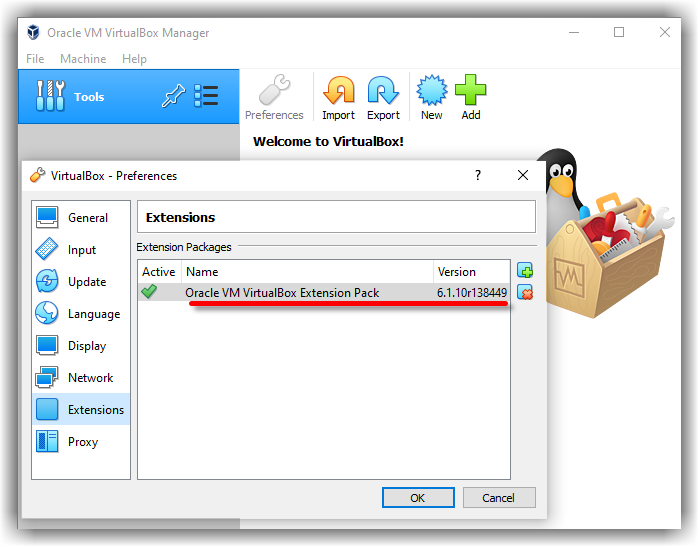
- Oracle VM VirtualBox Extension Pack Installed
Step 4: Create a New Virtual Machine & Customize it
Creating a virtual machine for macOS Catalina is kind of the same as you create a virtual machine for the Windows Operating system or Linux but with some minor changes. In this post, I’ll show those changes. Follow the steps below to create a new virtual machine for macOS Catalina using ISO file.
- Open up your VirtualBox application and click New.
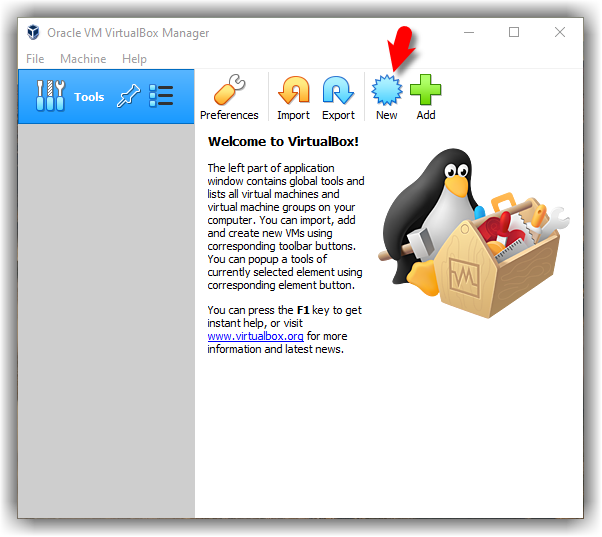
New VM
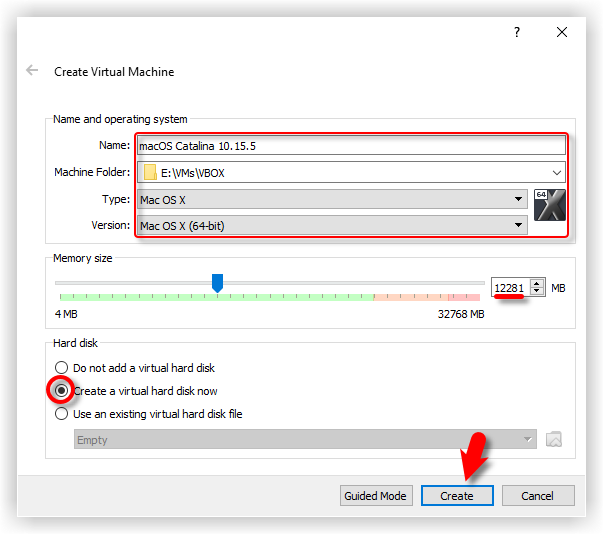
- Click Expert Mode and select the following options then click Create.
- Type a suitable Virtual Machine Name.
- Virtual Machine Location (a separate drive is recommended).
- Type (Mac OS X).
- Version (Mac OS X 64-bit).
- Memory 4 GB (recommended 8 GB or higher).
- Hard Disk: Select Create a virtual disk now.
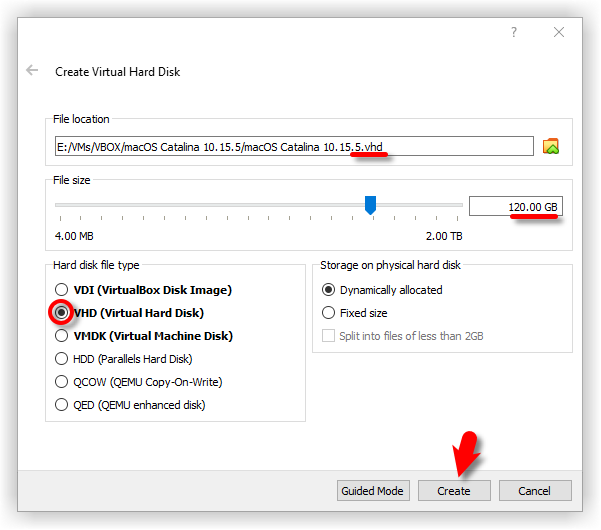
- On the create virtual hard disk window, choose the following options.
- Disk Location: The default location should be fine unless you want to change to a new location.
- File Size: You can specify the disk size here.
- Hard disk file type: Select VHD (Virtual Hard Disk) format.
- Storage on physical hard disk: Select the Dynamically allocated option. However, if you want to have a better performance disk then choose a fixed disk. Fixed disk, will allocate the specified size from your host machine immediately. Read more about the dynamic vs fixed-size disk.
-
- Name and Operating System
-
- Create macOS Catalina VHD Disk
-
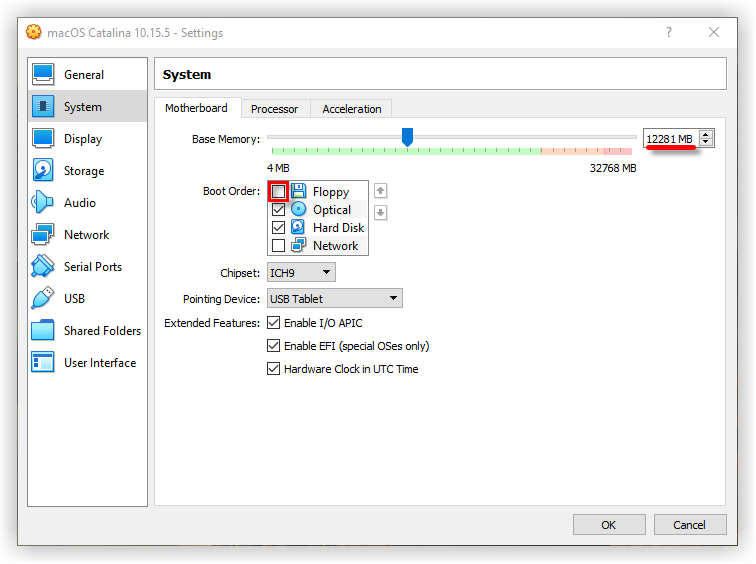
- It’s time to edit the virtual machine to make it works. Select macOS Catalina VM and click on Settings. Now, bring the following changes to macOS Catalina VM.
- Under System>Motherboard, increase the Base Memory to 12281MB. However, you can use a bit lower memory if your system doesn’t have this much RAM.
- Uncheck Floppy from the Boot Order section.
- Under the Processor tab, increase the processors to 4 or higher.
-
- Change Boot Order and Remove Floppy Disk
-
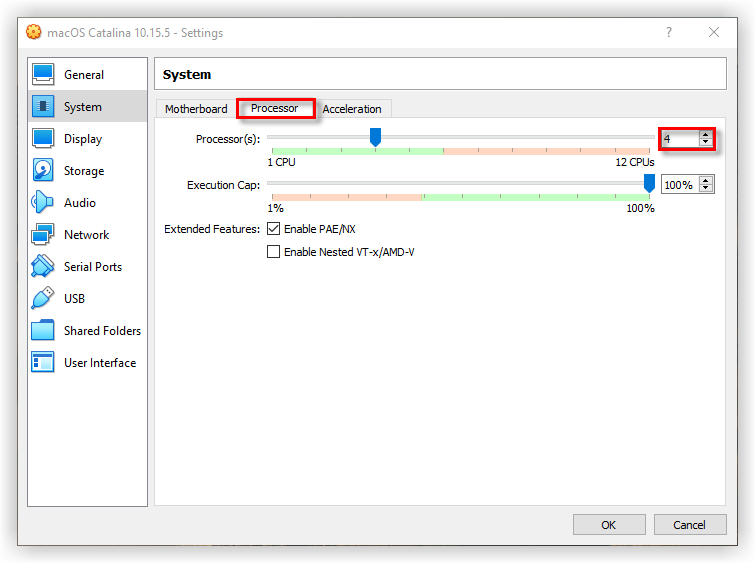
- Increase macOS Catalina Processors
-
- On the Display window, increase the Video Memory to 128MB.
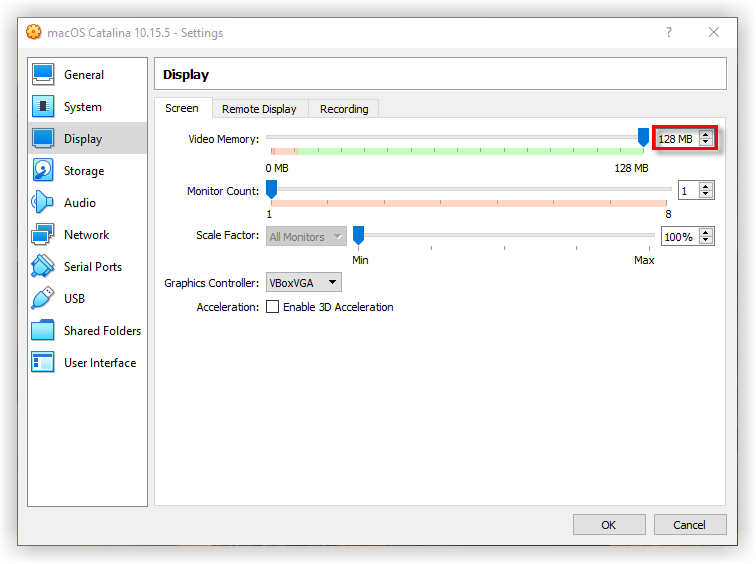
Increase Video Memory
- From the Storage section, click on the Empty>DVD icon. Click on Choose a disk file. You should select macOS Catalina ISO which you’ve downloaded from the “Required Files” section of this post. Finally, click OK to close the macOS Catalina Settings window.
-

- Select macOS Catalina ISO Image 1
-
- Select macOS Catalina ISO Image 2
-
Step 5: Run VirtualBox Code Via Command Prompt
Once you’ve created and customized your virtual machine, it’s time to run some codes in order to install macOS Catalina on VirtualBox.
First, you should notice your virtual machine name because later on, we will use it. Open the VirtualBox code which you should have downloaded from the Required File section of this post. If you’ve not downloaded doesn’t matter. Just use the following code.
Note: Before, you execute the code by command prompt. You should read the following steps.
cd "C:\Program Files\Oracle\VirtualBox\"
VBoxManage.exe modifyvm "VM Name" --cpuidset 00000001 000106e5 00100800 0098e3fd bfebfbff
VBoxManage setextradata "VM Name" "VBoxInternal/Devices/efi/0/Config/DmiSystemProduct" "iMac19,1"
VBoxManage setextradata "VM Name" "VBoxInternal/Devices/efi/0/Config/DmiSystemVersion" "1.0"
VBoxManage setextradata "VM Name" "VBoxInternal/Devices/efi/0/Config/DmiBoardProduct" "Mac-AA95B1DDAB278B95"
VBoxManage setextradata "VM Name" "VBoxInternal/Devices/smc/0/Config/DeviceKey" "ourhardworkbythesewordsguardedpleasedontsteal(c)AppleComputerInc"
VBoxManage setextradata "VM Name" "VBoxInternal/Devices/smc/0/Config/GetKeyFromRealSMC" 1- When you opened VirtualBox code via notepad or any other text editor, use the replace function of the program to Replace the “VM Name” with your virtual machine name. See the picture below to get an idea of how to do it.
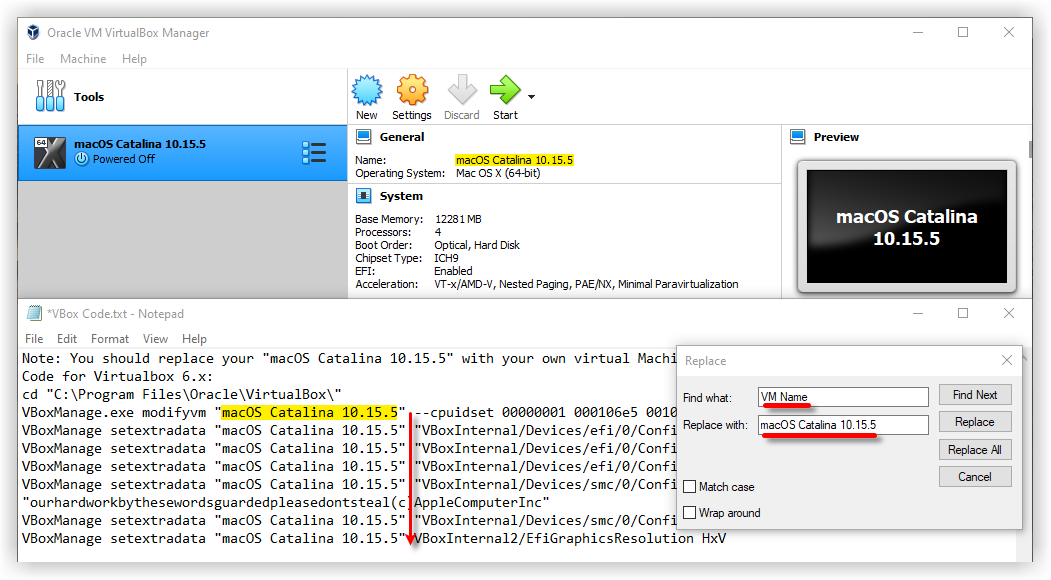
Replace VM Name
- Now, you’ve two choices. First, if you want to fix your macOS Catalina screen resolution in the first place. You should also execute the following code. You have to change “VM Name” with your virtual machine name and HxV with a screen resolution such as “1280×720“. For more supported screen resolution on VirtualBox and detailed guide, visit fix macOS Catalina screen resolution on VirtualBox.
Important Note: We highly recommend to quit the VirtualBox program before executing the code. If you don’t do it, your virtual machine might not proceed to the installation step.VBoxManage setextradata "VM Name" VBoxInternal2/EfiGraphicsResolution HxV
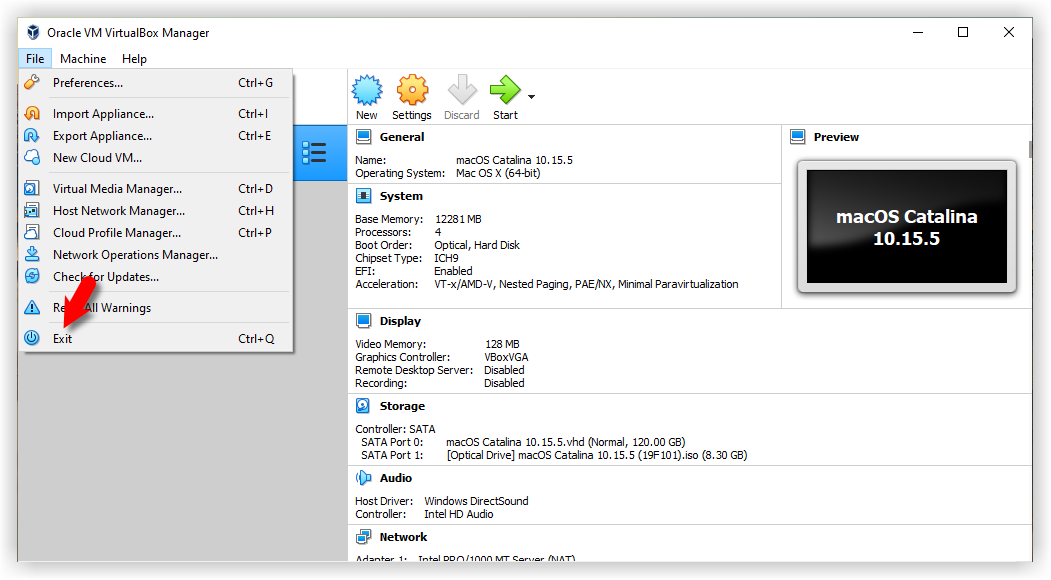
Exit VirtualBox
- Once you replaced the “VM Name” with your virtual machine name, then run the code one by one via command prompt (CMD). You can open the command prompt by pressing the Windows+X key in Windows 10 and select Command Prompt from the list. Or simply press Windows key and type CMD. Click Run As Administrator and click Yes.
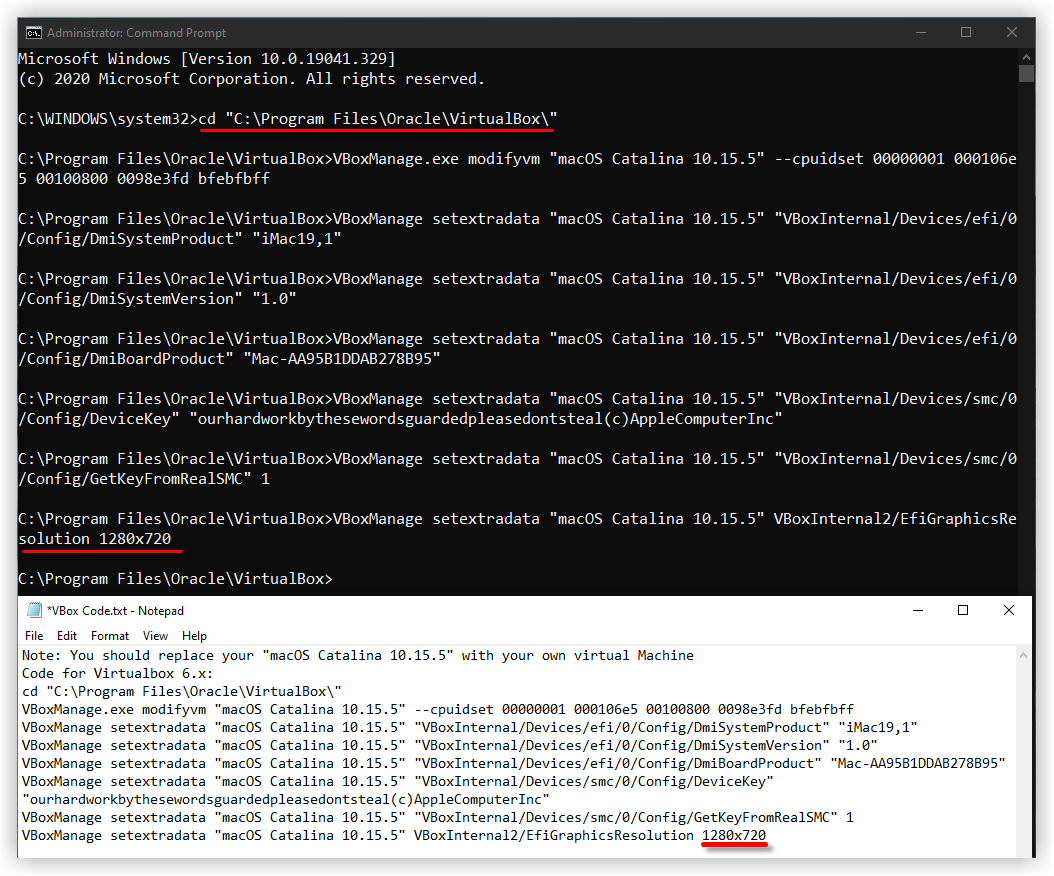
Execute VirtualBox Code by CMD
Step 6: Start the Virtual Machine
Starting macOS Catalina with the older version of the Mac Operating system was a bit different, but with new macOS Catalina still, it’s easy to set it up.
#1. Open the VirtualBox app then click the Start button. A black screen with a few yellow & white text will appear on the screen.
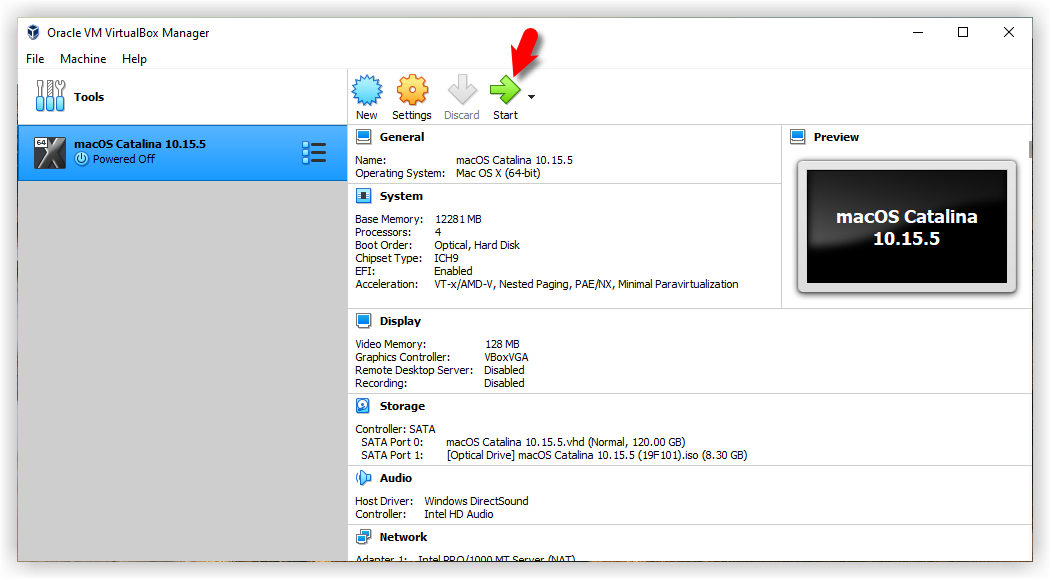
Start macOS Catalina VM
#2. Once you’ve started your virtual machine, you might have to choose which ISO to select. If you’ve attached only one ISO image. You probably not see the window below. Just make sure, you’re using the right macOS Catalina ISO.

Select Start-up Disk
Step 7: Create macOS Catalina Bootable Disk
- Once you start your VM, a whole bunch of code will run on the screen, but you should not be worried about it. Wait for a few minutes, and you should see the macOS Catalina Language window. Select your Language and click Continue arrow.
-
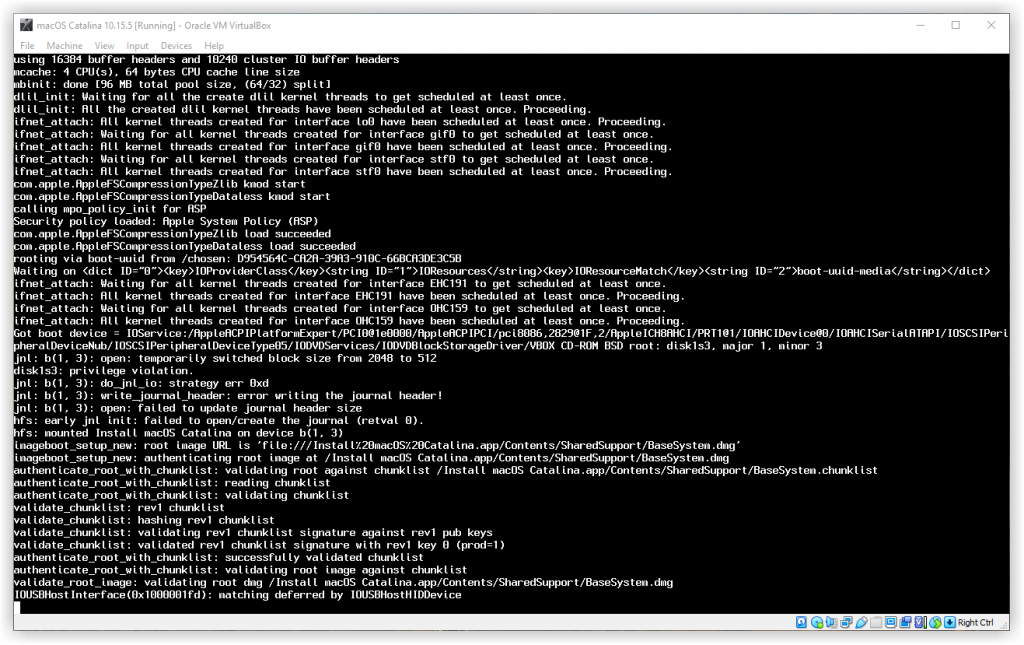
- Background Code
-
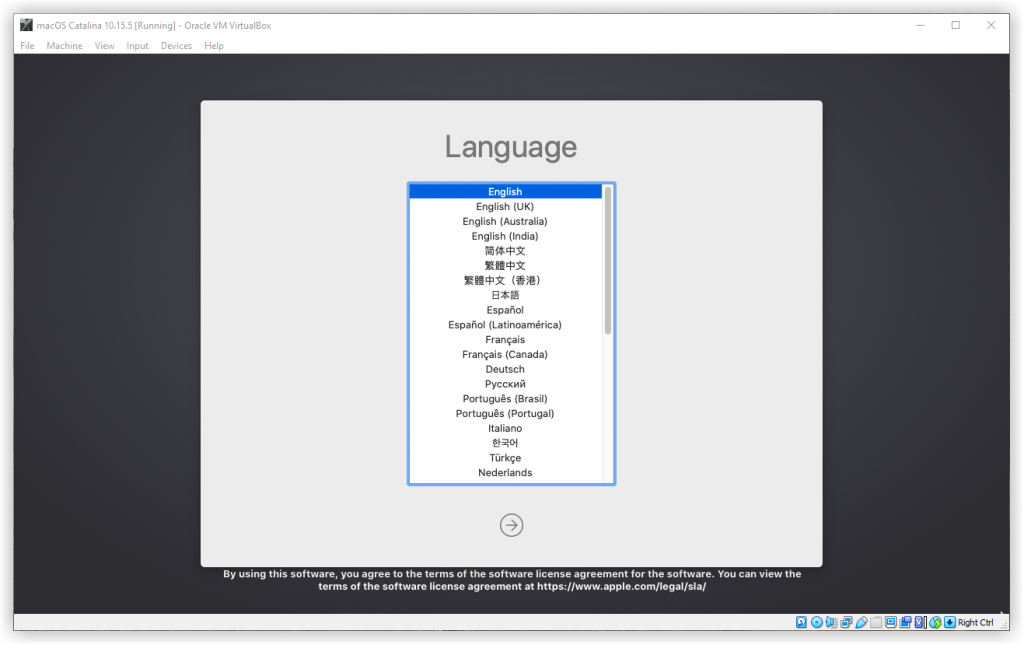
- Choose A Language
-
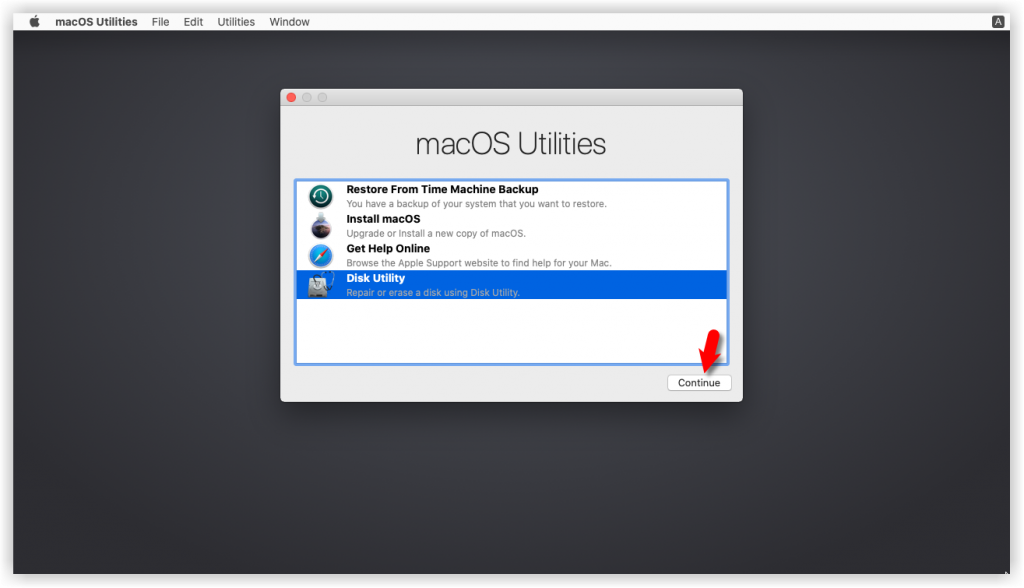
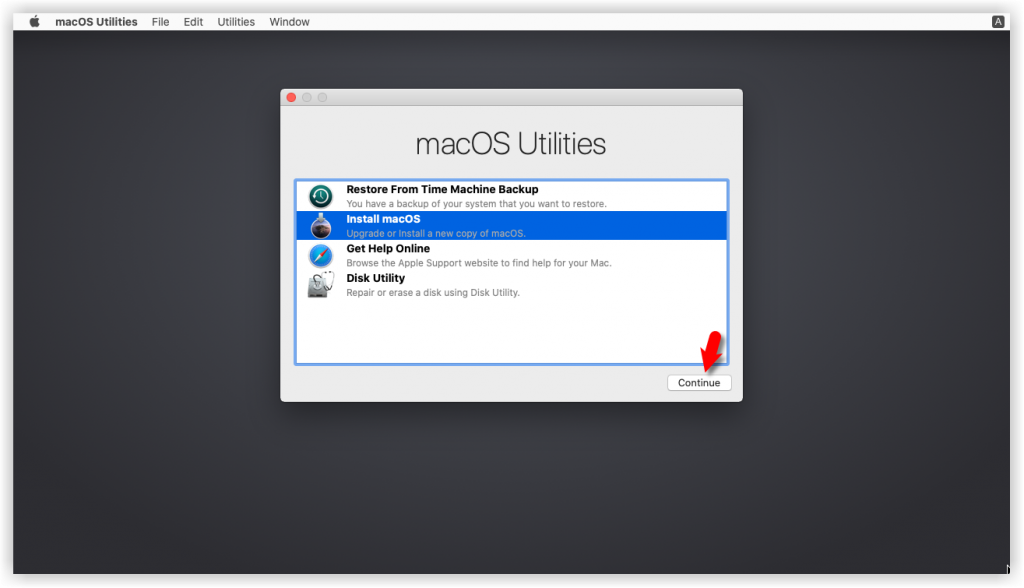
- Now, you’ll see macOS Utilities Window. From the list, select Disk Utility and click Continue.
- Select your main VHD Disk and click the Erase button. Choose the following options and again click Erase.
- Name: Catalina Disk (You can type any name you want)
- Format: APFS (If you get an error, select Mac OS X Extended Journaled)
- Scheme: GUID Partition MAP
- Now, close the Disk Utility window.
-
- Catalina Disk Utility
-

- Erase Catalina Disk
-
- From macOS Utilities, select Install macOS and click Continue.
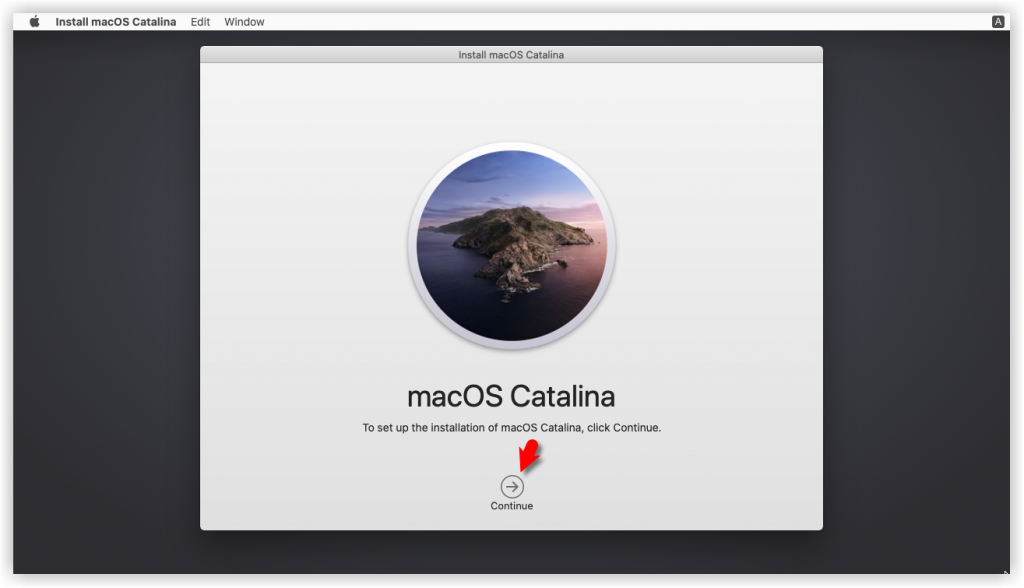
- Click Continue on Install macOS Catalina screen.
-
- macOS Catalina Utilities
-
- macOS Catalina Setup Process
-
- Agree to the macOS Catalina License agreement.
- Select macOS Catalina Disk and click Install.
-
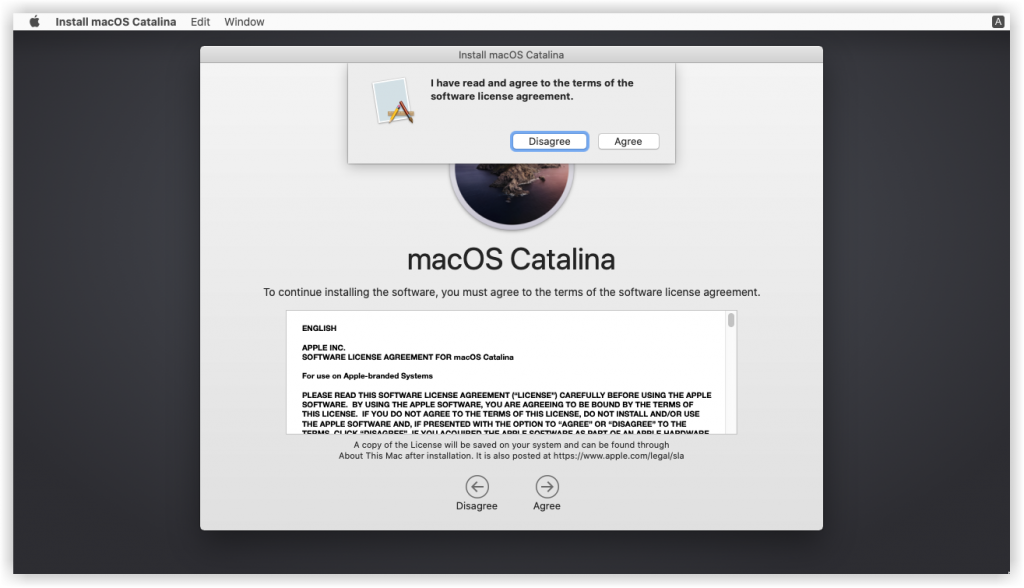
- Agree to the Terms and Conditions
-
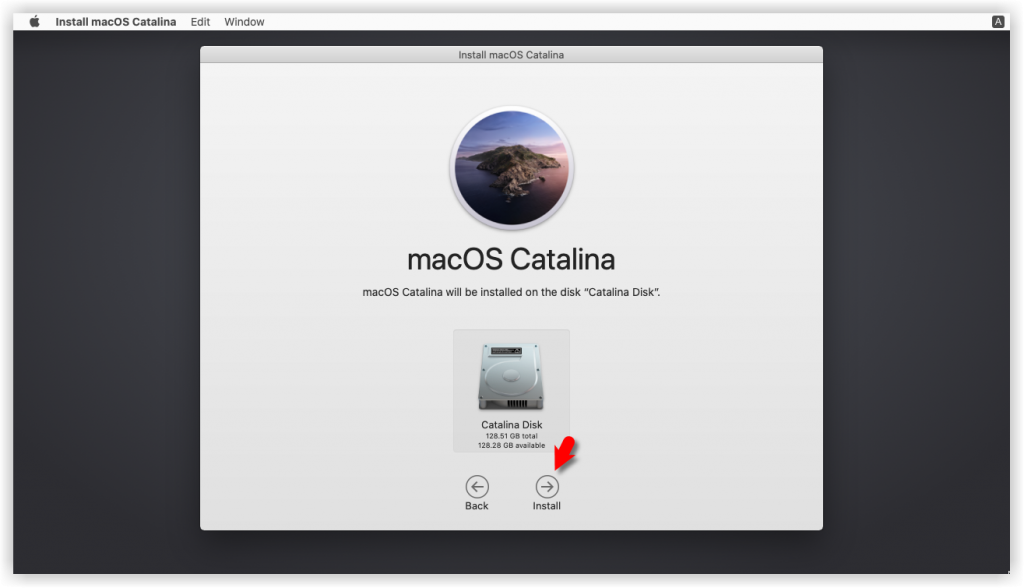
- Select Installation Disk for Catalina
-
- Now, wait for 3 minutes and your VM will restart. macOS Catalina will be installed on your Disk. Next, you should not do anything. You’ll see another 29 minutes installation window.
Step 8: Perform a Clean Installation of macOS Catalina
- Once you’ve passed the step #9. You’ll see the macOS Catalina Welcome window. Select the following options. You can change most of the settings later on, so don’t worry about it for now.
-
- Select your Country and click Continue.
- Choose a Keyboard Layout and click Continue. If you’re not happy with default settings, you can customize the Settings.
- On the “Data & Privacy” window, click Continue.
- Select Don’t transfer any information now.
- Click on Set Up Later then Don’t Sign In. Click Skip. You can add your Apple ID later.
- Click Agree to the Terms and Conditions and click Continue.
- Fill out the Full name, Account name, Password, and Hint then click Continue.
- If you want to customize Express Set Up, you can click on Customize Settings otherwise click on Continue.
- On the Analytics window, click Continue.
- On-Screen Time, click Set up Later.
-
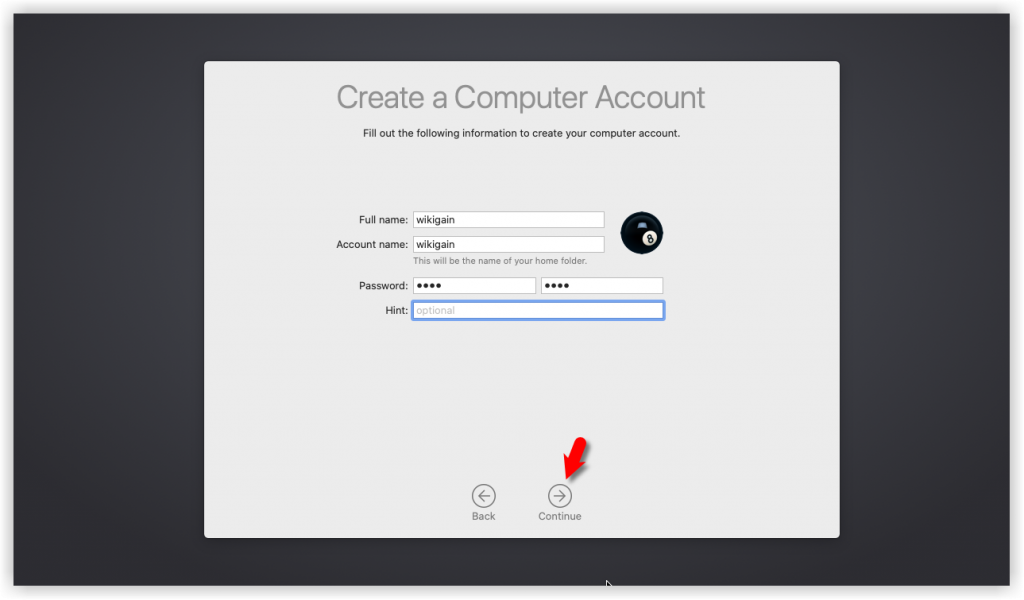
- Create Catalina Computer Account
-

- Catalina Screen Time
-
- Do not set up Siri for now. Just skip it.
- Select an appearance theme and click Continue. You can choose between dark mode or light and Auto mode.
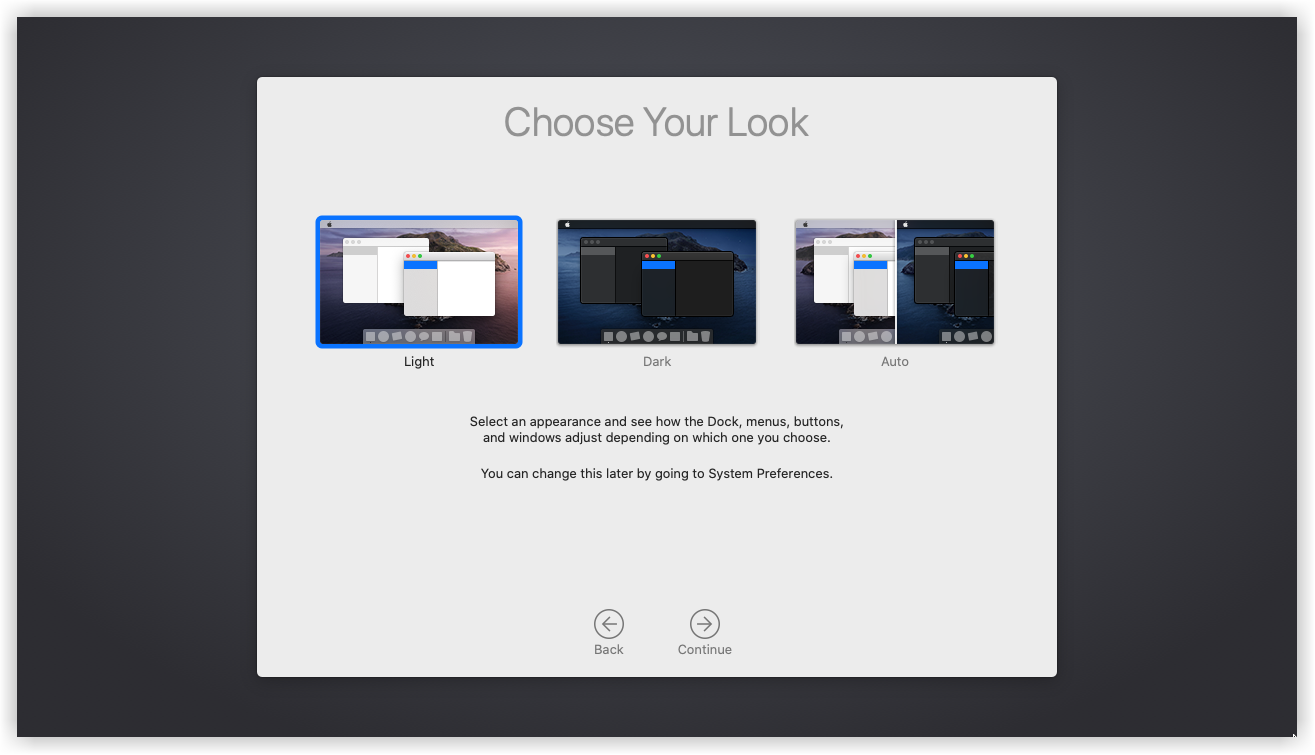
Choose Catalina Theme
- Wait a few seconds that your macOS should be set up.
- Close Feedback Assistant for now and close mouse & keyboard window.
-
- Well done 👌 you’ve successfully installed macOS Catalina on VirtualBox using the ISO image.
Related: If you want to install macOS Catalina using VMDK file then visit “how to install macOS Catalina on VirtualBox on Windows using VMDK”.
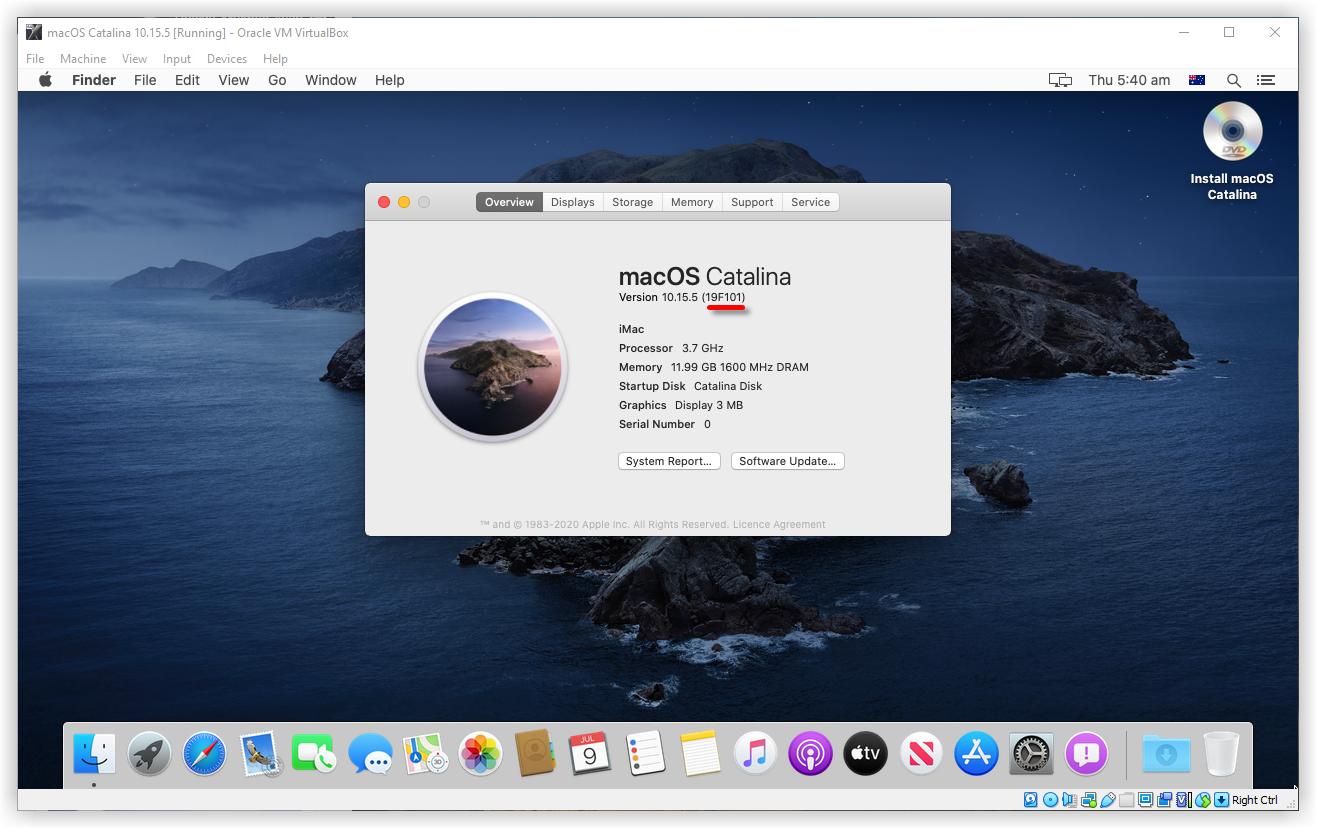
Installed macOS Catalina on VirtualBox
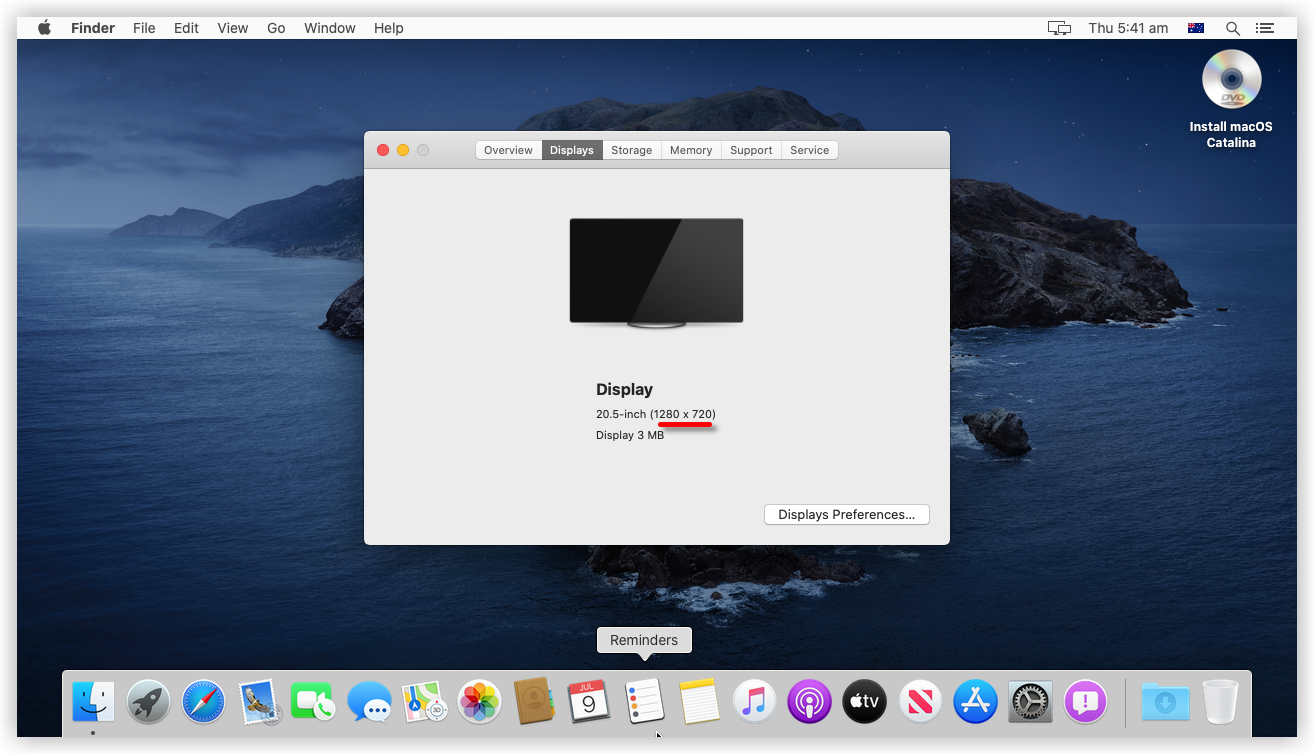
Catalina Display
Fix Common Errors
The issue regarding “[EB|#LOG:EXITBS:START] (AND CURRENT DATE/TIME)”. Use the command below.
VBoxManage modifyvm “VM Name” --cpu-profile “Intel Xeon X5482 3.20GHz”Please comment your problem and solution if you’ve then we will add in this section for other visitors.
Summary
Basically, in this article, I’ve shown you the step by step pictorial guide on how to install macOS Catalina on VirtualBox on a Windows computer. After reading and following this guide, you should have done the following;
- Download macOS Catalina ISO
- Install VirtualBox on Windows
- Installed & upgraded VirtualBox extension
- Created a new virtual machine for macOS Catalina
- Customized macOS Catalina VM
- Executed the VirtualBox code via CMD
- Start the Virtual Machine
- Create macOS Catalina Bootable Disk
- And finally performed a clean installation of macOS Catalina.
We are ready to keep receiving your feedback about this article, and other posts on wikigain. Your suggestions and feedbacks are highly appreciated.
I had an error because I am on Windows 11 using Ryzen 7. Specifically, 5800x3d.
This command fixed it.
VBoxManage modifyvm “VM NAME HERE” –cpu-profile “Intel Xeon X5482 3.20GHz”
IF you have a RYZEN cpu and the installation hangs during startup, open a cmd and type:
VBoxManage modifyvm “macos” –cpu-profile “Intel Core i7-6700K”
This will solve your problems
Great instructions. I still got an SMC error when starting. I had to also run this:
cd “C:\Program Files\Oracle\VirtualBox\”
VBoxManage.exe setextradata “VM name” “VBoxInternal/Devices/smc/0/Config/GetKeyFromRealSMC” 0
I can’t install Catalina because whenever I try it tells me the following error message:
“This copy of the INstall macOS Catalina Beta application is damaged and can’t be used to install macOS”
I read it had to do with changing the time in the GuestOS but I don’t know how. Any ideas?
If you get error after first run with description as bellow
Failed to query SMC value from the host (VERR_INVALID_HANDLE).
change value 0 to in in below command
VBoxManage setextradata “VM Name” “VBoxInternal/Devices/smc/0/Config/GetKeyFromRealSMC” 1
I have another solution for VERR_INVALID_HANDLE.
My PC is running Windows 10 Pro 21H1, cpu Intel(R) Core(TM) i7-3770K CPU @ 3.50GHz 3.50 GHz
The required file VBox-MacOS-Setup-Commands.bat (within Commands-bats.zip) already has “…GetKeyFromRealSMC” with a trailing digit one so this wasn’t a solution for me.
I followed the steps by user Jeff (November 9, 2021 at 4:54 AM), with a slight variation: I wanted to know what the “hypervisorlaunchtype” was set to before changing it, in case it didn’t solve the problem. To do this, follow Jeff’s instruction to launch CMD as Administrator and simply type in:
bcdedit
then look for the line “hypervisorlaunchtype” which is probably the very last thing displayed. I made a note that for my system it was set to “Auto”.
Proceed with Jeff’s instructions:
bcdedit /set hypervisorlaunchtype off
and reboot your PC.
After a few years trying to have a MacOS VM, I finally got it done.
However, at startup and shut down, I still have the long black screen with texts. On start, it runs through long texted black screen before opening; same as during closing, every time. That’s kinda annoying. Any solution?
Thanks
Thank you for the great tutorial. I tried another one a couple of months before and didn’t worked, the system was extremely laggy.
This tutorial does work, however you have to be patient during the installation since it took hours.
Thanks a lot for this!
Just installed Catalina on a Linux host, following the same steps. Had the “[EB|#LOG:EXITBS:START] (AND CURRENT DATE/TIME)” issued and the suggested fix did the job, even tough I have a AMD Ryzen 7. I just had to change the syntax due to bash expansion. Specifically I used:
VBoxManage modifyvm VM\ Name –cpu-profile Intel\ Xeon\ X5482\ 3.20GHz
THIS CAN HELP YOU
After hours of unsuccessful trials and never ending looping text, here is what did the trick for me:
My config is Intel i9 and Windows 21H1.
At first, you have to make sure the hypervisor is off in Windows, otherwise it won’t work or it can be very sluggish in Virtualbox.
In CMD (admin mode), here is the command to turn it off, just in case:
bcdedit /set hypervisorlaunchtype off
Reboot your PC.
THE MOST IMPORTANT to be able to boot on the CD, and then reboot to finish the install on step 8, you have to configure your storage disks as follow:
macOS Catalina ISO optical drive = SATA Port 0
Hard Disk VHD = SATA Port 1
N.B. Never check the option “Solid-state Drive”, even if your physical disk is an SSD
It should only take about 2mn before you can boot and get the Apple logo.
If ever you can’t boot and you get the “shell”, type “exit”.
In the menu, select Boot manager maintenance.
Then manually select the file “boot.efi” to lauch the install, which is located in
System / Library / CoreServices / boot.efi
Keyboard not working. HELPPPP!!!!
I had a problem where after following all of these steps Virtualbox would boot into an UEFI shell.
I fixed it by following this youtube clip..Hope this helps anyone else having the same issue.
<span class="embed-youtube" style="text-align:center; display: block;"><iframe class="youtube-player" width="1200" height="675" src="https://www.youtube.com/embed/A3z64QUTJsM?version=3&rel=1&showsearch=0&showinfo=1&iv_load_policy=1&fs=1&hl=en-US&autohide=2&wmode=transparent" allowfullscreen="true" style="border:0;" sandbox="allow-scripts allow-same-origin allow-popups allow-presentation allow-popups-to-escape-sandbox"></iframe></span>Can’t get it to work at all in VirtualBox. I can get Mojave and Big Sur to work, but not Catalina. I get an “in memory Panic stackshot succeeded” and then it sits there trying to restart
FORGET VIRTUAL BOX!!! While I very much appreciate the effort here I tried for WEEKS to do this using VirtualBox. I could never get a serial number fix using Clover, never had any sound, the mouse wheel was reversed and the response was terrible. I used Virtualbox because I had used it before for Linux and was familiar with it. What a mistake. ONE PASS WITH VMWARE and my VM runs perfectly as expected. https://www.wikigain.com/install-macos-catalina-on-vmware-on-windows/
Could You add this to the guide?
If You get an UEFI error, locate the boot.efi file on the ISO/USB-stick
System\library\coreservices\boot.efi
Run Boot.EFI
Those whose virtual box runs extremely slow, probably have a green turtle icon on the right bottom corner of the virtual box window. You shouldn’t see it, it should be a V icon in a blue chip. This issue is caused by Hypervisor. You need to turn it off, to do so, follow method one on this website.
https://www.tenforums.com/tutorials/139405-run-hyper-v-virtualbox-vmware-same-computer.htmlI needed to add “.” to the VBoxManage.exe scripts (e.g. .VBoxManage setextradata “VM Name” “VBoxInternal/Devices/efi/0/Config/DmiSystemProduct” “iMac19,1” ) otherwise alles ist in ordnug
Lol! You didn’t mount the correct ISO, looks like you have the VirtualBox ISO mounted.
Is there someone that have solved the Audio issue on Mac OS Catalina Guest ?
Thanks
The screen with code all over (step 7) stays still and doesnt move to the macOS utilities screen, the code there also looks different to the one in the photo.
My config is:
CPU: Ryzen 5 2600X
GPU: GTX 1650 S
MOBO: B450F Gaming
Any ideas why?
Dear Mr. Mukhtar,
Your work is great! I followed all the instructions here and got a VirtualBox VM with macOS Catalina running.
Just a simple question: I’m trying to add some email accounts and they are not showed neither in SysPrefs>Internet Accounts nor if adding them in Mail.app (I’m talking about iCloud and Gmail accounts).
Is there something I’m doing wrong?
Thanks in advance,
Gianluca
In the “Select the disk where you want to install macOs” it didnt find any disk. How i do i fix it?
You need to allocate more than 25gb space in order to find your disk.
Did you complete the step with the Disk Utility? You need to create a drive at that step on which to install the OS.
https://www.dev2qa.com/how-to-fix-no-disk-to-select-issue-when-install-mac-os-on-virtual-machine/
Use this link
You forgot to go to disk utility and erase the Virtual Hard Disk
When its in the “Select the disk where you want to install macOs” it cant find any disk. How do i fix it?
It works great! Installed on Centos 7 Dedicated server using this tutorial. Intel Xeon E3-1245v2
4c/8t 3.4GHz, 32GB of ram. VirtualBox 6.1 (8GB). Accessing over Windows Remote Desktop connection.
CPU: Ryzen 7 and got same problem. Fixed it with this command:
VBoxManage modifyvm “VM NAME” -–cpu-profile “Intel Core i7–6700K”
This fixed for ryzen nitro5 thaaaaanks!!!!
Hi,
I’m stuck at the very beggining of the installation, it runs unbelievably slow, like one frame every two seconds. I can’t pass the second screen because it’s impossible to click on anything.
Core i7 9700k (allocated 4cpus) 32go DDR4 (allocated 8)
I used to be able to boot macOS Catalina without problems on my Ryzen 3600 without problems a few months ago. Now I get stuck on: [EB|#LOG:EXITBS:START] (AND CURRENT DATE/TIME)
I tried
VBoxManage.exe modifyvm “macOS” –cpu-profile “Intel Xeon X5482 3.20GHz”
but it doesn’t help.
i have the same problem on my Ryzen 5 4600H
Hi! This is awesome!! I almost made it to the end, but as i was about to install MacOs, it said that i didn’t have enough space. It said that it needed 64.21GB and only 64.09 were available!
Is there anything I can do? Settings that I can change?
Please help! Thank you! :))
Hi
I had this working well thanks to your very clear tutorial. But that was a few months ago. I have now returned to it and get this error:
Failed to open a session for the virtual machine Mac21.
The virtual machine ‘Mac21’ has terminated unexpectedly during startup with exit code 1 (0x1). More details may be available in ‘G:\mac21\Mac21\Logs\VBoxHardening.log’.
Result Code: E_FAIL (0x80004005)
Component: MachineWrap
Interface: IMachine {85632c68-b5bb-4316-a900-5eb28d3413df}
I have tried setting up a new VM, repairing the VMBox software and finally uninstalling/reinstalling but nothing works.
Any ideas?
thanks v much
turns out this was down to rapport – have uninstalled and back to working 🙂
I pass through the installation, but upon boot after installation, I get “AppleKeyStore: operation failed (pid: 91 ….
How do I post a comment?
I got an error of apfs failed to initialize keybag. How do I fix this.
Hi Mukhtar,
I tried your very good installation guide, but I had a problem with the installation.
I followed the guide step by step. The installation of iOS in the virtualbox starts, some questions came up regarding language selection and license agreement, but the question for the drive selection where to install the OS, probably a dialog-windows should be displayed is not visible. The right-arrow-button is disabled and can not be pressed – of course.
Is this issue known and is there a solution for it?
thx and best regards
I think you forgot to erase the main VHD Disk. I got the same issue, so I restarted and erased it and then it worked for me.
Non-functional Apple ID. Help please.
I have an AMD 5950x…
I had the “EXITBS:START” problem and set the CPU to Xeon…
VBoxManage modifyvm “macOS” –cpu-profile “Intel Xeon X5482 3.20GHz”
Had the boot disk image, etc. as well
I then had to run the following from an elevated PowerShell:
bcdedit /set hypervisorlaunchtype off
Restarted Windows and tried again and it worked!
Hopefully this might help others with the same issue. Btw – I had HyperVisor enabled because I use Docker for Windows.
This worked for me. Thanks!
I tried all the other steps and it didn’t work for me till I enabled the Hypervisor platform and ran the bcdedit command. Thank you!
Thanks for the tutorial too!
Hi Richard,
So nice to see that people post solutions for AMD as well.
I have an AMD 5900X
And the VBoxManager command You used seems to not work for me.
Can you help a fellow out?
It just gives me this:
VBoxManage.exe: error: Unknown option: -cpu-profile
it’s work with me with i7 without that command
VBoxManage modifyvm “VM Name” –cpu-profile “Intel Xeon X5482 3.20GHz”
and with Ryzen 7 3700X Octa-Core not working so i run this command but i face some slow with mouse
can you help me ?
Hi I have followed the steps, everything seems fine except the audio, there is no audio device.
In VirtualBox, I have selected Windows DirectSound and Intel HD Audio, but in the MacOS, there is no audio output device.
Everything seems to be working, but I can’t seem to access app store due to apple id issues. I have an apple id from my ipod account. It won’t let me create a new apple id either.
Many thanks for the work accomplished and especially for sharing this method.
This has no price and provides a high value for users like me who never tried to achieve this target.
I may update in the future, if i identify something usefull to share with you and the others to give you back a little from what you kindly offered to anyone 🙂
Much love from France
Great Article. Following this I have MacOS Catalina running in VirtualBox on an Ubuntu Host. I’ve set up USB pass through for the iPhone but I’m having trouble connecting my iPhone to the MacOS.
When I plug in the iPhone it keeps trying to connect to the Host and failing. The iPhone vibrates on and off, usually in pulses of 3, and the Trust Computer dialogue on the iPhone briefly appears then disappears continuously. I suspect that it is failing to connect to the Guest and gets stuck in an infinite loop attempting to connect to the Host and Guest in turn.
While it’s doing this the Device number for the iPhone in the host, as displayed by lsusb, will be constantly changing.
I’ve tried USB 1, 2, & 3 with no luck.
Same iPhone can connect to Windows Guest, and other USB devices can connect to Guest Catalina just fine.
I’m using: Ubuntu 16.04 host Virtual Box 6.1 with Extension pack Catalina Guest with Guest additions iPhone 7
VBox.log:
00:29:22.384244 usb-linux: Reset failed, rc=Not supported. errno=19.
00:29:22.384304 usb-linux: Reset failed, rc=Not supported. errno=19.
00:29:22.396584 usb-linux: Reset failed, rc=Not supported. errno=19.
00:29:22.399738 VUSB: Detached ‘00007f549c1c4af0[proxy 05ac:12a8]’ from port 3 on RootHub#0
00:29:23.161507 VUSB: Disabled ‘00007f549c1c4af0[proxy 05ac:12a8]’ remote wakeup for configuration 0
00:29:23.161536 VUSB: Disabled ‘00007f549c1c4af0[proxy 05ac:12a8]’ remote wakeup for configuration 1
00:29:23.161538 VUSB: Disabled ‘00007f549c1c4af0[proxy 05ac:12a8]’ remote wakeup for configuration 2
00:29:23.161539 VUSB: Disabled ‘00007f549c1c4af0[proxy 05ac:12a8]’ remote wakeup for configuration 3
00:29:23.179012 VUSB: Attached ‘00007f549c1c4af0[proxy 05ac:12a8]’ to port 3 on RootHub#0 (HighSpeed)
00:29:24.821059 VUSB: Detached ‘00007f549c1c4af0[proxy 05ac:12a8]’ from port 3 on RootHub#0
00:29:25.951225 VUSB: Disabled ‘00007f549c1c4af0[proxy 05ac:12a8]’ remote wakeup for configuration 0
00:29:25.951237 VUSB: Disabled ‘00007f549c1c4af0[proxy 05ac:12a8]’ remote wakeup for configuration 1
00:29:25.951239 VUSB: Disabled ‘00007f549c1c4af0[proxy 05ac:12a8]’ remote wakeup for configuration 2
00:29:25.951241 VUSB: Disabled ‘00007f549c1c4af0[proxy 05ac:12a8]’ remote wakeup for configuration 3
00:29:25.951242 VUSB: Disabled ‘00007f549c1c4af0[proxy 05ac:12a8]’ remote wakeup for configuration 4
00:29:25.971921 VUSB: Attached ‘00007f549c1c4af0[proxy 05ac:12a8]’ to port 3 on RootHub#0 (HighSpeed)
00:29:26.372378 usb-linux: Reset failed, rc=Not supported. errno=19.
00:29:26.372512 usb-linux: Reset failed, rc=Not supported. errno=19.
00:29:26.384050 VUSB: Detached ‘00007f549c1c4af0[proxy 05ac:12a8]’ from port 3 on RootHub#0
00:29:27.160467 VUSB: Disabled ‘00007f549c1c4af0[proxy 05ac:12a8]’ remote wakeup for configuration 0
00:29:27.160504 VUSB: Disabled ‘00007f549c1c4af0[proxy 05ac:12a8]’ remote wakeup for configuration 1
00:29:27.160507 VUSB: Disabled ‘00007f549c1c4af0[proxy 05ac:12a8]’ remote wakeup for configuration 2
00:29:27.160518 VUSB: Disabled ‘00007f549c1c4af0[proxy 05ac:12a8]’ remote wakeup for configuration 3
00:29:27.188315 VUSB: Attached ‘00007f549c1c4af0[proxy 05ac:12a8]’ to port 3 on RootHub#0 (HighSpeed)
00:29:28.871512 VUSB: Detached ‘00007f549c1c4af0[proxy 05ac:12a8]’ from port 3 on RootHub#0
My installation did stuck at the first reboot of the setup.
I solved this by changing the filesize of the dynamic disksize from 80 gb to 100 gb.
plese help me i install mac os catalina after restart this error occurs a disk with mount point iis required(-69854).
Endless of cmd code. It’s been almost 30 mins and the same code is recurring again and again.
I just get out of this loop by restartung VM.
Mukhtar,
issue regarding “[EB|#LOG:EXITBS:START] (AND CURRENT DATE/TIME)”
can be resolved by adding
VBoxManage modifyvm “VM Name” –cpu-profile “Intel Xeon X5482 3.20GHz”
to the script.
at least the was the trick that worked for me !
regards
Swakke Schakel!
Thanks for your nice feedback. I’ll mention this solution for visitors.
Can confirm with Ryzen processors adding the line to cmd prompt config:
VBoxManage modifyvm “” –cpu-profile “Intel Core i7-6700K”
Worked for me, then I got the proper mac screens instead of the EXITBS:START error
*It is double dash before cpu-profile!!
Stuck on estimating time remaining… I left it over night still same thing please help.
So one thing to note, running:
VBoxManage modifyvm “VM Name” –cpu-profile “Intel Xeon X5482 3.20GHz”
by itself will not work. You need to modify it to:
VBoxManage modifyvm “VM Name” –cpu-profile “Intel Xeon X5482 3.20GHz”
since the comments changed the double dash to a long dash instead. So if any of you run into the error that -cpu-profile does not work, just add another dash in front of the first one and you should be set!
Thanks Peter. That one Dash saved me 🙂
Hello! Looks great!
Question: Is it safe to let macOS Catalina perform updates as a guest operating system?
Hey I reached the step where you’re supposed to erase the disk. Does that mean that after this step all the files and programs on the hdd I selected will be gone?
No, it only erases what’s inside the VirtualBox environment.
Your tutorial dies at the same point as other tutorials. Right before “Step 6”.
Errors on startup of the VM after entering the ridiculous series of commands at the command prompt.
Looks like the problem is all about Ryzen CPUs. You should have a disclaimer at the top saying “Don’t try this with Ryzen”.
I tried another computer with an Intel i7 chip and it managed (eventually) to get the VM going.
Just one problem now…the boot includes the ENTIRE on-screen gobbledygook of the setup and NOT the usually quick Apple bootup. Any way to bypass that? Takes an awfully long time. My Compaq 386s 16Mhz PC loaded Windows 3.1 faster.
I’m getting stuck at the following message as well:
[EB|#LOG:EXITBS:START] (AND CURRENT DATE/TIME)
I specified my cpu profile and that didn’t help. Has anyone else ran into this issue and solved it?
Same Problem here.
My solution:
I removed the HDD from the VM and created a new “VHD” NOT VDI with 32GB.
I don’t know if its the HDD Type (VDI / VHD) or the more rounded space.
Hi Mukhtar,
Any help for:
[EB|#LOG:EXITBS:START] (AND CURRENT DATE/TIME)
thx
There is nice thread dedicated to such issue:
https://github.com/myspaghetti/macos-virtualbox/issues/8
For me the VM did not have proper permissions (Err Open(…)) to access the core files. What worked was to use elevated PowerShell, change the cpu profile and run the VM using elevated powershell.
The article says multiple times: Look for the “Required File” section of this post, but where is that “Required file” section?
Select the where you want to install “21GB space showing, but I couldn’t able to click on ‘lnstall”
Dear Sir,
I got stuck at running code
Hey I’ve done from Stp. 1 -7. When the background code runs, it loops. Any help out there?
Help i’m stuck at “Attempting system restart…” Some help. please? PLEASE HELP ME!!!!!!!
Hi, Bartek! I get stuck as well. And I had selected the option of virtualization in the Processor tab. I turned off the VM and unselected that option and turned on again and it worked!
Thanks for the detailed tutorial. Unfortunately, I ran into the error others have mentioned already: “UNDEFINED” and “too many corposes being created”, which cause a permanent reboot.
I was able to follow another tutorial for Big Sur here (german:
), and that worked.
One notable difference is that the other tutorial mentions turning off Hyper-V. Run this in an administrator CMD window before the setup:
bcdedit /set hypervisorlaunchtype off
Of course, it might also work due to the different image
https://snipboard.io/4VBNR0.jpg that is the ss of the problem I did everything as told and still keep getting this there are errors their so there must be something wrong with ur tutorial maybe its patched.
Matt,
Me 2 , did the same thing as described above x 3 , but no luck
One thing I saw is that the cmd script that needs to be executed, the one mentioned at the beginning (download) and the one in the text is different …
Hopefully Mukhtar can provide us some feedback… soon 😉
Matt,
just found this :https://github.com/myspaghetti/macos-virtualbox/issues/134#issuecomment-583216307
seems to be an issue with newest version of Catalina & an old bug in Vbox
workaround should be using Catalina 10.15.1 not higher.
correct me if I’m wrong.
I get the same results
Hi,
I need help. Everything went pretty smoothly until I got to the point where I’m supposed to “Erase Main VHD Disk” from the Utility screen. I see disk entries on the screen but “Erase” is greyed out?
I must be missing something. Can you help. I’m almost there, but not quite.
I can send a screen shot if necessary.
Good evening, it stuck to me where it restarts after installation for an hour and I restarted my virtual machine.
I have a restart (panic) and then it is stuck forever on “Service exited…..”
This is just so amazing! I am installing it now on my Vbox! Thanks and I wanna hug you for this!
Don’t get so amazed it can stuck, bug, lag or something
Everytime I try to erase the main disk the virtual machine crashes, when I relaunch the disk is mounted anymore and when I go to install Mac OS there’s no disk option to choose
I’m stuck in this message
[EB|#LOG:EXITBS:START] (AND CURRENT DATE/TIME)
I did run the script before open and running VM (did change script to my vm name). tried changing parameters (ich9, piix3) so far no luck. Using macOSCatalina 10.15.5 (19F101).iso.
Help please?
Same problem, anyone have a solution?
Me too, have you managed to fix this?
What CPU are you using? If it’s an AMD CPU you might need to add this line of code when you input the codes into the cmd prompt.
VBoxManage modifyvm “Your VM Machine” –cpu-profile “Intel Core i7-6700K”
If this works, you’re welcome. Otherwise, I’m sorry that I wasn’t of any help
So… the text “VBoxManage modifyvm “Your VM Machine” –cpu-profile “Intel Core i7-6700K”” worked. There must have been a typo at “-cpu-pr…” because it should look like “–cpu-pr…”
Heres the edited version:
VBoxManage modifyvm “Your VM Machine” –-cpu-profile “Intel Core i7-6700K”
Hey, I followed all of the instructions and tested different approaches.
But I always get stuck at the end of Step 7.
The installer shows me this error:
“An error occurred validating the installer data. The download is either damaged or incomplete”
Can someone help me?
Me too
The same here, have you find how to solve this issue??
I have problems with installing macOS it says when I click Install Disk “The selected volume is not large enough to install on. A minimum of 25.8 GB is required.” But I have space.
You might have created a different format then
The same holds for me. What do you mean with “You might have created a different format then”?
I had the same problem. How do I fix this?
See step 4.2.g.d – You probably didn’t allocate enough space under File Size. In the image it suggests 120 GB.
First of all, great article. Very detailed and easy to follow. I tried this today on my thinkpad. It has and Intel i7 processor. 32GB RAM. Everything works fine up to step 7. It just hangs on that screen seems to repeat the same actions
disk2s1: 0x3e8 (UNDEFINED).
it keeps doing that and has been for the past 2 hours. I tried to do the whole thing again from scratch but apart from some other errors that pop up, this is the one that lingers. Any idea what it could be?
mine its doing from last 3-4 Hrs
Everything starts like it should do, but the booting process always stops at this point:
https://gyazo.com/180dc7a2036709c676b82da7303a19cd
What should I do?
I was having this issue too – I just did a clean removal and reinstall of Virtualbox, restarted my computer, and that seemed to fix things. Hopefully that works for you!
i am stuck here too 🙁
I’m running VirtualBox on Windows10 with a Ryzen 5 2600 with 16 GB of ram. The VM has 8 GB of that ram, 6 cpus and 128 MB of video memory. Catalina works well except for the fact that I can’t get any sound output and also I have a lot of screen-tearing while using it, especially visible when watching youtube for example. Is there any fix?
Is there a way to get the sound working?
The I/O cache encountered an error while updating data in medium “ahci-0-0” (rc=VERR_INVALID_PARAMETER). Make sure there is enough free space on the disk and that the disk is working properly. Operation can be resumed afterwards. There’s a solution?
The installation is successful, but it restarts and the line stays, but it always tells me that there are 16 minutes left but it never ends. Do you know how to fix it? I
A quick question. Is it a bad idea to sign in with my apple ID on the VM?
It’s better to do it once you’ve done the setup.
How can I get my Apple ID working? I started IMessage but it won’t let me login from VM
Is there any way to get the sound working? Really need help on this please.
I managed to fix the issue with the install by changing the cpu settings.
However, I now have a nice install of catalina, but the problem is now that the VM will not connect to the internet. I have tried all sorts of different settings in virtual box but nothing seems to work. Any help would be appreciated.
I am running on a windows 10 laptop (HP Pavillion-cw1007) through wirelss
Thanks
Make sure the following options are set on your VM
Adapter 1
1. Enable Network Adapter (Checked)
2. Attached to (NAT)
3. Adapter type (your adapter)
4. Cable Connected (Checked)
Hi, I hope you can help.
I have been following your instructions up to the point where I start the VM after running the code through CMD.
However, I get the black screen with white text but it just stays there.
Below is a link to the screenshot of where I am at. Any help on getting past this point would be great appreciated.
https://share.getcloudapp.com/8LuP0rG9
Thanks
Mark
Hi, did you quit VBox before executing the code?
If no, Quit VBox and re-execute the code.
thank you . crystal clear steps . problem solved
Hi,
Already running a macOS 10.15 guest on Windows vdi disk. Would like to upgrade my virtualbox mac guest to 10.15.5. How can I do that?
Please follow the last section of this guide. It’ll show you how to upgrade your macOS to the latest version. This guide is for macOS Mojave but it should work on macOS Catalina as well.
If it doesn’t help you let us know.
hi,can you help me fix the problem?
im stuck in boot screen like this
https://drive.google.com/file/d/1H9GtYAsTG3zXUKU6vbf2z_ZiXgf6RG3i/view?usp=sharing
i run those command after exit virtual Box app
VBoxManage.exe modifyvm “Mac OS Catalina” –cpuidset 00000001 000106e5 00100800 0098e3fd bfebfbff
VBoxManage setextradata “Mac OS Catalina” “VBoxInternal/Devices/efi/0/Config/DmiSystemProduct” “iMac19,1”
VBoxManage setextradata “Mac OS Catalina” “VBoxInternal/Devices/efi/0/Config/DmiSystemVersion” “1.0”
VBoxManage setextradata “Mac OS Catalina” “VBoxInternal/Devices/efi/0/Config/DmiBoardProduct” “Mac-AA95B1DDAB278B95”
VBoxManage setextradata “Mac OS Catalina” “VBoxInternal/Devices/smc/0/Config/DeviceKey” “ourhardworkbythesewordsguardedpleasedontsteal(c)AppleComputerInc”
VBoxManage setextradata “Mac OS Catalina” “VBoxInternal/Devices/smc/0/Config/GetKeyFromRealSMC” 1
VBoxManage setextradata “Mac OS Catalina” VBoxInternal2/EfiGraphicsResolution 1280×720
VBoxManage modifyvm “Mac OS Catalina” –cpu-profile “Intel Core i7-6700K”
i use [AMD Ryzen5 2600 | WInodws 10 pro | GTX 1050Ti Graphics ] pc,
and i tried Install Ubuntu on Virtual Box for testing , it work perfectly . i have no idea where the problem is
In this code, I see only one problem. Can you confirm please this double hyphen (–) before cpuidset. It should now be –cpuidset. It should be –cpuidset.
Also the last line you should use –cpu-profile not –cpu-profile
i have the exact same problem…
I´ve follow every step and works perfect, except that i can´t hear anything from my virtual machine. It´s like the sound doesn´t exist. Anyone know, why that happens?
It failed installing macOS at the very final stage – after about an hour of displaying black screen with an Apple sign and progress bar it said that the installation had failed and asked me to view the logs. What should I do? Thanks
After tried to install from several website, I was failed again and again so many times. When from this website it’s Fantastically done. Super! Thank you very much.
Thank you for your nice feedback Hossain
Hello,
Step 7
Background code runnning bat No matter how long I wait, the screen of macOS Catalina Language window does not appear.
I tried changing the settings below.
check System>Processor tab,Enable Nested VT-x/AMD-V
But it didn’t work.
Any Help ?
Thank You.
I use system-
CPU:RYZEN 7 3700X
M/B:B350GT3
GPU:GTX1080Ti
Where it stucks and give us an image please?
Try (VBoxManage modifyvm “your vm name” –cpu-profile “Intel Core i7-6700K”) command in addition to other commands in the article. It is needed for AMD cpus.
Hello.
I am sorry for my late response.
I was able to solve it by specifying the CPUProfile.
Thank you very much.
Also, if you do not specify it, it seems that it will stop at the following screen.
https://gyazo.com/d866b5a1ab1518cf6d192efab86c07b6
I tried this command and was given this error VBoxManage.exe: error: Unknown option: -cpu-profile
I believe it’s actually –cpu-profile
some reason the board removes it, but there should be two minus signs before cpu.
Before executing the command make sure to exit VirtualBox otherwise it won’t work
How did you specify your CPU? I am having the same error. Thank you!
I am having issues while starting the VM first time. It shows a bunch of errors:
[EB | #LIMG: DP] Acpi *** /CDROM(Entry0)
Help, please. I am getting stuck at erasing the virtual hard drive:An error has occurred during virtual machine execution!
The error details are shown below. You may try to correct the error and resume the virtual machine execution.
The I/O cache encountered an error while updating data in medium "ahci-0-0" (rc=VERR_INVALID_PARAMETER). Make sure there is enough free space on the disk and that the disk is working properly. Operation can be resumed afterwards.
Error ID: BLKCACHE_IOERR
Severity: Non-Fatal Error
This error happens when are you erasing the disk right?
Select the main disk and erase with the MacOS Extended Journaled format.
I had this problem. I created a fixed size disk instead of a dynamically allocated one. This fixed this error
Hi! excellent article. I want to know where to put the VBox Code o how to change everything by the Command Prompt
Copy the code and paste on notepad.
To open notepad, press windows key from your keyboard and type notepad, hit enter.
Perfect. Thanks a lot
Thanks for your comment
Thank you it works like charm
Thank you for your positive feedback
Thanks for the brilliant effort.
The installation was smooth and clean
i can’t find the password from the gram where macOS catalina is extracted can you help me with password?
This comment helped me a lot. Not the least to have patience. Thank you very much!
Couple of notes:
I didn’t need to do the UEFI settings either, the installation worked without it. Took ages but in the end it worked. Just had to wait and restart the virtual machine a few times.
I had a lot of trouble with my mouse/keyboard, they kept being hijacked and Right-Ctrl didn’t always worked so I kept having to force restart my PC. It would be great to see how that setup looks like for other people.
I have an MX Master mouse and K800 keyboard from Logitech, using their Unifying Receiver usb dongle thingy. I have the 6.1.2 extension pack installed (not sure if downgrading is necessary but it’s what worked for me so not touching it).
The keyboard works fine both in the host and the guest but my mouse had the trouble of not being able to do drag&drop gesture. It immediately drops whatever window I’m dragging. I ended up plugging in an old cabled optical mouse (alongside the wireless). My USB setup in VirtualBox is: USB 2.0 with a “Logitech USB Optical Mouse [5400]” filter (the old mouse also happens to be Logitech). I use this pretty much only for drag&drop, the wireless mouse works for anything else.
In setting the screen resolution, this article helped a lot:
https://www.nakivo.com/blog/make-virtualbox-full-screen/especially the command
> VBoxManage setextradata “UR VM NAME HERE” VBoxInternal2/EfiGraphicsResolution 1600×900
Again, thanks a lot!
And thanks for the great article Mukhtar, without it we’d be ded.
I am getting boot.efi is not recognized as an internal or external command error
Any Tip to run in VirtualBox 6.1 ?? Seems that only work on VirtualBox 6.0 or lower
it works on 6.1 i tried and it works
Why are the RAR archives password protected. What’s the password so I can open them? Using zipfile because winrar can’t open them,
I’m getting a loop of “too many corpses being created”. Will it still install? Or will this go on forever?
I’m getting a loop of “too many corpses being created”. Will it still install? Or will this go on forever?
Cannot thank you enough. I now have a fully-functioning copy of Catalina, running in a VirtualBox VM, which is running in Linux Mint 19.3 Mate, which is running on an old Dell Studio-XPS-435T-9000 that has 24 gigs of memory.
I already had a copy of VirtualBox 6.1 installed, complete with Extensions, and it’s been working just fine, running a copy of Win10, so that end of things was already well taken care of.
I downloaded the VMDK file, created a new VM and applied all of the the settings as per your instructions above, and just for anybody who might be wondering, the directory to open a terminal (command prompt) in, to effect the 6 VboxManage commands (for Mint Linux) is /home/your-own-username-in-lowercase-letters/VirtualBox VMs, and then opened it up.
It went into the Mac Installer mode, with no end of white gobbledygook lines of code against a black background, and it took forever, and then it said it was unable to complete the install, and said it was shutting down BUT IT DID NOT SHUT DOWN. Instead, it rebooted, and more or less picked right back up where it left off. This whole process took most of an hour to complete. Very very slow. So give it time, ok? Keep an eye on it, and verify that every once in a while, it will look like it’s hung on one line or another, but eventually it will kick back into gear, and this will repeat itself many times. (Or at least for me it did.)
In the end, I was presented with a proper Mac setup GUI which asked for language and a few other things, and then it finally got to the Network part, and it defaulted to “Manual” and I changed that to ‘Automatic’ and it spun merrily along for another too-long time, and then it suddenly rebooted again, without ever having made it to the actually set up screens for creating a user account and passwords.
When it came back up after this reboot, it picked right back up where it left off, and I was able to create the user account and password. All of which was none too fast, but it got there in the end.
Following all of which, it finally opened up with a proper desktop in the default 1024×768 resolution, at which point I googled for “change mac vm screen resolution” and got plenty of hits, and I followed those instructions, and now I’m up and running with 1600×900 screen resolution.
The thing works PERFECTLY.
I cannot thank you enough!
And for everyone else, please be more than patient. Give it time. If you have more than one monitor, move it over to a secondary monitor and just kind of keep it in the corner of your eye, while you engage yourself elsewhere. In the end, you shall prevail.
I managed to get it to install but am stuck in the setup on the screen “How do you connect?” It wont let me select wi-fi, only local network (Ethernet). But I don’t know what details to put in the LAN page… any help?
I have the same issue – did you fix it??
thanks
That’s work perfect, thanks. Now i can build my react-native project from here, thanks thanks.
It appears that I was able to get it to install successfully without running boot.nsh. Hitting the escape key did nothing but bring up the Virtualbox bios, and that was of no help.
I thought I would give this a whirl but like other comments I have read – system never gets past the WARNING! You’re about to install macOS on a Non-Apple device……
I couldn’t get into UEFI shell to write execute boot.nsh but it did show logs of executing code and started the installation.
Could this be a problem?
Bro I’ve formatted the disk to apfs and erased it.In the next step u mentioned to close the disk utilities and select install macos and pree continue but nothing was happening after that continue doesn’t gery and it’s not showing the next step .pls help me
I am not getting sound. Is there a way to fix this issue?
Thanks! worked great!
This worked perfectly for me. Thanks. But how can I upgrade to Catalina 10.15.2 Final?
I am stuck at blank black screen after step 7 #9
Nothing is happening. I have followed everything step by step. Just changed the dynamic disk to fixed size. Please help
‘boot.nsh’ is not reconized as an internal or external comand, operable program, or script file
So, the installation is impossible
All worked great apart from typing “boot.nsh” which said it wasn’t recognised as an internal or external command. I googled it and it and found something which said to type “exit” then select “Boot Maintenance Manager” followed by “Boot from file” and selected the second option. Everything else was great. Thanks.
Thanks for this. I had to actually keep clicking through (after the second option you mentioned) until I actually found that boot.nsh file and when I hit ENTER on that it ran for me.
please tell me how to do that in detail, i am stuck in this.
Hi Dave,
could you specify where the file “boot.nsh” is (directory) ?
Thk a lot
Same problem here.
Hello,
Step 7
#1 Hit enter :
I’m stuck with VM freeze on the warning message :
“WARNING ! You’re about………../////………. take any responsibility.”
– Image ‘FS0:\VBoxApfs.efi’ loaded at DBD65000 – Success
Any Help ?
Thank You
What system do you use?
Hi Mukhtar,
I have the same issue with VirtualBox 6.0.14 on CentOS 7.6.1810.
Can you help me ?
Philippe
Same problem here.
Same problem here. My config is:
CPU : Ryzen 5 2600
MOBO: B450 Aorus Pro
GPU: GTX 1060 6GB
Same problem here. My config is:
CPU : Ryzen 5 2600
MOBO: B450 Aorus Pro
GPU: GTX 1060 6GB
Some fix to this?
Same problem here. I use Windows10 x64 with Ryzen5 2600 CPU
Some fix to this?