In this article, I am going to show you how to fix VirtualBox macOS High Sierra screen resolution. Also, I want to remember that it works for macOS Sierra too, so if you have macOS running 10.12 or higher then no worries the steps below will be the same. Before we get started, you should note that this method doesn’t work for all the resolutions out there. Some resolutions are used by most people around the world like 1920×1080, and this article works on most computers. Some of our users test these methods, and you can also give a try. If it worked for you, then let us know in the comment section below for other folks to help them out just like you.
Related: How to install macOS High Sierra on VirtualBox on Windows 10
Fix VirtualBox macOS High Sierra Screen Resolution
It’s a common problem for those who installed macOS Sierra or macOS High Sierra on Virtualbox on Windows. Right after the installation part finishes, then you will notice that your resolution is not fitting your screen on the host. The default VirtualBox resolution for macOS 10 is 1024×768, so to fix this just follow step by step guide but before that the following resolutions has been tested and works with this method.
- 1280×720 (HD)
- 1920×1080 (FHD)
- 2560×1440 (QHD)
- 2048×1080 (2K)
- 3840×2160 (4K)
- 5120×2880 (5K)
Note: most of you might have the 1366×768 resolution and to mention here that we have tested this resolution, but we had no success. If the method below worked for you, then please let us know in the comment section below, it would help lots of other guys.
Step #1. Download this Virtualbox screen resolution code for macOS Sierra and High Sierra from the link below.
Step #2. Open the code with Notepad and replace it that is written as “Type Your VM Name Here” to your macOS Virtual machine name. Make sure it’s the same otherwise it won’t work.
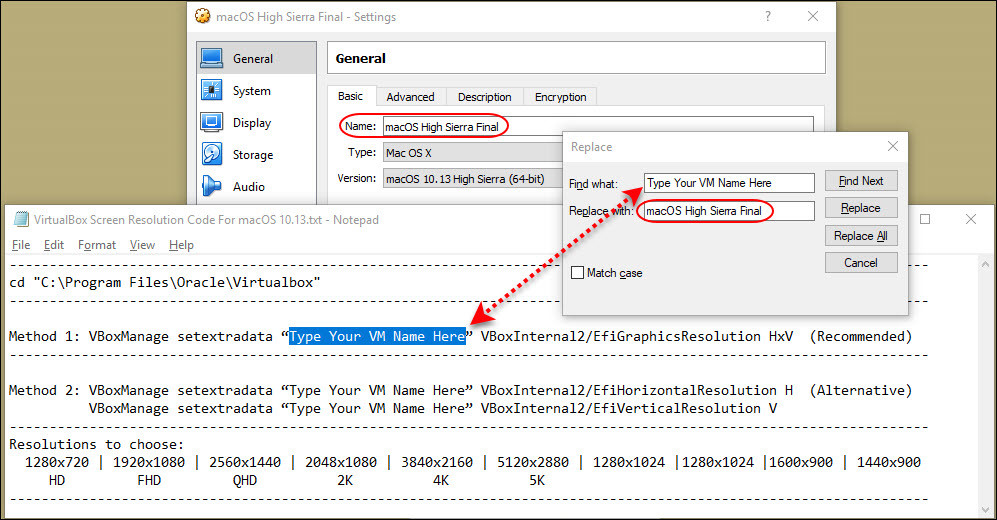
Edit the Code
Step #3. Now at the end of the code, type your own screen resolution instead of HxV. For example, if your screen resolution is 1920×1080, then type this at the end of the code.
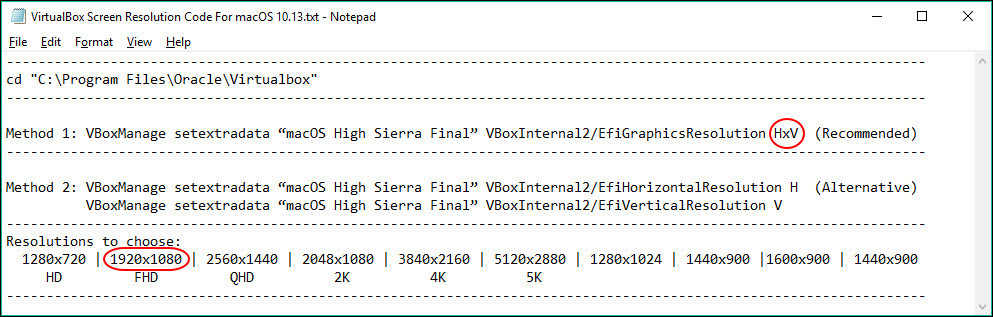
Add your Screen Resolution to the Code
Step #4. Now, open the command prompt by pressing Windows button + X then click on Command Prompt (Admin).

Run CMD
Step #5. Now, you have to select VirtualBox path by changing the directory command, so copy & paste it to Command Prompt (CMD) then hit enter.
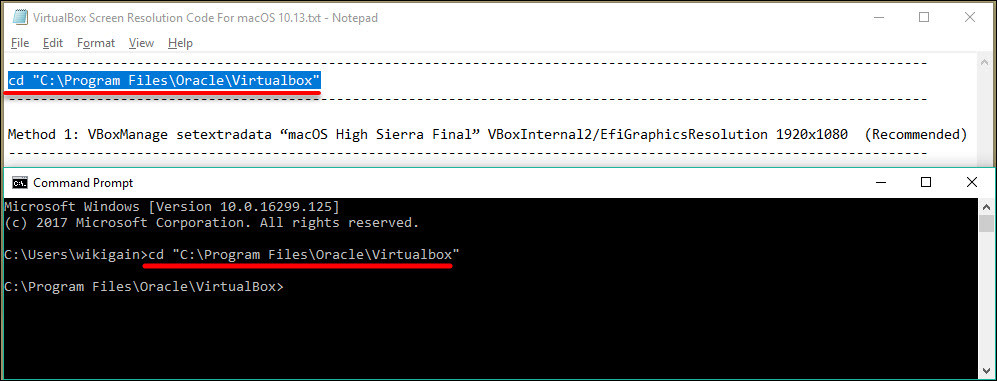
Type the Change Directory Code
Step #6. This time copy & paste the fix screen resolution code to Command Prompt (CMD) then hit enter.
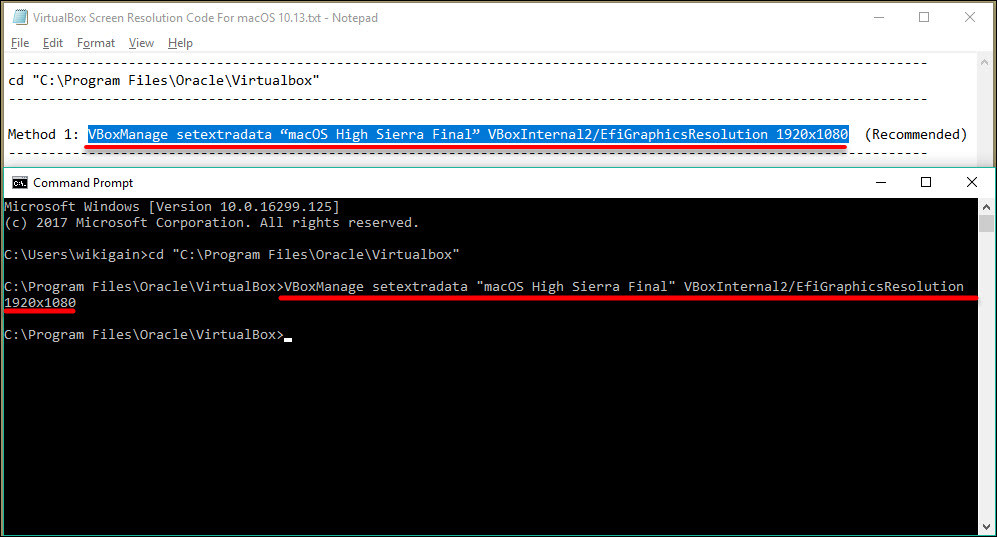
Apply the Change Resolution Code
Step #7. All done, now just play the macOS Virtual Machine to check if it worked or not.
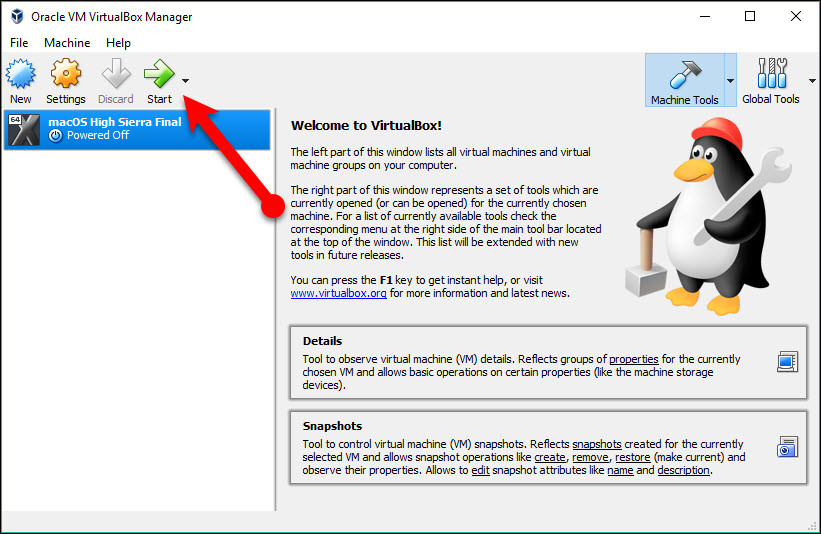
Play the macOS Virtual Machine
Step #8. Go to About This Mac then click on Displays next to the overview tab to check it.
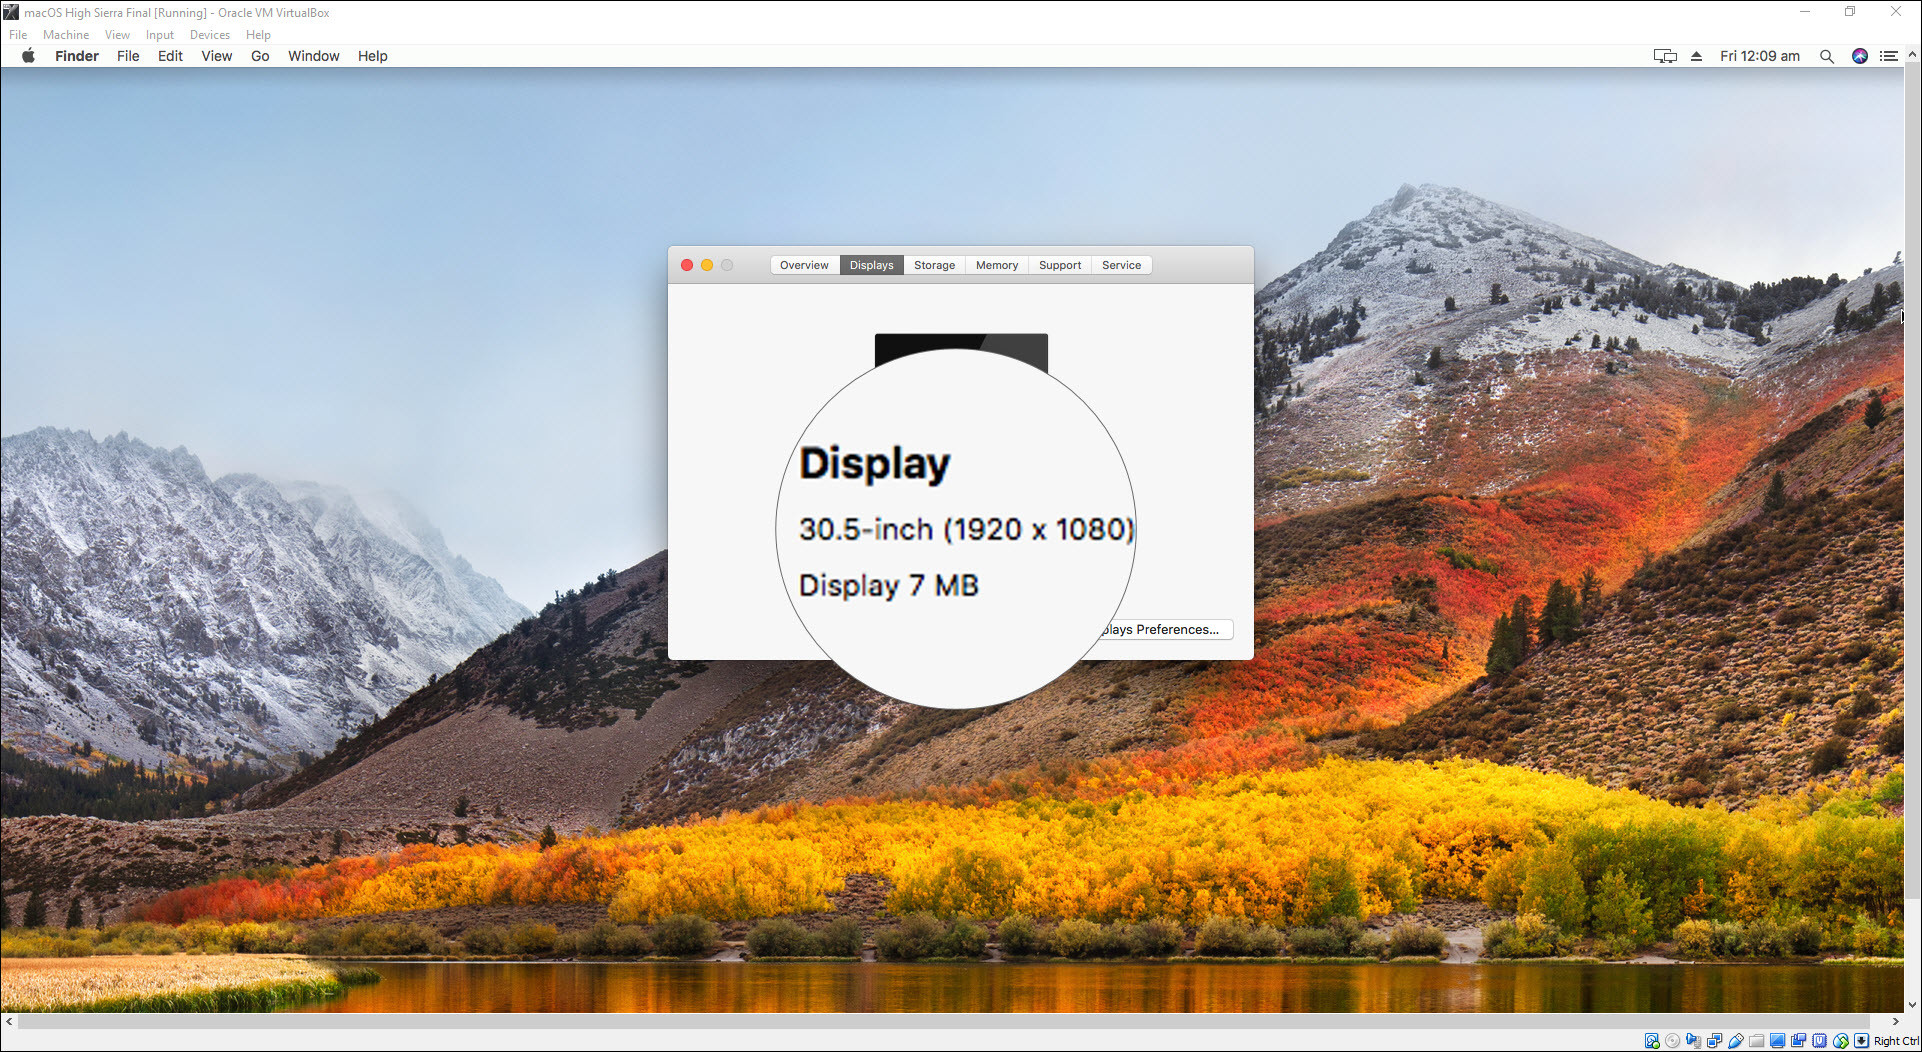
Resolution Changed to FullHD
Troubleshooting
Note: Your VirtualBox should be updated to the latest version to get the most accurate result possible from this guide.
The step below has been proven to work because we have received lots of feedback from our visitors saying that this method worked for them. To avoid any error, make sure you replaced the exact name of your virtual machine in the code (Step #2.). If it didn’t work for you, then I suggest you uninstall VirtualBox then reinstall the latest version of Virtualbox. Then it should work for you because it has also been tested and it works for some folks. Also to mention here, we have another method that works for everybody so if it didn’t work for you, so make sure to check it out.
Another Method: How to Fix macOS High Sierra and macOS Sierra Screen Resolution on VirtualBox.
That’s all for this article, how to fix Virtualbox macOS High Sierra screen resolution. If this method work for you then don’t forget to share it with us in the comment section below and it will help other guys also. Thanks for being with us and hope that you found this guide helpful. We’re waiting for your feedback and suggestion in the comment section below.
Thank you very much, really appreciate how simple you made it!
Thanks for all the information you shared, it worked for me as follows:
0. Close all VirtualBOx windows.
1. Open cmd in the normal “NOT administrator” mode.
If you use windows 11, press the keys: windows + x and open “Windows Terminal”, the POWERSHELL will open by default.
Press ctrl + shift + 2 or go to the arrow on the toolbar to run the cmd command.
2. Copy this text and hit enter:
cd “C: \ Program Files \ Oracle \ Virtualbox”
3. Copy this text and hit enter:
VBoxManage list vms
4. You will get something like this:
“Sierra” {944b5667-8827-4591-8c2d-46bb421aae86}
5. Copy the name of your virtual machine (including quotes, in this case it is “Sierra”) and replace by “VM Name Here” and Where it says “HxV” put your screen resolution.
VBoxManage setextradata “VM Name Here” VBoxInternal2 / EfiGraphicsResolution HxV
IT SHOULD LOOK LIKE THIS FOR EXAMPLE:
VBoxManage setextradata “Sierra” VBoxInternal2 / EfiGraphicsResolution 2560×1440
WHY COPY from CMD AND NOT WRITE? = I think I had text differences between cmd and notepad, it sent me an error in the cmd when I wrote the name of my virtual machine. This is how it worked for me.
6. Copy all that edited text in the CMD and hit enter.
7. If everything goes well, the text of the item “number 2” should appear.
Close the cmd and start your VirtualBox, by default the MacOS will change to the new resolution.
Tested on Windows 11 21H2 (OS 22000.258), VirtualBox v6.1.26, MacOS Sierra 10.12.6.
The first (recommended) method worked for me! Very happy! Thanks so much!
Nothing I try seems to work for me. I am stuck with the default resolution.
Thanks, worked for me. I am using 1280×720. Much better than 1024×768
There’s no VitualBox directory under “c:\Program Files\Oracle”, in version 6.0 of VirtualBox.
That’s because you might have installed VBox on different location.
Worked fine. Thanks a lot.
Thank you for your feedback
Thanks a lot. Excellent problem resolution.
Regards.
Thank you for sharing your positive feedback with us.
it worked before but now it wont work help please!
VBoxManage setextradata “mac” “CustomVideoMode1” “1366x768x32”
VBoxManage setextradata “mac” “VBoxInternal2/EfiGraphicsResolution” “1366×768
YES !!
This worked like a charm for me, thanks :))
Thanks, works 100%. Windows 10, VirtualBox 5.2.22. macOS High Sierra 10.13, 1080p Resolution.
Hi Faiz
Thank you very much for your useful article.
Host: Ubuntu 16.04.5
Guest: Mac OS X Sierra 10.12
VM: VirtualBox
Display: 24″
I successfully tested 1440×900 and 1600×900. I choose 1600×900. Since my display has 1920×1080 resolution I did not test it because I do not want to use both the horizontal and vertical scroll bars as I observe in your picture of Step 8.
Thanks a lot Faiz.
Hi Faiz
Thank you very much for your useful article.
Host: Ubuntu 16.04.5
Guest: Mac OS X Sierra 10.12
VM: VirtualBox
Display: 24″ 1920×1080
I successfully tested 1440×900 and 1600×900. I keep 1600×900. Since my display has 1920×1080 resolution I did not test it because I do not want to use both the horizontal and vertical scroll bars as I observed in your picture of Step 8.
Thanks a lot Faiz.
Thanks a lot worked for me
ubuntu 18.10
os 10.12
virtual 5.2
Thank you for your positive feedback
Thank you! It works now on my Dell XPS13 9360, after Windows killed it on the last update! Can even generate a 3200×1800 res but it was way too big of a window! Reverted to 2560×1440 and put on Scaled Mode to fill the entire screen. Only trouble now is the fonts are extremely tiny despite putting setting of Icons and Font to Large. Have to use the Zoom in feature by pressing Alt+Windows+=. Thank you again!
I ran into one “gotcha” either your web server or my browser or something substitutes “smart quotes” for standard ones, so it said no such VM name or something like that (on linux) replacing the quotes around the vm name fixed it.
works perfectly with virtual box 5xx and macosx mojave 10.14
Thank you for sharing your feedback
The resolution works, but MAC OS does not recognize all allocated video memory, I configured 128MB in VirtualBox but it only recognizes 4MB.
Does anyone know how to solve this?
Updating to the latest OS version, the system won’t boot anymore.
Is there a way around that?
Its not working for 1366×768.
but ok with for 1280×720. I have to use this one.
Thank you for help.
Thanks that worked
Hi there.
vboxmanage setextradata “” VBoxInternal2/EfiGraphicsResolution 1366×768 didn’t work for me.
After some research I disabled System Integrity Protection from guest High Sierra under VirtualBox 5.2 like described here:
http://anadoxin.org/blog/disabling-system-integrity-protection-from-guest-el-capitan-under-virtualbox-5.html.Then I was able to edit /Library/Preferences/SystemConfiguration/com.apple.Boot.plist and add key-string pairs + update VirtualBox config like described in answer 2 here: https://superuser.com/questions/478901/change-macos-x-guest-screen-resolution-for-virtualbox
And finally I got my 1366×768 working.
I hope it will help someone.
I confirm the observation by Yunizar [on April 20, 2018]. As I wrote in a comment in another page of the blog, I’m running MacOS Sierra as a guest, in VirtualBox 5.2.10, under Linux Fedora 27 as its host.
Here, under Linux(es), it goes as follows:
1. with VirtualBox turned OFF, open a NON ADMINISTRATIVE (i.e.: non-root) terminal, and check the precise name of your virtual MacOS machine with
$ VBoxManage list vms
2. Assume the answer of VirtualBox is
“MacOSX” {xxxxxxxx-yyyy-zzzz-wwww-nnnnnnnnnnnn}
(where “BlahBlahBlah” is the PRECISE name you gave to your virtual MacOS machine when you created it, and this latter line is the hex code for the virtual disk). Then you have to input (again, in the non-root CLI)
$ VBoxManage setextradata “MacOSX” VBoxInternal2/EfiGraphicsResolution 1366×768
Voilà! When you’ll log back into your VBox-ed MacOS, you’ll finally find the screen set up to the correct 1366×768 mode.
Hope this can help others…
Absolutely it’ll help people who have this issue. Thank you for sharing your feedback.
Confirming non-root terminal input with format as described by Alan Ian Ross (I used 1900×1600 for my desired resolution) works perfectly on High Sierra VM running inside of Linux Mint 19 (Kernel 4.15.0-30-generic).
A thousand and one thanks to everyone involved. We’re all in this together, and it’s heartening to see everyone taking care of each other.
Thank you so much for this information. Works perfectly. Far simpler than other methods I’ve come across.
First solution works perfectly on the latest 5.2.10 Windows, for 1920×1080. Thanks!
You’re welcome and thank you for sharing your feedback.
It will works for common 1366×768. First, change your original resolution to 1280×720, then apply 1280×720 to command prompt, the screen successfully fit.
Thank you for sharing your feedback.
Thanks for this article.
Welcome
Thanx! Works like a dream, also on 2560×1600 (30″). Maybe you could ad “make sure to close virtualbox before running commandprompt” otherwise it doesn’t work…
Thank you for sharing your feedback. Yeah, we have to add it otherwise it’s not working.
I use dell laptop touch screen. I can move cursor but I can’t click button or something within touchscreen mode.
Thanks bro..
I try method 1, failed. I try 2nd method…it’s run.
salam
علیک بر سلام
That’s fine and good luck bro
The resolution thing worked like a charm, now the problem is that the fonts within the Mac VM are very small, can’t find anything to get me to a overall resolution (e.g. Status Menu or the Finder). Anyone has any ideas? I am a MacOS newbie so any help is appreciated. Thank you.
Thanks for sharing your feedback dear, Google you can find it.
vboxmanage setextradata “macos” VBoxInternal2/EfiGraphicsResolution 1366×768
Worked for me. Using Linux and virtualbox 5.2.6
I was thinking if that does not work, I could choose the closest aspect ratio (16:9) and just scale it down. Then it should in theory look correct.
That’s awesome. This command works for most of our visitors.
It works – but: I have an 17″ 4K screen. If I select 3840×2160, the display properties in the High Sierra in VB shows 3840×2160 on a 70″ screen. Consequently the desktop is larger than my screen. If I set it to 1920×1080 it becomes full screen and is quite acceptable. But the OS believes the screen is 30″. Is there a way to make the MAC OS understand that it is in fact a 17″ screen?
Thanks! 1920×1080 is quite an improvement over 1024×768.
Yeah but still some resolutions don’t work.
Any update on iMessage or FaceTime?
Not right now.