In this article, I am going to show you how to install macOS Catalina on VMware on Windows. So, Apple announced macOS Catalina in WWDC 2019. If you want to give macOS Catalina a try, then you’re in the right place. We will provide a link to download macOS Catalina ISO or a guide to create your own ISO if you want. So without wasting any more time, let’s get started. If you want Catalina on Virtualbox then follow the article on how to install macOS Catalina on VirtualBox on Windows.
Required: If you haven’t already then you should enable Virtualization Technology (aka Intel VT or AMD-V).
Steps to Install macOS Catalina on VMware on Windows 10
- Download the prerequisites
- Install the Prerequisites
- Unlock VMware to Install macOS Catalina on Windows
- Create a New Virtual Machine
- Edit macOS Catalina VMX File (Optional)
- Install macOS Catalina as VM on VMware
- Complete Basic macOS Account Settings
- Install VMware Tools (Optional)
Step 1: Download the Prerequisites
Before you begin, you should download some files, and you may also download & install the Virtualisation application, which is required later on in this guide. But if you have done any of the followings already, then you may skip it. Here is the list:
- Download VMware Workstation Pro 15.5.x or VMware Player 15.5.x.
- Download the macOS Unlocker V3 for VMware
- Download macOS Catalina ISO
Step 2: Install the Prerequisites
Now install the following application, and if you already have it by any chance then you’re welcome to Skip but make sure then it works properly and updated to the latest version.
- Install VMware Workstation Pro 15.5.x or VMware Player 15.5.x
After downloading the VMware Workstation pro/player, run the setup and follow the prompt leaving all the options as default.
Step 3: Unlock VMware to Install macOS Catalina on Windows
Firstly make sure VMware Workstation application is closed completely otherwise the VMware unlocker won’t work. You can do this by Clicking on File Tab > Exit.
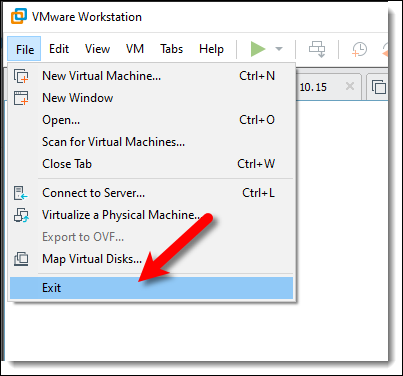
Exit VMware Workstation
You should have downloaded macOS Unlocker V3 for VMware GitHub or the direct link above. So now extract the macOS Unlocker V3.0 for VMware Workstation. Right-click on win-install.cmd and select Run as Administrator.
Note: You may always uninstall the previous version of the Unlocker before using a new release. Failure to do this could render VMware unusable. – David Parsons
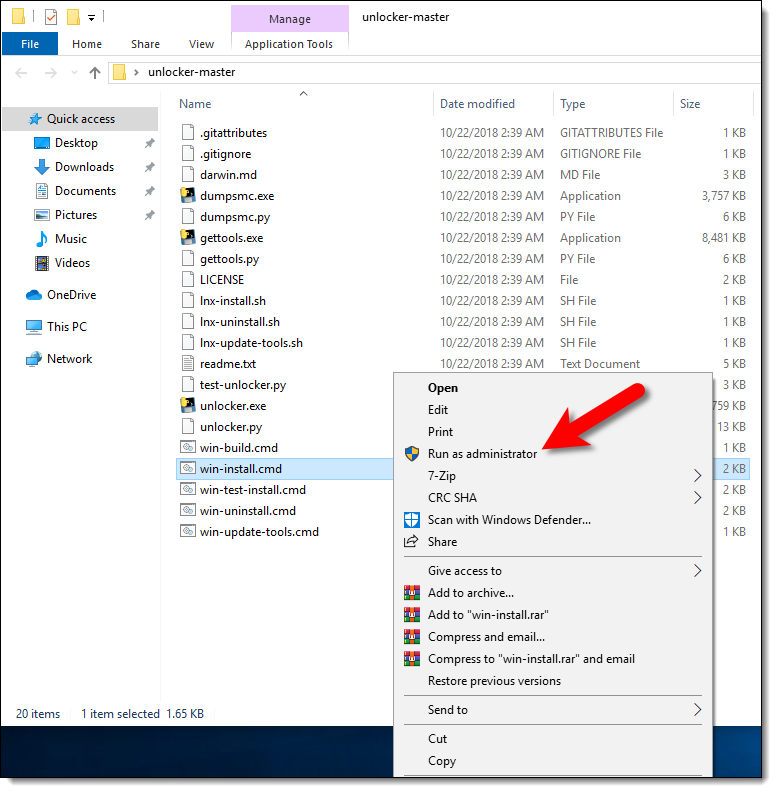
Run win-install.cmd As Administrator
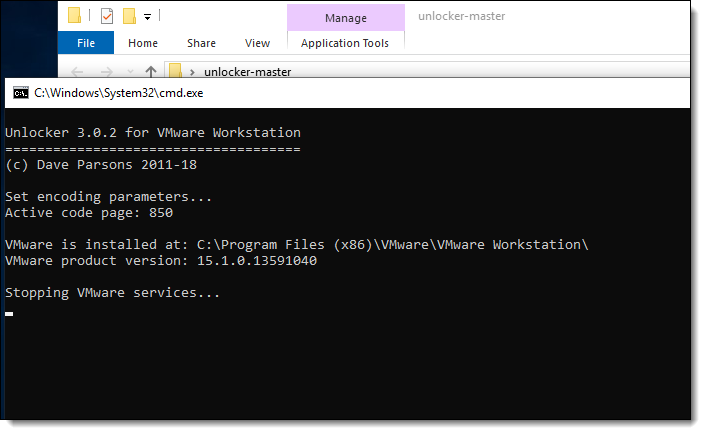
Unlocker 3.0.3 for VMware Workstation
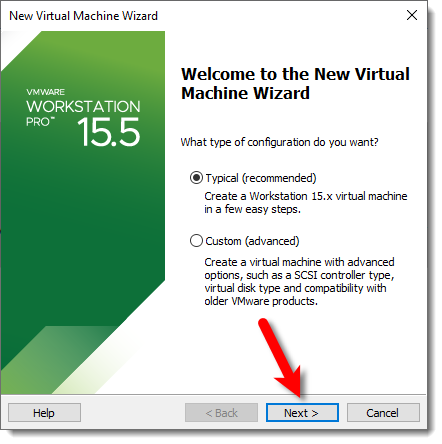
Step 4: Create a New Virtual Machine
#1. Open VMware and click on Create a New Virtual Machine (Ctrl+N) then select Typical (Recommended) and click Next.
-
- Create a VM
-
- Select Typical (recommended)
#2. Now select I will install the operating system later and click Next. Choose Apple Mac OS X from operating system list then select macOS 10.15 from version and click Next.
-
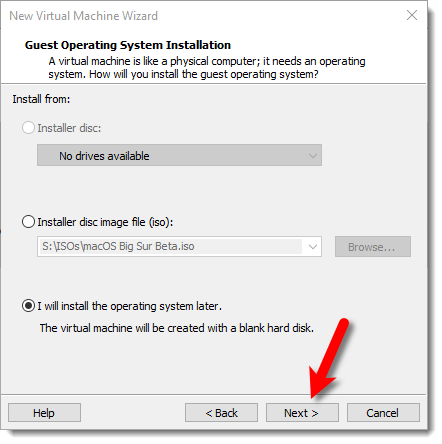
- Select Install the Operating System Later
-
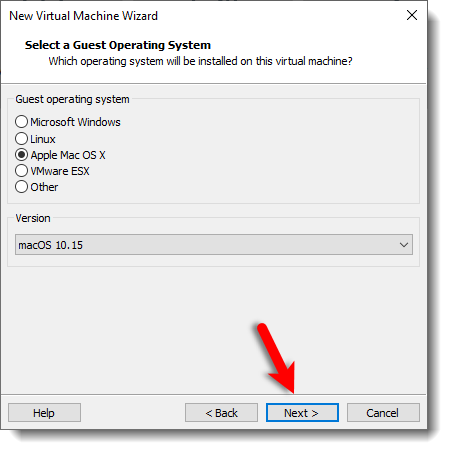
- Select macOS 10.15 Verizon
#3. Name the virtual machine as you prefer like macOS Catalina. Click Browse then choose a location to save virtual machine files and click Next, or you may let it as default.
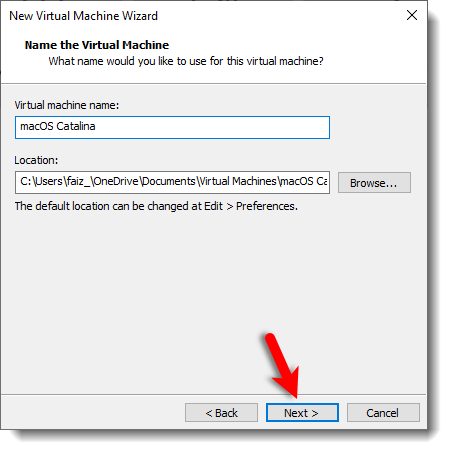
Name & Save macOS Catalina VM
#4. Specify the disk size of 120 GB or more than 50 GB. Then select Store virtual disk as a single file and click Next.
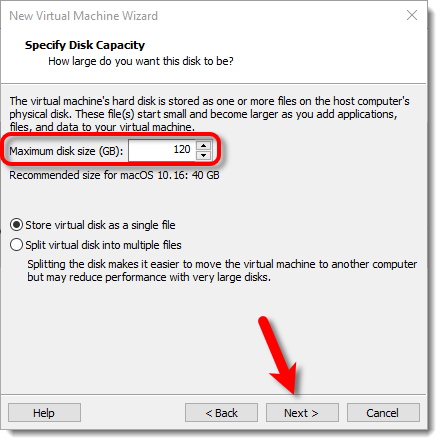
Specify Disk Capacity
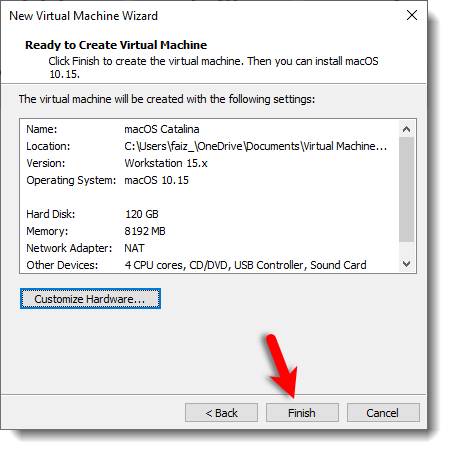
#5. On Ready to Create Virtual Machine, Click Customize Hardware.
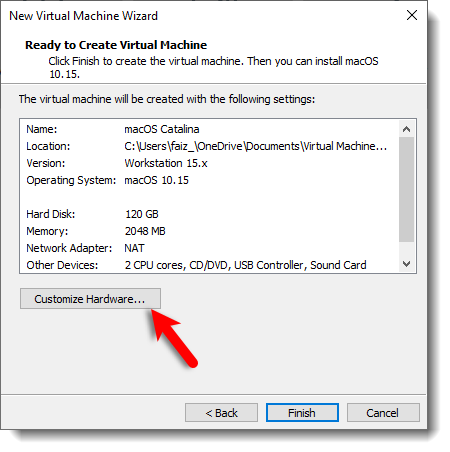
Customize Hardware
#6. Increase the Memory from 4 GB to 8 GB or higher for better performance.
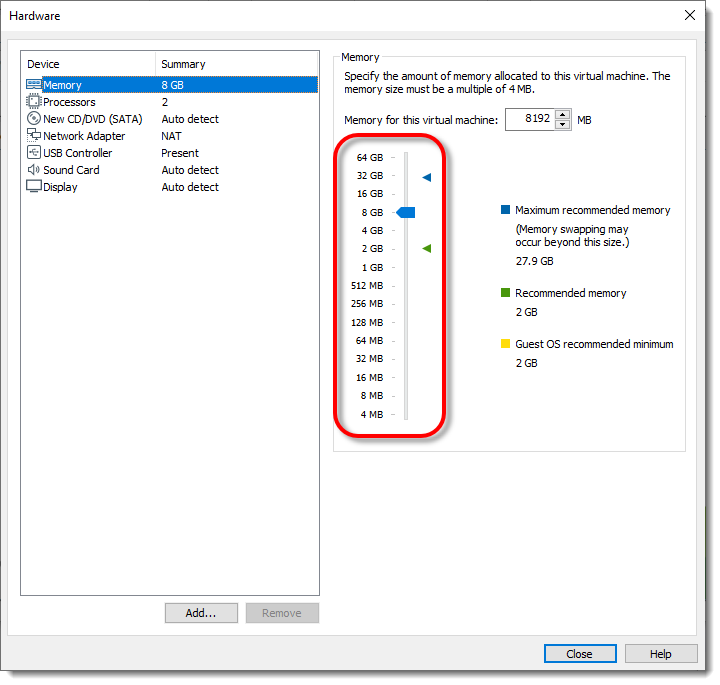
Increase RAM
#7. Select Processor menu then increase the CPU processor core from 2 cores to 4 or Higher cores for better performance.
Note: If you don’t have enough resources then you may not increase the Memory and Processor since the minimum requirement is 4 GB Memory and 2 Cores of Processor.
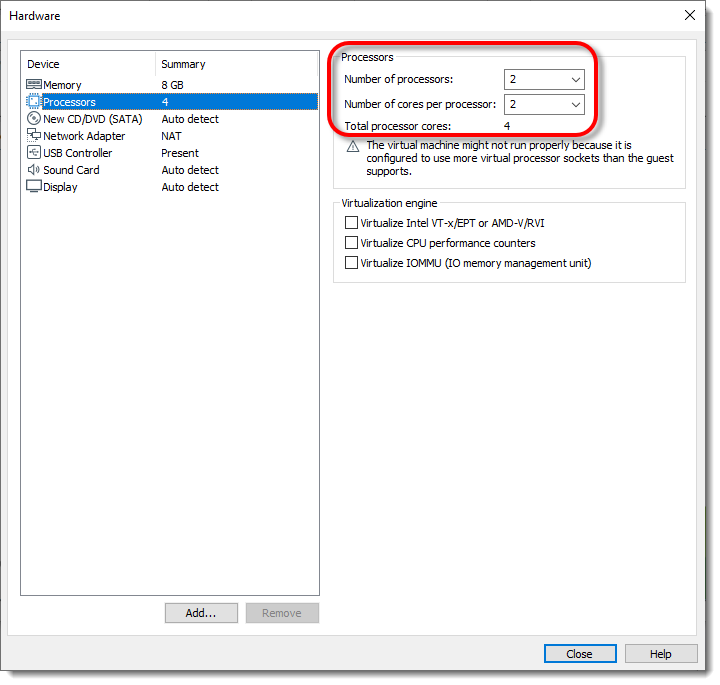
Increase Number of Processors
#8. Select New CD/DVD (SATA) from the menu then click Use ISO image file: and click Browse.

Click Browse
#9. Locate the macOS Catalina 10.15.5 (19F101).iso file then click Open. If you don’t have this file then you should download this from Step 1: Download the Prerequisites section.
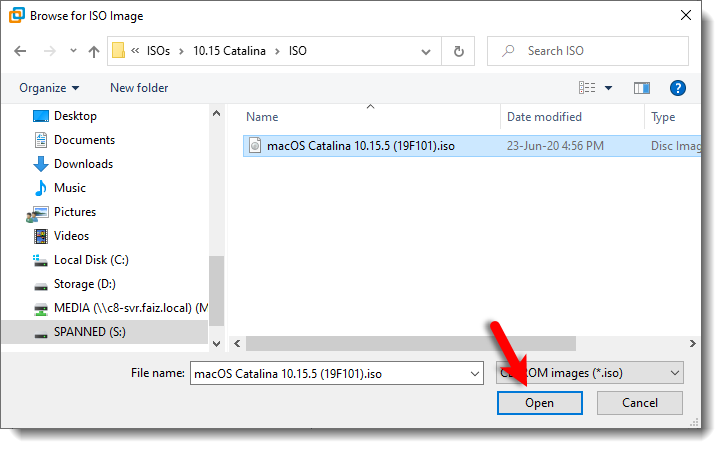
Browse macOS Catalina ISO
#10. After selecting the macOS Catalina ISO, to save all the changes click Close.
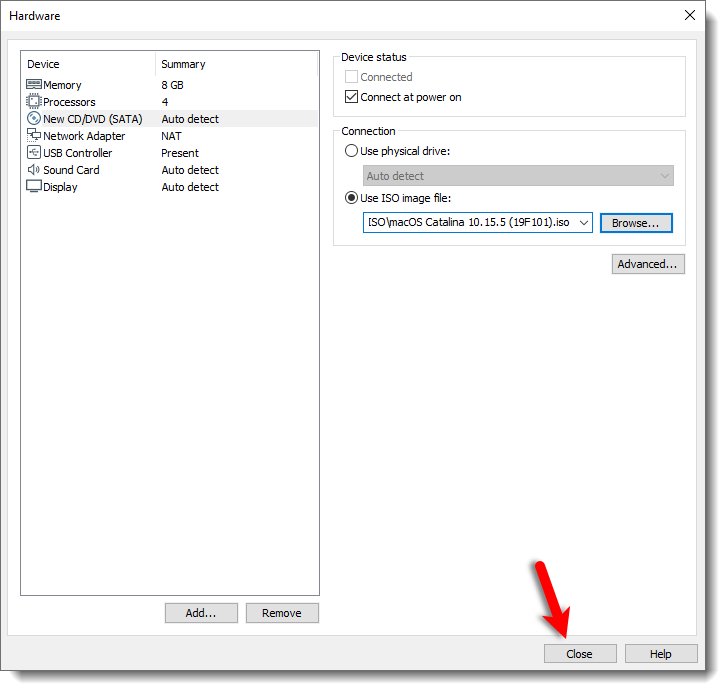
Save Changes
#11. Finally on the New Virtual Machine Wizard Window, Click Finish.
Ready to macOS Catalina VM
Edit macOS Catalina VMX File (Optional)
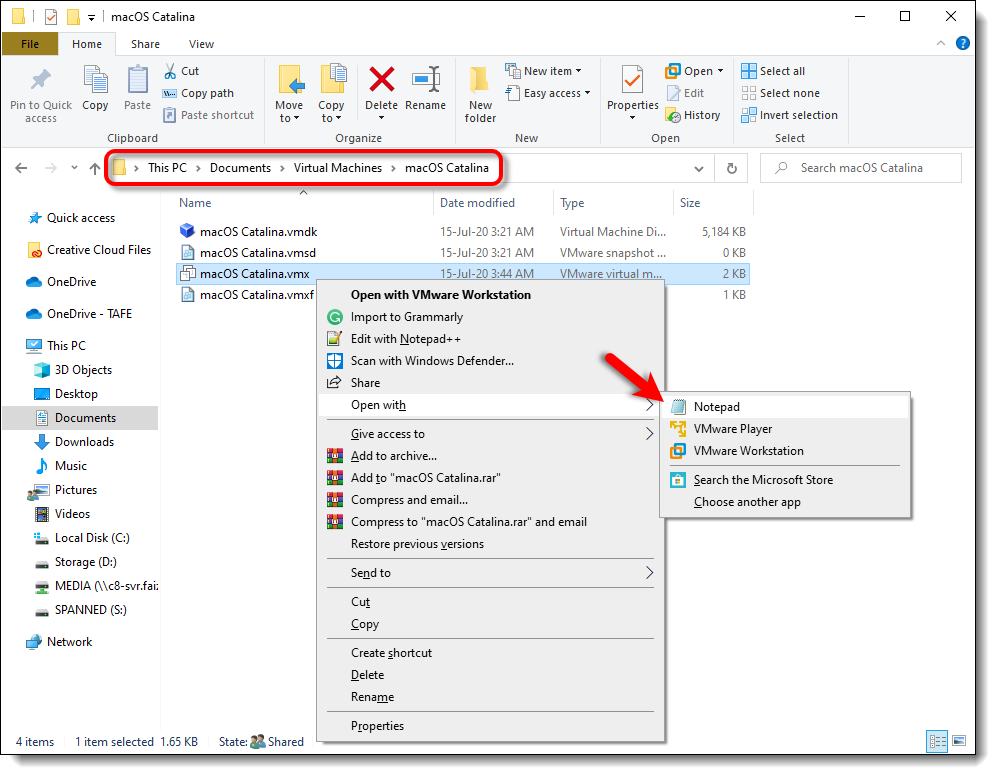
- Do these 2 steps only if you can’t boot into macOS or have other issues. Navigate to the virtual machine folder which you select in step #4.3 of this guide. If you didn’t specify a new location, then the default location is in Document > Virtual Machine. Right-click on macOS Catalina.vmx then open it via Notepad or any third-party text editor of your choice.
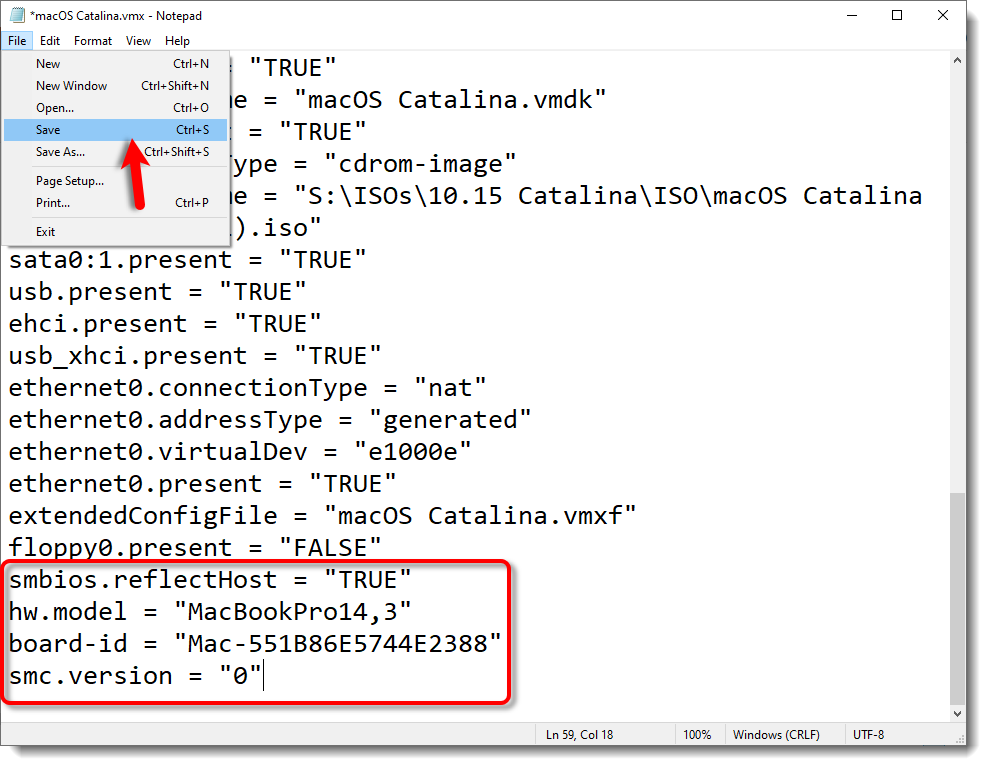
- Scroll down to the bottom of texts and add the following code; then click on File > Save. After that, you may close it as you don’t need it anymore.
smbios.reflectHost = "TRUE"
hw.model = "MacBookPro14,3"
board-id = "Mac-551B86E5744E2388"
smc.version = "0"-
- Open macOS Catalina VMX with NotePad
-
- macOS Catalina VMX File
Step 5: Install macOS Catalina as VM on VMware
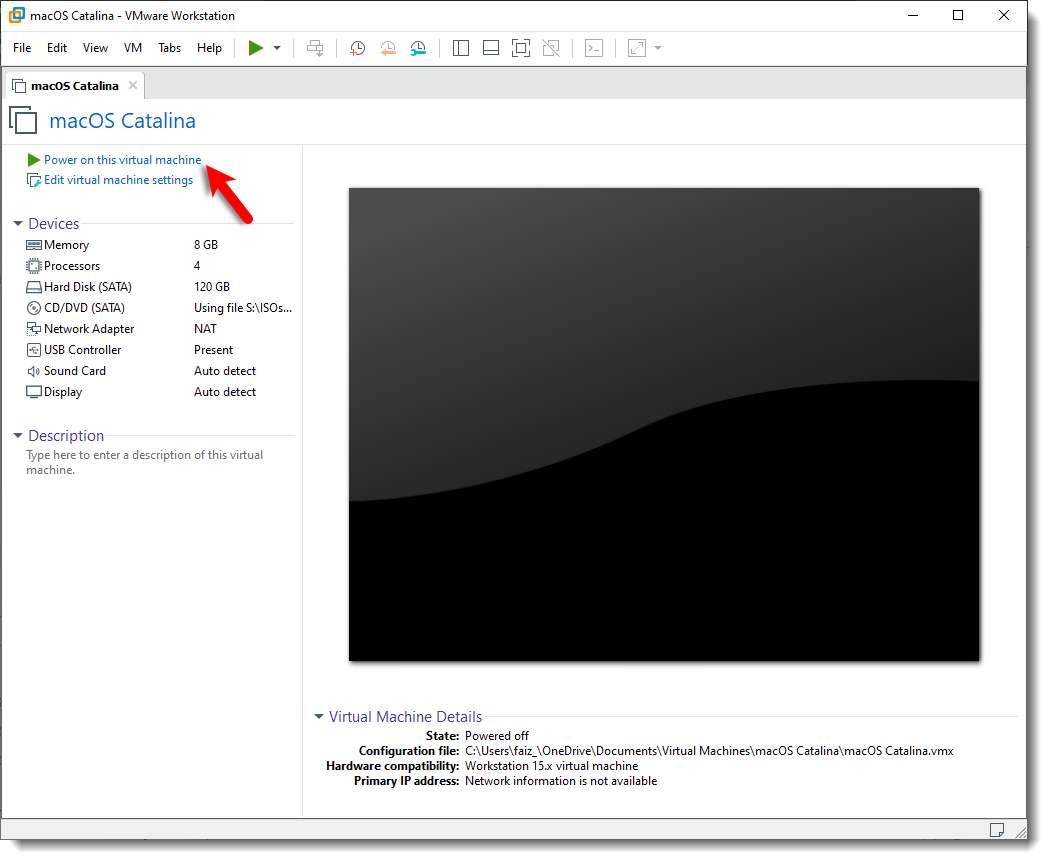
- Open VMware and on the macOS Catalina VM window Click Power on this Virtual Machine.
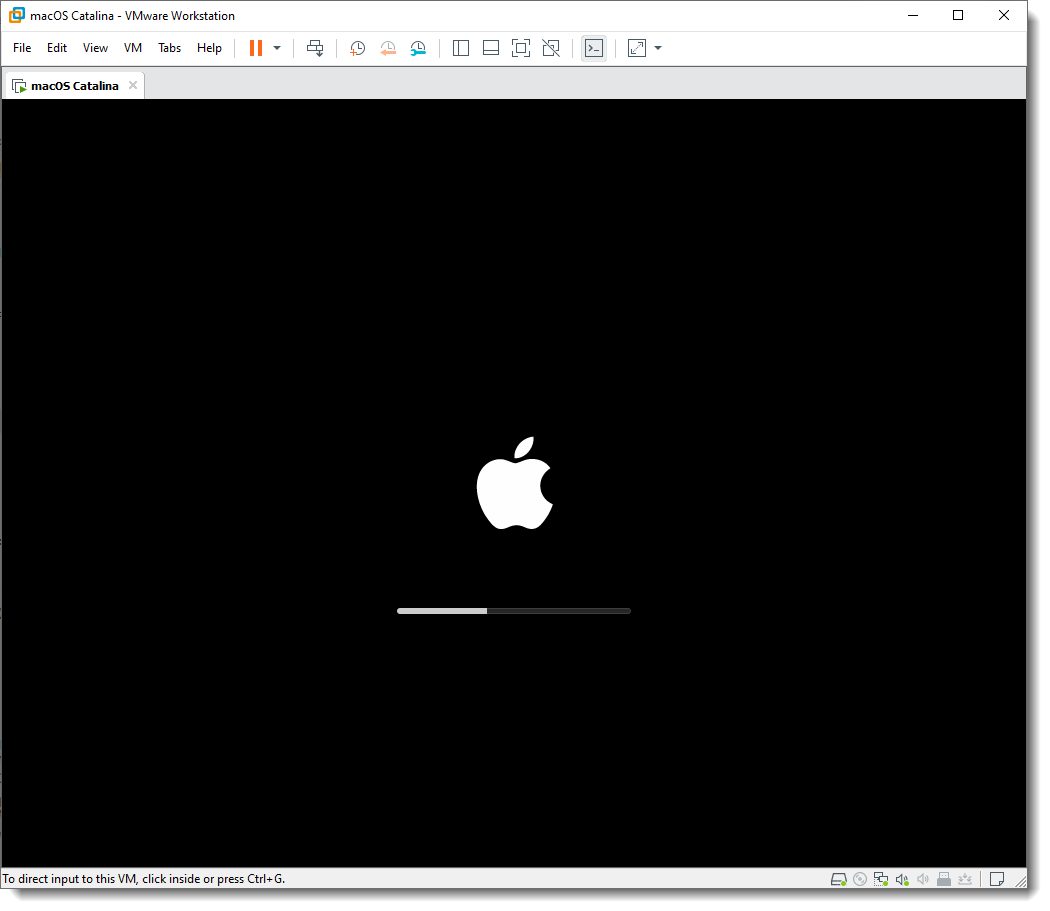
- Wait for it boot up.
- Select English on the language page then click Continue Arrow.
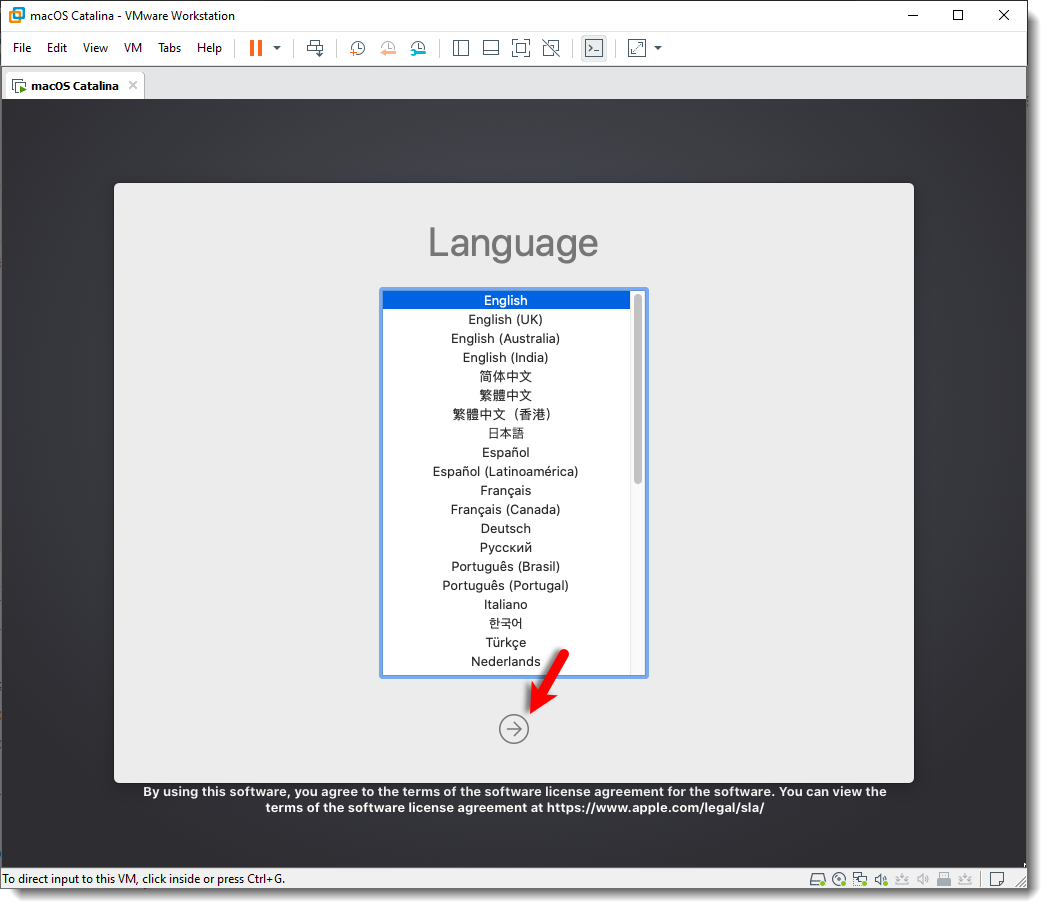
Select Language and Click Continue Catalina
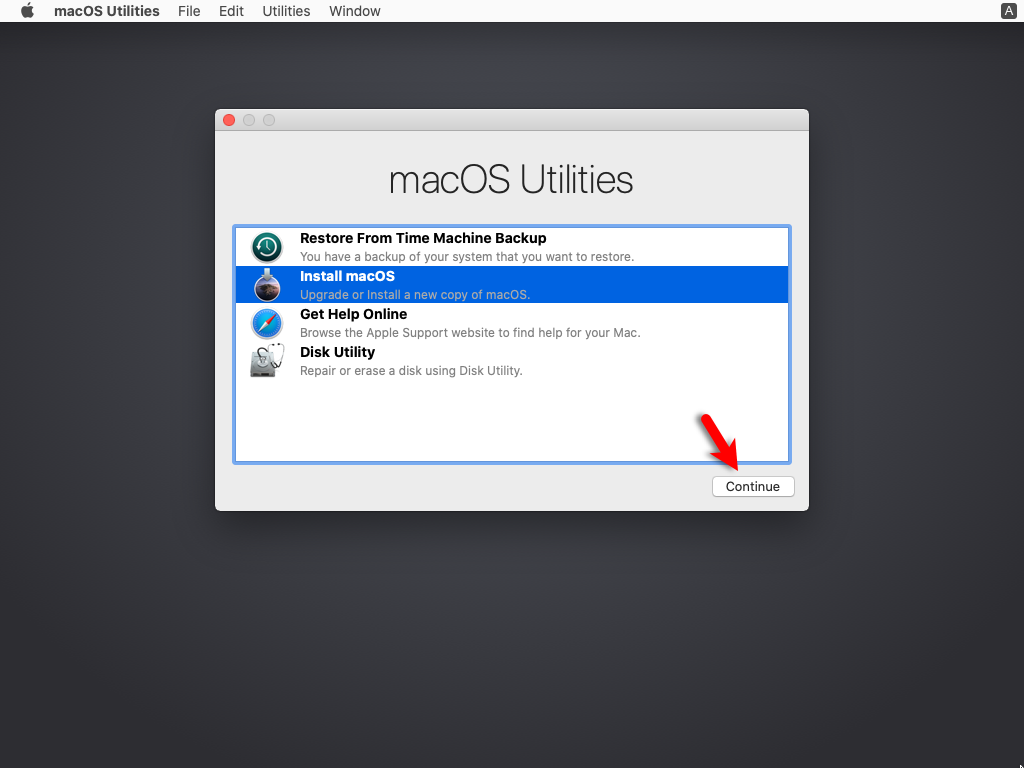
- Now, you’ll see macOS Utilities Window. From the list, select Disk Utility and click Continue.
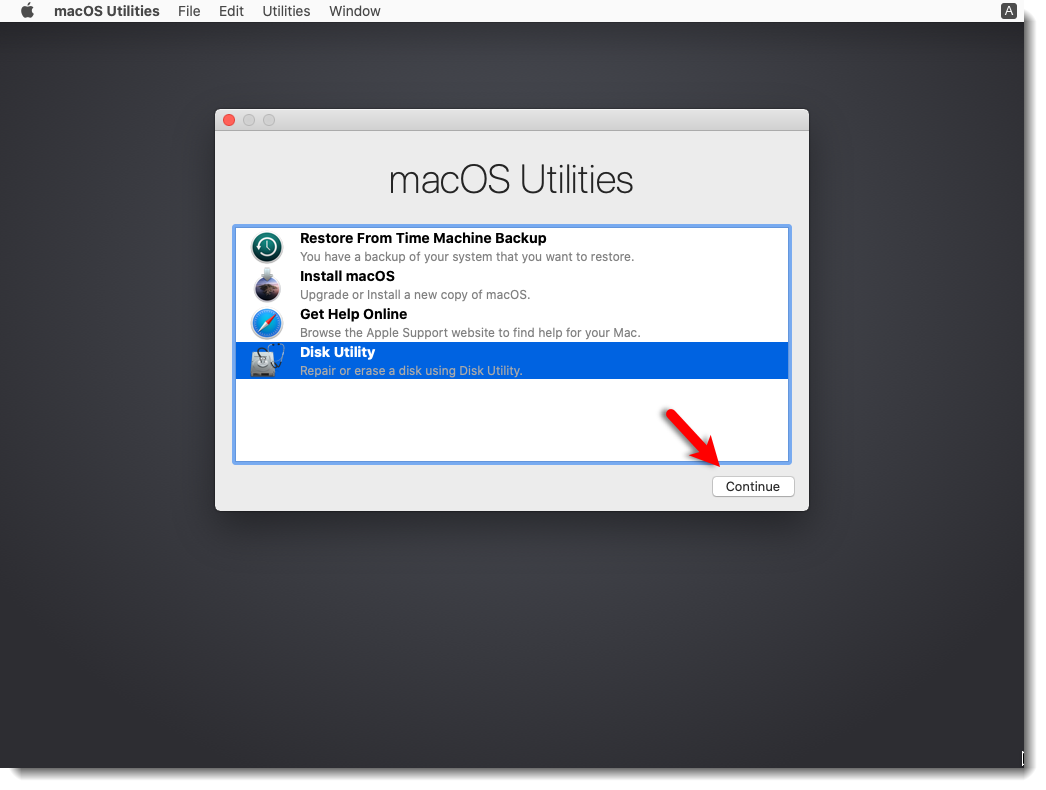
Go to Disk Utility
- Select VMware Virtual SATA Hard Drive Media then click Erase. Choose the following options and again click Erase.
- Name: Catalina HD (You can type any name you want)
- Format: APFS (If you get an error, select Mac OS X Extended Journaled)
- Scheme: GUID Partition MAP
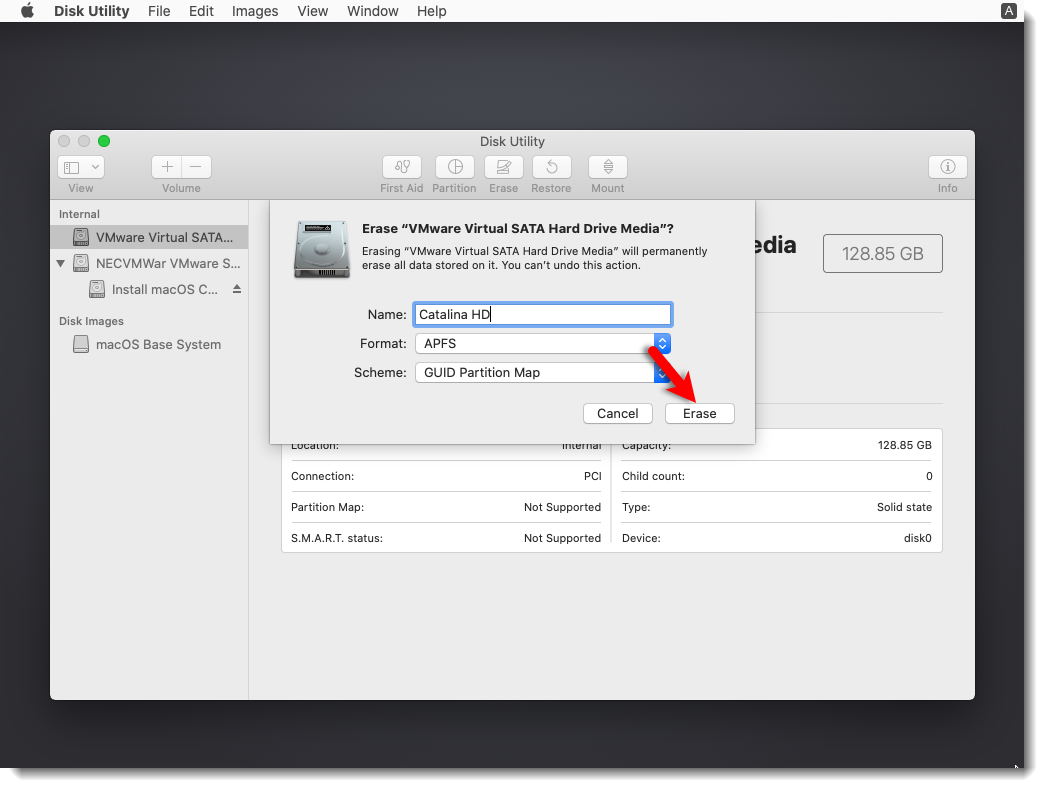
Format the VMware Virtual SATA Hard Drive Media
- From Disk Utility Tab, click Quit Disk Utility
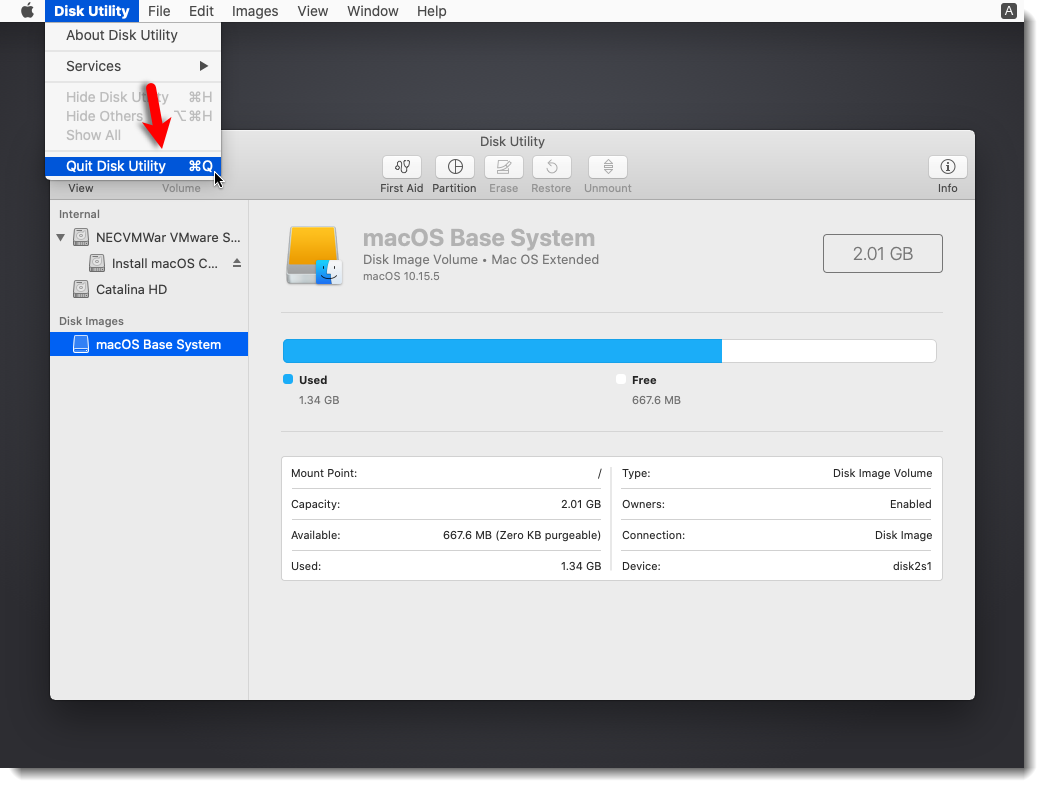
Quit Disk Utility
- From macOS Utilities, select Install macOS and click Continue.
Install macOS
- Click Continue on Install macOS Catalina screen.
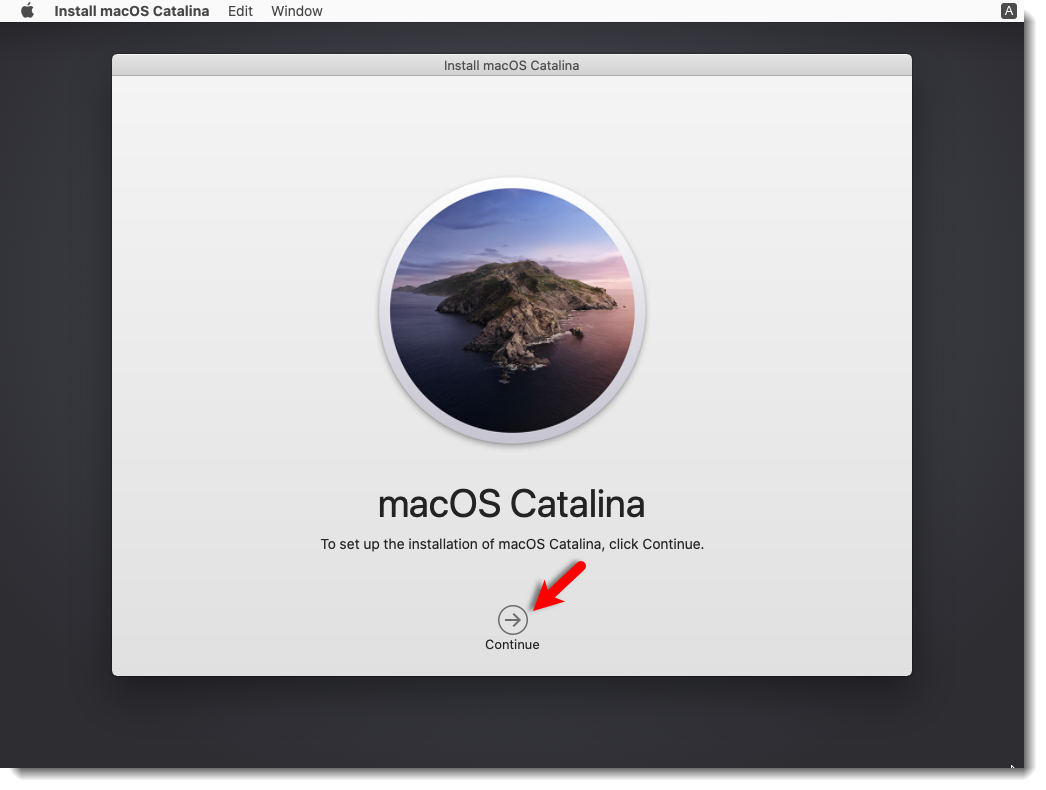
Install macOS Catalina
- Agree to the macOS Catalina License agreement.
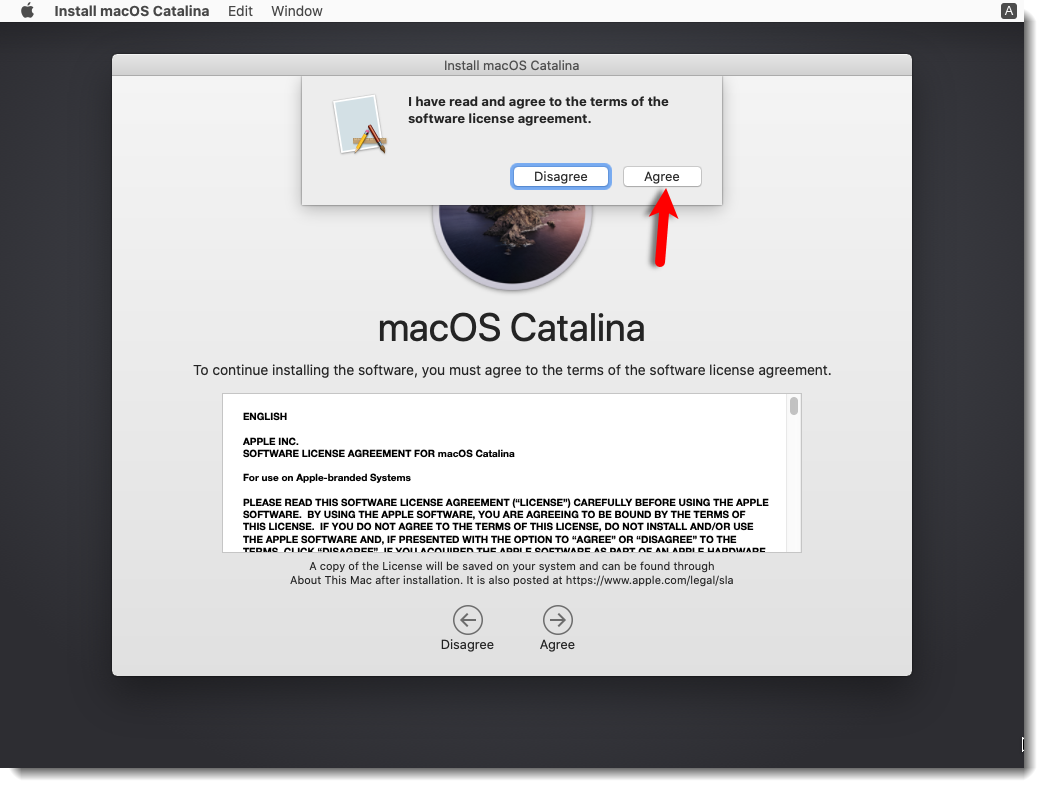
Agree to the macOS Catalina License agreement
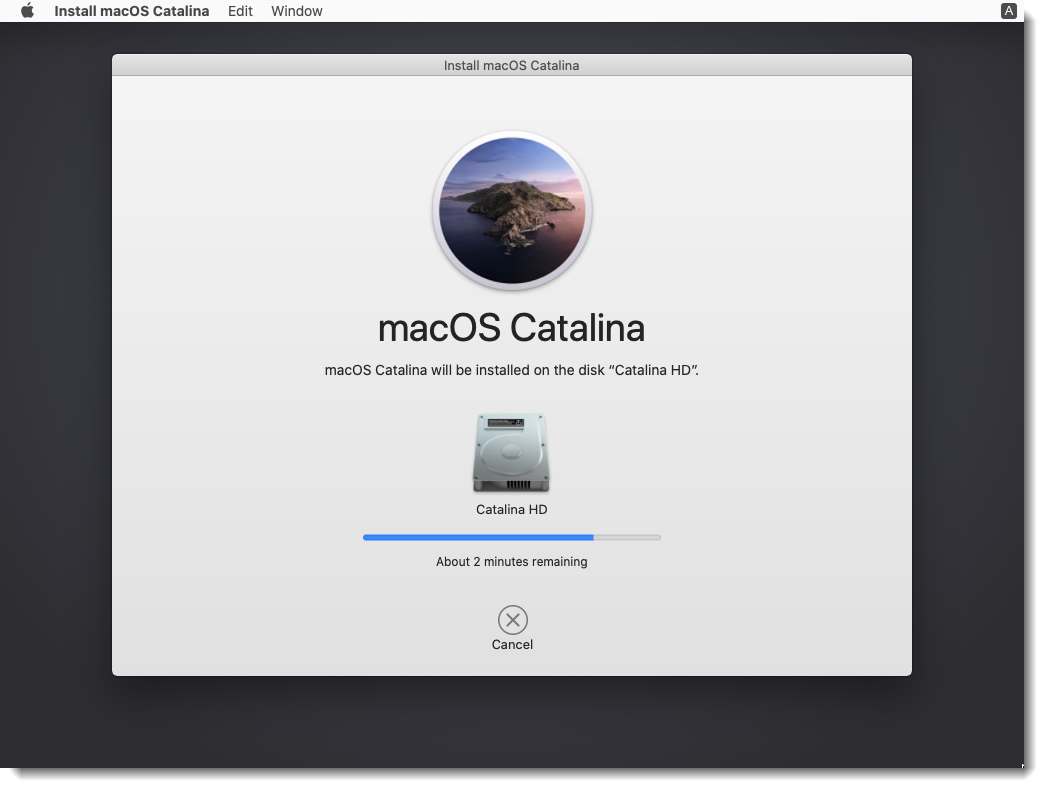
- Select Catalina HD and click Install.
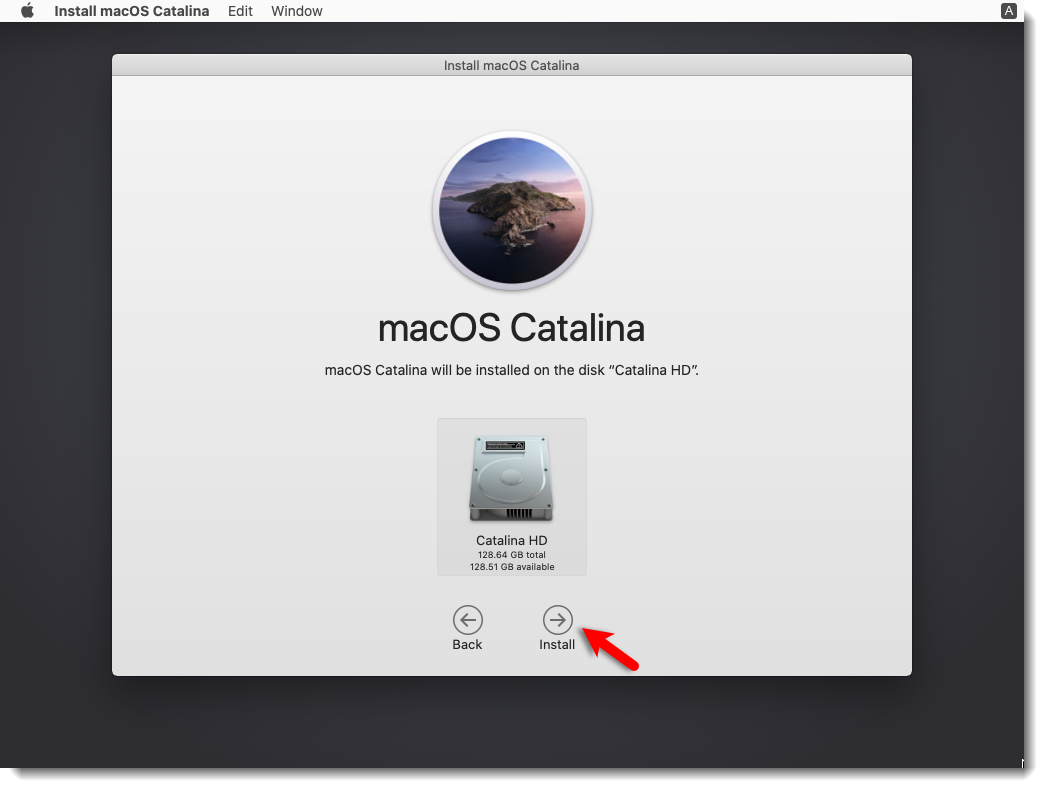
Install macOS On the VMDK
- Wait for macOS Catalina will restart 2/3 times to complete the installation itself without you touching anything. It will take roughly 15-20 minutes depending on your system, be patient.
-
- Installing macOS On the VMDK
-

- Installing macOS On the VMDK
-
Step 6: Complete Basic macOS Account Settings
Once the installation part complete, the VM will reboot, and after the reboot, you should see macOS Catalina Welcome page.
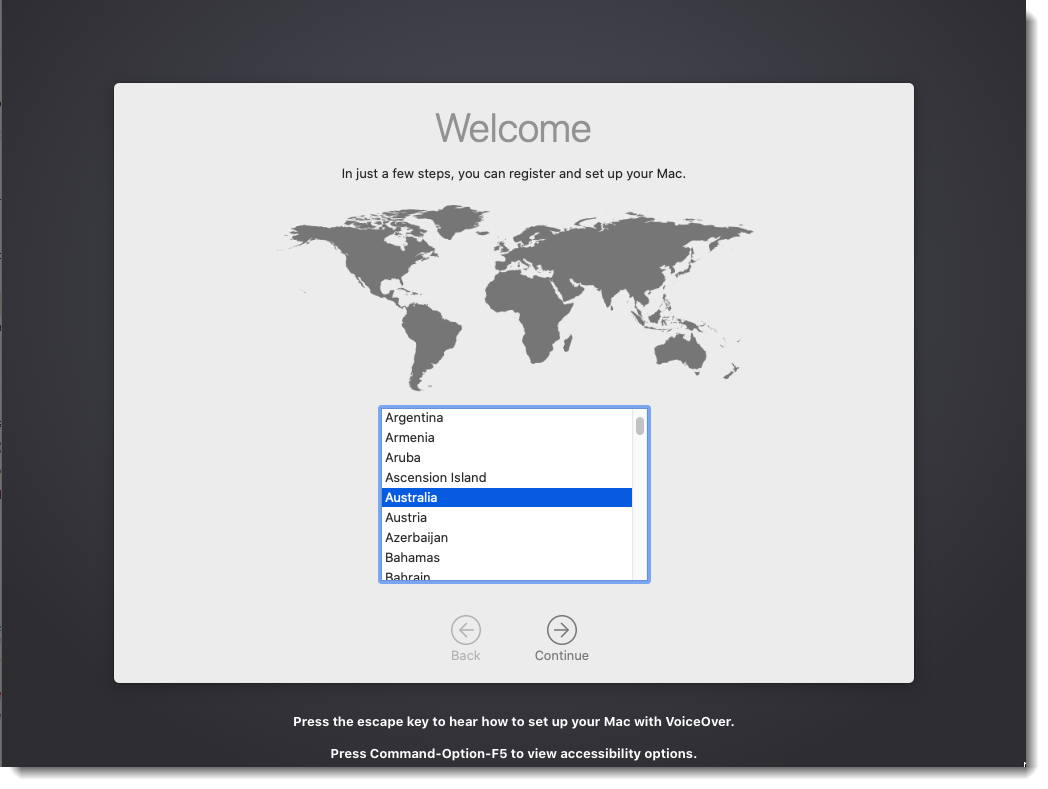
macOS Catalina Welcome Page
- Select your Country and click Continue.
- Choose a Keyboard Layout and click Continue.
- On the Data & Privacy page, click Continue.
- Select Don’t transfer any information now and click Continue.
- Click on Set Up Later then Skip.
- Click Agree to the Terms and Conditions.
- Fill out the Full name, Account name, Password, and Hint then click Continue.
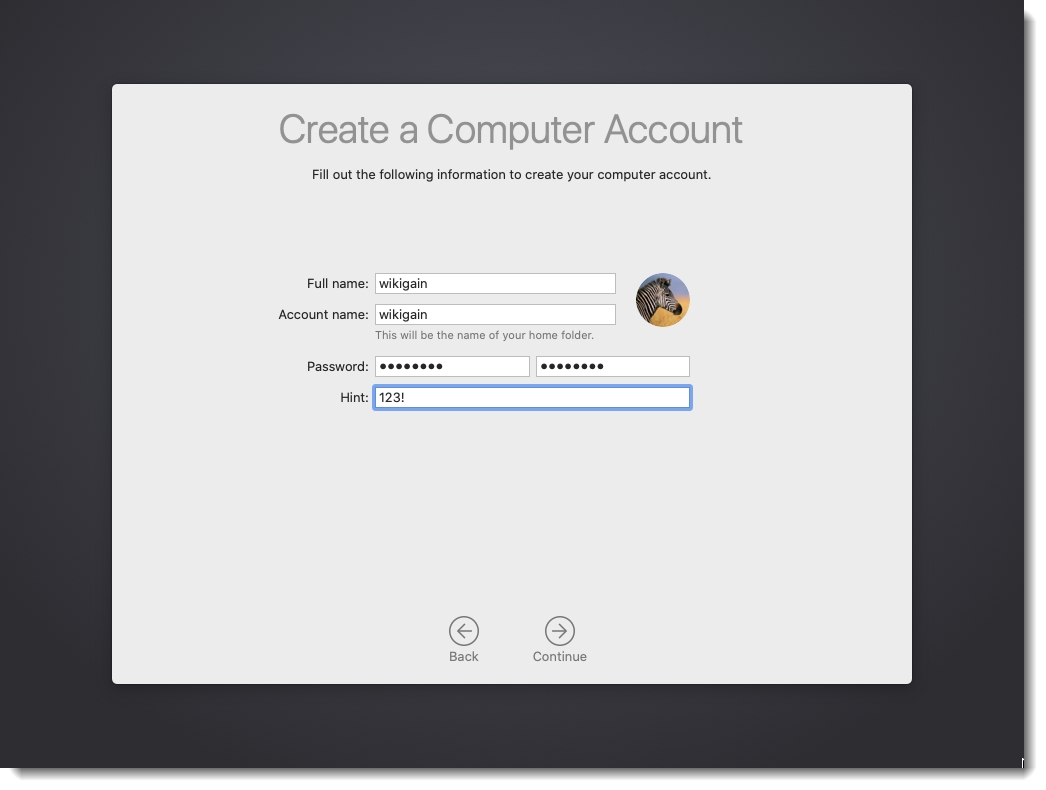
Create a Catalina Computer Account
- Click on Continue on the Express Set Up page.
- On the Analytics, click Continue.
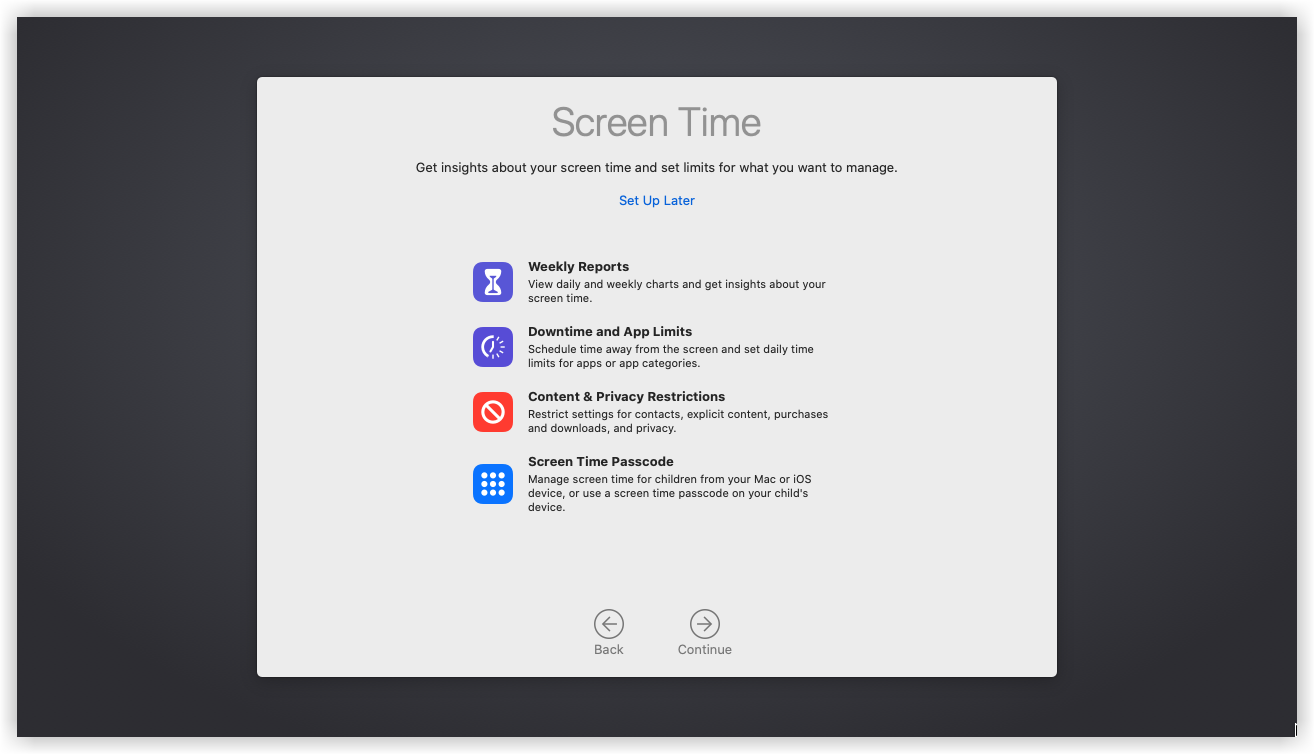
- Click Continue on Screen Time.
- Skip set up Siri
- Select any appearance theme and click Continue. You can choose between dark mode or light and Auto mode.
-
- macOS Catalina Screent Time
-
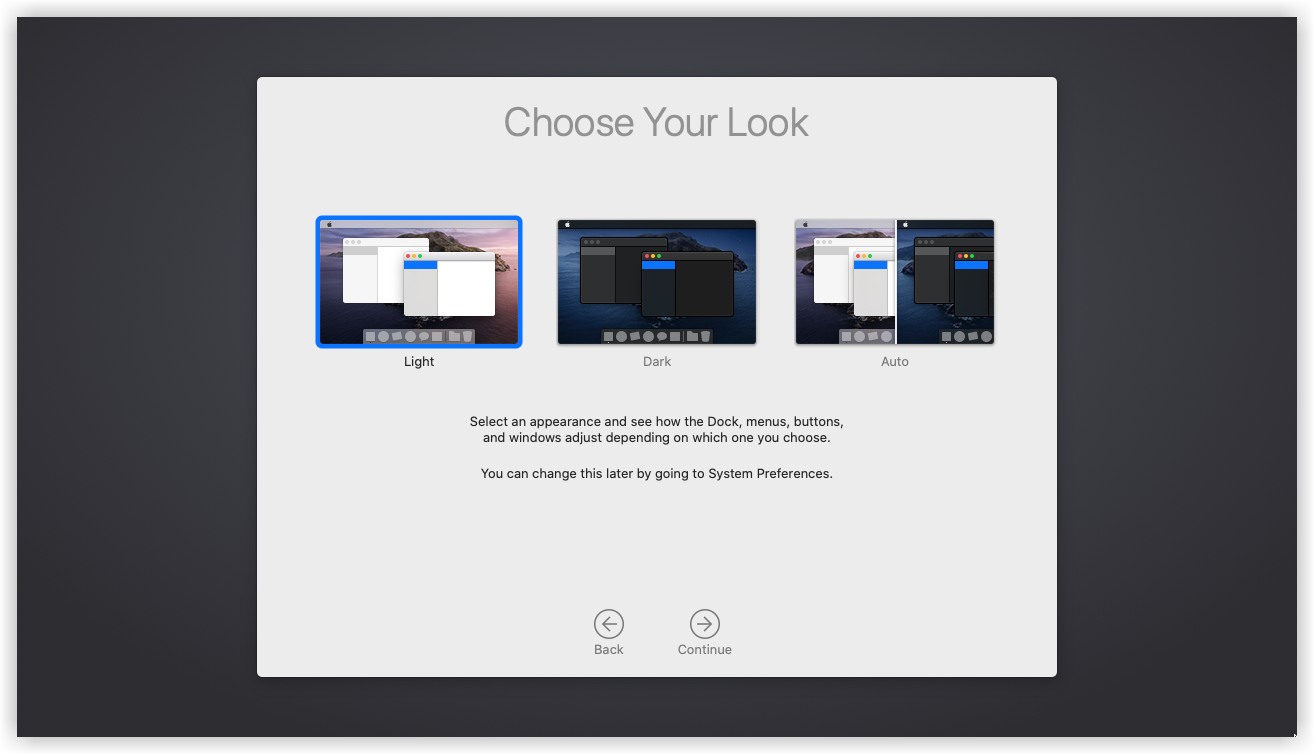
- Choose Your macOS Catalina Look
-
- Finally, wait a little while for macOS to finish setting up then it should boot into the macOS Catalina Desktop.
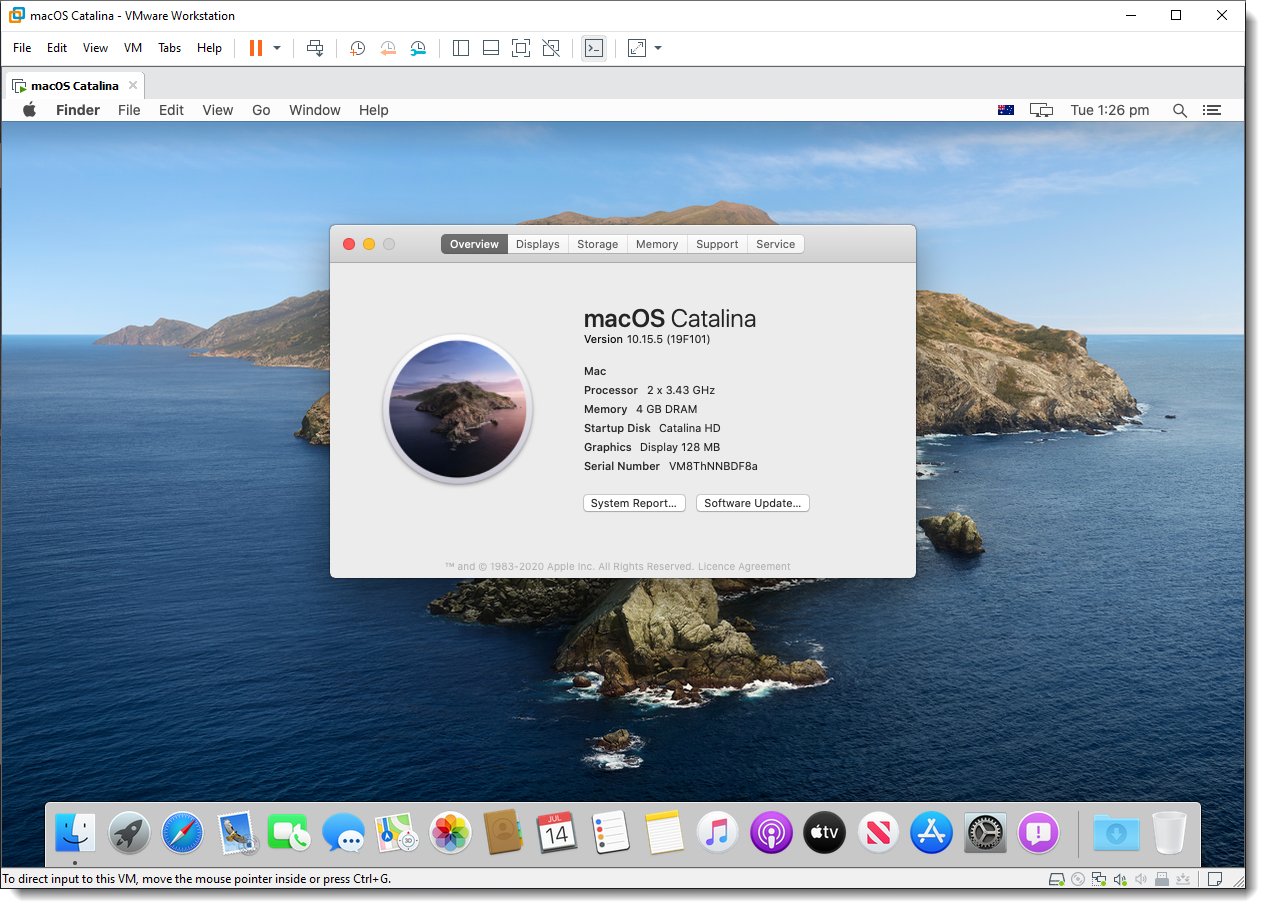
Successfully Installed macOS Catalina on VMware
Step 7: Install VMware Tools (Optional)
So now you should have noticed that the resolution of macOS Catalina can’t be changed and it’s not working as smoothly as you expected. To fix macOS Catalina Resolution on VMware or Make it more responsive, you need to install something called VMware Tools. It’s quite easy and straightforward to work with any system. So to do that we have created a comprehensive guide. Please click the link below and follow the guide Step by step.
See this guide: How to install VMware Tools on macOS Catalina
Summary
Basically, in this article, I’ve shown you the step by step pictorial guide on how to install macOS Catalina on VMware on Windows 10 using ISO. After reading and following this guide, you should have done the following:
- Download the prerequisites
- Install the Prerequisites
- Unlock VMware to Install macOS Catalina on Windows
- Create a New Virtual Machine
- Edit macOS Catalina VMX File (Optional)
- Install macOS Catalina as VM on VMware
- Complete Basic macOS Account Settings
- Install VMware Tools (Optional)
Related: New version of macOS is out!. Check out How to Install macOS Big Sur on VMware on Windows and Install macOS Big Sur on VirtualBox on Windows.
We are ready to keep receiving your feedback about this article, and other posts on wikigain. Your suggestion and feedback are highly appreciated.
If your mouse and keyboard are not working, you can change USB to USB 2.0 in VmWare VM Settings.
Just installed macOs 12 with macOS_Monterey_GEEKrar.iso on a Windows 11 with and intel i7-9750H CPU following this guide. Used vmware player 15, didn’t need the fix codes, used the tools to fix the resolution and everything worked as described. Tried using virtualbox before vmware, but virtualbox only allowed me to use 1 core.
Thanks for the guide.
Works very well. Thanks for the guide!
I am running Win 10 Pro on a Ryzen Threadripper 1950x with 64gb ram. I ran through all of the steps and even did the “fix” code change but it still won’t boot. I get a message that says “The CPU has been disabled by the guest operating system. Power off or reset the virtual machine.” Any ideas on how to fix this?
Please Enable the virtualisation from your bios
It worked for me before when I used a PC with an old Intel CPU but when I upgraded to a newer AMD CPU it did not work anymore, just keep stucking on Apple logo for ever.
But it stil woeks well for other OS like Windows or Linux.
Now I find out a lot of people with AMD CPU have same problem.
Thanks. Everything worked great for me. For some reason I had to run the unlocker 2 or 3 times before it worked but after I got macOS to show up in VMWare everything went smoothly.
I also only added
hw.model = “Macmini7,1”
to the end of the .vmx file, this allows it to show as a Mac mini (2014), but it keeps the serial number instead of making it Bxxxxxxxxxxxxx.
Great Job! I really appreciate the tutorial.
Followed all the steps to the letter. None of the steps worked, when I start Mac OS to install Catalina, VMWARE gets stuck on Apple logo and does nothing else.
Hello i follow all your steps but after it copies files and restart it didnt boot . I dont know whats the problem is
All wasted time if running on Ryzen.
I tried for WEEKS to do this using VirtualBox. I could never get a serial number fix, never had any sound, the mouse wheel was reversed and the response was terrible. I used Virtualbox because I had used it before for Linux and was familiar with it. What a mistake. One pass with VMware and my VM runs perfectly as expected. FORGET VIRTUAL BOX!!!
The guide was very good except for one problem. When I ran the unlocker as administrator from a command console, I got errors. Instead I ran it from an MySYS command window as administrator and it worked
Can’t connect to a network and wifi is disabled.
Can’t connect to a network and wifi is diabled.
i run AMD and i keep getting an error “The CPU has been disabled by the guest operating system. Power off or reset the virtual machine.” I tried the extra step you suggested , of coping and pasting a code into tthe .vxm file. but no success with that as well.
I followed these instructions to the letter and no matter what I do meaning if i add the bios settings to the VMX file using notepad or not all I get when I power up the VM is the White Apple Logo and it just sits there, then after a few mins I get the prompt to downlad the VMWARE TOOLS from inside the VM Screen. I Choose download and again it just sits there.. I know the virtuailzation is enabled because I am running another VM on the same machine (Windows 10 Pro) My hardware is more than capable of running it. I have an AMD FX-8650 on an ASUS Motherboard Model: Crosshair V Formula. With 32GBS Ram and a 1TB SSD Drive. I get no error messages under logs, again it just sits there. Can you help?
I was facing the same problem, solved when I installed VMware Workstation 16.1.0 Pro instead the one previously installed on my device (VMware Workstation 14).
I was facing the same problem when VMware Workstation Pro V14 was installed on my PC, problem solved when VMware Workstation Pro V16 installed.
That’s not true because I use V16.1.2 and I can’t do anything but to power down the virtual machine.
I have a Ryzen 7 2700X and that doesn’t work.
I’m also getting stuck on the Apple Logo. Did you have to re-run the setup after installation Workstation PRO? Also does it not work on the Workstation Player?
worked exactly as described… thank you!
While installing its showing that ” an error occurred validating the installer data” . i downloaded the iso file again and tried still shows the same error
Mouse and keyboard not working to init the installation.
I use VMware Workstation 16
I not edit the vmx, same when I edit and restart the PC for avoid issues.
Add usb support in the VM setting.
No luck here. Running Version 16 Pro of Vmware because it is required for newer Windows 10 Pro versions. I keep getting a blue Boot Manager box.
At first it says
“Attempting to start up from:
-> EFI VMware Virtual SATA Hard Drive (0.0)… unsuccessful.
-> EFI VMware Virtual SATA CDROM Drive (1.0)… unsuccessful.
-> EFI Network…
>>Start PXE over IPv4.
Station IP address is 192.168.189.135”
Then it shows me the blue “Boot Manager” screen.
Any ideas?
Please does anyone know if it is okay to upgrade to big sur?
Please does anyone know if it is okay to update to big sur?
yes it is safe to update to big sur
Everything works really fine. But the Catalina-Guest-System seems to be not able to change the Screen-Resolution from 1024×768 to 1920×1080. Is there any way to solve this?
Install the VMWare Tools; then you can change screen-resolution.
im in a bootloop loads apple and progress bar the goes back to the vmware log and repeats over and over
It worked perfectly on my ASUS Prime B250 Pro with Win10 and VMware 15. Unfortunately SIP and MRT ruin any VM, the disk thrashes all the time. To disable SIP you have to go into recovery mode, which, using this method isn’t possible.
A really good tip : When you Erase the disk before installation proper starts, load Terminal and enter “crsutil disable” (without the quotes). then continue the rest of the installation. IT WORKS!
Thank you so much
I want to confirm that this is working. And if someone is not able to make it through. Just use the latest VMWare Workstation preferably version 16 and install the unlocker again and you be all set to install macOS Catalina on Windows 10 : -))
More garbage. DOES NOT WORK. CPU disabled. Restart or shut down. Virtualization has been enabled since the day this machine was built. THAT IS NOT THE PROBLEM. Your crappy instructions have missed something. LOTS of other comments/problems exactly like mine. And NO RESPONSE from you.
chille, there are guids to mask AMD proccesor id’s… yes its a problem with AMD.
how do i do this, because i run amd as well
Big surprise it doesn’t work. There isn’t even an OSX 10.15 option. Does anyone actually try this or is it just bs
it works for me, maby the osx unlocker didnt work for you, you can email me at chrelliott978@gmail.com if you need assistance…
After selecting the hard drive to install tha os it stucks everytime and after some time whole laptop screen goes blank and cant do anything aprat from forcing window off by pressing and holding the power button. What to it is not installing everytime same thing happens. Screen freezes and later goes blank the whole screen blank.
After installing, I still cannot boot the system. it always stuck on apple logo when progress bar full. I can use mouse and keyboard but nothing happens…
By the way, could someone explain what those fields mean in vmx file? I cannot edit that file because it will be rewritten every time I start the VM…
That’s because you might not exit the VMware. When you edit vmx file, you have to quit the VMware and it should not be running in the background.
It didn’t work for me, the last entry in the “vmware.log” file is:”2020-08-17T14:20:05.516+02:00| vmx| I005: Vix: [guestCommands.c:1942]: Error VIX_E_TOOLS_NOT_RUNNING in VMAutomationTranslateGuestRpcError(): VMware Tools are not running in the guest” and then the VM is frozen.
is it possible to do on amd processor , because when i tried booting up it give me an information CPU has been disabled.
Use this guide to fix your issue. You should enable Virtualization Technology from your host machine.
This is NOT the issue. My virtualization is ON, as I’m able to run other OS’es on VMware. It’s a OSX problem with the VM.
OMG you are my hero!
does it work on linux? (zorin os)
When I change the file system to Windows 10 x64 I get a message pop up “The CPU has been disabled by the host. Please shutdown or restart the machine.”
Firstly thanks for all of these. I wonder if it works when we increase the memory to 8 GB.
Thanks in advance.
Not working on ryzen 3700x
is it passable to install Xcode 11.2 in Beta versions ?
Step 5 is not clear.
“#5. Now click on Options tab then from Guest operating system section select Microsoft Windows and make sure Windows 10 x64 is selected in the Version drop-down. Finally, Click OK to save changes. ”
Yet, the picture states to change it back to MacOS. Changed it to MacOS, working fine now.
Thanks
Is this working with an AMD Ryzen CPU?
It should work but I personally have not tried yet
From the guest operating systems list in VMware, there is no option for macOS
Run the script (Win-install.cmd). It’s mentioned in the guide.
Quit the VMware before running the script.
Is it working now?
I was anxious to test this out and take a peek, but when I try to attach the harddrive, I get an incompatibility error. I was using V.14, so I upgraded it to V.15 but still get the error. Any thoughts?
Error:
The selected virtual disk is incompatible with this Workstation 14.x virtual machine. Adding this disk would make this virtual machine incompatible with older VMware products.
Interesting, the same error is obtained whether using v.14 or v.15….. It won’t allow the drive to be saved.
Make sure you attach the hard drive as SATA not SCSI. You may try installing it via macOS Catalina ISO which you can download from here: https://www.wikigain.com/download-macos-catalina-iso-image/