In this article, I am going to show you how to install macOS Big Sur on VMware on Windows. So, Apple announced its latest and greatest operating systems in WWDC 2020. If you want to give macOS Big Sur Beta a try, then you’re in the right place.
macOS Big Sur is Currently in Beta, and obviously, it’s baggy. When a new release/version comes out then depending on how many vital fixes it has, I may update the ISO file linked below. Although you can make your own ISO. I will create a step by step guide on how to create your own macOS Catalina ISO and link it below. So, without wasting any more time, let’s jump into it.
Required: If you haven’t already then you should enable Virtualization Technology (aka Intel VT or AMD-V).
Steps to Install macOS Big Sur on VMware on Windows
- Download the prerequisites
- Install the Prerequisites
- Unlock VMware to Install macOS Big Sur
- Create a New Virtual Machine
- Edit macOS Big Sur VMX File
- Start macOS Big Sur Virtual Machine
- Complete Basic macOS Account Settings
- Install VMware Tools (Optional)
Step 1: Download the Prerequisites
To begin with, you should download some files, and you may also download & install some applications, which are required later on in this guide. But if you have done any of the followings already, then you may skip it. Here is the list:
- Download VMware Workstation Pro 15.5.x or VMware Player 15.5.x.
- Download the macOS Unlocker V3 for VMware
- Create or Download macOS Big Sur Beta ISO
- macOS Big Sur Beta 11.0 (20A4299v) Dev Beta 1
- macOS Big Sur Beta 11.0 (20A4300b) Dev Beta 2
- macOS Big Sur Beta 11.0 (20A5343j) Dev Beta 4/Public Beta 1
- macOS Big Sur 11.0.1 (20B29) Initial public release Latest
- Create macOS Big Sur ISO Image
- Download VMware Tools (Optional)
Step 2: Install the Prerequisites
Now install the VMware Workstation Pro applications, and if you already have it by any chance then you’re welcome to Skip but make sure then it works properly, and it’s compatible.
- Install VMware Workstation Pro 15.5.x or VMware Player 15.5.x
After downloading the VMware Workstation pro/player, run the setup and follow the prompt leaving all the options as default.
Step 3: Unlock VMware to Install macOS Big Sur on Windows
Firstly make sure VMware Workstation application is closed completely otherwise the VMware unlocker won’t work. You can do this by Clicking on File Tab > Exit.
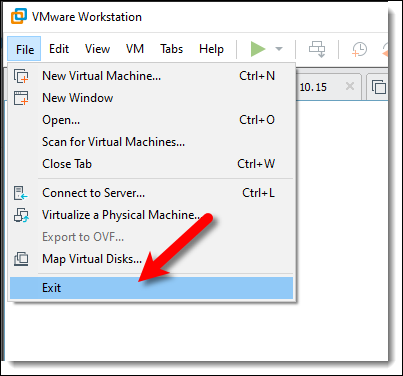
Exit VMware Workstation
You should have downloaded macOS Unlocker V3 for VMware from GitHub or the direct link. Extract the macOS Unlocker V3.0. Right-click on win-install.cmd and select Run as Administrator.
Note: You may always uninstall the previous version of the Unlocker before using a new release. Failure to do this could render VMware unusable. – David Parsons
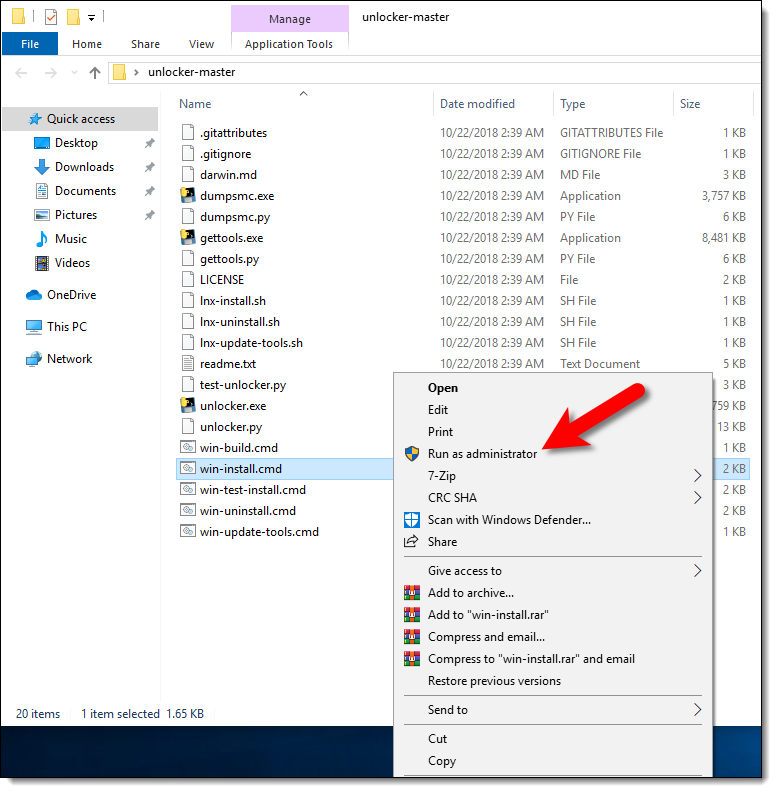
Run win-install.cmd As Administrator
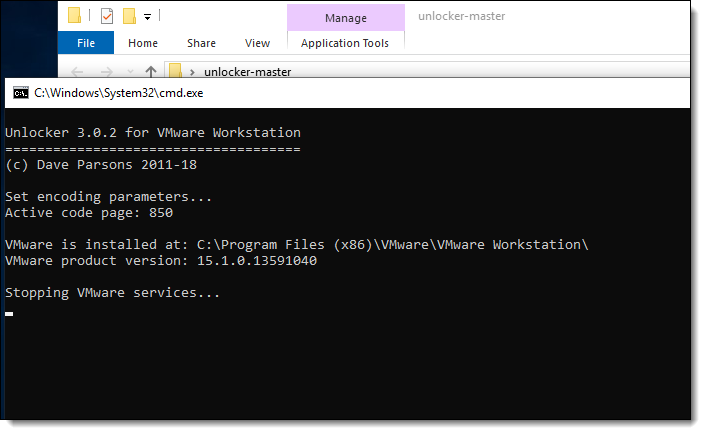
Unlocker 3.0.2 for VMware Workstation
Step 4: Create a New Virtual Machine
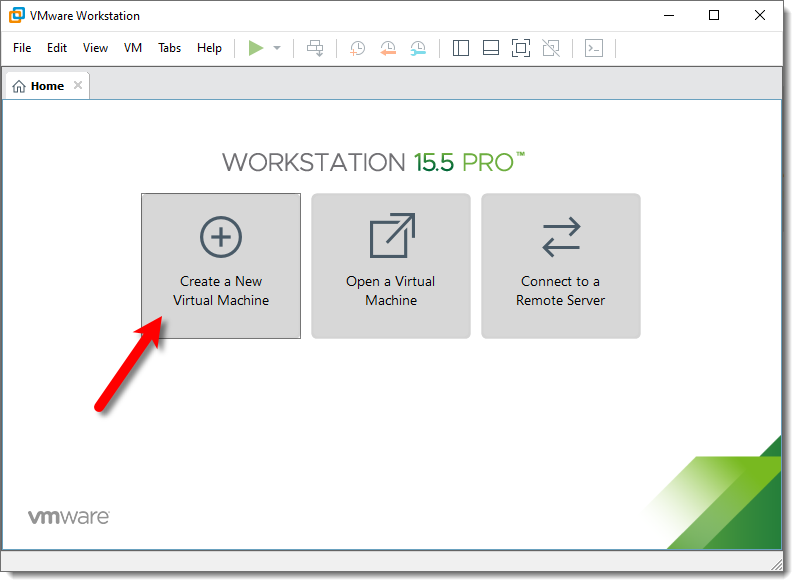
#1. Open VMware and click on Create a New Virtual Machine (Ctrl+N) then select Typical (Recommended) and click Next.
-
- Create a VM
-
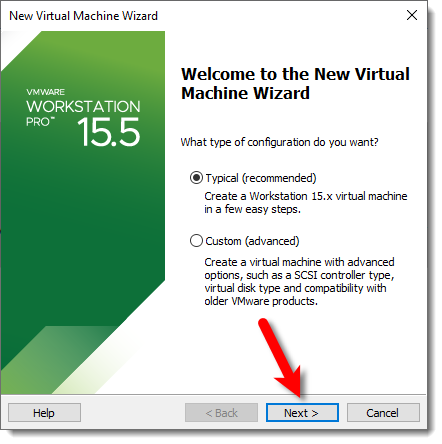
- Select Typical (recommended)
#2. Now select I will install the operating system later and click Next. Choose Apple Mac OS X from operating system list then select macOS 10.16 from version drop-down list and click Next.
-
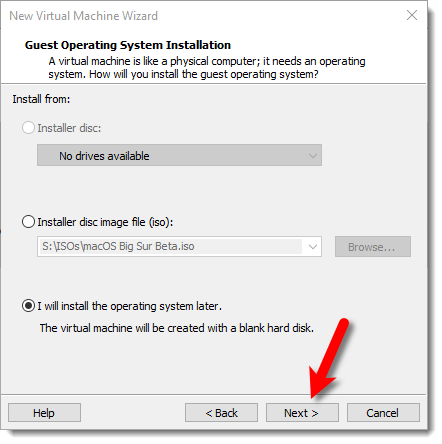
- Select Install the Operating System Later
-
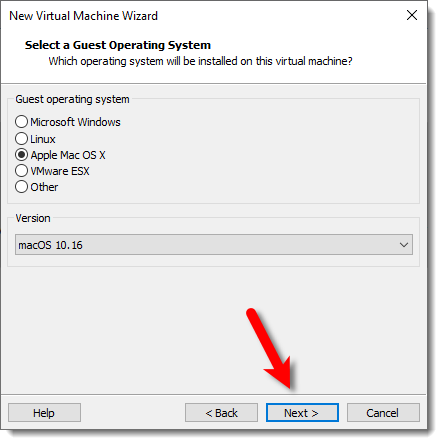
- Select macOS 10.16
#3. Name the virtual machine as you prefer like macOS Big Sur Beta. Click Browse then choose a location to save virtual machine files and click Next, or you may let it as default.
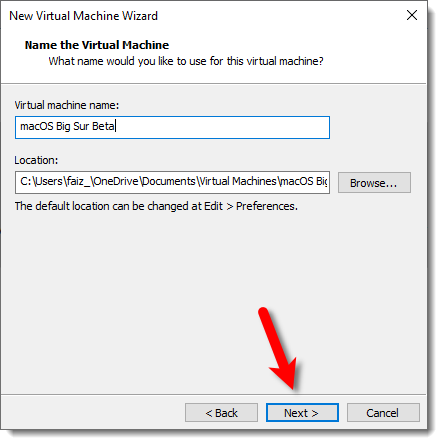
Name and Save macOS Big Sur Beta
#4. Specify the disk size of 120 GB or more than 50 GB. Then select Store virtual disk as a single file and click Next.
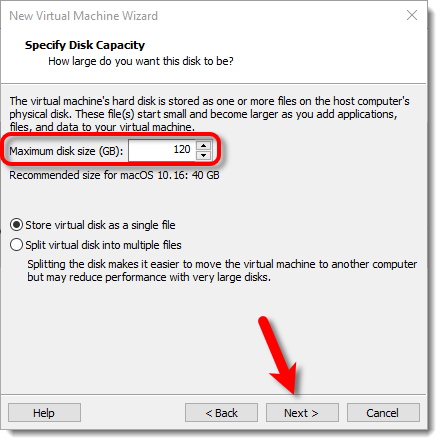
Specify Disk Capacity
#5. On Ready to Create Virtual Machine, Click Customize Hardware.
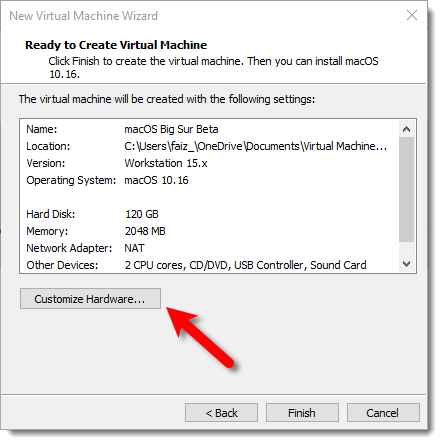
Customize macOS Big Sur Hardware
#6. Increase the Memory from 4 GB to 8 GB or higher for better performance.
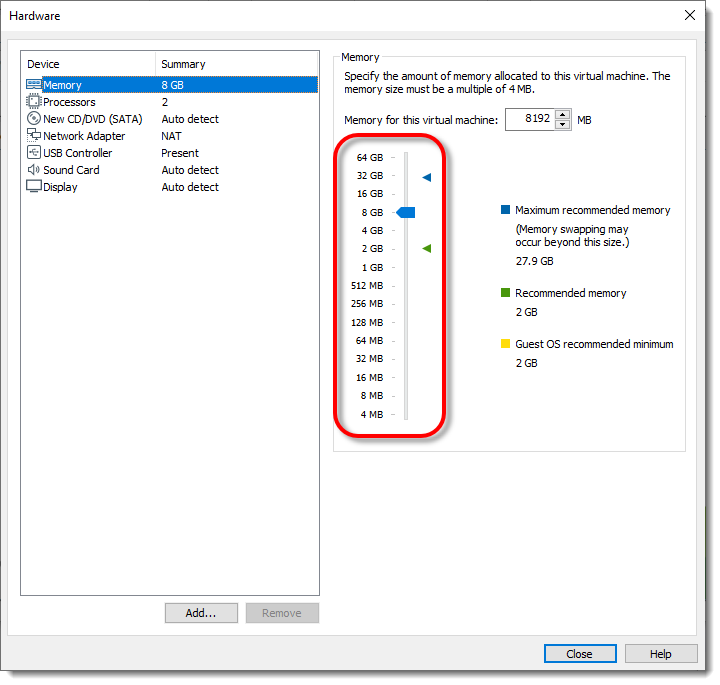
Increase RAM
#7. Select Processor menu then increase the CPU processor core from 2 cores to 4 or Higher cores for better performance.
Note: If you don’t have enough resources then you may not increase the Memory and Processor since the minimum requirement is 4 GB Memory and 2 Cores of Processor.
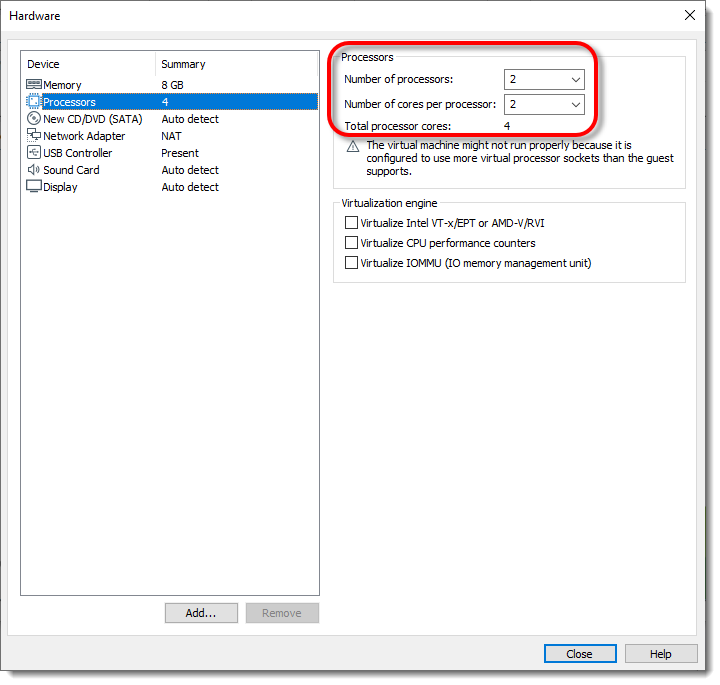
Increase Number of Processors
#8. Select New CD/DVD (SATA) from the menu then click Use ISO image file: and click Browse.

Click Browse
#9. Locate the macOS Big Sur Beta.iso file then click Open. If you don’t have this file then you should download this from Step 1: Download the Prerequisites section.
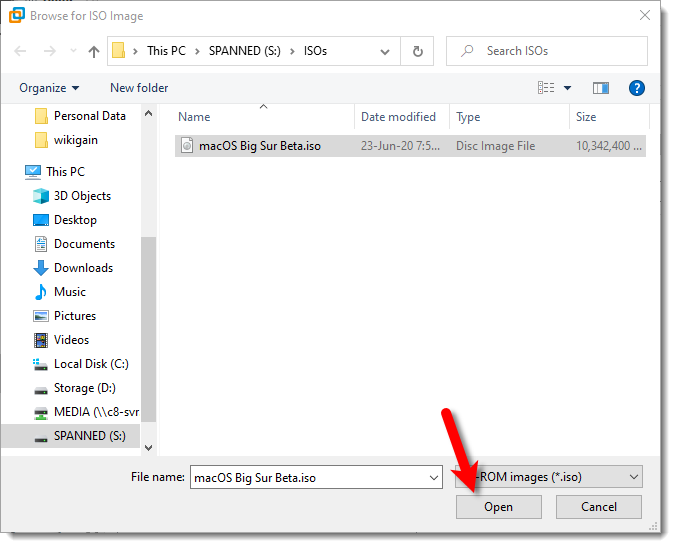
Select macOS Big Sur Beta ISO
#10. After selecting the macOS Big Sur ISO to save all the changes click Close.
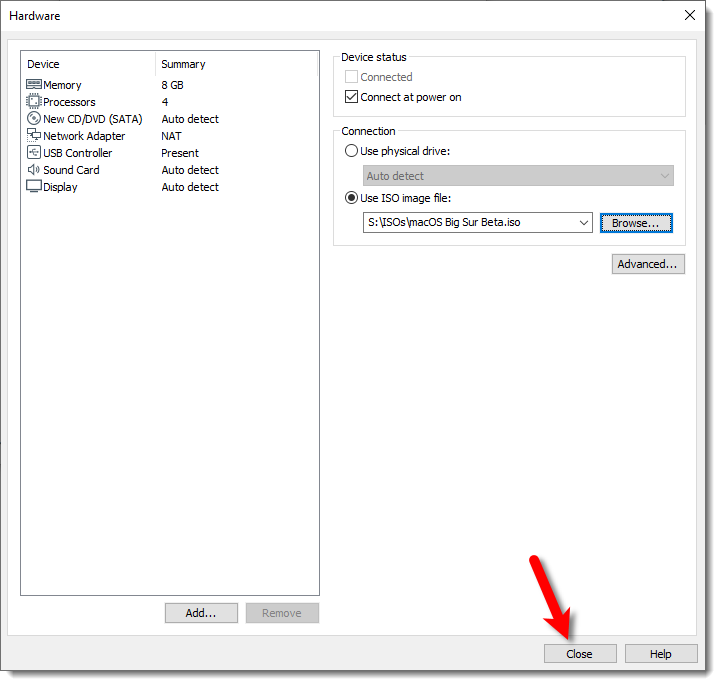
Save Change by Clicking Close
#11. Finally on the New Virtual Machine Wizard Window, Click Finish.
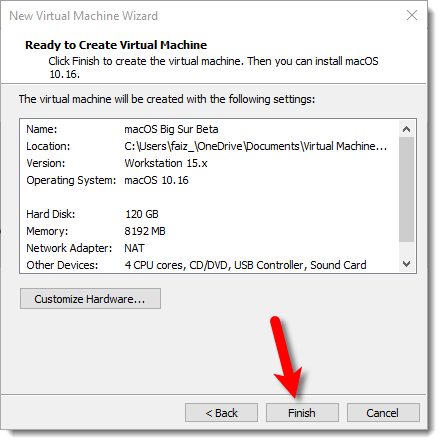
Ready to Create Virtual Machine
Step 5: Edit macOS Big Sur VMX File
#1. Navigate to the virtual machine folder which you select in step #4.3 of this guide. If you didn’t specify a new location, then the default location is in Document > Virtual Machine. Right-click on macOS Big Sur Beta.vmx then open it via Notepad or any third-party text editor of your choice.
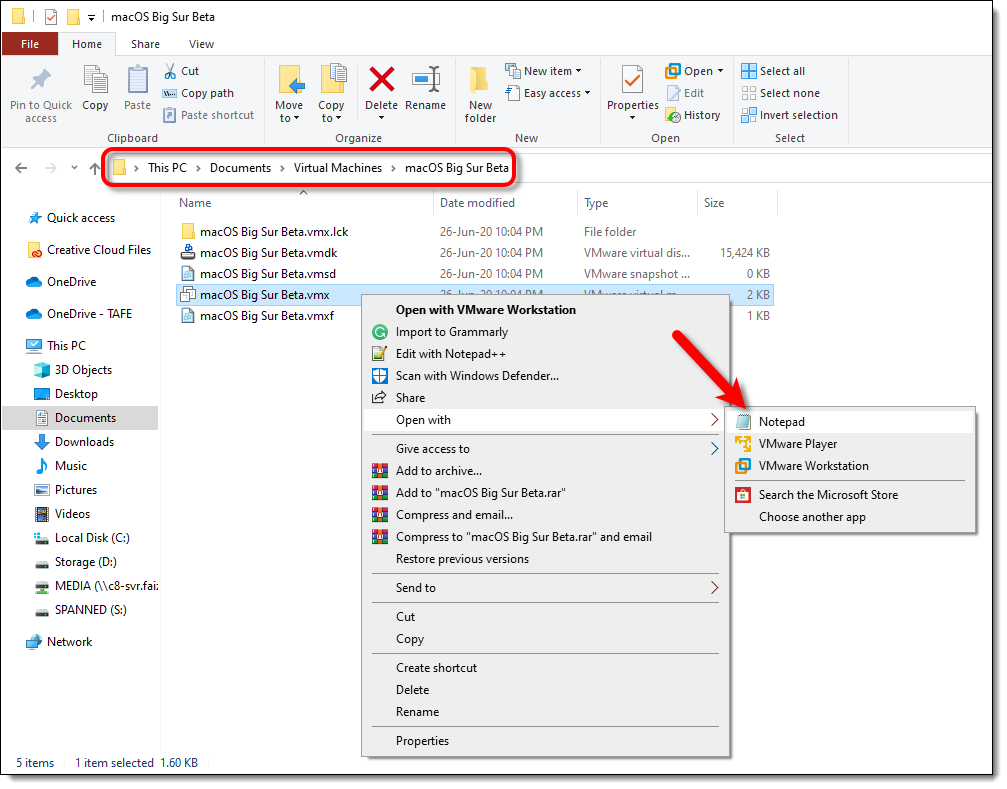
Open macOS Big Sur Beta VMX with NotePad
#2. Scroll down to the bottom of texts and add the following code; then click on File > Save. After that, you may close it as you don’t need it anymore.
smbios.reflectHost = "TRUE"
hw.model = "MacBookPro14,3"
board-id = "Mac-551B86E5744E2388"
smc.version = "0"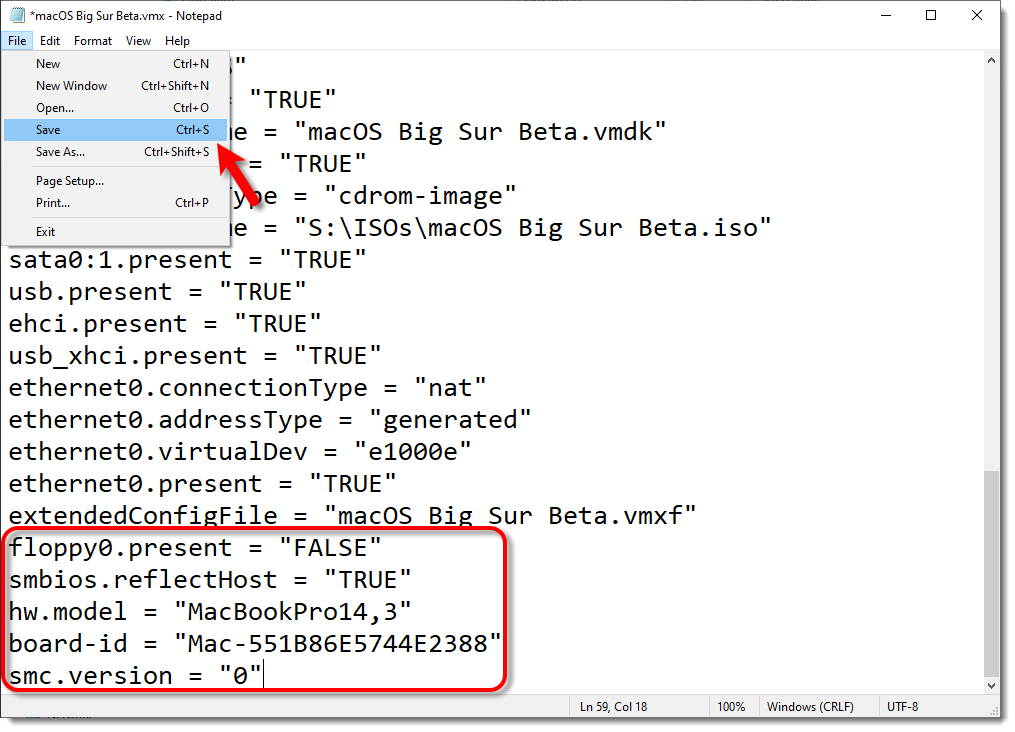
Save the macOS Big Sur Beta VMX File
Step 6: Start macOS Big Sur Virtual Machine
#1. Open VMware and on the macOS Big Sur VM window Click Power on this Virtual Machine.
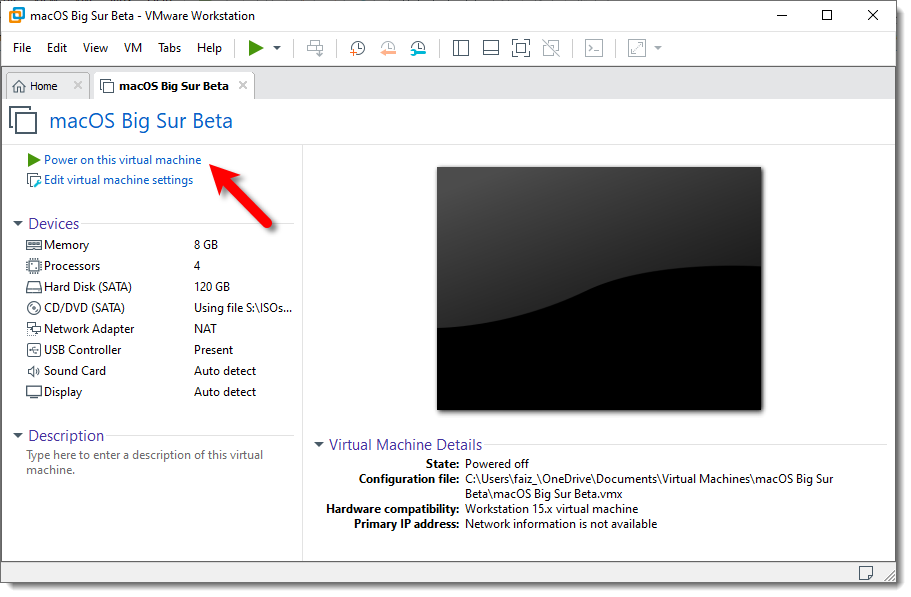
Start macOS Big Sur VM
#2. Wait for it boot up.
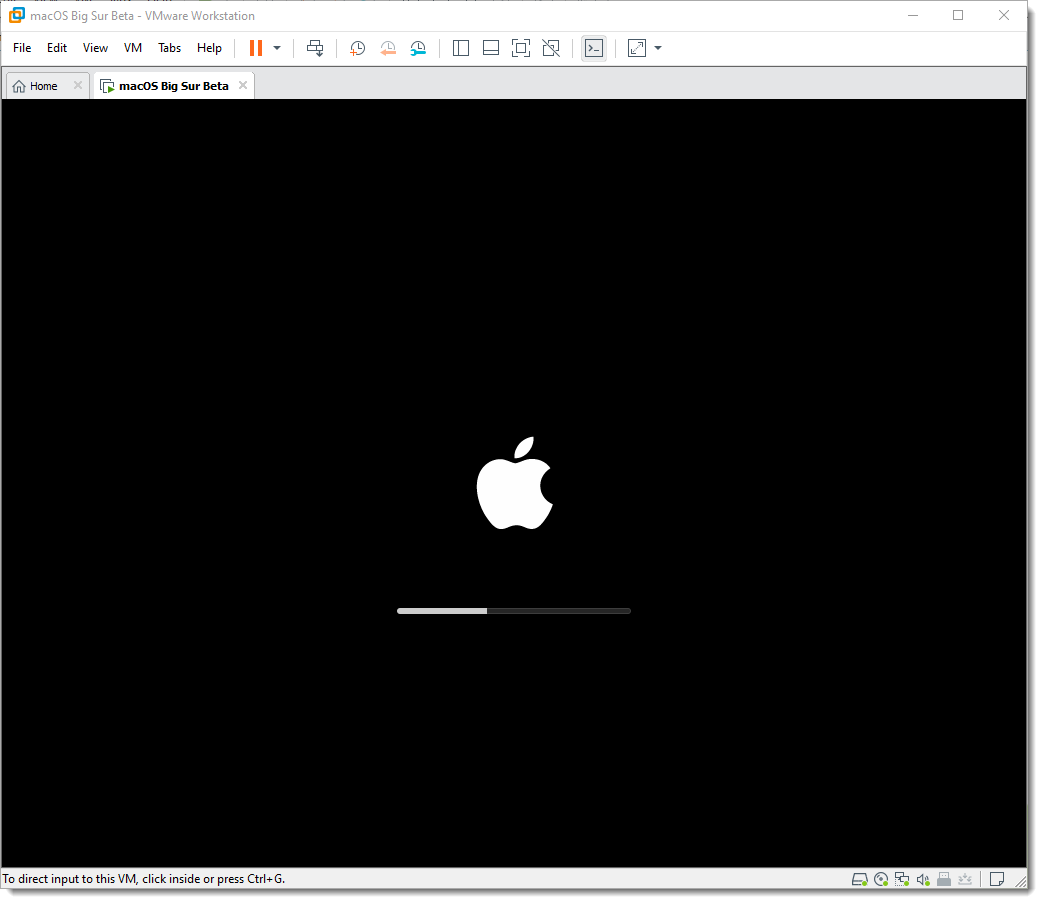
Wait for Boot Up
#3. Select English on the language page then click on Next Arrow icon.
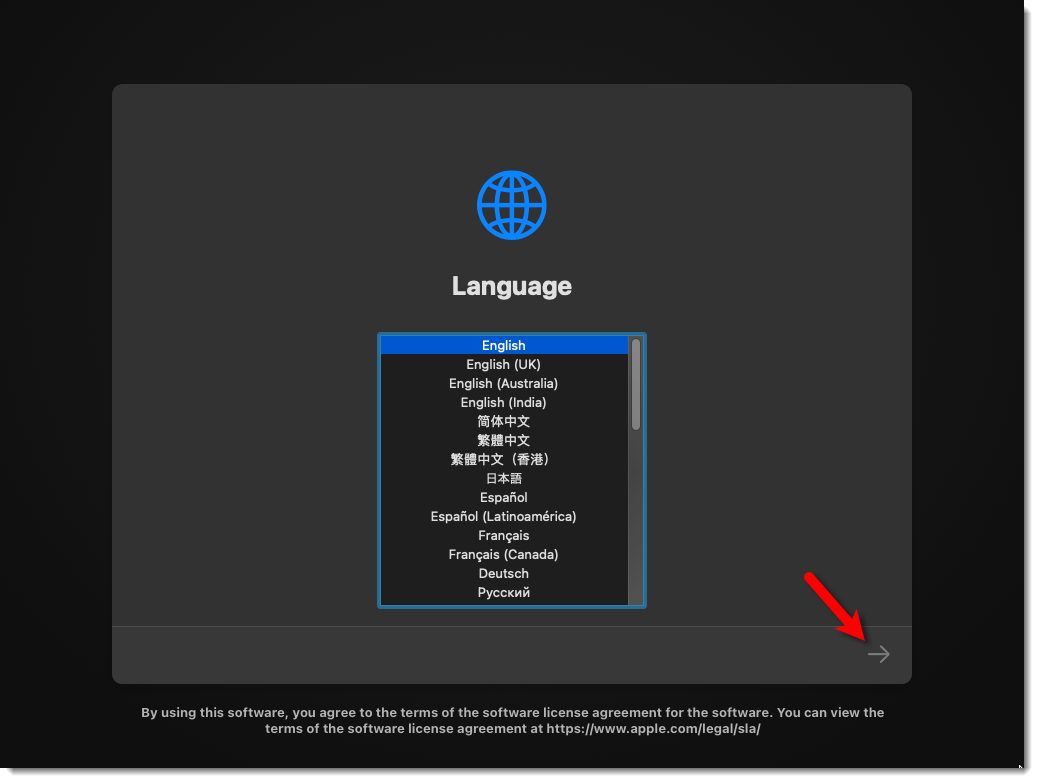
Select English Language
#4. Select Disk Utility and click Continue.
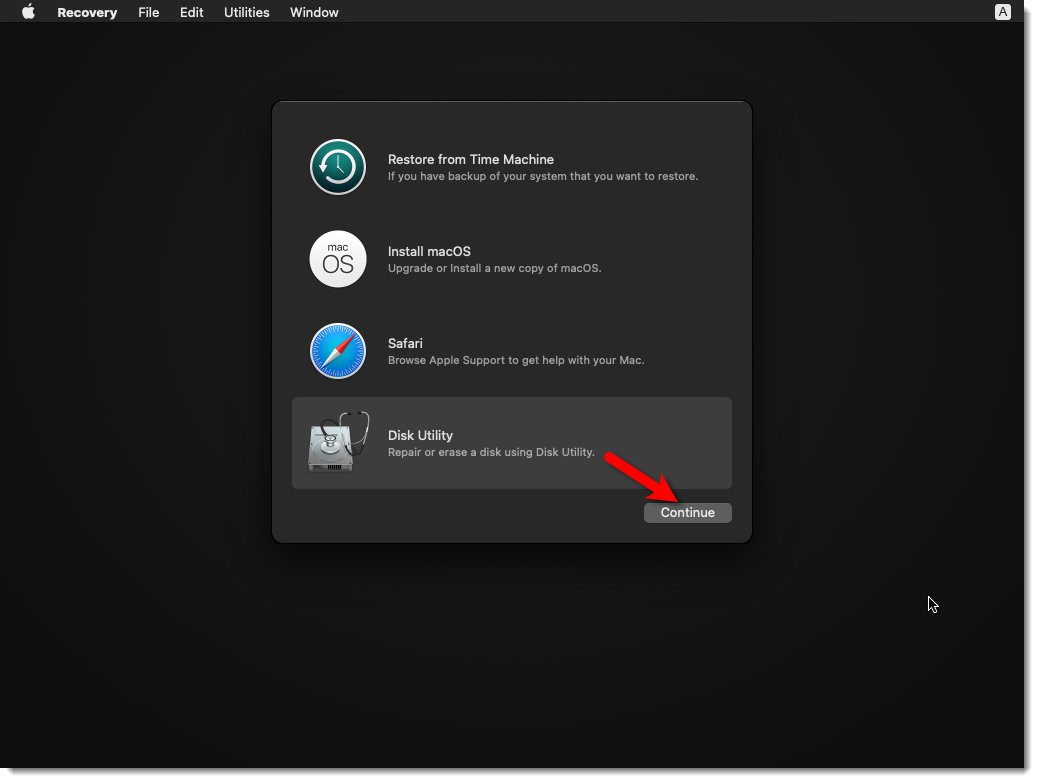
Go to Disk Utility
#5. Select VMware Virtual SATA Hard Drive Media then click Erase.
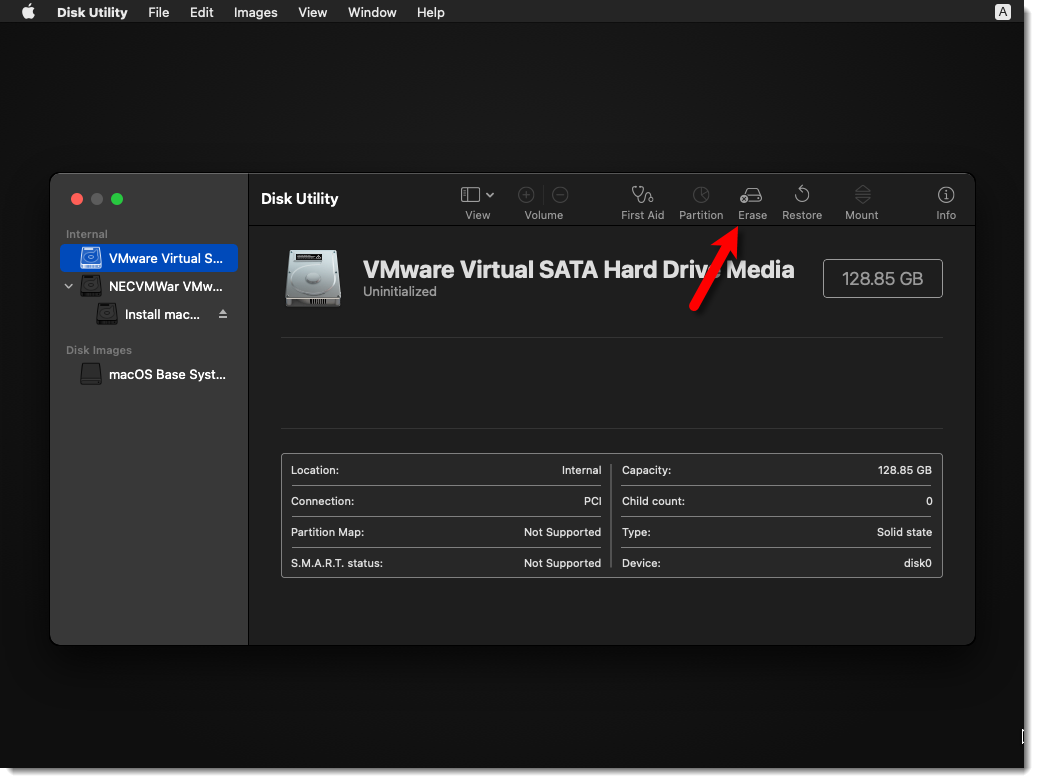
Erase VMware Virtual SATA Hard Drive Media
#6. For Name, type disk macOS Big Sur Beta then select APFS from Format drop-down list and click Erase.
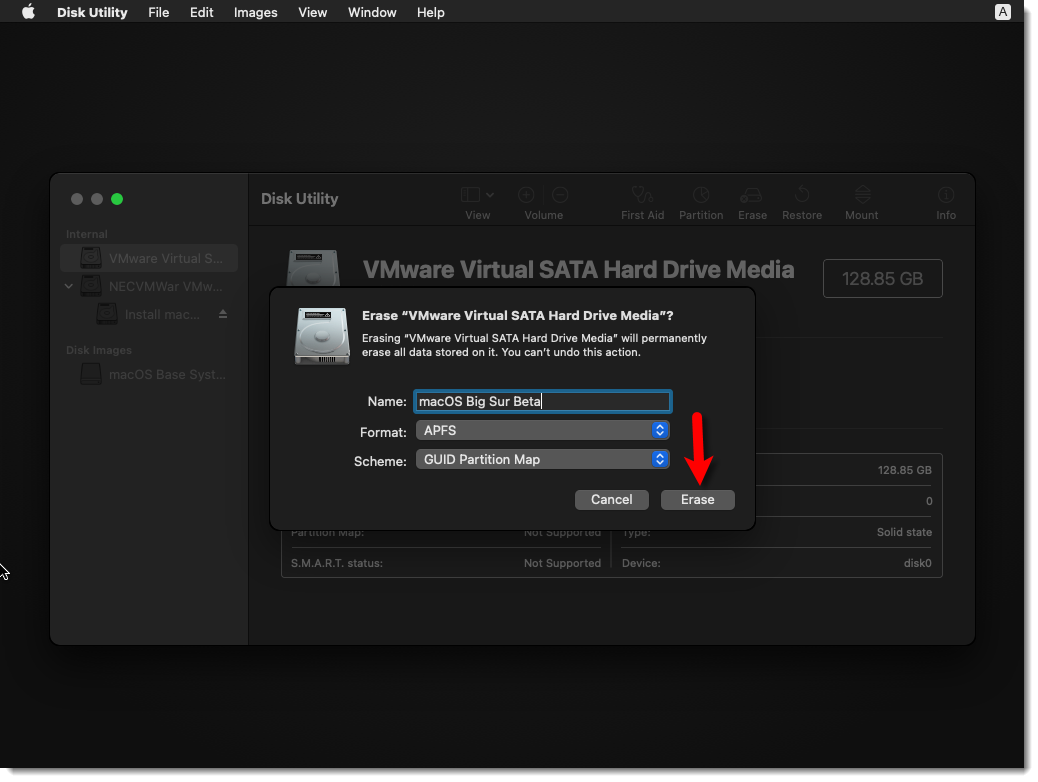
Name and Select Format Type
#7. Click Done to close the dialog box.
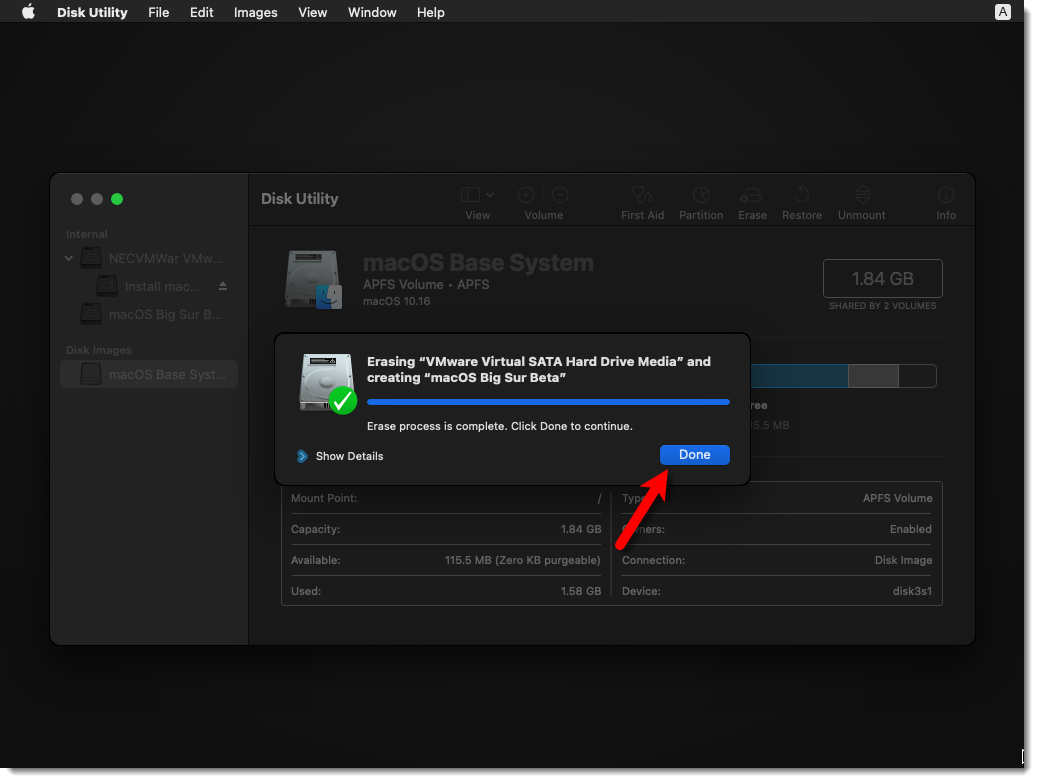
Close the Dialog Box
#8. From Disk Utility Tab, click Quit Disk Utility.
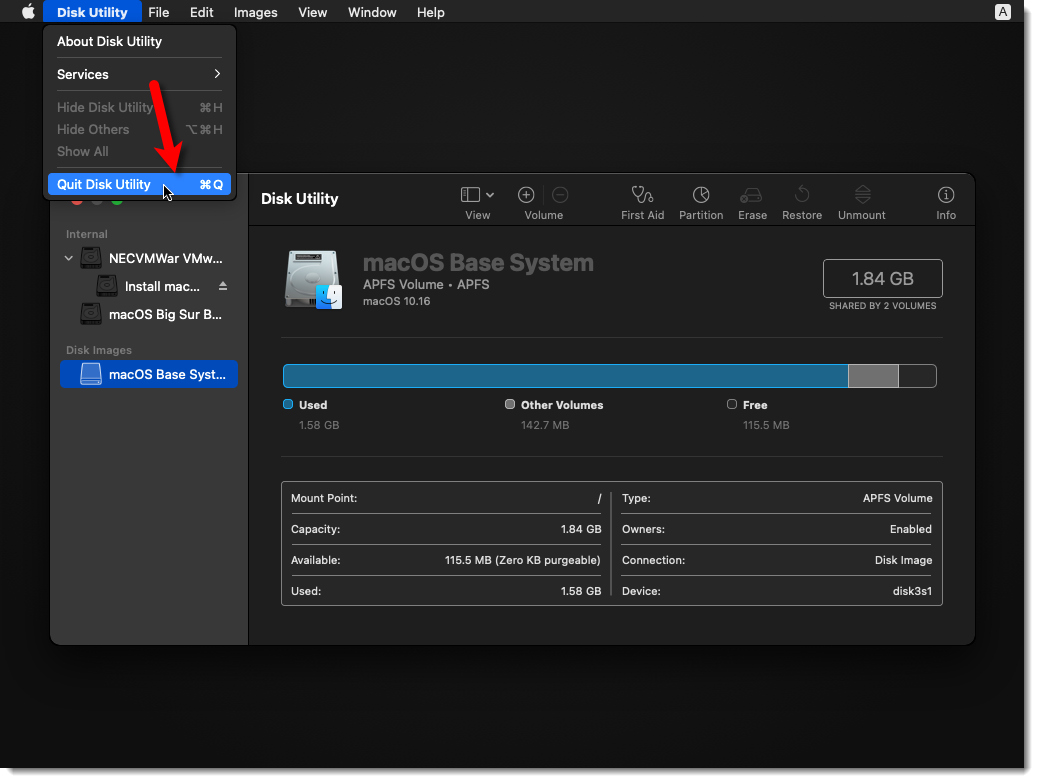
Close Disk Utility
#9. Select Install macOS and click Continue.
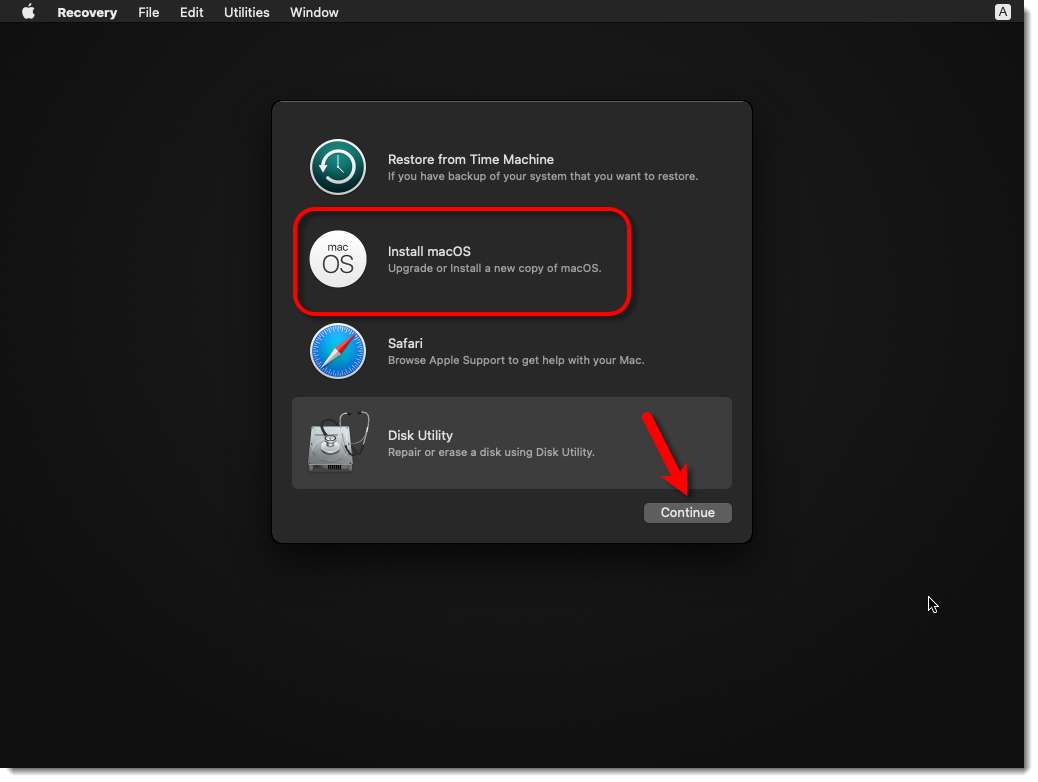
Select Install macOS
#10. Click Continue.
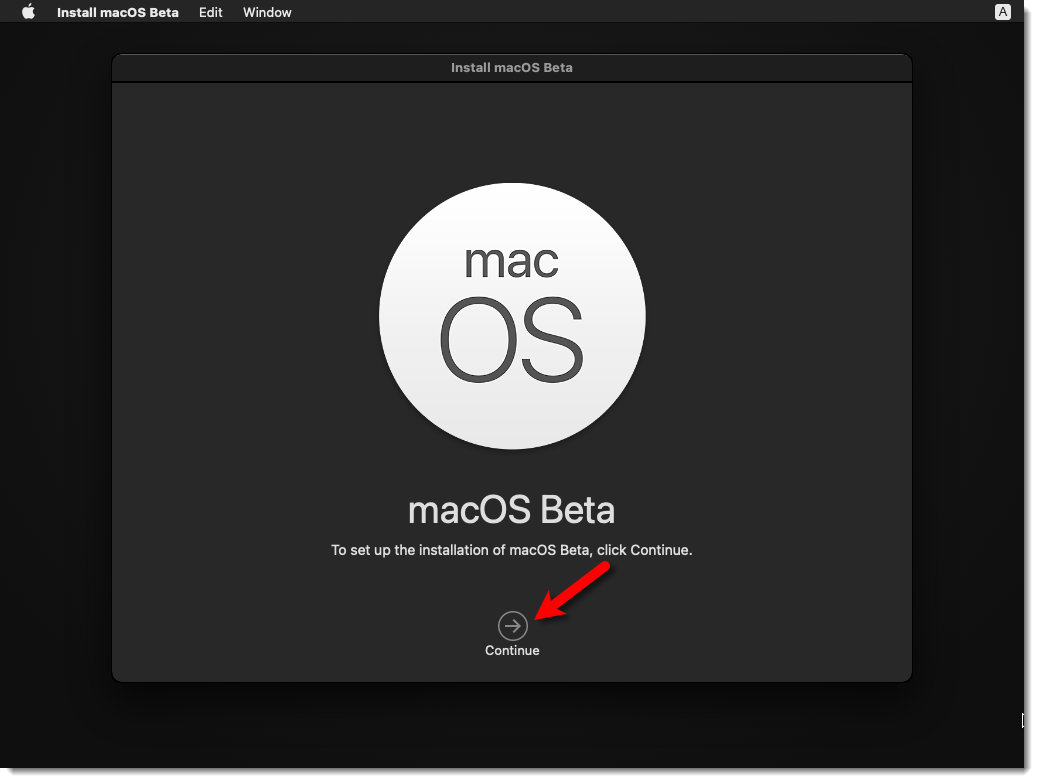
Continue macOS Installation
#11. You have to Agree to the terms of the software license agreement.
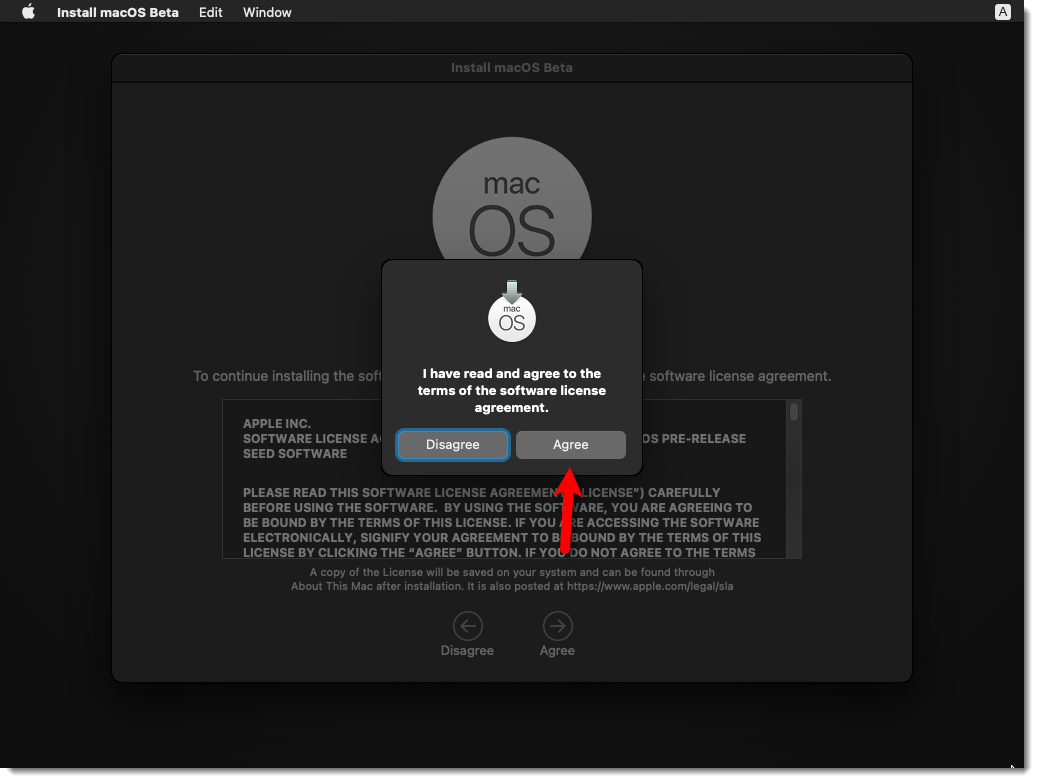
Agree to the terms of the software license agreement
#12. Select the available disk then click Install.
NOTE: If you get the Operation Couldn’t be Completed BiErrorDomain Error 3 then follow this step by step guide to Fix the Operation Couldn’t be Completed BiErrorDomain Error 3.
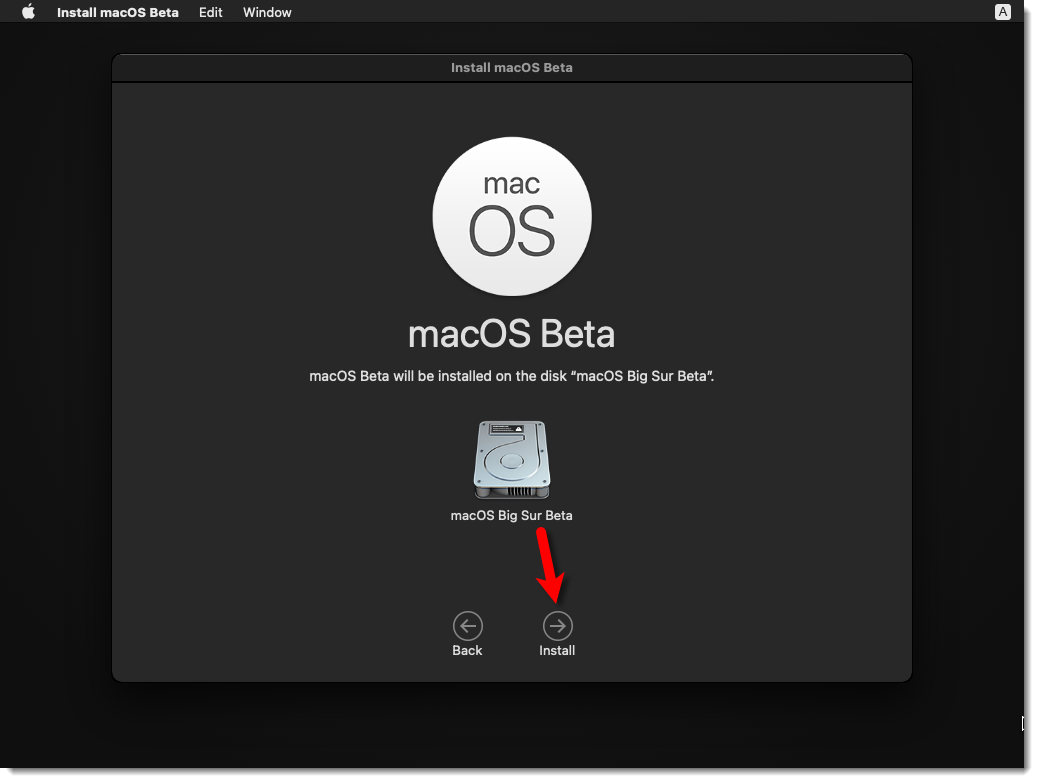
Select Install Location
#13. Now, macOS Big Sur will restart 2/3 times to complete the installation itself without you touching anything. It will take roughly 15-30 minutes depending on your system, be patient.
-
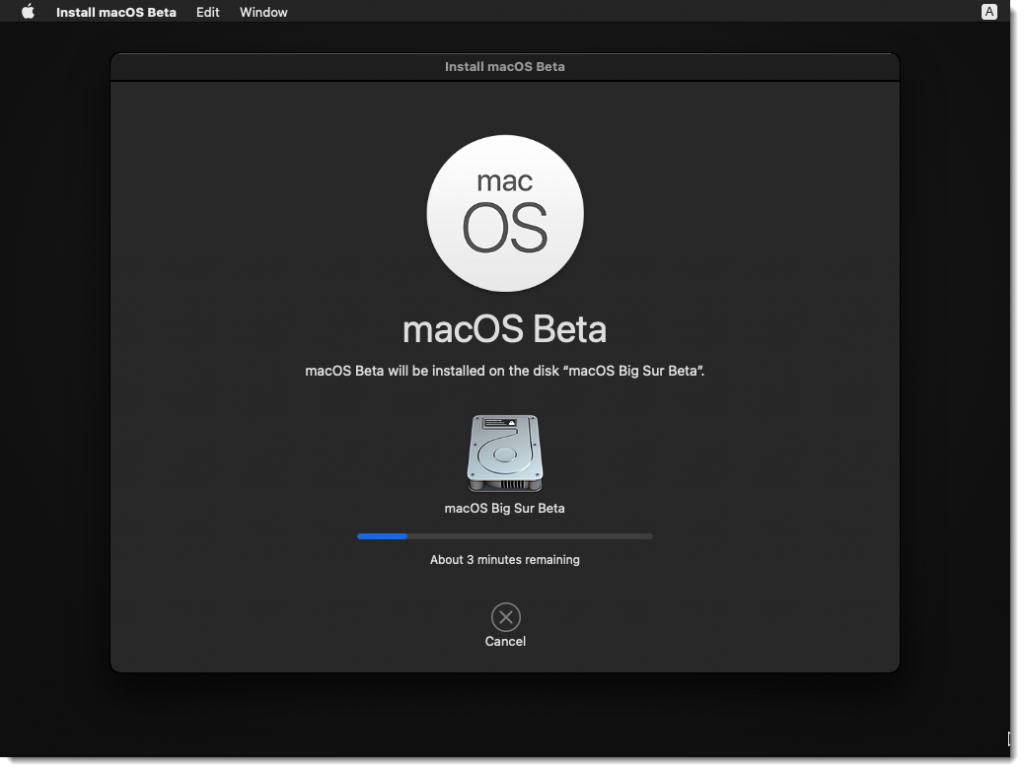
- Wait for Installation to Complete
-

- Wait for Installation to Complete
Step 7: Complete Basic macOS Account Settings
- Select your Country and click Continue.
- Choose a Keyboard Layout and click Continue. If you don’t agree with preset options then you customize it. Just click Customize Settings.
- You can turn on the Accessibility features now with macOS Big Sur. You’ve several options with accessibility like vision, motor, hearing, and cognitive. If you don’t want to set up right now just click Not Now button to skip them.
- Read Data & Privacy and click Continue.
- On the Migration Assistant page, click the Not Now button to continue.
- Click on Set Up Later then Don’t Sign In. You can add your Apple ID later. IMPORTANT: Don’t sign in with your Apple ID since some people have mentioned in the comments section that they have issues with it.
- Click Agree to the Terms and Conditions.
- Fill out the Full name, Account name, Password, and Hint then click Continue.
- If you want to customize Express Set Up, you can click on Customize Settings otherwise click on Continue.
- On the Analytics page click Continue.
- On-Screen Time, click Set up Later.
- Select an appearance theme and click Continue. Here you choose your dark mode if you want.
- Finally, wait a little while for macOS to finish setting up then it should boot into the macOS Big Sur Desktop
Step 8: Install VMware Tools (Optional)
So now you should have noticed that the resolution of macOS Big Sur can’t be changed and it’s not working as smoothly as you expected. To fix macOS Big Sur Resolution on VMware or Make it more responsive, you need to install something called VMware Tools. It’s quite easy and straightforward to work with any system. So to do that we have created a comprehensive guide. Please click the link below and follow the guide Step by step.
See this guide: How to install VMware Tools on macOS Big Sur
Conclusion
That’s all on the step by step pictorial guide on how to install macOS Big Sur on VMware on Windows PC. We covered the following:
- Download the prerequisites
- Install the Prerequisites
- Unlock VMware to Install macOS Big Sur
- Create a New Virtual Machine
- Edit macOS Big Sur VMX File
- Start macOS Big Sur Virtual Machine
- Complete Basic macOS Account Settings
- Install VMware Tools (Optional)
If I left out something and didn’t mention please let me know by commenting down below this post. Please share your feedback with us if that above guide worked for you. It would help if you also share some of your system information through the comments section below. We have lots of new posts related to macOS Big Sur so stay up to date with us.
Thanks for the guide, very well written
How i can use more than 128MB of NVRAM? I have 3050gtx and Ryzen 7 5800H Mobile…this should work better with this configuration…when i use it on window (1280×720) works fine, but when i use it on full screen lags a lot….
SOOO LAGY
or is that problem of my pc,.. idk
What’s ICLOUD_UNSUPPRTED_DEVICE?
on AMD Ryzen 7 5800X I have the same cpuid.ds / failed to start vm / cpu disabled issues
finaly needs to be change the cpuid.1.edx
from:
cpuid.1.edx = “0000:1111:1010:1011:1111:1011:1111:1111”
to:
cpuid.1.edx = “0000:0111:1000:1011:1111:1011:1111:1111”
Full vmx modification:
smc.version = “0”
cpuid.0.eax = “0000:0000:0000:0000:0000:0000:0000:1011”
cpuid.0.ebx = “0111:0101:0110:1110:0110:0101:0100:0111”
cpuid.0.ecx = “0110:1100:0110:0101:0111:0100:0110:1110”
cpuid.0.edx = “0100:1001:0110:0101:0110:1110:0110:1001”
cpuid.1.eax = “0000:0000:0000:0001:0000:0110:0111:0001”
cpuid.1.ebx = “0000:0010:0000:0001:0000:1000:0000:0000”
cpuid.1.ecx = “1000:0010:1001:1000:0010:0010:0000:0011”
cpuid.1.edx = “0000:0111:1000:1011:1111:1011:1111:1111”
smbios.reflectHost = “TRUE”
hw.model = “iMac19,1”
board-id = “Mac-AA95B1DDAB278B95”
VM hardware: 15.X
VM host sw config:
VMWARE Workstation PRO 16.2.1 and unlocker 3.0.2
hw.model = “MacBookAir6,2”
board-id = “Mac-7DF21CB3ED6977E5”
followed all the steps but it won’t move past the apple logo for the past 10 minutes. The loading screen is not coming. should I wait more
https://prnt.sc/23z5ktf
when i try to erase the hard disk it opens a dialog and says failed. any fix?
Hi,
I’m not getting through this:
#6. For Name, type disk macOS Big Sur Beta then select APFS from Format drop-down list and click Erase.
I get this message and can’t get any further:
The operation on file “C:\Users\dippi\OneDrive\Documenten\Virtual Machines\macos\macos.vmdk” failed.
If the file resides on a remote file system, make sure that the network connection and the server where this disk resides are functioning properly. If the file resides on removable media, reattach the media.
Select Retry to attempt the operation again.
Select Cancel to power off the virtual machine.
Select Continue to forward the error to the guest operating system.
Hi,
#5. Select VMware Virtual SATA Hard Drive Media then click Erase.
Doesn’t work for me. I get:
The operation on file “C:\Users\dippi\OneDrive\Documenten\Virtual Machines\macos\macos.vmdk” failed.
If the file resides on a remote file system, make sure that the network connection and the server where this disk resides are functioning properly. If the file resides on removable media, reattach the media.
Select Retry to attempt the operation again.
Select Cancel to power off the virtual machine.
Select Continue to forward the error to the guest operating system.
Dear all, i used this tutorial on my win11 (Build 22458) and Workstation 16.1.2 and… it works. The only problem with it is a slow graphics performance.
I have Ryzen 3700X and 64 GB RAM (DDR4 3200), ASUS 570X Motherboard and… enabled Hyper-V – yes – VMWare and Hyper-V working together!
Has anyone experienced system freeze (host and guest) after installing VMWare Tools?
Without installing the tools, everything works well, but the resolution is too small.
Excellent however plugging in a USB drive causes Big Sur to crash. Any ideas
I don’t understand a thing Why you’re not able to Create an image Tissot no ISO no vmdk it’s a difference You don’t see why menus have problems do as you do Windows create ISO we don’t want dk it was earlier but it’s not titled correctly how do the people from Linex Linex and that I do it for free and I do well I do not why I do not understand how you want people to trust TRU operating system that raises problems in the installation phase can not be trusted it’s like leads into the forest where they are only no longer asking Snake snakes only Scorpio and you do not know where they are everyone is complaining that he can not go through it because of this danger so are the files you make make a good and easy ISO installed just put it in the virtual machine to run the virtual machine and follow the installation steps that in the end the match is a linux platform the files the presentation mode is the same as in linux the same for what I install you need the password without password no you can in stala no file Obviously it’s the password that each user puts in when they install the operating system. there will be no more problems with everything that the virtual machine needs to read in order to install the system
I don’t know if you understand something that I used Google translation I only know Romanian If you had translators you tell me and then I write you in Romanian I put again make ISO image as they do from Linex and Windows you see well they are not installation problems with them
I found a fix for AMD users, it’s the same sort of issue as Mojave on AMD.
I am running Workstation Pro 16 and had these lines added to the stock vmx file.
I’ve not installed it yet but it’s actually got past the point where it would say that the CPU was halted.
hw.model = “MacBookPro14,3”
board-id = “Mac-551B86E5744E2388”
smc.version = “0”
cpuid.0.eax = “0000:0000:0000:0000:0000:0000:0000:1011”
cpuid.0.ebx = “0111:0101:0110:1110:0110:0101:0100:0111”
cpuid.0.ecx = “0110:1100:0110:0101:0111:0100:0110:1110”
cpuid.0.edx = “0100:1001:0110:0101:0110:1110:0110:1001”
cpuid.1.eax = “0000:0000:0000:0001:0000:0110:0111:0001”
cpuid.1.ebx = “0000:0010:0000:0001:0000:1000:0000:0000”
cpuid.1.ecx = “1000:0010:1001:1000:0010:0010:0000:0011”
cpuid.1.edx = “0000:0111:1000:1011:1111:1011:1111:1111”
featureCompat.enable = “TRUE”
the quotes was a big issue for me, once i changed all the ” ” which was the same as the rest of the file i was able to boot off the iso and get to the next stage. I also used 3.0.3 but not sure if that had anything to do with it as well.
smbios.reflectHost = “TRUE”
hw.model = “MacBookPro15,3”
board-id = “Mac-1E7E29ADo135F9BC”
smc.version = “0”
When pasting, make sure the ” ” matches the rest of the file ” ”
VMWare Workstation 16 on Ubuntu 20.04 using unlocker 3.0.3 and changing quotes ” ” after pasting above.
So I copy and pasted James Walker’s AMD fix above. all of his quotes above slant to the right. However in the default VMX file, all the quotes and straight up and down. So do I change everything to the slanted version or change the newly copy and pasted section to straight up and down? I’m not really having any luck. I either get CPU disabled error or that missing AVX2 error.
How to fix this error?
I need fix for learn IOS
Video see this error : https://www.youtube.com/watch?v=U_VmckWxxfI
Hello
I completed the Mac installation settings and did the installation, but during the installation, when the Mac logo appears on the black screen and below it it says “less than a minute left”, it took more than an hour, but it still remains on that screen.
My system is strong, cpu, vga and hdd are good, but I do not know where the problem comes from. If anyone knows, please help us.
I think you should install again mac os big sur
this part is notoriously bad about taking a long time, even on virtualbox. Just wait it out, go out and grab coffee or something. It can sometimes take 3+ hours.
THANK YOU !!!! (Shouting loudley)
Followed tutorial to the letter.
Many years I have been trying to successfully install macosx in vmware.
First time ever it went totally straight forward.
Vmware 16.1
Asus B365 Prime Plus
i5 9400F
Vulcan DDR4 3000mhz 8GB
if i install this, will i lost my data
You must select the disk to install the OS to to be able to click install
What do you do if you are on amd cpu?
Hello.
I would like to disable SIP in the big south of the virtual machine.
I have tried to boot into recovery mode but it was impossible.
What I can do?
Thank you and my congratulations for this magnificent tutorial
Hey. I’ve done everything and installed BigSur 11.3.0. so when im runnig the vmware, it straight goes to boot manager and I can’t do anything to skip this problem l. Plz help
Eject the installation disk from vm.
Hi, good afternoon, I followed your guide and I actually could install mac osx bigsur without problem, so thanks, and it works pretty fluid with some exceptions .
1- transition animations either when minimize or maximize are too slow, I think that´s due to the lack of 3D acceleration ¨ only transition animations are slow in my case, opening and use apps are ok ¨
2- audio output has a little bit of stutter, kind of annoying.
3- can´t enable true full 1920 x 1080 full screen mode
4- VMware is reporting me two errors every time I run the virtual machine, those errors are related to the configuration you provided here, but weird enough they do not seem to affect the boot of the OS.
I could not copy the two error messages so here a screenshot : https://ibb.co/f9QwLj6
my pc:
Ryzen 5600x
32GB ram 3600 mhz
nvidea 2060
samsung NVME 1tb
For the resolution, you need to install VMWare tools which can allow you to resize the Window.
Hi,
I have successfully followed this excellent guide to run Big Sur on VMware Workstation 15.5, I am now trying to enroll the device in Intune for testing but keep getting this error, has anyone else tried adding to Intune?
Error:
Profile installation failed.
Could not download the identity profile from the Encrypted Profile Service. The credentials within the Device Enrolment profile may have expired.
After following all the steps and getting the MacOS successfully up and running if I close down then Virtual Machine try to start it up again VMWare says “Failed to Open Virtual Machine: A file access error occurred on the host or guest operating system.” Additionally, I was never able to find a VMX file for it after creating the virtual machine, my folder only had files with these types: VMXF, VMSD, VMDK, NVRAM, and VMWare Virtual Machine Configuration file. After running it there was also a vmware log txt file.
Would like to share this to all people having trouble like system freeze or random reboot during install process of osx:
Check your BIOS settings and look for the “power management” (if any) INSIDE BIOS SETTINGS: make sure that this power management is NOT set to things like turbo – high performance – super speed – anything intended to squeeze all the power from your CPU. Set it to normal – powersaving – ecofriendly or anything that do NOT try to push the cpu to the max performances.
This solved my life. I was totally unable to get to the finish of the installing process untill I set my power management from High Performances to a more reliable “Normal”
Hope this can help.
Hi there, what I have with big sur 11.1 (also very slow, not usable) with an AMD Ryzen 7 5800X is the following, maybe it has something to do why its so slow?: When I resume the Big Sur VM the VM Workstation tells me: “The features supported by the processors in this machine are different from the features supported by the processors in the machine on which the virtual machine state was saved. You may attempt to resume this virtual machine, but doing so may result in unpredictable behavior. Do you wish to resume this virtual machine? Here is my vmx:
.encoding = “windows-1252”
config.version = “8”
virtualHW.version = “16”
pciBridge0.present = “TRUE”
pciBridge4.present = “TRUE”
pciBridge4.virtualDev = “pcieRootPort”
pciBridge4.functions = “8”
pciBridge5.present = “TRUE”
pciBridge5.virtualDev = “pcieRootPort”
pciBridge5.functions = “8”
pciBridge6.present = “TRUE”
pciBridge6.virtualDev = “pcieRootPort”
pciBridge6.functions = “8”
pciBridge7.present = “TRUE”
pciBridge7.virtualDev = “pcieRootPort”
pciBridge7.functions = “8”
vmci0.present = “TRUE”
hpet0.present = “TRUE”
nvram = “macOS Big Sur.nvram”
virtualHW.productCompatibility = “hosted”
powerType.powerOff = “soft”
powerType.powerOn = “soft”
powerType.suspend = “soft”
powerType.reset = “soft”
displayName = “macOS Big Sur”
usb.vbluetooth.startConnected = “TRUE”
smc.present = “TRUE”
smbios.restrictSerialCharset = “TRUE”
firmware = “efi”
guestOS = “darwin20-64”
board-id.reflectHost = “TRUE”
ich7m.present = “TRUE”
tools.syncTime = “FALSE”
sound.autoDetect = “TRUE”
sound.virtualDev = “hdaudio”
sound.present = “TRUE”
numvcpus = “4”
memsize = “16384”
sata0.present = “TRUE”
sata0:0.fileName = “macOS Big Sur-000002.vmdk”
sata0:0.present = “TRUE”
sata0:1.deviceType = “cdrom-image”
sata0:1.fileName = “Z:\New bundle macos\VMware-Tools-darwin-11.2.5-17337674\vmtools\darwin.iso”
sata0:1.present = “TRUE”
usb.present = “TRUE”
ehci.present = “TRUE”
usb_xhci.present = “TRUE”
ethernet0.addressType = “generated”
ethernet0.virtualDev = “e1000e”
ethernet0.present = “TRUE”
extendedConfigFile = “macOS Big Sur.vmxf”
floppy0.present = “FALSE”
smbios.reflectHost = “TRUE”
hw.model = “MacBookAir6,2”
board-id = “Mac-7DF21CB3ED6977E5”
smc.version = “0”
gui.lastPoweredViewMode = “fullscreen”
numa.autosize.cookie = “40022”
numa.autosize.vcpu.maxPerVirtualNode = “4”
uuid.bios = “56 4d 07 dd 89 95 65 e0-7d 26 ac 4f 1b b8 ec 4f”
uuid.location = “56 4d 07 dd 89 95 65 e0-7d 26 ac 4f 1b b8 ec 4f”
sata0:0.redo = “”
pciBridge0.pciSlotNumber = “17”
pciBridge4.pciSlotNumber = “21”
pciBridge5.pciSlotNumber = “22”
pciBridge6.pciSlotNumber = “23”
pciBridge7.pciSlotNumber = “24”
usb.pciSlotNumber = “32”
ethernet0.pciSlotNumber = “160”
sound.pciSlotNumber = “33”
ehci.pciSlotNumber = “34”
usb_xhci.pciSlotNumber = “192”
vmci0.pciSlotNumber = “35”
sata0.pciSlotNumber = “36”
svga.vramSize = “268435456”
vmotion.checkpointFBSize = “134217728”
vmotion.checkpointSVGAPrimarySize = “268435456”
ethernet0.generatedAddress = “00:0C:29:B8:EC:4F”
ethernet0.generatedAddressOffset = “0”
vmci0.id = “-1547057384”
monitor.phys_bits_used = “43”
cleanShutdown = “TRUE”
softPowerOff = “FALSE”
usb_xhci:6.speed = “2”
usb_xhci:6.present = “TRUE”
usb_xhci:6.deviceType = “hub”
usb_xhci:6.port = “6”
usb_xhci:6.parent = “-1”
usb_xhci:7.speed = “4”
usb_xhci:7.present = “TRUE”
usb_xhci:7.deviceType = “hub”
usb_xhci:7.port = “7”
usb_xhci:7.parent = “-1”
toolsInstallManager.updateCounter = “13”
toolsInstallManager.lastInstallError = “21004”
guestOS.detailed.data = “bitness=’64’ buildNumber=’20A4299v’ distroName=’Mac OS X’ distroVersion=’10.16′ familyName=’Darwin’ kernelVersion=’20.0.0′”
ulm.disableMitigations = “TRUE”
cpuid.0.eax = “0000:0000:0000:0000:0000:0000:0000:1011”
cpuid.0.ebx = “0111:0101:0110:1110:0110:0101:0100:0111”
cpuid.0.ecx = “0110:1100:0110:0101:0111:0100:0110:1110”
cpuid.0.edx = “0100:1001:0110:0101:0110:1110:0110:1001”
cpuid.1.eax = “0000:0000:0000:0001:0000:0110:0111:0001”
cpuid.1.ebx = “0000:0010:0000:0001:0000:1000:0000:0000”
cpuid.1.ecx = “1000:0010:1001:1000:0010:0010:0000:0011”
cpuid.1.edx = “0000:0111:1000:1011:1111:1011:1111:1111”
workingDir = “.”
mks.keyboardFilter = “allow”
usb.generic.allowHID = “TRUE”
sound.fileName = “-1”
checkpoint.vmState = “”
cpuid.coresPerSocket = “2”
tools.upgrade.policy = “useGlobal”
usb_xhci:4.present = “TRUE”
usb_xhci:4.deviceType = “hid”
usb_xhci:4.port = “4”
usb_xhci:4.parent = “-1”
I am having an issue installing vmware tools, it won’t install, I am pretty sure I didn’t click on allow the installation after I unlocked it. It displays installation failed every time after I uninstall reinstall, I can’t get to the unlocking/allow. window anymore. Is there a solution I could use besides reinstalling the whole thing?
Wmware says to me that 3d acceleration is not supported in this guest operating system. How can I fix that?
when I get to step 3- part 13, the time cga at 14 minutes and does not pass from there
AMD
smc.version = “0”
cpuid.0.eax = “0000:0000:0000:0000:0000:0000:0000:1011”
cpuid.0.ebx = “0111:0101:0110:1110:0110:0101:0100:0111”
cpuid.0.ecx = “0110:1100:0110:0101:0111:0100:0110:1110”
cpuid.0.edx = “0100:1001:0110:0101:0110:1110:0110:1001”
cpuid.1.eax = “0000:0000:0000:0001:0000:0110:0111:0001”
cpuid.1.ebx = “0000:0010:0000:0001:0000:1000:0000:0000”
cpuid.1.ecx = “1000:0010:1001:1000:0010:0010:0000:0011”
cpuid.1.edx = “0000:0111:1000:1011:1111:1011:1111:1111”
smbios.reflectHost = “TRUE”
hw.model = “MacBookPro14,3”
board-id = “Mac-551B86E5744E2388”
Works on R9 3900 + VM Player 16.1 (VMware-player-16.1.0-17198959.exe) + unlocker 3.0.3
Thank you this got it to boot for me on my AMD/NVIDIA machine. Cheers bro!
Login with Apple ID was successful using VMware Workstation 16. (Used https://gist.github.com/gopalindians/ec3f3076f185b98353f514b26ed76507 for the serial key)
From step 2, select macOS 11.0 instead of 10.16 from version drop-down list and use the macOS 11.0 fInal version iso.
I logged in at the main menu of System Preferences if that helps.
Been in It for 25+ years. This is likely be best, most accurate, easy to understand how-to tutorial I’ve ever used. Your effort here doesn’t go unnoticed. Many thanks!
First off, thanks for putting together such a great guide. Overall things installed smoothly for me. However, I’m running into some performance issues. I took a look at the one guide that was linked that offered some options for slow performance, but I don’t have Hyper-V installed nor is device guard being used. Things just seem somewhat sluggish and slow to respond with this VM where with the Kali Linux VM I often run doesn’t have any issues even using the same specs. I was expecting to run fairly smoothly due to my system specs. I guess having decent hardware isn’t everything…haha
Has anyone else ran into performance issues when using Big Sur in a VM on Windows 10? Anyone have a similar situation that found a solution? I’d be interested to see solutions others used, maybe one would be a good fit for my setup.
Here is my host setup:
i9 9980 2.4
32 GB RAM
NVIDIA GTX 1650
Virtualization is on in BIOS
WIN 10 PRO
VMware Workstation 16 Pro
Here are 4 VM hardware configurations I’ve tried:
macOS VM Setup 1:
4 proc/4 cores
16 GB RAM
macOS VM Setup 2:
1 proc/16 cores
16 GB RAM
macOS VM Setup 3:
2 proc/2 cores
16 GB RAM
macOS VM Setup 4:
2 proc/2 cores
8 GB RAM
Minimizing application will cause freezing for a while. How to fix?
my hyper-v is uncheck all but still slow my mac os big sur at vmware? any solution?
even for open/preview picture with space bar slow like waiting 3 seconds.
fyi my rig windows 10, i7, ram 16gb, gpu rtx2070
The same issue here, did you find any solutions??
It keeps asking me “How do you connect?” I can’t connect the machine to the internet no matter how freaking hard I try :/
everything done perfectly . but in setup after choosing country nest step remote management “retrieving configuration settings ” keep on loads for long time and no response . What is solution for that sir?
Hello
I completed the Mac installation settings and did the installation, but during the installation, when the Mac logo appears on the black screen and below it it says “less than a minute left”, it took more than an hour, but it still remains on that screen.
My system is strong, cpu, vga and hdd are good, but I do not know where the problem comes from. If anyone knows, please help us.
https://s17.picofile.com/file/8415869750/image_2020_11_30_141812.png
Me too. I have the same problem.
I have installed it but there are animation issues it very slow I have already installed VMware tools!
my system has the following specifications but it still very slow.
Processor: Intel(R) core(TM) i5-4590S CPU @3.00GHZ
RAM: 16GB
operating system: 64bit
SSD HArddrive: 120 GB
I’m having the same issue as others have reported here where Big Sur is just slow/sluggish when opening and closing simple Finder windows and other basic actions.
When opening a folder on my Desktop, the proccess WindowServer spikes to 200% cpu usage, the OS freezes for a couple of seconds, and only then the folder opens and things go back to normal.
These mini-freezes are making this setup kind of useless. Changing the Mac’s type in the VM’s file to Macbook Air did not help.
Hey Everyone
I was having problem during BigSur install from iso (yours and mine) with Workstation 16 and unlocker 3.0.3. (11.0 selected and imac19,1 values in VMX)
I think Apple Servers got problem today with updates, i’ve disconnect from boot the Network card and install seems to be good … (with your iso)
Thanks
Could you please send the link for the zip file of the iso file. And what download manager are you using ?? Thanks in advance
I have an AMD 3700x and Big Sur latest officially released ISO, and tried all kinds of combos of unlock-master 3.0.2, 3.0.3, Vmware 15.6 and 16.0, and there is no luck so far.
The error messages can be:
1. the guest operating system has disabled the CPU
2. failed to start the virtual machine
3. a bunch of messed up codes
for AMD:
Player 16.1 + 3.0.3 unlocker
smc.version = “0”
cpuid.0.eax = “0000:0000:0000:0000:0000:0000:0000:1011”
cpuid.0.ebx = “0111:0101:0110:1110:0110:0101:0100:0111”
cpuid.0.ecx = “0110:1100:0110:0101:0111:0100:0110:1110”
cpuid.0.edx = “0100:1001:0110:0101:0110:1110:0110:1001”
cpuid.1.eax = “0000:0000:0000:0001:0000:0110:0111:0001”
cpuid.1.ebx = “0000:0010:0000:0001:0000:1000:0000:0000”
cpuid.1.ecx = “1000:0010:1001:1000:0010:0010:0000:0011”
cpuid.1.edx = “0000:0111:1000:1011:1111:1011:1111:1111”
smbios.reflectHost = “TRUE”
hw.model = “MacBookPro14,3”
board-id = “Mac-551B86E5744E2388”
This works on Player 16.1 + 3.0.3 unlocker | AMD 3950x and Vega64.
Thank you.
Works on Player 16.1.1 + 3.0.3 unlocker | AMD AMD Ryzen 7 1700X on Gigabyte B450M DS3H V3 (enable SVM Mode in BIOS (M.I.T / Advanced Frequency Settings / Advanced CPU Core Settings / SVM Mode: Enable)
During installation it is showing error while loading the update. Tried more than 7 times on different pc’s different versions of vmware workststion but no hope. What is the problem. Thanks in advance
I have succeeded in installing Big Sur in a vm using vmware workstation 16, but every time it starts it take 80% of my PC CPU, is unusable. I have tried the suggestion to change model from macbook pro to macbook air but the result is the same.
Any ideas
The same issue for me – can’t use the installation, because I even have 80%-90% cpu usage.
I would like to report that some applications like messages, photo booth etc. crash unexpectedly and once after photo booth crashed (I was trying the effects lol) the VM shut down and turned back on with the message “Your computer had a problem and had to restart”. Can you please investigate this?
Thanks for your ISO,
Koyot Gavalis
Thank you! I had installed Catalina and 1st attempt to upgrade failed. Your VM setup edit probably helped
Even though I might be using newer versions than in the article, I only have till Catalina (10.15) in VMWare, while I want to install 10.16. Funny.
Hey.
I had the same issue with VMware 16.0 (only macOS 10.15 in the drop down menu) ; but since this guide uses 15.5.6, I uninstalled 16.0 and gave 15.5.6 a try. I now have macOS 10.16 in the drop down menu, and it works 🙂
I’ll upgrade to VMware 16.0 later, like after testing everything works well ^^
I can’t seem to find where to download VMware 15.5.6 without having to go to some sketchy, ad-filled, secondhand site. Where did you find it?
Hey @THE I GAMING, you can find “VMware 15.5.6” here:
https://my.vmware.com/en/web/vmware/downloads/details?downloadGroup=PLAYER-1556&productId=800&rPId=55787
hI, I am using vmware workstation pro 16 and I have followed all the steps so far correctly but as soon as it started installing, it showed a grey screen which and I am stuck at it.
I installed VMware tools but still it only sticks to 1024 res
Uninstall and reinstall the vmware tools. Sometimes it’s not working.
I’ve been using macOS on wmware since El Capitan and have always worked fine, but on this macOS Big Sur, for some reason simple things like “quick view” or minimize a windows tale like forever, do you have any idea of what may be happening.
I’m using a Microsoft Surface Book as a host.
Hey, mine is stuck on the apple logo with no progress bar:/
Change the OS to windows in the options tab and try again. It will work fine.
Same… Did you solved it in some way?
Hii. I have used mojave and catalina in my vmware. I have allocated about 6 GB of ram to the big sur. However the loading bar is not moving beyond a certain point. Please help as soon as possible.
Speed up MacOS in VmWare
Acelerar MacOS En VmWare
open .vmx file
replace: hw.model = “MacBookPro14,3”
board-id = “Mac-551B86E5744E2388”
and write: hw.model = “MacBookAir6,2”
board-id = “Mac-7DF21CB3ED6977E5”
why?
Macbook pro 14.3 needs 32 GB RAM AND quad-core processor with 2.7 GHz and Macbook Air 6.2 needs 4 GB RAM and dual-core processor with 1.3 GHz
Acelerar MacOS En VmWare
abrir archivo .vmx
reemplazar: hw.model = “MacBookPro14,3”
board-id = “Mac-551B86E5744E2388”
y escribir: hw.model = “MacBookAir6,2”
board-id = “Mac-7DF21CB3ED6977E5”
¿por que?
Macbook pro 14,3 necesita 32 GB RAM Y procesador de cuatro nucleos con 2,7 GHz y Macbook Air 6,2 necesita 4 GB RAM y procesador de dos nucleos con 1,3 GHz
Thank you for your nice comment
Thanks, helped a lot!
How much physical space does the virtual drive take after installing macOS?
Generally 20GB but it’s different when the VM is turned on
If you guys have signed out issue when you click on menu bar on macOS Big Sur. This is macOS Big Sur bug and it’s fixed on Beta 4 so the solution is to update macOS Big Sur to latest Version (Beta 4) at least.
Just ahead up that macOS Big Sur Beta 4 is now available to download from the download section of this post.
Link: Download macOS Big Sur Beta ISO Image
So, I followed all the instructions but when trying to use in fullscreen… It’s almost unusable. I looked at the Graphics in macOS and it says 128mb. I tried making it higher in the vm’s settings but it never changes. When I try to enable virtualization, I get a not supported on this platform error. Is there any way of fixing this issue?
Beta 4 fixed logout issue.
Thanks, Adam for informing us. We will update the Big Sur iso to Beta 4 ASAP
from https://blogs.vmware.com/teamfusion/2020/07
Big Sur guests may log out unexpectedly and/or display a black screen when clicking an invisible icon in the upper right corner of the display.
– Workaround: There is no workaround at this time, we are continuing to investigate
it’s happening for me also when I run xcode app in simulator
please keep us up to date if any workaround 🙂
Yes sure
I had a running Catalina system [VMWare ver 15.5.1] and installed Bir Sur on a new virtual disk (migrated across the settings from the origonal disk) and am booting via Clover. I can login with my Apple ID to iCloud but not tried either Messages or Facetime yet, and all is good. Except clicking on the menu bar at “control center”, “WiFi”, “Account” or “Time” causes me to be logged out.
Same here when I click on that part I also get logged out automatically
That’s VMware issue and people don’t have this on a real Mac Device. Hopefully, VMware fix it ASAP.
Yes, allowed it in security preferences as well. Video is detected with 128MB or RAM
May be macOS Big Sur has some issues with VMware right now since it’s in beta 2. I’ll update the ISO as soon as new versions of macOS comes out (Create macOS Big Sur ISO)and update the download section of this guide. In the meantime, if need macOS that works, I highly recommend you to install macOS Catalina on VMware. It very stable for me and works great.
Hello man, I keep getting an errror of exitbs start1 when I boot the virtual machine.
Could you please share a screenshot of the error?
Beta 3 is now out. I can no longer login to my Beta 2 instance. It automatically logs me out when I log on to it.
Installed Beta 2. I get logged out of my session every 10-11minutes. Is there a fix? Thanks
Have you installed the VMware tools on macOS Big Sur?
I had an issue when trying to shrink my drive. I used terminal to run “cat /dev/zero > bigfile” to zero out the unused disk space. When the command terminated (errored out as disk was full) the system logged me out. Every time I tried to log in it tried to restart terminal and logged me out. It was not disk space as I deleted ‘bigfile’ havinmg booted into my old Catalina drive. It seems that when commands error out you get looged out. So if you are getting logged out every 10 minutes then I guess there is something runing every 10 minutes in the background that errors out, but have no ideas what it might be. Maybe something checking email? Think the default is 5 mins.
BTW if you want to zero the unused space on the disk before compacting the virtual drive it seems you can’t afford to have a command shell erroring out in terminal …… a solution is to SSH in (enable it in sharing) and run the command shell that way. When it errors out you can simply delete the file, exit, shutdown from the gui and compact the disk.
On my AMD system with a Ryzen 7 3700X I get an error upon booting the VM saying that the guest operating system has disabled the CPU Running all the latest software in this article on windows 10 1909
Did you enable Virtualization Technology from your host BIOS? If not, please enable VT-X from your System BIOS to get the VM running.
Yes virtualization is enabled I’ve run multiple other VM”s with no issues mac os is refusing to boot with an AMD CPU.
Does this even work on AMD processors? I can’t get my VM to boot.
I don’t have an AMD processor to test it. Please make sure to use the latest version of VMware and this new ISO. macOS Big Sur Beta 11.0 (20A4300b).iso.
If that didn’t work then please let me know.
Is this like a modified version of the .iso? Because I didn’t use the .iso from the article because Mediafire downloads super slowly (around 80KB/s) so I used an iso I found somewhere else. The iso you provided would take me 2 days to download (I have a 100mbit connection so the problem is with Mediafire). I can try with that one but it will take at least 2 days to download unless you happened to have the file on some other cloud storage provider. That’d be really amazing.
I appreciate you even writing this guide in the first place!
No mate, I really don’t have the skills to modify macOS and inject some kind of virus init (why would I do that? lol). All I did was, I downloaded the latest version of macOS Big Sur from Apple then used this guide: How to Create macOS Big Sur ISO Image File and uploaded that to Mediafire.
I will upload it to OneDrive soon and link it to the article, but my I can download around 12MB/s(my max internet speed) from Mediafire right now.
Btw, I have updated the article’s download section and included the new version macOS Big Sur Beta (Beta 2).
Sorry for the confusion, I didn’t mean that you modified it to inject some sort of virus, I just thought you needed to change something so it runs on Windows. I didn’t want to accuse you of anything.
Mediafire is still downloading at 100KB/s for some reason though 🙁
Ohh, I apologize. I am very sorry for the misunderstanding :(.
I will try to upload the ISO to OneDrive soon, but I can download like 12MB/s from Mediafire.
https://imgur.com/a/XIgpqwF
I just tried downloading it using Opera VPN and now it’s downloading with 10MB/s so it’s all good now. I’ll let you know if it works on AMD when it’s finished downloading
All good. Again I am very sorry for the misunderstanding 🙁
I just tried it and when I try to start the virtual machine it shows the Apple Logo and then a message from VMware pops up saying “The CPU has been disabled by the guest operating system. Power off or reset the virtual machine.”
I’ll see if I can find a solution
Hi Mxx,
That’s because Virtualization Technology is not enabled on your host machine. Shut down your main system and go to BIOS. Find Virtualization Technology (VTx/VTd)and enable it.
Have a look at this article: The CPU has been disabled by the guest operating system
Hi, virtualization was already enabled. I assume it does not boot because I have an AMD processor. I have found some solutions on the internet about masking the CPU in VMware but I have not gotten it to work.
Please let me know if you found the solution so I can update the article and help people with AMD CPUs.
Hi Faiz, I just tested this and I still can’t get it to work. The .vmx file now has this at the bottom:
smbios.reflectHost = “TRUE”
hw.model = “MacBookPro14,3”
board-id = “Mac-551B86E5744E2388”
smc.version = “0”
cpuid.1.eax = “0000:0000:0000:0001:0000:0110:1010:0101”
But I still get the same issue. I’m a little short on time right now, but I’ll try on some other PCs soon, I have another one with a newer AMD processor and another one with an older Intel one. I’ll keep you updated. Thanks for your time so far!
Alternatively, you can use these also in the vmx:
I tried with the new hw models and board ids you provided and sadly no luck so far. I still don’t have a lot of time so I couldn’t yet test on another AMD or an intel system
Thanks for the update. Please let me know if you found a solution. I’ll see if I can get an AMD system from friends and test it out.
Did you ever solved the Problem i have the same?
Thanks for step-by-step tutorial that works perfectly, my biggest issue is that when I try to open the control center or anything from top right corner of my screen the screen freeze and goes black, then want to login again, all the applications closed and reopened after. just like respring in iOS. do you have any idea what’s wrong?
We have the same issue. It’s from the OS itself because it’s quite buggy at the moment. As you know it’s the beta version.
Thanks for your reply, the problem is that it grows and I can’t even login after a few times.
When I login it tries to load the top menu, it doesn’t show up and the screen freezes, suddenly I’m pushed to login screen again.
Yes, It is like that for everyone. I will update the article as soon as a new version of macOS comes out.
Does this work on Unlocker 3.0.2 in VMware Workstation 15.1.0? After installing the operating system, I get stuck on the Apple logo screen.
It’s really slow although I gave my virtual machine 8 gigs of ram and 4 processors.
Here’s my system spec:
Intel i7-8550U CPU @ 1.80GHz
16 gigs of ram
Running Windows May 2004 update 64-bit
Once you’ve installed macOS on VMware, you should install VMware Tools to get high performance and also fix the screen resolution. Our few visitors says Windows 10 May 2004 update cause this slow performance. Use the following guide to fix it. Follow the last section of the guide.
Fix macOS slow performance on VMware or VirtualBox on Windows
It’s better to use the new unlocker (3.0.3) which we have provided in this article.
my hyper-v is uncheck all but still slow my mac os big sur at vmware? any solution?
even for open/preview picture with space bar slow like waiting 3 seconds.
fyi my rig windows 10, i7, ram 16gb, gpu rtx2070
I haven’t tested that but it works with 15.5.2. Upgrade your VMware to the latest version then try again and see how you go.
Its keeps on going into boot loop. All I can see is the apple logo then again it geting rebooted
What is your system’s processor?
i5 4690k,
Ok. for a second, I thought you might have an AMD CPU.
Have you enabled VT from BIOS?
I dont remember. Should I enable it ?
Well, you should because without that it won’t work for Sure. So YES.
Its enbled. still having issue
Have edited your .vmx file? You could try adding
at the bottom of the code.
Please give it a try
It keeps restaring unable to boot
Try upgrading to the latest version of VMware if you haven’t already.
Hello, I’m French but I don’t speak a treacherous word of English. So I set up my virtual machine like this: region and languages France and French and I entered my Apple ID and password. as soon as I open my session it closes 5 seconds after opening it.
Some other guys have the same problem. We’re investaging to find a good solution. Thank you for your comment
In the meantime, please don’t sign in with your Apple ID. Apple doesn’t like macOS to be run on VMs so they block it as soon as you sign in with your apple id.
Signing with Apple ID in XCode to pulish an app also leading to signout.
Can’t be used for development this way.
Some people have this issues and we’ve not found the solution. We’ll let you guys know once we find a solution.
Thanks for raising your problem.
If i sigh with Apple ID, the OS logs-out immediatelly after sign in??
Is it happen while installing or after you install your macOS?
After I install the macOS. I’ve tryed upgrading working Cataling with my Apple ID signed in, and intsalling fresh Big Sur. When I install fresh macOS Big Sur it is working until I sign in with my Apple ID.
Some people have these issues and we’ve not found the solution. We’ll let you guys know once we find a solution.
Thanks for raising your problem.
Some people have this issues and we’ve not found the solution. We’ll let you guys know once we find a solution.
Thanks for raising your problem.
Some people have this issue and we’ve not found the solution. We’ll let you guys know once we find a solution.
Thanks for raising your problem.
Im stuck on less than a minute left on the apple logo install screen
Followed this 2x.
First time I used my normal icloud account, and when I get the opportunity to try and sign on, it would go for about 15 seconds, flash and then back to the login screen.
Second time, i create a brand new icloud account. I was able to login, do stuff. I wanted to try to change the resolution, but it wouldn’t let me. I also wanted to load the vmware tools, it wouldn’t give up the CD/DVD drive. I rebooted the image normally and now when I signon it signs on, see the finder but then in about 3 seconds goes back to the signon screen.. Any ideas?
Skip signing into your iCloud account since Apple doesn’t like macOS on VMware(Especially on Windows). When the installation finished make sure to eject or disconnected the macOS Big Sur ISO from the VM.
For VMware tools after ejecting/disconnecting macOS Big Sur ISO follow this guide: How to install VMware Tools on macOS Big Sur.
P.S: Use the default VMware tools provided by VMware (Step 1).
Having the same issue as Michael F. Happens with or without sign into iCloud. Have tried upgrades and fresh installs. With a valid serial, at least with Catalina, this was not an issue. Seems to be some sort of graphics rendering crash from what I can tell.
Hi, im always getting the error message: Error while powering on: Failed to power on ‘E:\VirtualPCs\macOS_BigSur\macOS BigSur.vmx’. What am i doing wrong? All other VMS fail to start as well, when installing the unlocker in the newest version?!
Delete your VM and open this guide. Follow all the steps from start to finish. If you’ve got an error just post the screenshot and we will help you.
Anyone else seeing Messages crash upon opening? Everything else fine.
Are you talking about the white text running on a black background when you start your VM for the first time? If Yes then it’s normal.
After following all Steps till 7 I get a gray screen after restart…
It’ll take some time to get passed that step. Please be patient. If you want it should be a little bit smooth and speed, just give your VM more RAM and Processor.
Everything to install suddenly just a gray screen how to fix
It’ll take some time to get passed that step. Please be patient. If you want it should be a little bit smooth and speed, just give your VM more RAM and Processor.
And you need to stick with 3.02 and VMWare 15 if you are using AMD.
Same issue with mouse and keyboard. Any chance of a vmdk upload? Would be very much appreciated. I’m using version 15.
Hi Bro, how did you manage to get the mouse and keyboard detected?
Hi, i’m solved it by change usb compatibility to 2.0 and check the “Show all USB input devices”
It’s working, see: https://i.imgur.com/bFxq5lL.png
2 things for everyone to know:
– Use unlocker version 3.03 and NOT v3.02 (with 3.02 it won’t work)
– Use these quotes with smc.version = “0” as smc.version = “0” didn’t work for me
After these 2 enhancements it’s working nicely with VMWare player 15.5.6 build-16341506
Thanks Jordan,
I have already updated the guide.
Thanks for your feedback.
I don’t have the option Apple Mac OS X with Vmware player 15.x
See: https://i.imgur.com/Sm3Hzqi.png
How do you get this option working in VMware ?
Did you install win-install.cmd? When you run this as administrator your VMware should be quit and exit. It should not be opened otherwise, you won’t see Mac OS X on the list.
Yes, but you provide 3.02 as well. With this unlocker it will fail. You need at least 3.03 if you have latest vmware player.
We’ve already provided the latest unlocker file on our Download section of this guide. Please download all the necessary files before you begin the installation.
I needed this unlocker 3.0.3 version to get Apple Mac OS X with VMware player 15.x to show up:
https://github.com/paolo-projects/unlocker/releases/tag/3.0.3
Great, we’ve updated unlocker to v3.0.3 to get Apple Mac OS X on the Guest Operating System list.
And if you copy paste what’s on this page:
smbios.reflectHost = “TRUE”
hw.model = “MacBookPro14,3”
board-id = “Mac-551B86E5744E2388”
smc.version = “0”
It won’t work as the last line should be:
smc.version = “0”
So other quotes.
The quote is a bit weird but we’ll update it.
Thanks for your suggestion
I’m using your link but when I unlock VMWare it still shows that it is using version 3.0.2, any idea how to fix this?
Keyboard and Mouse don’t work after booting up
What version of VMware do you use?
I’m still using version 12. I was able to install Catalina 10.15.5 with no issues