In this article, I am going to show you how to install macOS Mojave on VirtualBox on Windows. If you are interested in Apple’s new Mac operating system macOS Big Sur, you can visit our latest guide to install macOS Big Sur on VirtualBox on Windows PC. In addition, we have the VMware guide on how to install macOS Big Sur on VMware on Windows. In this guide, we will provide all the prerequisites to install macOS Mojave on VirtualBox on Windows 10 based computer.
Newer versions of macOS are out, So check the guides below to install them:
- Guide to Install macOS Catalina on VMware on Windows
- Guide to Install macOS Catalina on VirtualBox on Windows
Requirements
Before we get started, make sure to read the following requirements. Please do not skip this step because it’ll help you to successfully install macOS Mojave on VirtualBox on Windows 10 PC.
- Minimum 2 GB memory (Recommended 8GB or higher)
- Minimum 2 cores of processors (Recommended 4 cores or higher)
- Hard disk free space 20 GB (Recommended 100GB or higher)
- Your system should support Intel or AMD VT (Virtualization Technology)
- Intel/AMD VT (Virtualization Technology) Should be enabled from BIOS setup
Required: If you haven’t already then you should enable Virtualization Technology (aka Intel VT or AMD-V).
Furthermore, it’s highly recommended that you install macOS Mojave on SSD (Solid State Drive) instead of HDD (Hard Disk Drive) because you will have a much faster performance with SSD rather than HDD.
Steps to Install macOS Mojave on VirtualBox on Windows
- Download the Prerequisites
- Install VirtualBox on Windows / PC
- Install & Update VirtualBox Extension
- Create macOS Mojave a New VM & Customize
- Execute the VirtualBox Code
- Perform a Clean Installation of macOS Mojave
- Update macOS Mojave to the Latest Version (Optional)
To install macOS Mojave on VirtualBox on Windows successfully, you must download the following prerequisites. Read the step by step guide to avoid any problems. If you miss any of the steps below, then you might be unsuccessful in installing macOS Mojave on Windows.
Note: We’ll use the VMKD image for this specific guide. If you want to install macOS Mojave Using ISO file, you can visit our article “How to install macOS Mojave on VirtualBox on Windows Using ISO” Image.
Step 1: Download the Prerequisites
You have to download all the following files because they are all important to successfully install macOS Mojave on VirtualBox on a Windows-based system.
- Download macOS Mojave VMDK
- macOS Mojave 10.14.6 (18G103) Latest
- macOS Mojave 10.14.5 (18F203)
- macOS Mojave 10.14 (18A293u) Beta
- Download latest version of VirtualBox
- Download VirtualBox Code
Note: If you want to use the VMDK file multiple times, we recommend you have a copy in a different location once the download completed.
Step 2: Install VirtualBox on Windows / PC
From the “Download Prerequisites” section of this post, you should have downloaded VirtualBox and if you didn’t, download VirtualBox latest version and install it on your Windows system. If you’ve already installed VirtualBox, then you can skip this step. Other than that, follow the steps below.
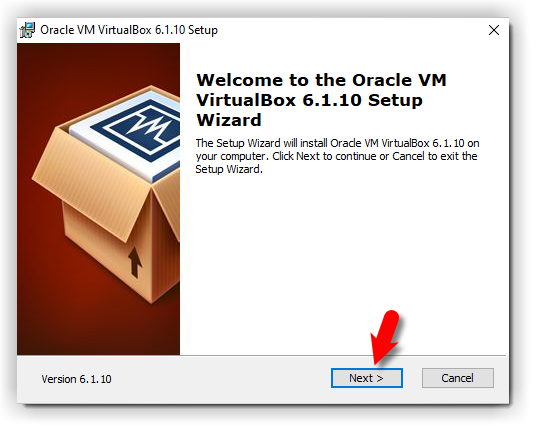
- On the welcome Wizard page, click Next.
- Keep the default setting on the Custom Setup page and click Next.
- Again Click Next to accept the default options unless you want to change something.
- On the warning Network interface page, just click Yes to process with Virtualbox installation.
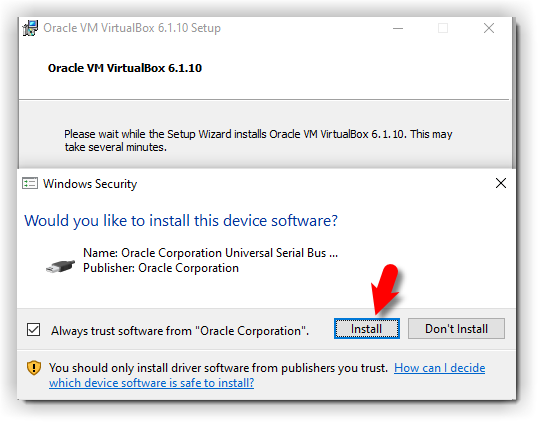
- Click the Install button to install VBox. Again click Yes if required.
- While installing VBox, you might see a security warning about “Oracle Corporation”. You need to click Install on this page to process with the installation. If you click Don’t install, the installation process will be terminated here and you can’t go ahead. If you see the security warning again click the Install button.
- Finally, click Finish.
-

- Virtualbox Setup Completed
-
- Windows Security
-
- Virtualbox Setup Welcome Wizard
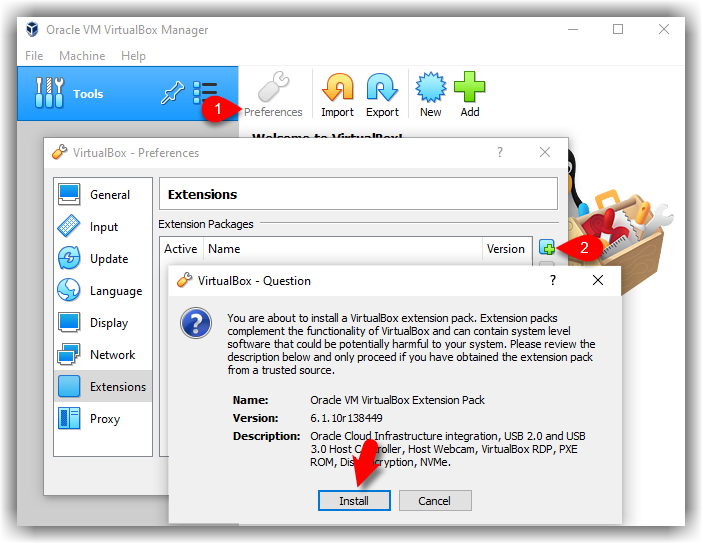
Step 3: Install & Update VirtualBox Extension
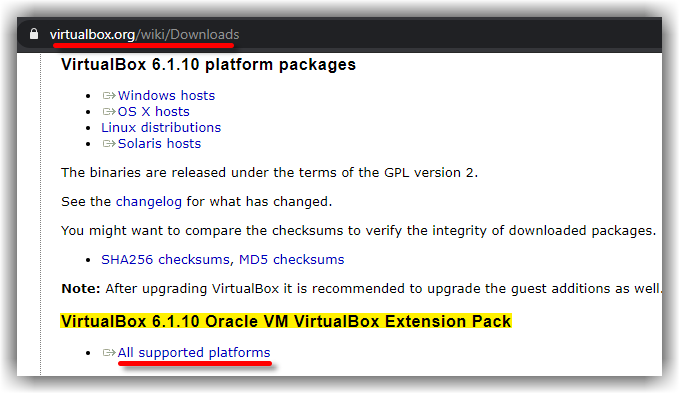
This step is not 100% necessary but it’s highly recommended to do this step because macOS Mojave might not function properly on VirtualBox. For this reason, it might cause problems during the installation. Go to the Virtualbox download page. Under VirtualBox 6.1.10 Oracle VM VirtualBox Extension Pack section, click All supported platforms to download the latest version of Virtualbox Extension Pack.
Download Virtualbox Extensions
Once you’ve downloaded the Extension pack. Now, follow the steps below to update the Virtualbox extension pack.
- Open up VirtualBox, navigate to Tools>Pereferences>Extensions.
- Click on Plus (+) icon and select VirtualBox extension which you’ve downloaded at the beginning of this section. Click Install or Upgrade and then Agree to the terms and conditions. Click the OK button.
Finally, you should see something like the screenshots below.
-
- VirtualBox Extension Install
-
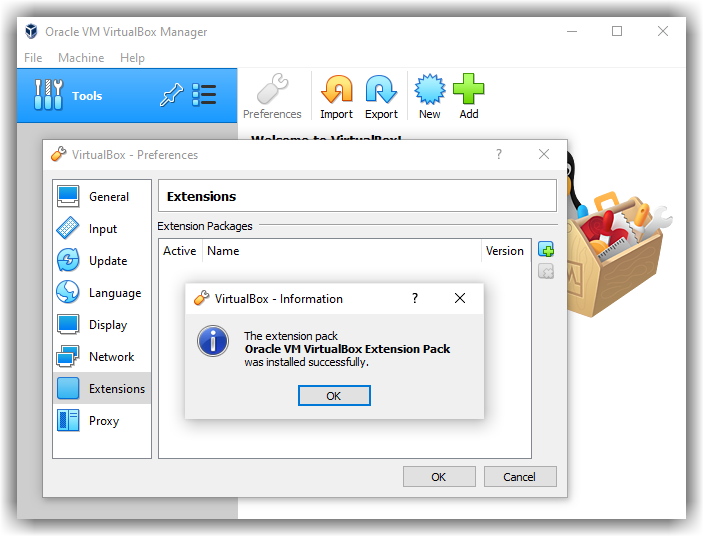
- Oracle VM VirtualBox Extension Pack
-
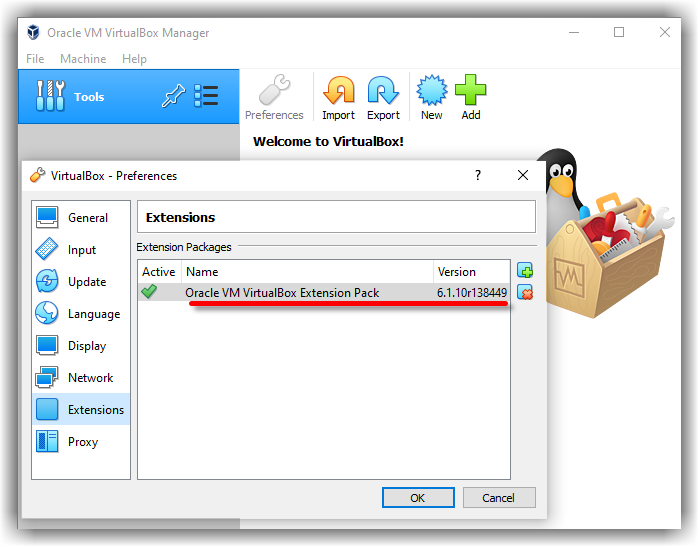
- Oracle VM VirtualBox Extension Pack Installed
Step 4: Create macOS Mojave a New VM & Customize
After installing VirtualBox, now you will need to create a new virtual machine on Virtualbox.
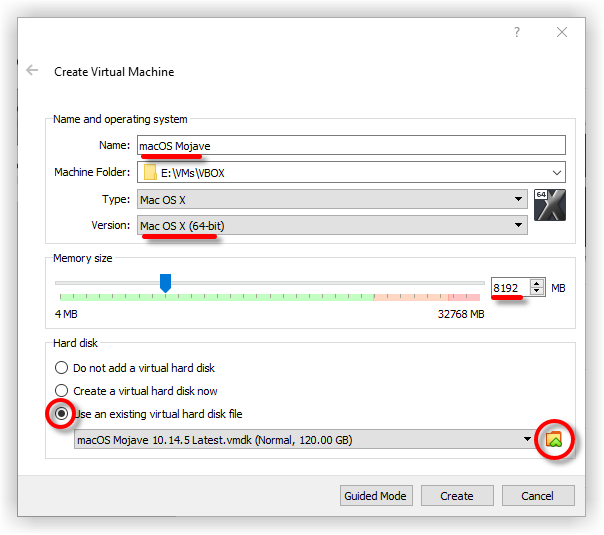
Creating a virtual machine for macOS Mojave is kind of the same as you create a virtual machine for the Windows Operating system or Linux but with some minor changes. In this post, I’ll outline those changes. Follow the steps below to create a new virtual machine for macOS Mojave using the VMDK file.
- Open up your VirtualBox application and click New.
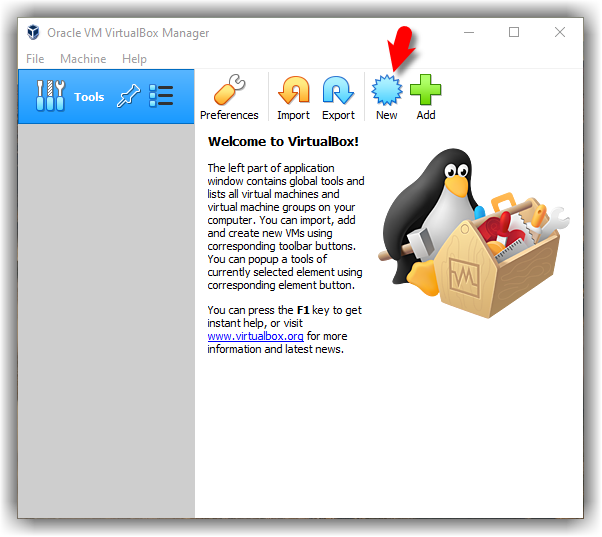
Create a New VM
- Click Expert Mode and select the following options then click Create.
- Type a suitable Virtual Machine Name.
- Virtual Machine Location (a separate drive is recommended).
- Type (Mac OS X).
- Version (Mac OS X 64-bit).
- Memory 4 GB (recommended 8 GB or higher).
- Hard Disk: Select Use an existing virtual machine hard disk file. Click on the Folder icon to browse the macOS Mojave VMDK file.
- Click Add and select the Mojave VMDK image
-
- Use macOS Mojave VMKD Image
-

- Add macOS Mojave VMDK Disk
-
- It’s time to edit the virtual machine to make it works. Select macOS Mojave VM and click on Settings. Now, bring the following changes to macOS Mojave VM.
- Under System>Motherboard, increase the Base Memory to 10248MB. However, you can use a bit lower memory if your system doesn’t have this much RAM.
- Uncheck Floppy from the Boot Order section.
- Under the Processor tab, increase the processors to 4 or higher.
-
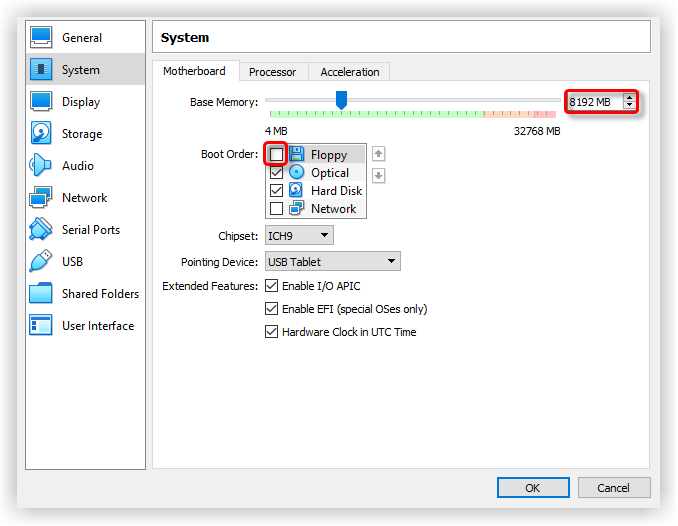
- macOS Mojave Boot Order
-
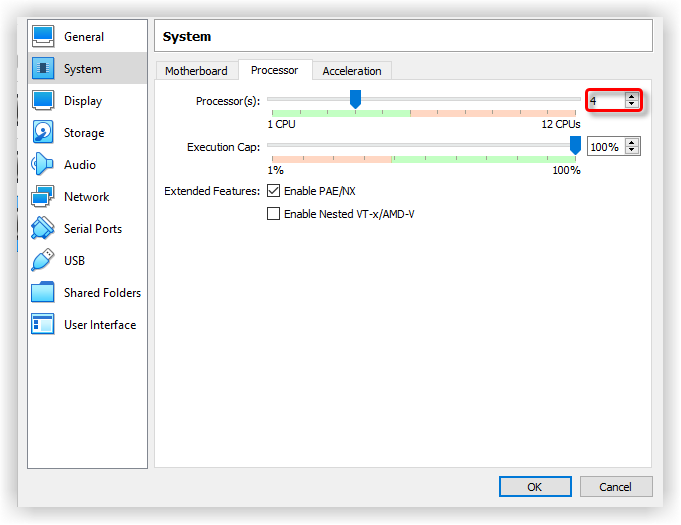
- increase macOS Mojave Processor
-
- On the Display window, increase the Video Memory to 128MB.
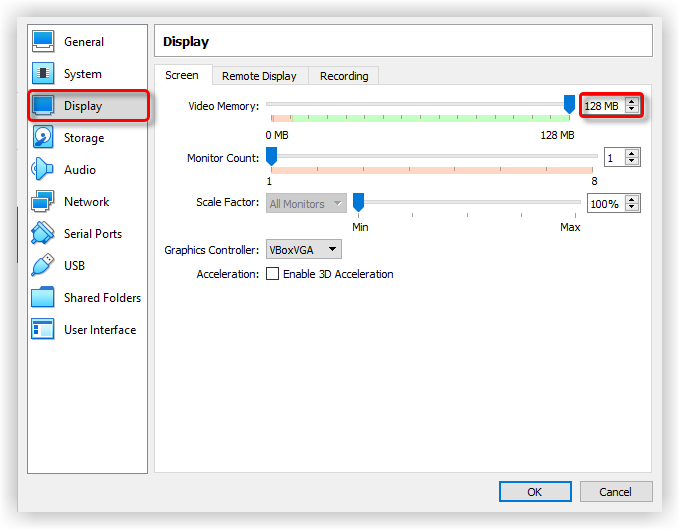
Increase macOS Mojave Video Memory
Step 5: Execute the VirtualBox Code
Once you’ve created and customized your virtual machine, it’s time to run some codes in order to install macOS Mojave on VirtualBox. First, you should note your virtual machine name because later on, we will use it. Open the VirtualBox code which you should have downloaded from the “Download Prerequisites” section of this post. If you’ve not downloaded, doesn’t matter. Just use the following code.
Note: Before, you execute the code by command prompt. You should read the following steps.
cd "C:\Program Files\Oracle\VirtualBox\"
VBoxManage.exe modifyvm "VM Name" --cpuidset 00000001 000106e5 00100800 0098e3fd bfebfbff
VBoxManage setextradata "VM Name" "VBoxInternal/Devices/efi/0/Config/DmiSystemProduct" "iMac19,1"
VBoxManage setextradata "VM Name" "VBoxInternal/Devices/efi/0/Config/DmiSystemVersion" "1.0"
VBoxManage setextradata "VM Name" "VBoxInternal/Devices/efi/0/Config/DmiBoardProduct" "Mac-AA95B1DDAB278B95"
VBoxManage setextradata "VM Name" "VBoxInternal/Devices/smc/0/Config/DeviceKey" "ourhardworkbythesewordsguardedpleasedontsteal(c)AppleComputerInc"
VBoxManage setextradata "VM Name" "VBoxInternal/Devices/smc/0/Config/GetKeyFromRealSMC" 1- When you opened VirtualBox code via notepad or any other text editor, use the replace function of the program to Replace the “VM Name” with your virtual machine name. See the picture below to get an idea of how to do it.
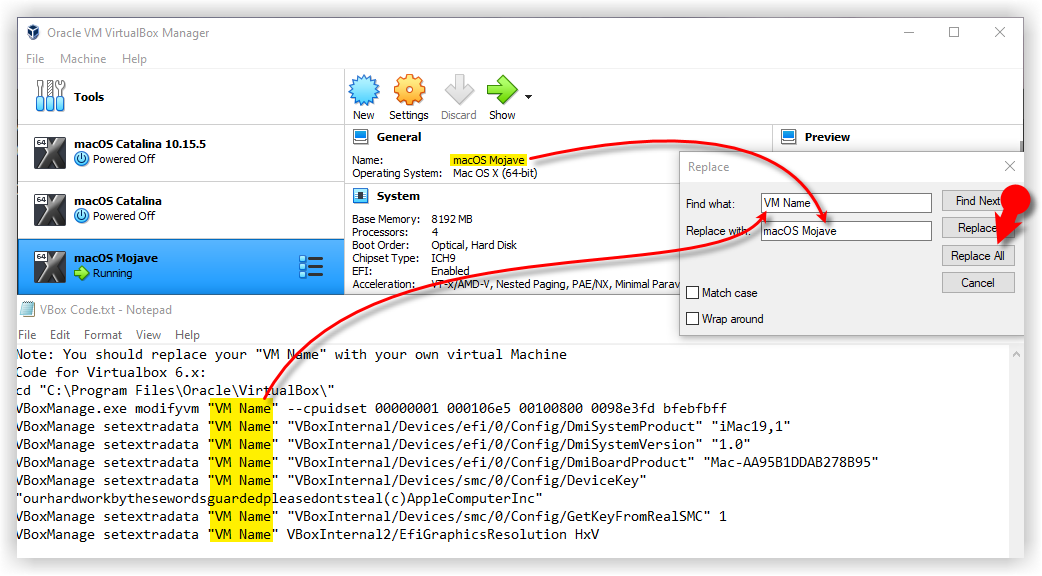
Replace macOS Mojave VM Name
- Now, you’ve two choices. First, if you want to fix your macOS Mojave screen resolution in the first place. You should also execute the following code. You have to change “VM Name” with your virtual machine name and HxV with a screen resolution such as “1920×1080“. For more supported screen resolution on VirtualBox and detailed guide, visit fix macOS Catalina screen resolution on VirtualBox.
VBoxManage setextradata "VM Name" VBoxInternal2/EfiGraphicsResolution HxVImportant Note: We highly recommend to quit the VirtualBox program before executing the code. If you don’t do it, your virtual machine might not proceed to the installation step.
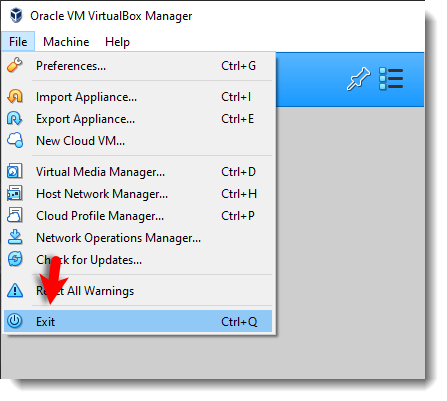
Exit VirtualBox
- Once you replaced the “VM Name” with your virtual machine name, then run the code one by one via command prompt (CMD). You can open the command prompt by pressing the Windows+X key in Windows 10 and select Command Prompt from the list. Or simply press Windows key and type CMD. Click Run As Administrator and click Yes.
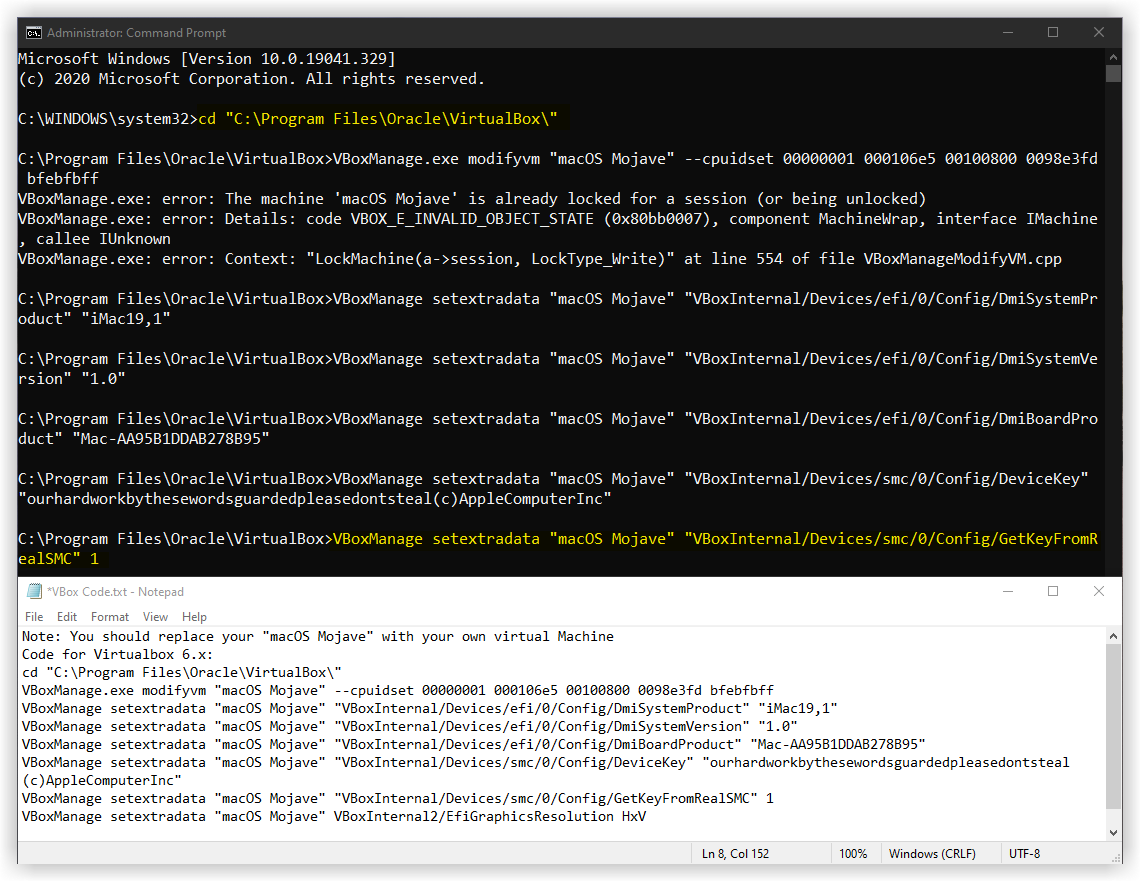
Execute macOS Mojave VirtualBox Code
- Now, that you’ve executed the macOS Mojave VirtualBox code. Open the VirtualBox app then click the Start button to power on the VM. A black screen with a lot of white text will appear on the screen. Just wait for a few minutes and the macOS Mojave installation will start.
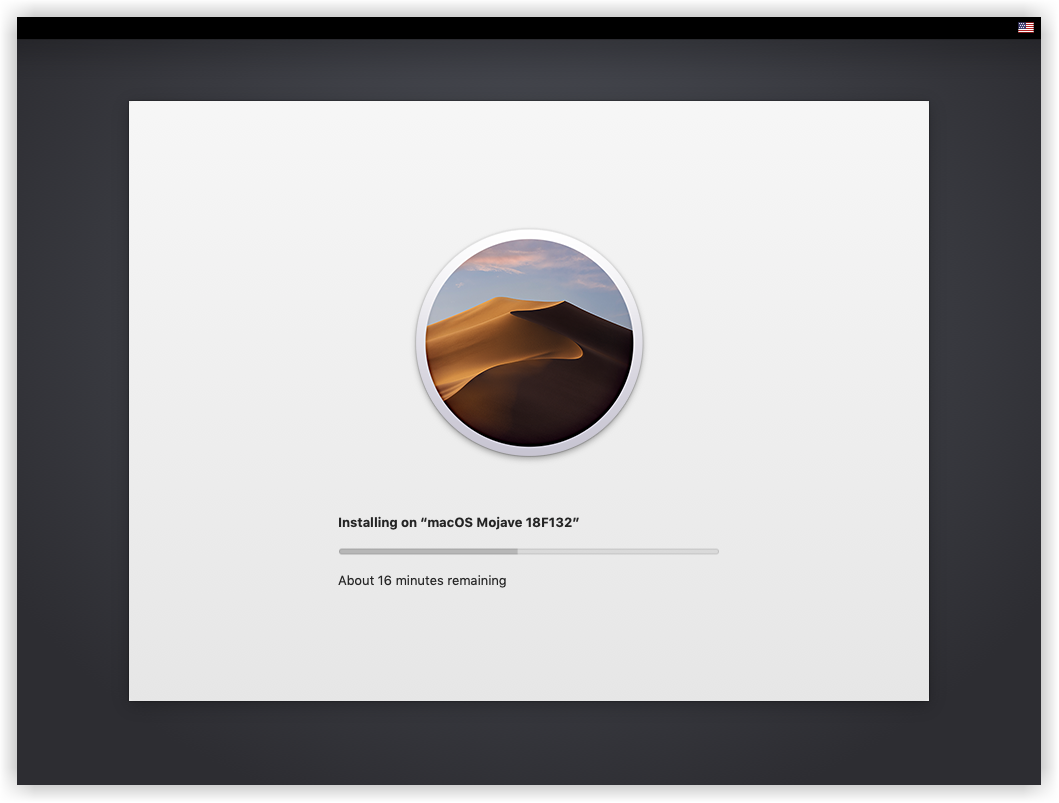
Installing macOS Mojave
Step 6: Perform Clean Installation of macOS Mojave
- Once you hit enter, a whole bunch of code will run on the screen, but you should not worry about it. Wait for a few minutes, and you should see the macOS Mojave installation window. Have a cup of coffee until the installation complete because it’s going to take around 15 minutes to finish.
- Once the installation part complete, your system will reboot, and after the restart, you should see macOS Mojave Welcome page.
- Select the following options. You can change most of the settings later on, so don’t worry about that for now.
-
- Select your Country and click Continue.
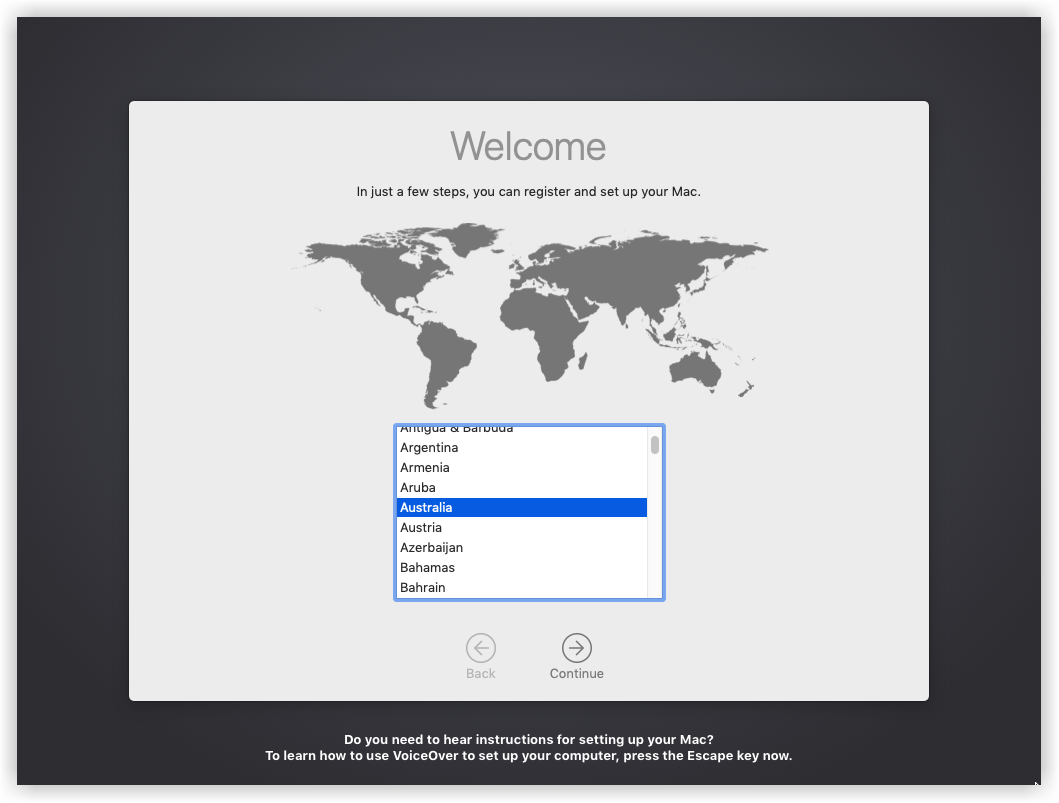
Welcome to macOS Mojave
- Choose a Keyboard Layout and click Continue. If you’re not happy with default settings, you can customize the Settings.
- On the “Data & Privacy” window, click Continue.
- Select Don’t transfer any information now.
- Click on Set Up Later then Don’t Sign In. Click Skip. You can add your Apple ID later.
- Click Agree to the Terms and Conditions and click Continue.
- Fill out the Full name, Account name, Password, and Hint then click Continue.
- If you want to customize Express Set Up, you can click on Customize Settings otherwise click on Continue.
- Select an appearance theme and click Continue. You can choose between dark and light mode.
-
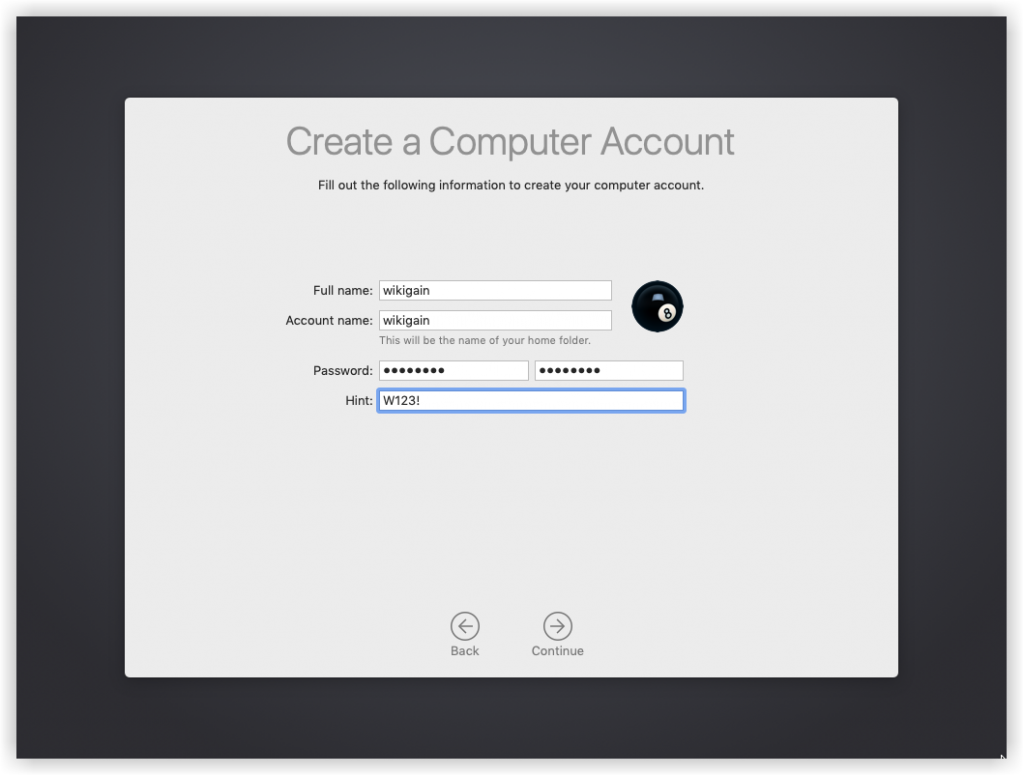
- Create macOS Mojave a Computer Account
-
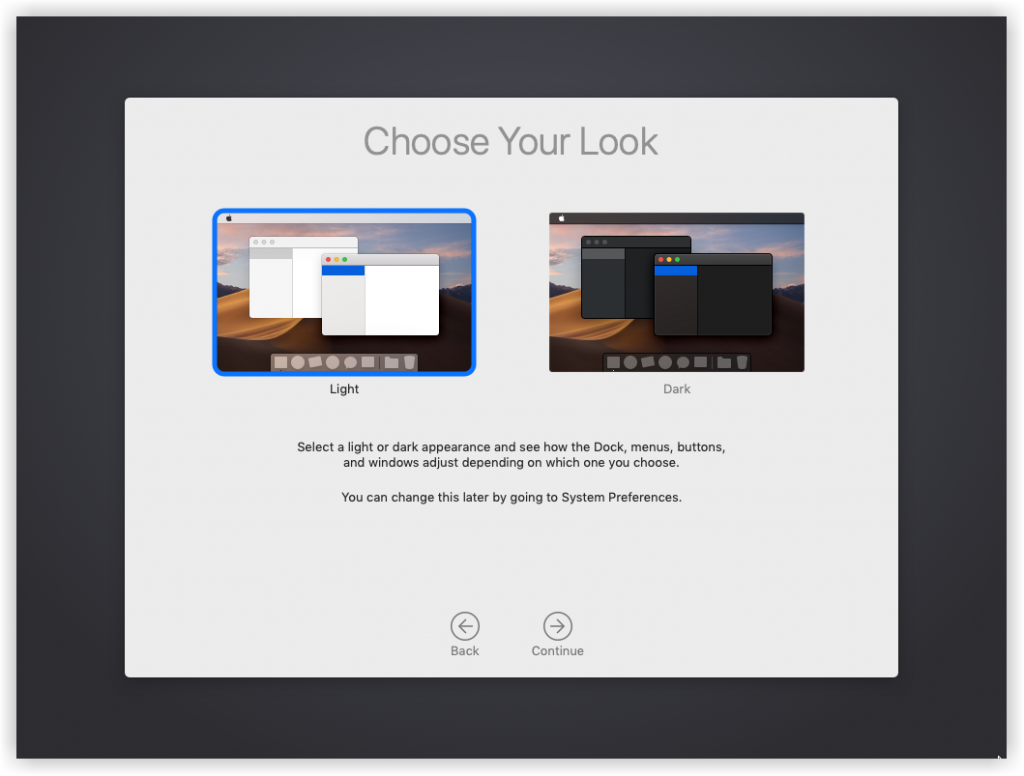
- Choose macOS Mojave Looks
-
- Wait a few seconds that your macOS should be set up.
-
- Close mouse & keyboard window for now.
-
- Select your Country and click Continue.
-
- Well done 👌 you’ve installed macOS Mojave on VirtualBox Successfully.
macOS Mojave Installation Completed
Step 7: Update macOS Mojave to the Latest Version (Optional)
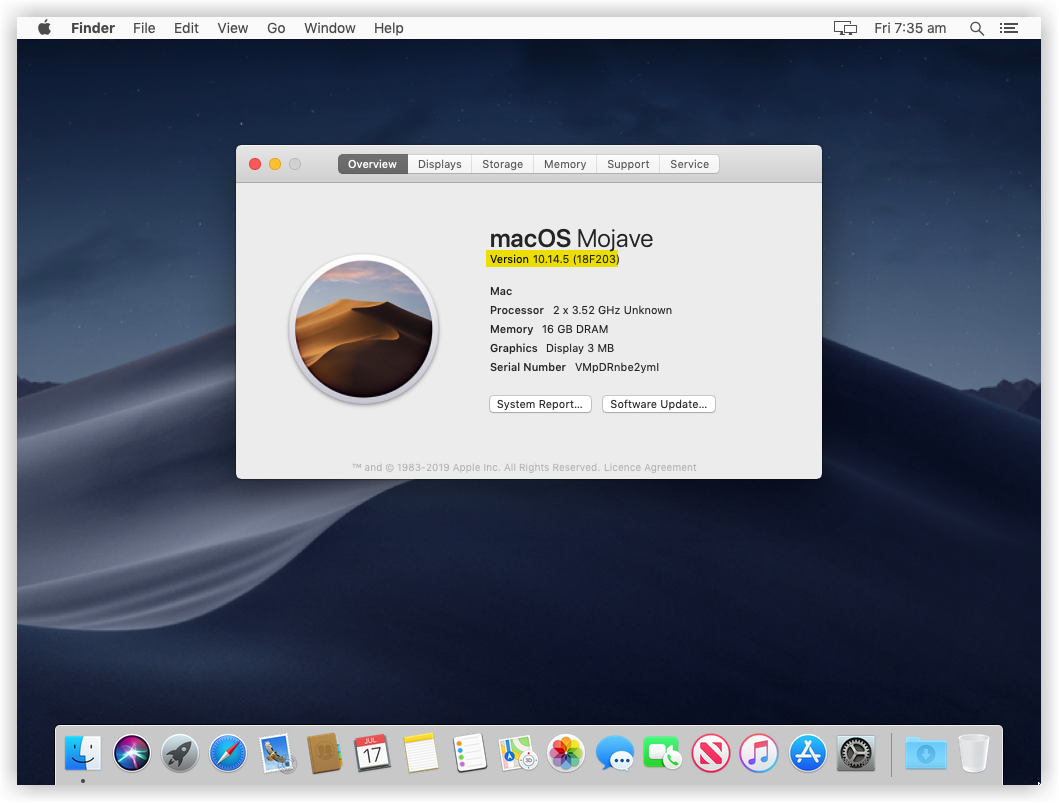
You should do this step if your macOS Mojave is not updated and not the latest version. So, you can update it by following the instructions below.
- Click on the Apple logo at the top-left corner of your screen. Select System Preferences from the list. Under System Preferences, click on Software Update.
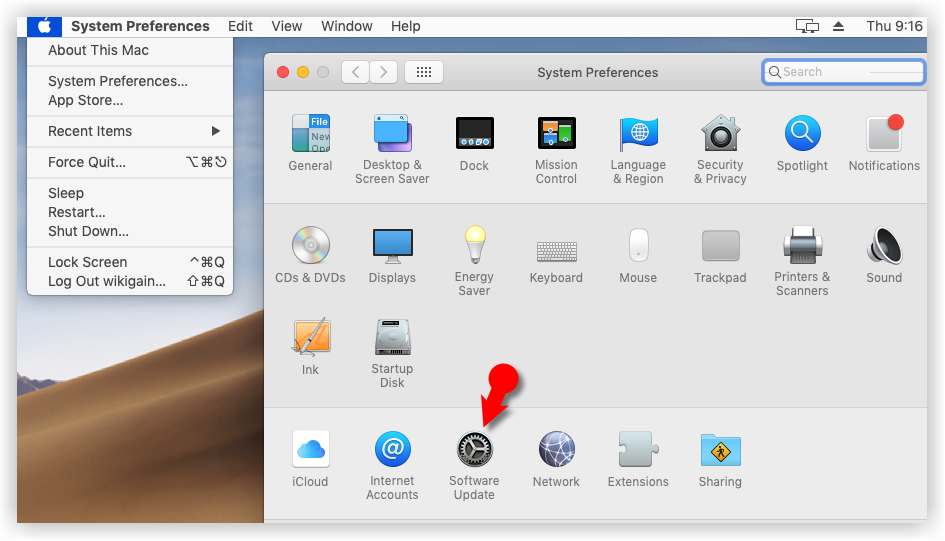
Software Update
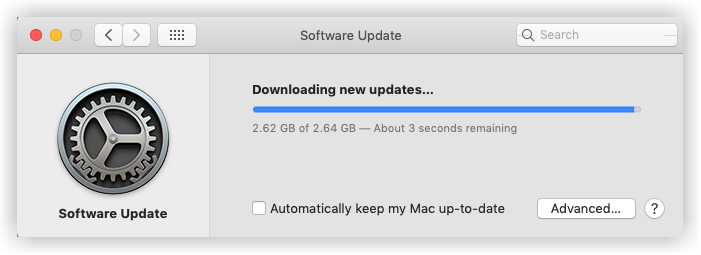
- For now, we do not upgrade to another release of macOS so we just updating our current version of macOS Mojave to the latest version of macOS Mojave. Under Another update available, click More info.
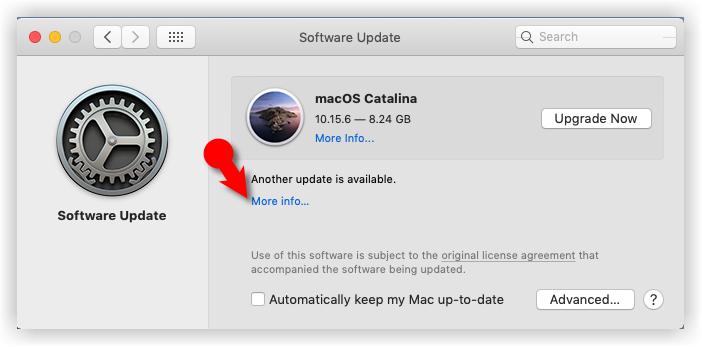
Update Available
- Check the latest update of macOS Mojave and click Install Now.
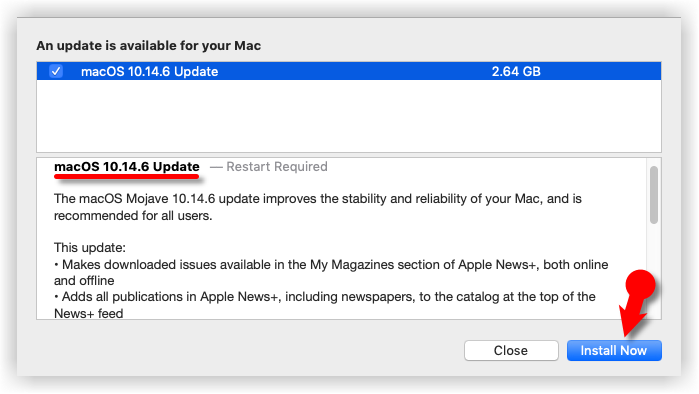
Update macOS Mojave to 10.14.6 Latest
- Click Download Install & Restart button. Now, wait for a couple of minutes so that the downloading Update complete.
-
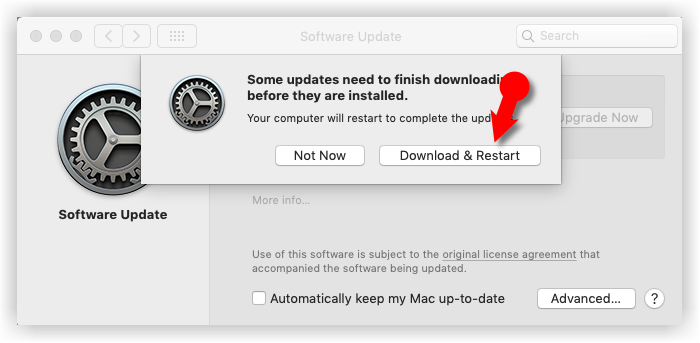
- Download & Restart
-
- Download macOS Mojave Latest Version
-
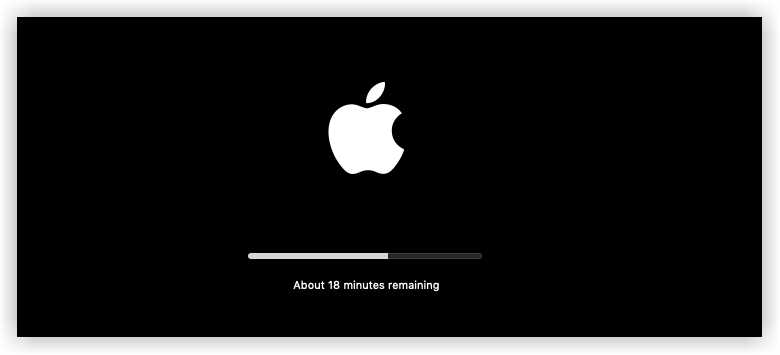
- Once the Downloading Update gets complete, your VM or system will restart automatically. Just wait and relax. Be patient because it’s going to take sometimes. First, you’ll see the Installing Software update followed by another 18 minutes remaining window.
-
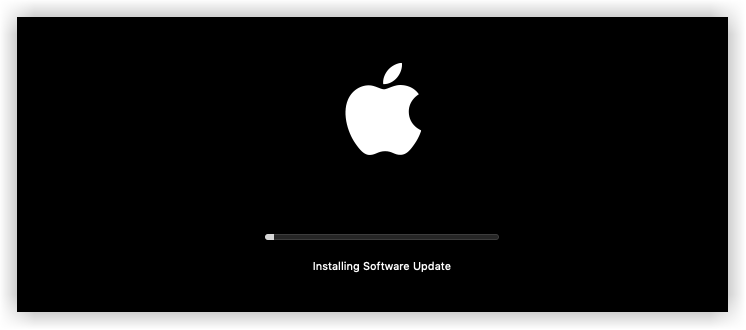
- Installing Software Update
-
- Installing Software Update
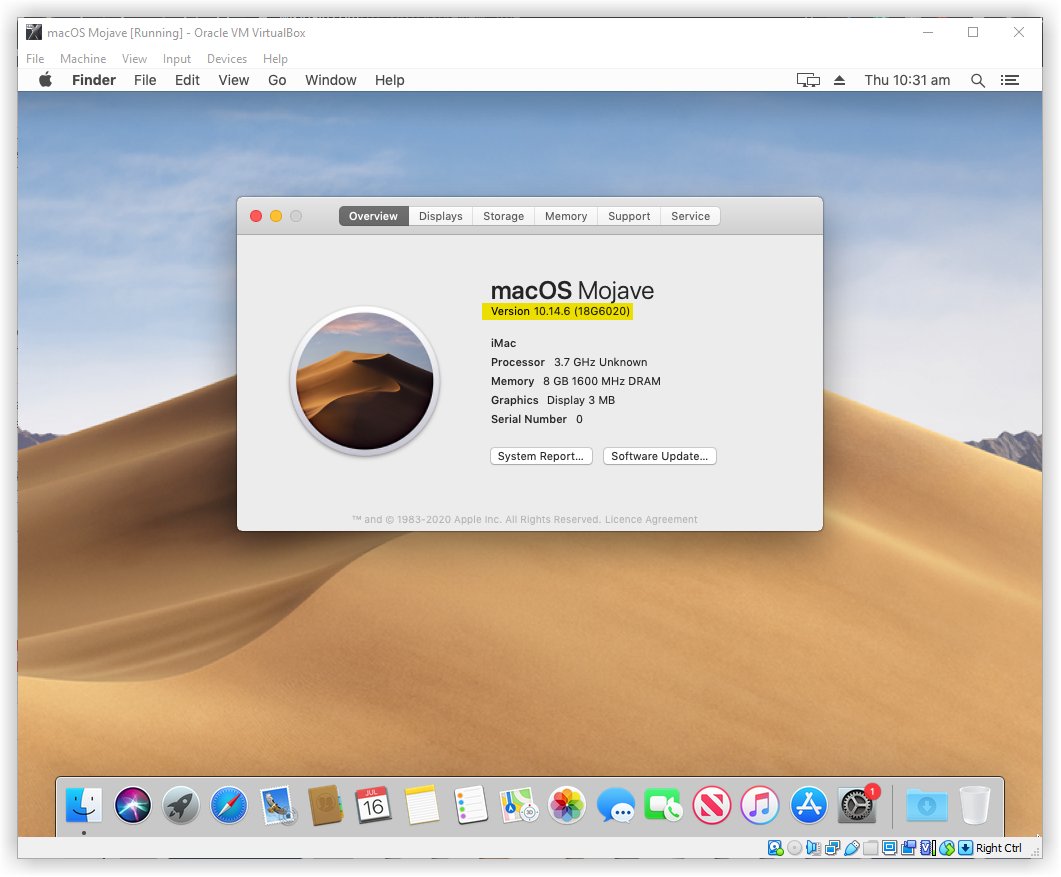
Updated macOS Mojave to the Latest version
-
Video Tutorial:
If you want to watch the video tutorial, you can open the URL below to see how to update your macOS to the latest version. It doesn’t matter what versions do you use. It should work for macOS Mojave, Catalina, Big Sur, and other versions of macOS.
https://www.youtube.com/watch?v=oovQHski5HsSummary
Basically, in this article, I’ve shown you the step by step pictorial guide on how to install macOS Mojave on VirtualBox on Windows computer. After reading and following this guide, you should have done the following;
- Download the Prerequisites
- Extracted macOS Mojave Image
- Installed VirtualBox on Windows / PC
- Installed & Updated VirtualBox Extension
- Created macOS Mojave a New VM & Customized
- Executed the VirtualBox Code
- Performed a Clean Installation of macOS Mojave
- Updated macOS Mojave to the Latest Version (Optional)
We are ready to keep receiving your feedback about this article, and other posts on wikigain. Your suggestions and feedbacks are highly appreciated.
thanks for the installer ISO link – that is very hard to find
this is the last MacOS that runs Adobe Creative Suite 6
really appreciate this guide
I landed on the shell for my first boot.
I typed in exit.
Then selected the correct efi partition as per this stack exchange article.
Great writeup.
https://superuser.com/questions/1235970/stuck-on-uefi-interactive-shell-with-mac-os-x-high-sierra-vm