It’s been a while that macOS Catalina 10.15 is released and this is the latest Apple Mac Operating system up to now. In this article, I’m going to show you step by step to install macOS Catalina on VirtualBox on Windows PC. Indeed, installing macOS on VirtualBox on a Windows PC is not technically legal according to Apple terms of use, but here we only use it for testing and educational purposes. If anyone misuses it, that’s not our responsibility. Tip: before reading the rest of the article, it’s recommended to navigate to the Required File section of this post and download macOS Catalina 10.15 then you’ve time to read the item until the downloading gets complete.
Related: Install macOS Catalina on VMware
Steps to Install macOS Catalina on VirtualBox on Windows
- Extract macOS Catalina VMDK File
- Install VirtualBox on Windows PC
- Install & Update VirtualBox Extension
- Create a New Virtual Machine & Customize it
- Execute the VirtualBox Code
- Perform Clean Installation of macOS Catalina
- Summary
Important Note
Before we get started, make sure your system can support Virtualization Technology (VT), and it is enabled from BIOS so that you should be able to run Virtualization software like Virtualbox or VMware. Also, you should have a 64-bit Windows operating system with at least 2 GB RAM and 20 GB of free storage. We recommend you 4 GB of RAM or higher and more room so you can store more files and install more apps on macOS Catalina disk. Furthermore, if you have an SSD, it’s highly recommended to use it as storage because SSD is much faster then mechanical hard drive (HDD) and macOS run on SSD very smooth. Anyway, it is not 100% compulsory but if you have don’t hesitate to use it.
Download Prerequisites (Required Files)
All the necessary files are linked in the article below, and you should be able to download them without any issues. Note: macOS Catalina VMDK version is beta so please keep in mind that. If you want to use the latest version, we recommend using “install macOS Catalina on VirtualBox” via ISO Image guide.
- Download macOS Catalina VMDK
- VirtualBox Code
- Virtualbox 6.1.10 Setup (Direct Link)
- Download Virtualbox 6.x Setup
- Download Virtualbox Extension
Step 1: Extract macOS Catalina VMDK Image
Now, you should have downloaded macOS Catalina VMDK & VirtualBox code from the link above. Once macOS Catalina is downloaded, you should extract the Image file via WinRAR or 7zip to a new drive or a new folder. If you’ve downloaded the five parts, make sure all five pieces are completely downloaded, and they are in the same location. Right-click on one of the elements and select Extract to macOS Catalina. If you’ve downloaded the One part, so just right click on the file then extract to a location where you want to install macOS Catalina. Recommendation: It’s highly recommended to create a new drive on your Windows PC and install macOS Catalina on a separate drive.
Step 2: Install VirtualBox on Windows PC
From the “Required File” section of this post, you should have downloaded VirtualBox and if you didn’t, download VirtualBox latest version and install it on your Windows system. If you’ve already installed VirtualBox, then you can skip this step. Other than that, follow the steps below.
- On the welcome Wizard page, click Next.
- Keep the default setting on the Custom Setup page and click Next.
- Again Click Next to accept the default options unless you want to change something.
- On the warning Network interface page, just click Yes to process with Virtualbox installation.
- Click the Install button to install VBox. Again click Yes if required.
- While installing VBox, you might a security warning about “Oracle Corporation”. You need to click Install on this page to process with the installation. If you click Don’t install, the installation process will be terminate here and you can’t go ahead. If you see the security warning again click the Install button.
- Finally, click Finish.
-
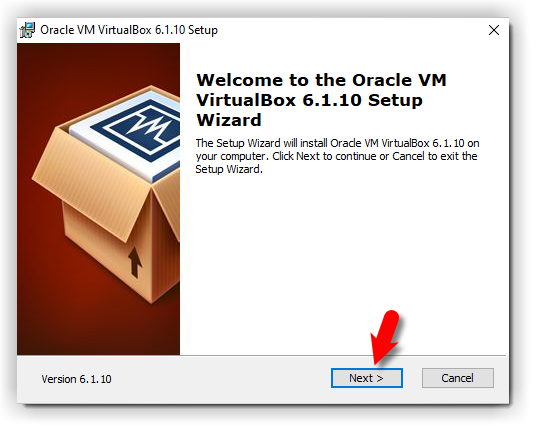
- Virtualbox Setup Welcome Wizard
-
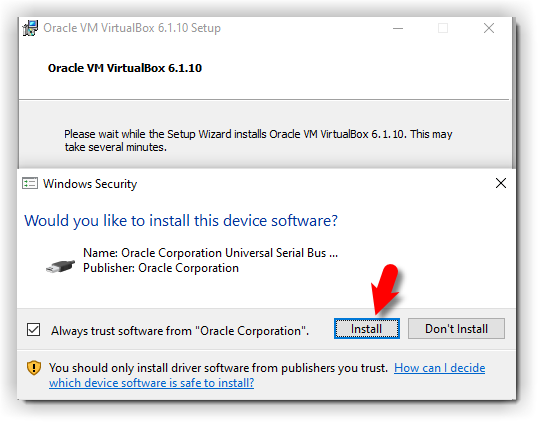
- Windows Security
-

- Virtualbox Setup Completed
-
Step 3: Install & Update VirtualBox Extension
This step is not 100% necessary but it’s highly recommended to do this step because macOS Catalina might not be compatible with VirtualBox and for this reason, it might cause problems during the installation. Go to the Virtualbox download page. Under VirtualBox 6.1.10 Oracle VM VirtualBox Extension Pack section, click All supported platforms to download the latest version of Virtualbox Extension Pack.
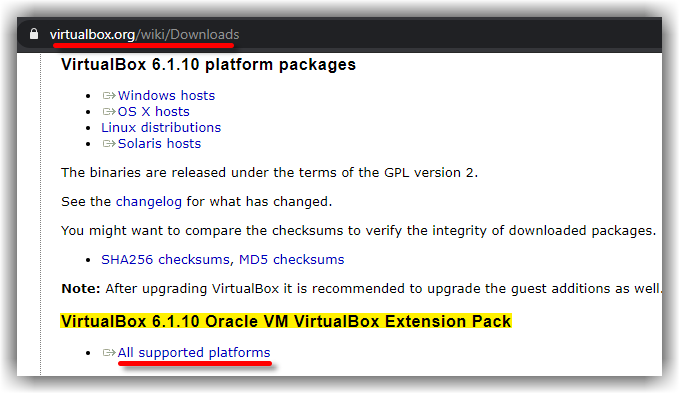
Download Virtualbox Extensions
Once you’ve downloaded the Extension pack. Now, follow the steps below to update the Virtualbox extension pack.
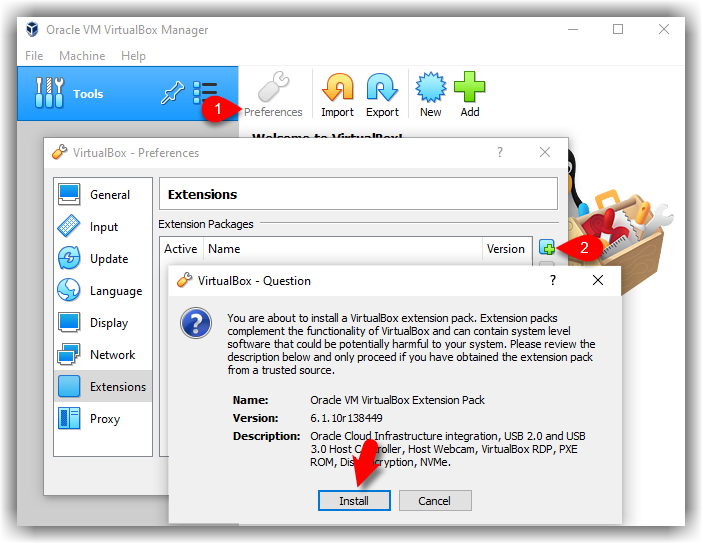
- Open up VirtualBox, navigate to Tools>Pereferences>Extensions.
- Click on Plus (+) icon and select VirtualBox extension which you’ve downloaded at the beginning of this section. Click Install or Upgrade and then Agree to the terms and conditions. Click the OK button.
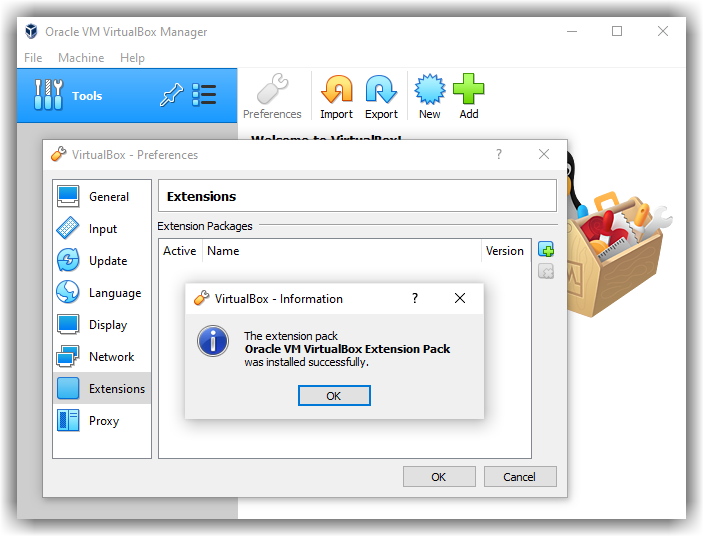
Finally, you should see something like the screenshot below.
-
- VirtualBox Extension Install
-
- Oracle VM VirtualBox Extension Pack
-
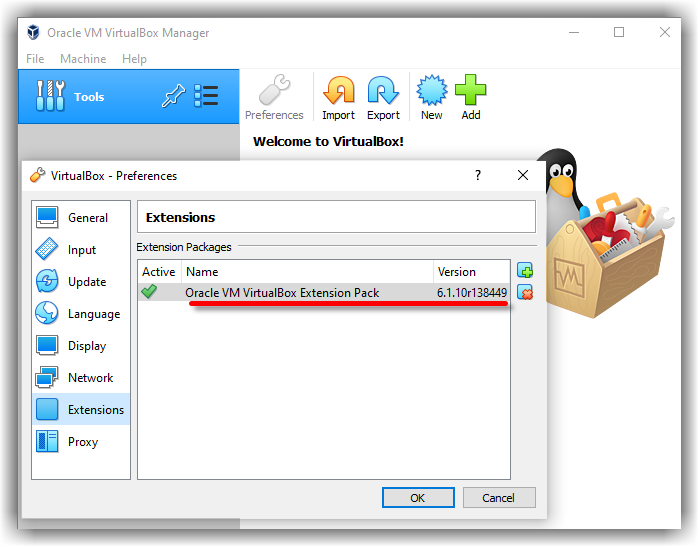
- Oracle VM VirtualBox Extension Pack Installed
Step 4: Create a New Virtual Machine & Customize it
Creating a virtual machine for macOS Catalina is kind of the same as you create a virtual machine for the Windows Operating system or Linux but with some minor changes. In this post, I’ll show those changes. Follow the steps below to create a new virtual machine for macOS Catalina using VMDK file.
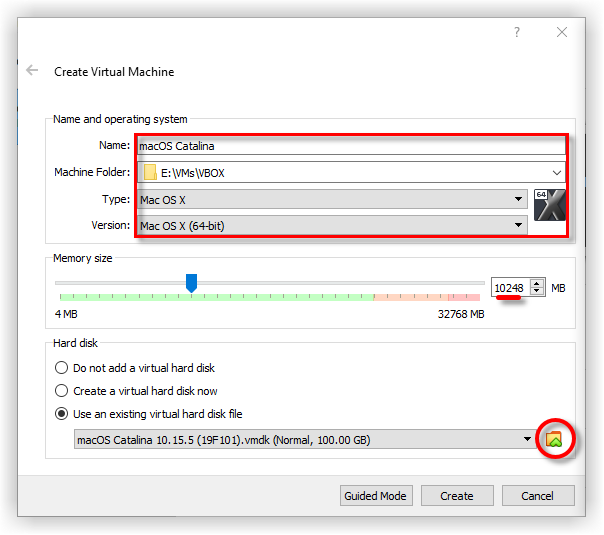
- Open up your VirtualBox application and click New.
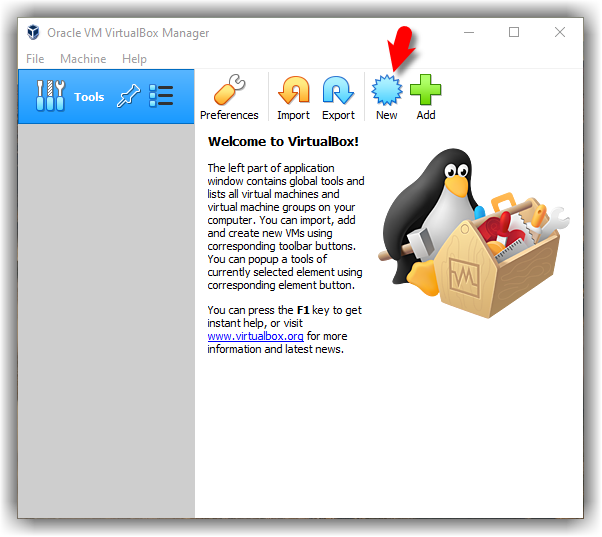
New VM
- Click Expert Mode and select the following options then click Create.
- Type a suitable Virtual Machine Name.
- Virtual Machine Location (a separate drive is recommended).
- Type (Mac OS X).
- Version (Mac OS X 64-bit).
- Memory 4 GB (recommended 8 GB or higher).
- Hard Disk: Select Use an existing virtual machine hard disk file. Click on the Folder icon to browse the macOS Catalina VMDK file.
- Click Add and select the Catalina VMDK image.
-
- Create a New Virtual Machine
-

- Attach macOS Catalina VMDK File
-
- It’s time to edit the virtual machine to make it works. Select macOS Catalina VM and click on Settings. Now, bring the following changes to macOS Catalina VM.
- Under System>Motherboard, increase the Base Memory to 10248MB. However, you can use a bit lower memory if your system doesn’t have this much RAM.
- Uncheck Floppy from the Boot Order section.
- Under the Processor tab, increase the processors to 4 or higher.
-
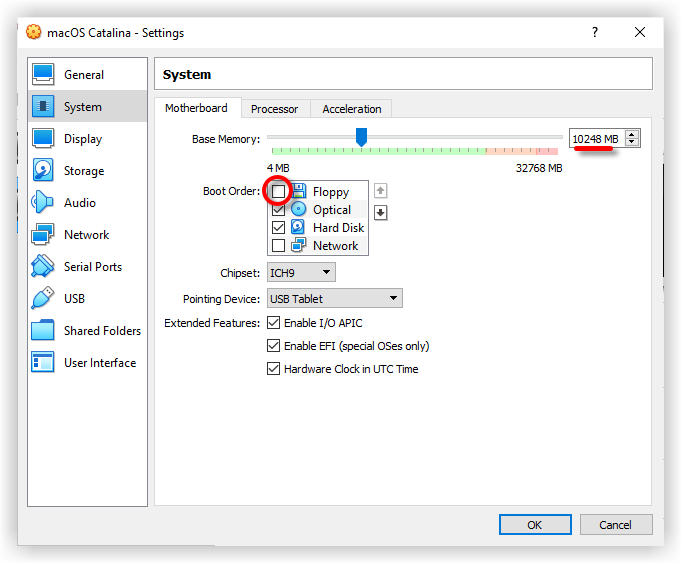
- Catalina Motherboard Settings
-
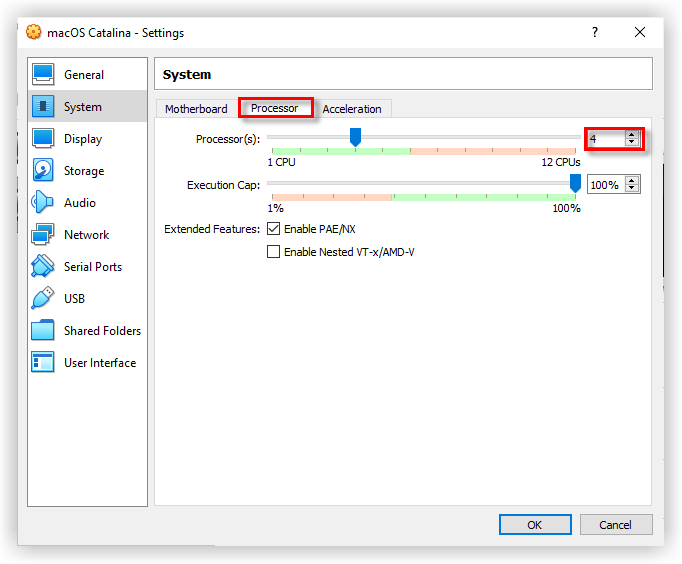
- Increase Catalina Processors
-
- On the Display window, increase the Video Memory to 128MB.
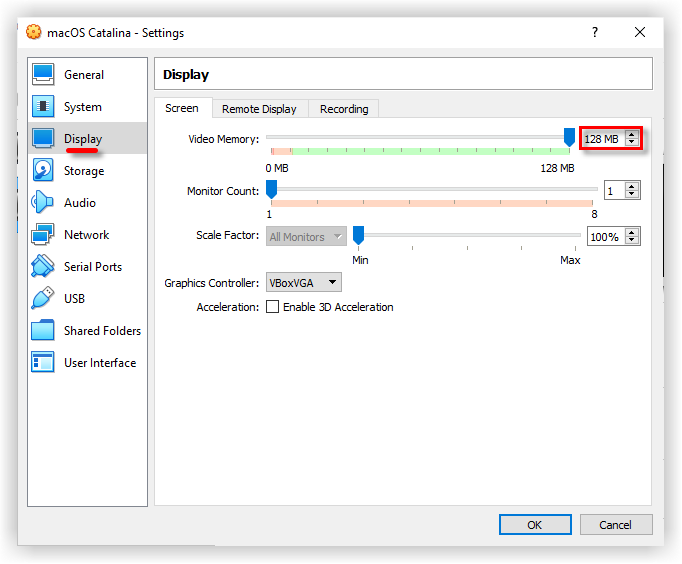
Increase Catalina Video Memory
Step 5: Execute the VirtualBox Code
Once you’ve created and customized your virtual machine, it’s time to run some codes in order to install macOS Catalina on VirtualBox. First, you should note your virtual machine name because later on, we will use it. Open the VirtualBox code which you should have downloaded from the Required File section of this post. If you’ve not downloaded doesn’t matter. Just use the following code.
Note: Before, you execute the code by command prompt. You should read the following steps.
cd "C:\Program Files\Oracle\VirtualBox\"
VBoxManage.exe modifyvm "VM Name" --cpuidset 00000001 000106e5 00100800 0098e3fd bfebfbff
VBoxManage setextradata "VM Name" "VBoxInternal/Devices/efi/0/Config/DmiSystemProduct" "iMac19,1"
VBoxManage setextradata "VM Name" "VBoxInternal/Devices/efi/0/Config/DmiSystemVersion" "1.0"
VBoxManage setextradata "VM Name" "VBoxInternal/Devices/efi/0/Config/DmiBoardProduct" "Mac-AA95B1DDAB278B95"
VBoxManage setextradata "VM Name" "VBoxInternal/Devices/smc/0/Config/DeviceKey" "ourhardworkbythesewordsguardedpleasedontsteal(c)AppleComputerInc"
VBoxManage setextradata "VM Name" "VBoxInternal/Devices/smc/0/Config/GetKeyFromRealSMC" 1- When you opened VirtualBox code via notepad or any other text editor, use the replace function of the program to Replace the “VM Name” with your virtual machine name. See the picture below to get an idea of how to do it.
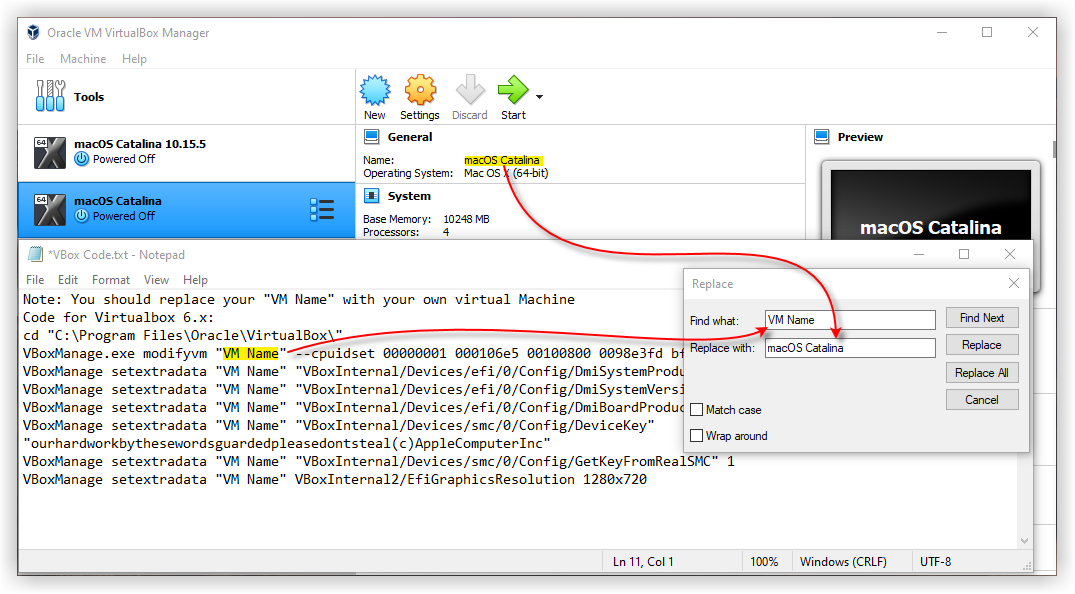
Replace VM Name
- Now, you’ve two choices. First, if you want to fix your macOS Catalina screen resolution in the first place. You should also execute the following code. You have to change “VM Name” with your virtual machine name and HxV with a screen resolution such as “1920×1080“. For more supported screen resolution on VirtualBox and detailed guide, visit fix macOS Catalina screen resolution on VirtualBox.
Important Note: We highly recommend to quit the VirtualBox program before executing the code. If you don’t do it, your virtual machine might not proceed to the installation step.VBoxManage setextradata "VM Name" VBoxInternal2/EfiGraphicsResolution HxV - Once you replaced the “VM Name” with your virtual machine name, then run the code one by one via command prompt (CMD). You can open the command prompt by pressing the Windows+X key in Windows 10 and select Command Prompt from the list. Or simply press Windows key and type CMD. Click Run As Administrator and click Yes.
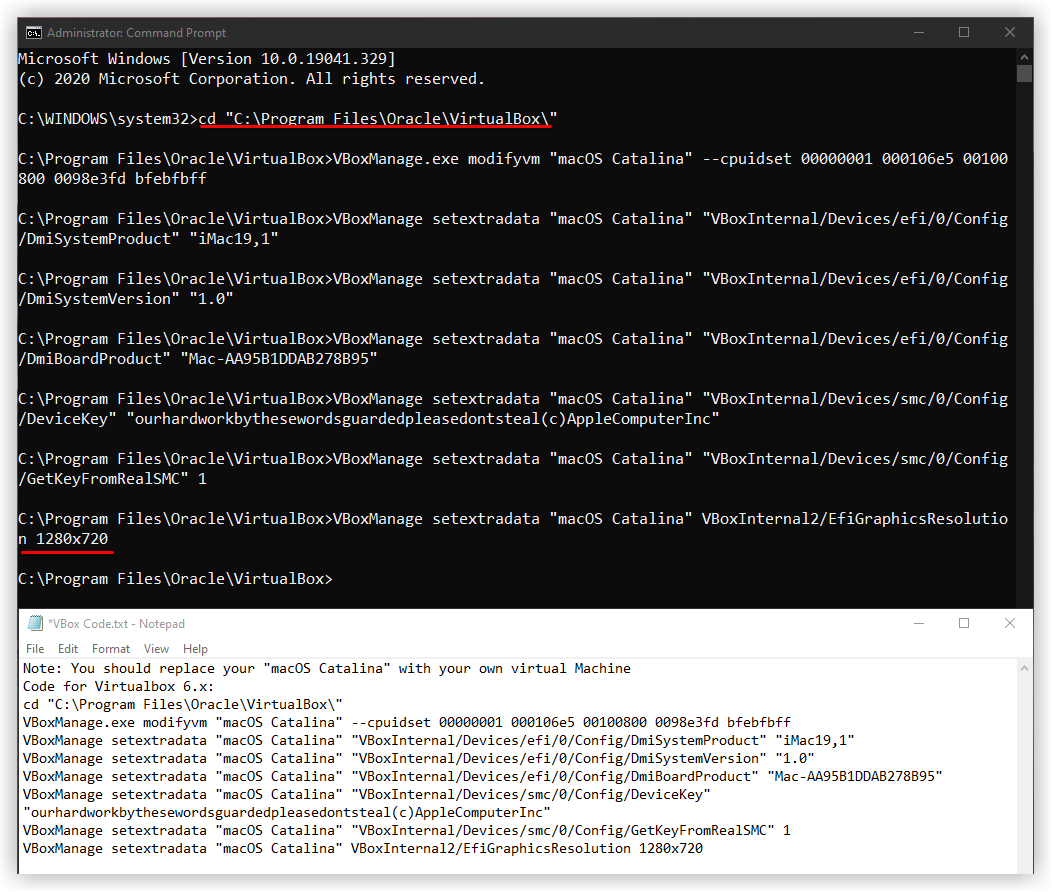
Execute VirtualBox Code
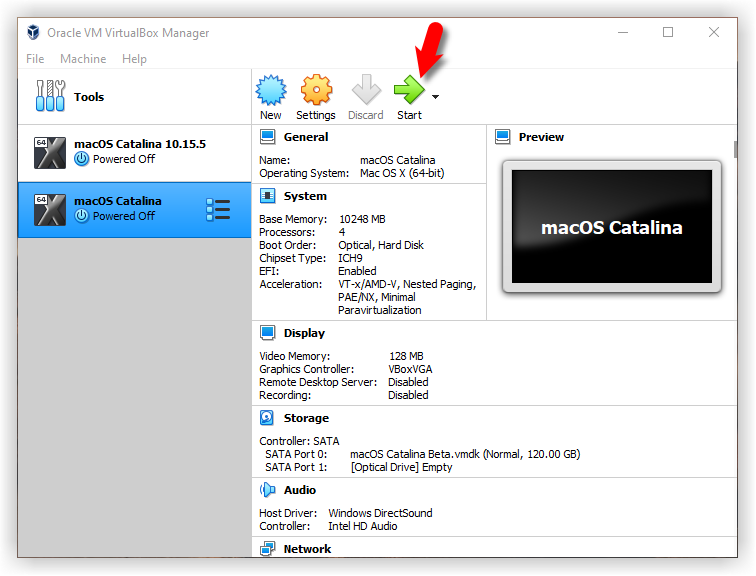
- Now, that you’ve executed the macOS Catalina VirtualBox code. Open the VirtualBox app then click the Start button to power on the VM. A black screen with a lot of white text will appear on the screen. Just wait for a few minutes and the macOS Catalina installation will start.
-
- Start Catalina Virtual Machine
-
- macOS Catalina Installation
-
Step 6: Perform Clean Installation of macOS Catalina
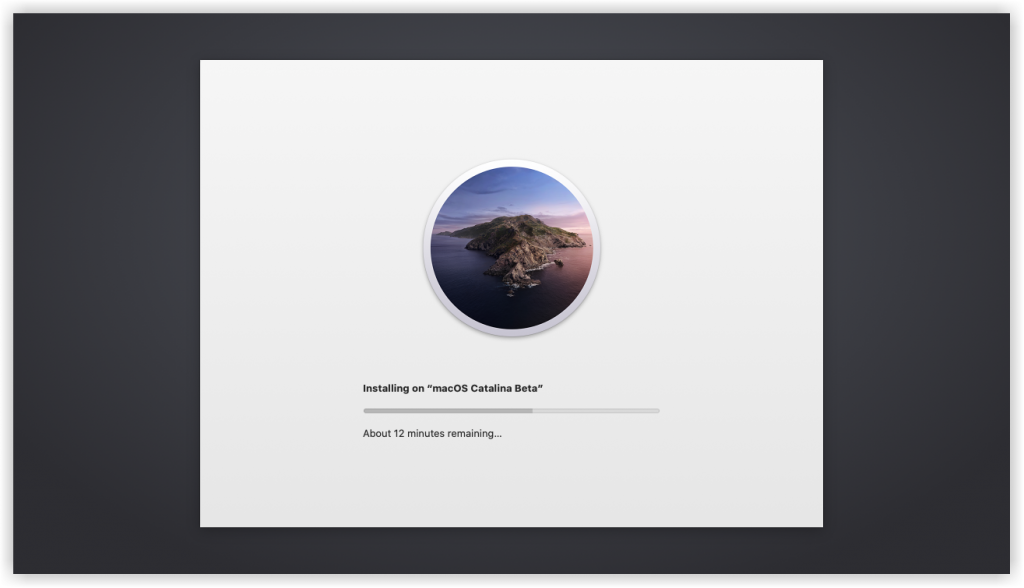
- Once you hit enter, a whole bunch of code will run on the screen, but you should not worry about it. Wait for a few minutes, and you should see the macOS Catalina installation window. Have a cup of coffee until the installation complete because it’s going to take around 15 minutes to finish.
- Once the installation part complete, your system will reboot, and after the restart, you should see macOS Catalina Welcome page.
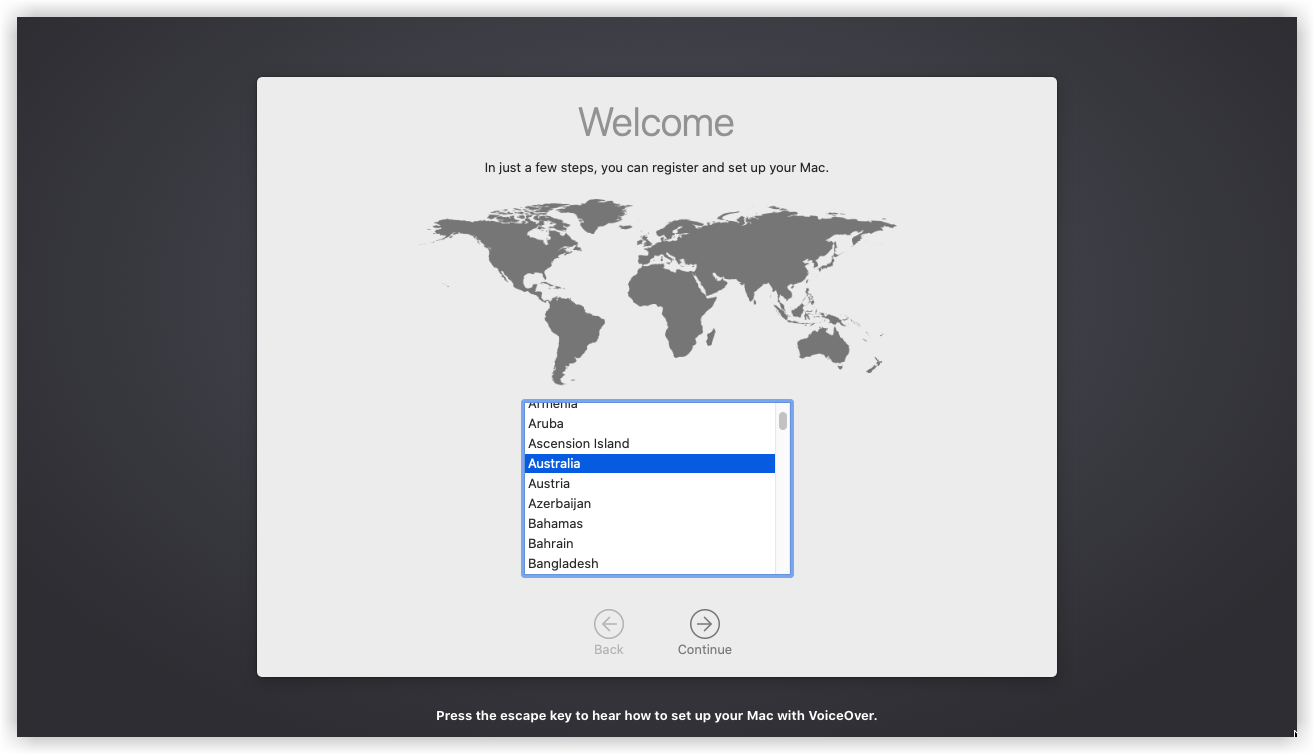
macOS Catalina Welcome Page
- Select the following options. You can change most of the settings later on, so don’t worry about that for now.
-
- Select your Country and click Continue.
- Choose a Keyboard Layout and click Continue. If you’re not happy with default settings, you can customize the Settings.
- On the “Data & Privacy” window, click Continue.
- Select Don’t transfer any information now.
- Click on Set Up Later then Don’t Sign In. Click Skip. You can add your Apple ID later.
- Click Agree to the Terms and Conditions and click Continue.
- Fill out the Full name, Account name, Password, and Hint then click Continue.
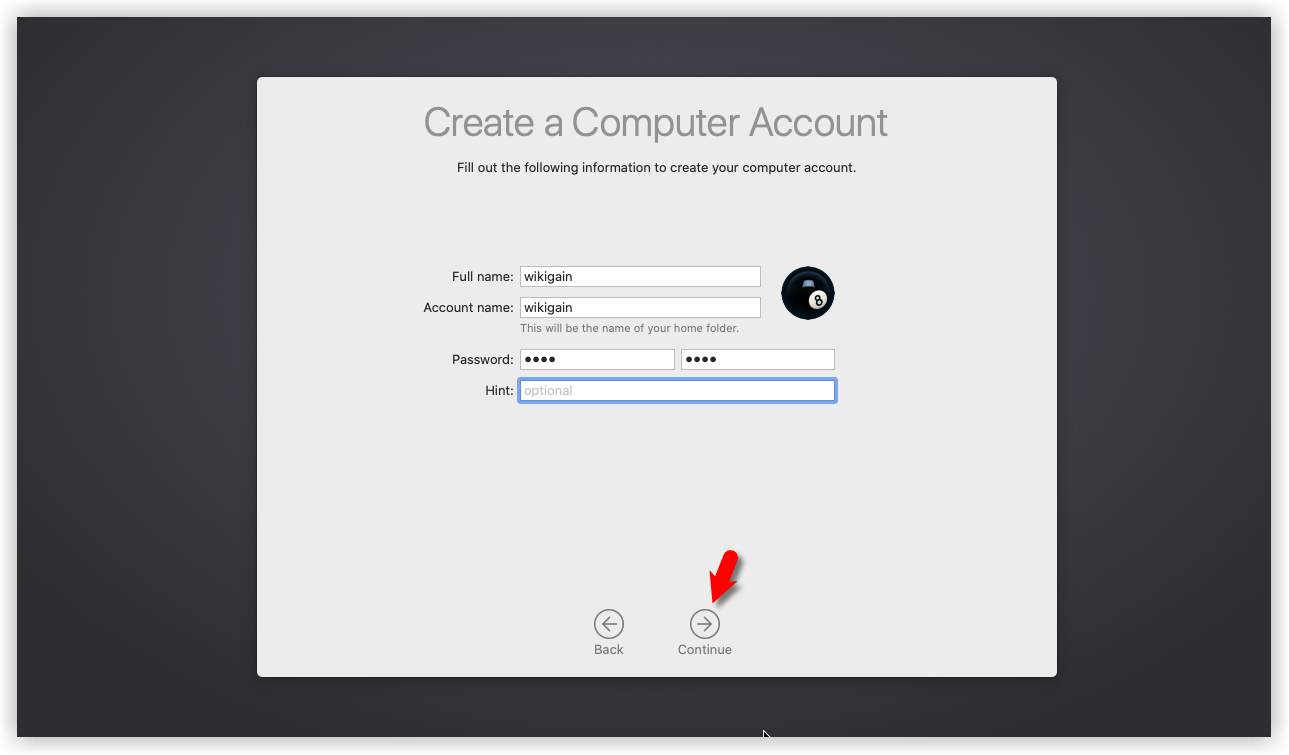
Create Catalina Computer Account
- If you want to customize Express Set Up, you can click on Customize Settings otherwise click on Continue.
- On the Analytics window, click Continue.
- On-Screen Time, click Set up Later.
- Do not set up Siri for now. Just skip it.
- Select an appearance theme and click Continue. You can choose between dark mode or light and Auto mode.
- Wait a few seconds that your macOS should be set up.
-
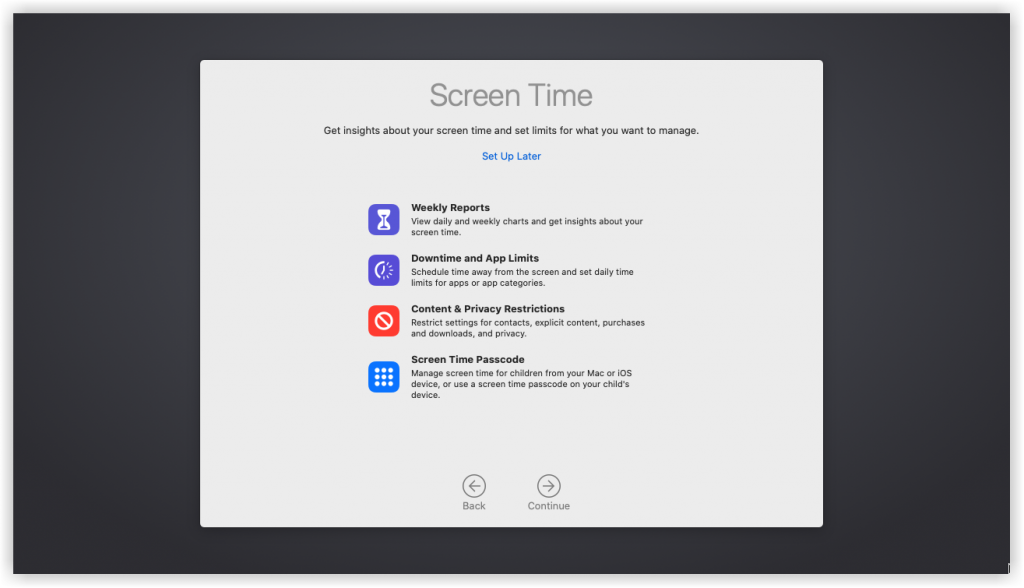
- macOS Catalina Screent Time
-
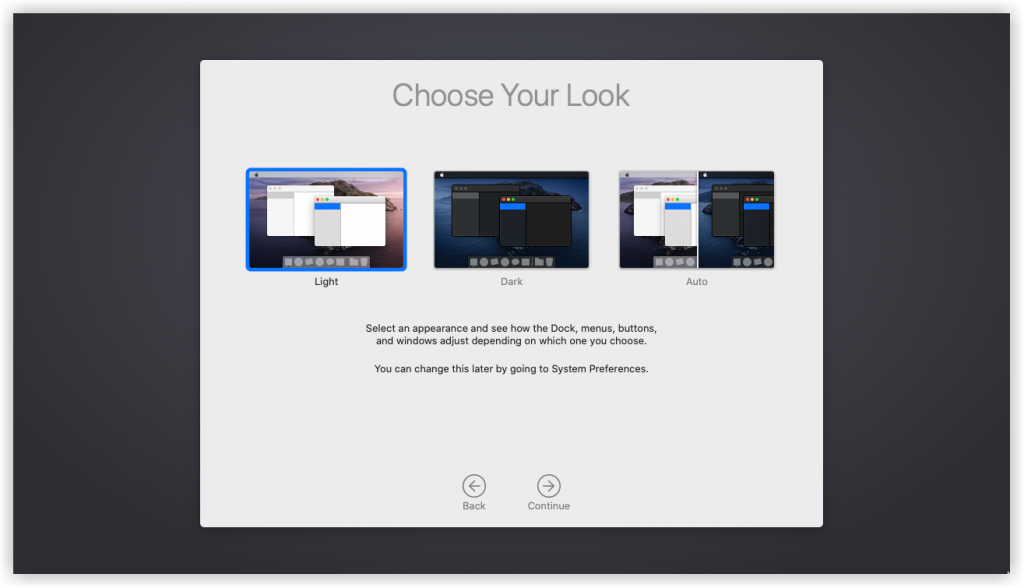
- Choose Your macOS Catalina Look
-
- Close Feedback Assistant for now and close mouse & keyboard window.
-
- Well done 👌 you’ve installed macOS Catalina on VirtualBox Successfully.
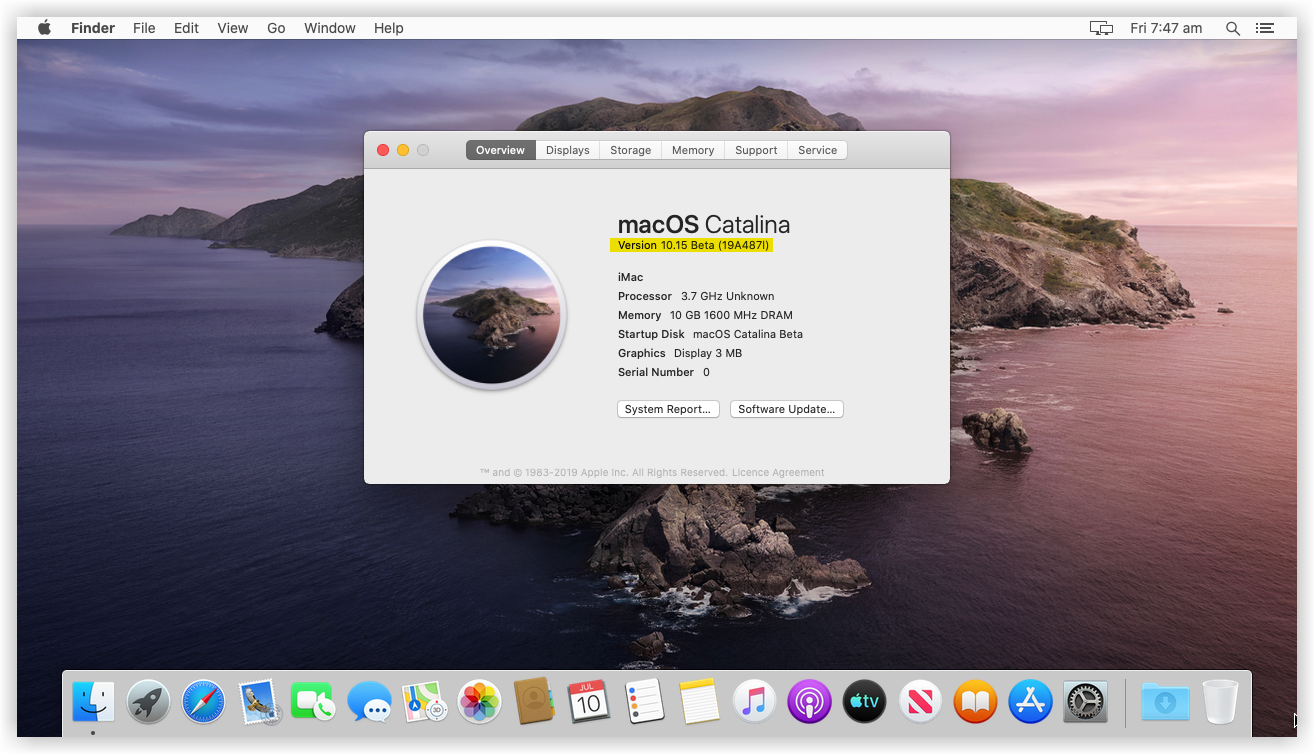
successfully Installed macOS Catalina on VirtualBox
Related: If you want to test the latest version of macOS which released on June 22, 2020. Follow how to install macOS Big Sur on VirtualBox on Windows.
Summary
Basically, in this article, I’ve shown you the step by step pictorial guide on how to install macOS Catalina on VirtualBox on Windows computer. After reading and following this guide, you should have done the following;
- Downloaded VirtualBox with its Extension
- Extracted the macOS Catalina Image from a zipped file
- Installed VirtualBox on your system
- Installed & upgraded VirtualBox extension
- Created a new virtual machine for macOS Catalina
- Customized macOS Catalina VM
- Executed the VirtualBox code to the CMD
- And finally performed a clean installation of macOS Catalina.
We are ready to keep receiving your feedback about this article, and other posts on wikigain. Your suggestion and feedback are highly appreciated.
I tried everything and got nothing. Including unzipping the vmdk file inside the “VM name” folder……->Nothing. It will run bash verbose etc, and stop at an error line….as long as I wait, the installation won’t start.
Is it because I use an AMD?
I tried with AMD X2 3.0, with 8192 ram and a GT610
I was having problems getting passed the boot loader black screen, then I installed the latest windows 10 update from here https://www.microsoft.com/en-us/software-download/windows10
click the update now button, after that it loaded up and started the mac installer in about 2 minutes.
I also disabled hyper-v and wls2 in the additional windows features, not sure i needed to do that though.
Hi,
I have been able to install Catalina 10.15.5 without any hitches by following the instructions. Thanks for this man. I am not able to connect the trackpad of my laptop to the VM. Also there is no audio output.
Laptop used: Latitude 7400, 8GB RAM, 512 SSD, i7-8665U.
Waste of time. Like everyone else, I get the command prompt with the shell.
I think you’re missing this command to setup the VM:
VBoxManage modifyvm “Your Virtual Machine Name” –cpu-profile “Intel Core i7-6700K”
This got me through the “failed to load boot0001” when booting the VM for the first time.
Thanks it is working for me now but the correct command is :
VBoxManage.exe modifyvm “Your Virtual Machine Name” –cpu-profile “Intel Core i7-6700K”
Got https://ibb.co/7RJrG2r also. Waste of time with no support
https://superuser.com/questions/1235970/stuck-on-uefi-interactive-shell-with-mac-os-x-high-sierra-vm
the solution is here
https://forums.virtualbox.org/viewtopic.php?t=85631
If you get the shell, types “exit” => Boot Maintenance Manager => Boot From File
Choose the recovery and find the installer file, it ends in .efi
I found the boot.efi under com.apple.installer. However, it does not work. It gives me a black screen with a bunch of log
All I got was the shell screen
same, know how to solve?
I got the same prompt, just type exit and then you will see a new window with options, choose the boot one and select the geekrar disk by moving the arrow down and press enter, screen should go black and then you will see all the white text
Hello. I have tried this tutorial, and on step 6:
Step 6: Perform Clean Installation of macOS Catalina
Once you hit enter, a whole bunch of code will run on the screen, but you should not worry about it. Wait for a few minutes, and you should see the macOS Catalina installation window. Have a cup of coffee until the installation complete because it’s going to take around 15 minutes to finish.
I got a strange cmd line screen:
https://ibb.co/7RJrG2r
What I did wrong ?
Weirdly when I run the machine I get an UEFI Interactive Shell (Where I can write) but nothing happens.
https://i.postimg.cc/3x49prYK/image.png
it would be cooler if you could upload a video
There lots of video on YouTube you can watch them but we don’t make macos video because Apple will send copyright sticker. That’s the reason. We have other guides on YouTube if you’re interested
Hi! when I do this, the sound does not work in the guest os. Do you know what I did wrong?
no, it’s really muted, how to explain in several videos, and no one was able to solve this until july