There are two official ways that you can install a wireless printer in Windows 11 (Automatic and Manual). The automatic method only includes visiting the settings, Adding devices, and waiting for the windows to detect the printer. After the name of the printer appeared, click connect and it will automatically connect to the printer. However, there are cases in which windows will not find the printer name, so in this case, you have to connect manually your printer to Windows 11 using an IP address. Find out How to Install a Wireless Printer in Windows 11 automatically and manually.
Steps to Install a Wireless in Windows 11
Step 1. Connect the Printer to the Router (Wi-Fi)
- Power on your Printer.
- Following that tap on Setup.
- Tap on Network Setup.
- Visit the Wireless Settings.
- Turn on the Wi-Fi if it is off, after that connect to the router.
Note: Ignore the mentioned steps if the printer is connected using the Ethernet cable to the computer. But keep in mind that you must know your printer’s IP Address. After that go to Setup> Network Setup> Ethernet Settings> tap on view Ethernet Details. Also, you can check the official website of your printer for further assistance.
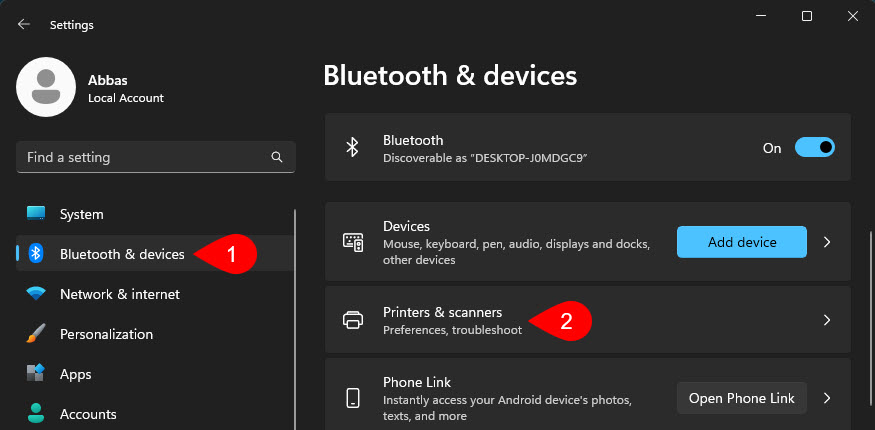
Step 2. Install Wireless Printer in Windows 11
- Launch the settings app.
- Go to Bluetooth and Devices.
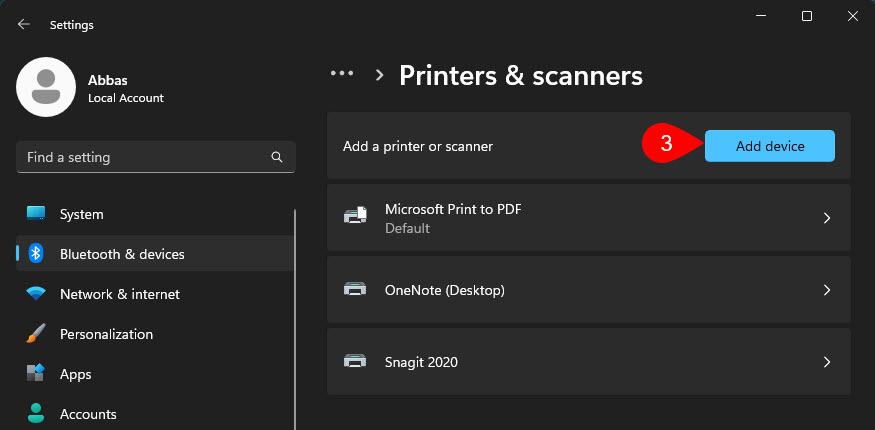
- After that visit the printers & scanners.
- Click on the Add a printer or scanner.
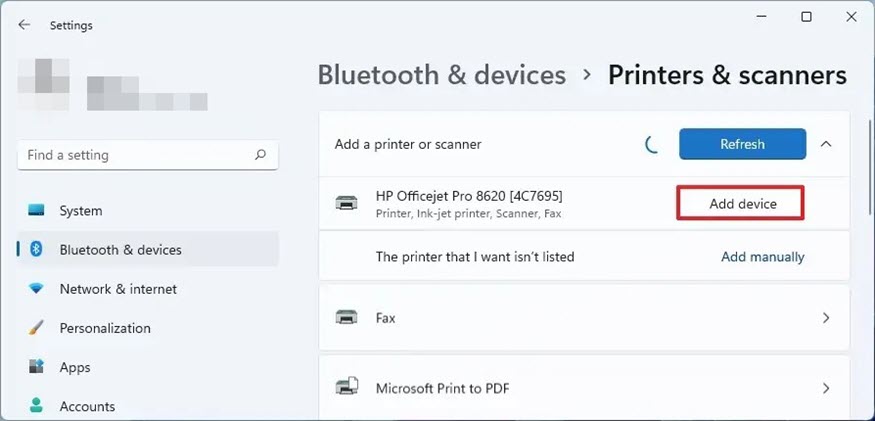
- After the printer is detected, click on Add device.
Please click on the images to zoom.
How to Install Wireless Printer Manually in Windows 11?
If your Windows 11 machine does not find the wireless printer’s name then you have to manually install the wireless printer. so here are the steps on how to install a wireless printer manually in Windows 11.
Note: Before starting to install manually wireless printer in Windows 11 you must perform steps 1 and step 2. If that did not work you have to store these in this technique.
- After the search for the printer is unsuccessful, an add manually option will appear, click on it.
- In the next window, you have to choose to Add a printer using a TCP/IP address or hostname.
- Following that you need to click next, for the next step from the drop-down menu in the device type choose Autodetect. And Make sure that the Query the printer and automatically select the driver to use box is checked.
- Following that confirm the printer’s IP Address.
- Click Next.
- Choose Do not share this printer.
- Again click next.
- This is the last page where you can print a test page and check out if the connection has been established correctly or not. Although it’s optional.
- Anyway click finish
How to Remove Wireless Printer in Windows 11?
- Launch the Settings App by pressing Windows + I.
- Go to Bluetooth & devices> Printers & scanners.
- Click on the printer that you want to remove from your machine.
- Click on Remove at the top.
Conclusion:
These were the steps that you can use to Install a Wireless Printer in Windows 11. Although keep in mind that Installing a Wireless printer will only install the basic driver for printing. If you use the printer for additional work, you must install the drive of the printer provided by the manufacturer.
Leave a Reply