
Virtual desktop is a feature that was introduced with Windows 10 and with Windows 11 it has gotten significant improvement. Which is a lot simpler for doing tasks separately for focusing only on one project. In Windows 11 the virtual desktop has gotten a lot better, for example, you can set a different wallpaper for each virtual desktop which makes it easier to distinguish one desktop from another.
What are Virtual Desktops?
Have you ever decided to complete your projects on different desktops and work on them separately one at a time? If yes, then the virtual desktops are exactly the feature that you are looking for. If you had a screen with multiple displays, you will remember that the same wallpaper with the same settings would have been applied to all of them. However, with the feature called task view in Windows 11, you can create separate Wallpapers for your separate screens. Even if you have a single screen you can create virtual desktops where you can work on a separate project at a time and switch between them. But remember that only the icons will be the same among all the virtual desktops. Even the background will be the same but you can change the background for each virtual desktop separately.
How to Create a Virtual Desktop?
With this significant improvement that Microsoft has brought to Windows 11 and on the virtual desktop, it is just located on the toss bar.
- Let’s get started with opening the task view. Click on the task view icon at the taskbar or simply press the shortcut Windows + tab on your keyboard. By default, the task view is always available on the taskbar and in case it was not available, right-click on the taskbar and choose taskbar settings. Find task view and turn it on.
- When you open the task viewer, you will see a Special screen showing all the active programs and applications. You will also be able to see all the currently active virtual desktops.
- In any case, if you want to create a separate virtual desktop, click on the task view and choose new desktop. Or simply hover your mouse on the task view and choose the new desktop. You can also use the Windows + Ctrl + D shortcut to create a new desktop.
- Once the new desktop has been created, simply click on it to switch to that. You will notice that everything is the same and works the same way as it was on your real desktop screen.
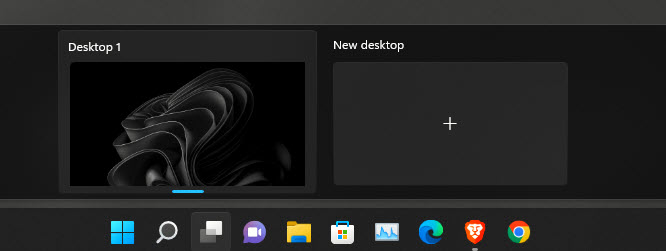
Create a New Virtual Desktop
Exactly what can you do on the virtual desktop? To put it in simple terms, you can do anything that you were doing on your real screen. For instance, you can open programs, play any type of game or save them in a specific snap layout. While at the same time you will notice that on your real desktop every setting has been preserved. If you want to differentiate between all the virtual desktops, it is advised to use separate Wallpapers for all the desktops.
Manage Virtual Desktops on Windows 11
As I said at the beginning of this article that in windows 11 the virtual desktop has got significant improvement over Windows 10. In simple terms, you can personalize each desktop for a separate job or function. There are several ways and methods that you can personalize each virtual desktop separately.
Steps to Change Wallpaper on a Virtual Desktop.
- Click on the task view in the taskbar.
- If you had not created a virtual desktop create it right away. To change the wallpaper of that specific virtual desktop, right-click on it and choose change background.
- Once you select change background, it will open personalization settings on the settings app. From there you can change or set any image or color as a background.
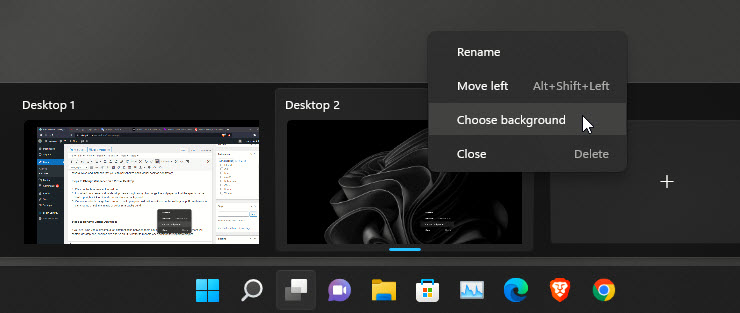
Change Background on Virtual Desktop
Steps to Rename Virtual Desktops:
If you are using virtual desktops a lot, differentiating between them could be a bit hard because all of them will contain desktop one, desktop two, and so on. It is better to rename each desktop for a separate project.
- Click on the task view icon on the taskbar
- Right-click on the desktop which you want to rename it. Choose rename and simply name it whatever you want.
- Do that for each and separate Virtual desktop.
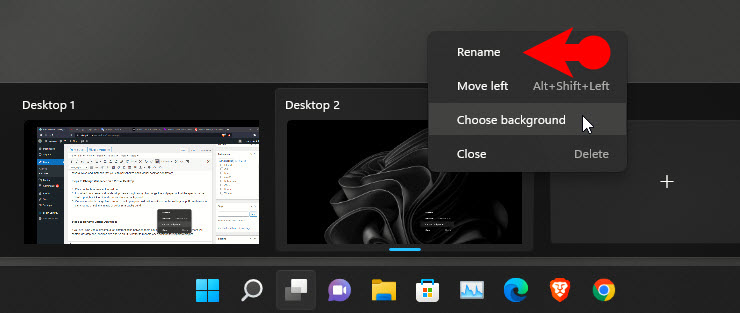
Rename a Virtual Desktop
Steps to Organize Virtual Desktops in order:
- You can organize the virtual desktops by simply dragging them.
- Or you have to right-click on the selected virtual desktop and choose to move right or left. The shortcut to move between the Virtual Desktops are Windows + Ctrl + Left/right arrow keys.
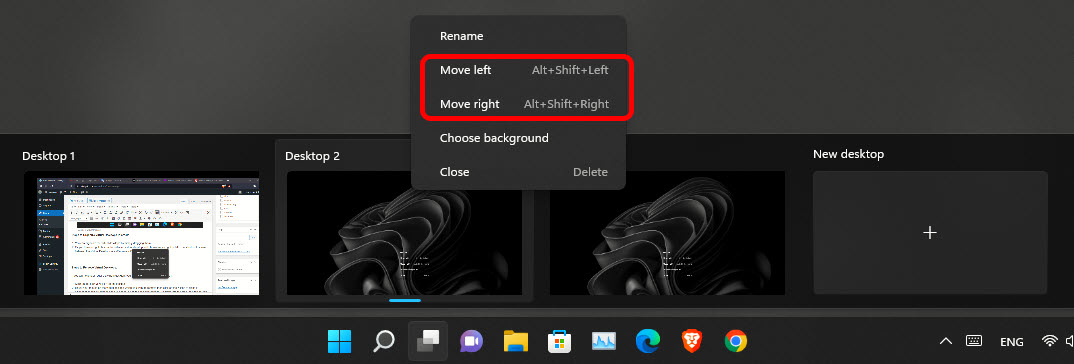
Organize Virtual Desktops in order.jpg
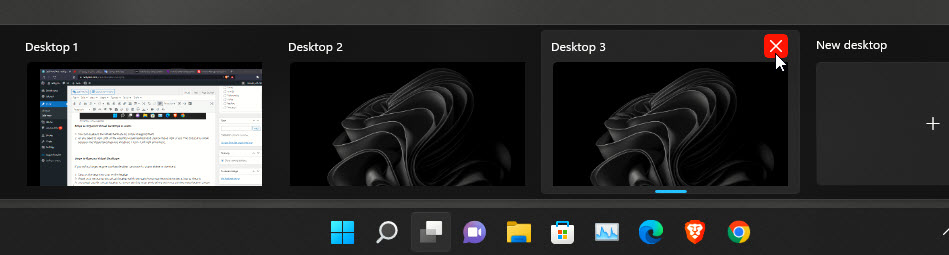
Steps to Remove Virtual Desktops:
If you will no longer require a virtual desktop, you have to simply delete or remove it.
- Click on the task view icon on the taskbar
- Hover your mouse on the virtual desktop which you want to remove then click on the X icon to close it.
- Once that specific virtual desktop is closed, all of its open applications will move into the main desktop screen.
Close the Virtual Desktop.jpg
Well, this is the official method that you can use to delete any virtual desktop. In the long term, it is taking quite a lot of time. However, just open the task view, and move on the virtual desktops using the arrow keys, this way the virtual desktop is selected. Press the delete key on the keyboard and the virtual desktop will close just like that.
Steps to Show a Specific Across all the Desktops:
If there is an application or a window that you want to be accessible across all the virtual desktops then you have to pin it to all the desktops.
- Right-click on the app on a specific virtual desktop.
- Choose to show this window on all desktops.
- If you have already opened that specific window across all the desktops, you can “Show Windows from this app on all desktops” will replace in that specific window that you have chosen.
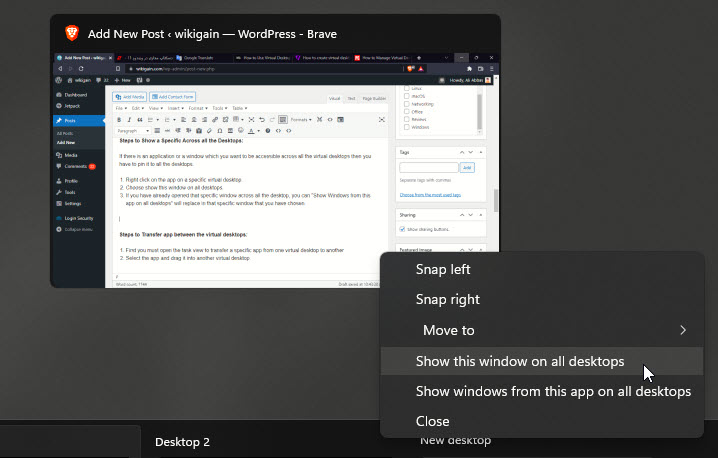
Show this Window on All Desktops.jpg
Steps to Transfer app between the virtual desktops:
- First, you must open the task view to transferring a specific app from one virtual desktop to another.
- Select the app and drag it into another virtual desktop.
Keyboard Shortcuts of Virtual Desktops:
If you want to use virtual desktops more efficiently perhaps it would be easier to know the keyboard shortcuts.
- Launch Task View: Windows + Tab
- Switch between virtual desktops: Windows + Ctrl + Left/Right Arrow keys
- Create a new virtual desktop: Windows + Ctrl + D
- Choose a virtual desktop in Task View: Arrow keys + Enter
- Delete a Virtual Desktop: Select the Virtual Desktop using the Arrow key and press the delete button on the keyboard.
- Close Task View: Press ESC
Conclusion:
Virtual desktops and task view or one of the productivity feature in windows 11 and Windows 10. In the end, I hope that this article has been helpful to you in working smartly and in an organized method.
Leave a Reply