
Let me guide you how to disable fast startup on Windows 11 and Windows 10. Once you disable the fast startup, it is going to fix the CPU uptime, even though I don’t care about the fast startup but sometimes a shutdown should fix an error. But because of the fast startup it is not going to fix the error, unless you restart the computer or you have to disable it and let the CPU rest for a bit. Before getting into disabling the Fast Startup, you need to learn What is Fast Startup, how it works and what are the pros and cons of this feature. Learn How to check the CPU Up time on your windows too.
What is Fast Startup (Pros & Cons) and How it works?
As far as I know with Windows 10 Microsoft introduced the fast startup which is increasing the startup process of your Windows. Apparently this is really a good and handy feature to quickly access your computer without wasting a lot of time. But sometimes it has a backlash on the users too. Specifically since it is not completely shutting down your computer instead it is putting your computer into a hibernation mode and when your computer restart it automatically grabs the files of the hibernation and you’ll be on your windows very quickly.
What is the backlash, well the backlash is that since it is putting your computer into into the hibernation mode the CPU is not completely shutting down. Instead CPU is totally up and running even if your computer is shut down. There are couple of methods that you can check the CPU up time how many days, minutes and weeks it has been running without completely shutting down. This is the setting which is not letting CPU to rest for a while.
The other backlash of using fast startup is that updates require a full shut down of the computer. And if the fast startup is enabled mostly it is not going to and install those updates unless you restart or disable the fast startup.
According to howtogeek.com, TrueCrypt users have also reported an issue regarding the encryption. Before shutting down if the drive is mounted, after the restart of the computer you will notice that it is still mounted. This is the issue that the TrueCrypt users have reported. For that the answer is to manually unmount the encrypted drive or disable the fast startup.
Note: Fast startup mostly depends on the hibernation, since most new computers come with the hibernation feature, you can assume that the fast startup is also supported. Older pieces mostly do not support the fast startup so you’re good to go.
How to Check CPU Uptime on Windows 11 and Windows 10?
Before getting into enabling or disabling the fast startup on your Windows PC, you need to learn how to check the CPU uptime on your windows machine.
There are several methods that you can use to check the CPU uptime. But the most common method that everyone is using it is the task manager. On the Windows 10 you have to right click on the taskbar and choose task manager. In windows 11 you have to right click on the start menu icon and choose task manager. After doing that make sure to change the view of the task manger to more options.
Go to the Performance tab> click on the CPU and check the CPU Uptime.
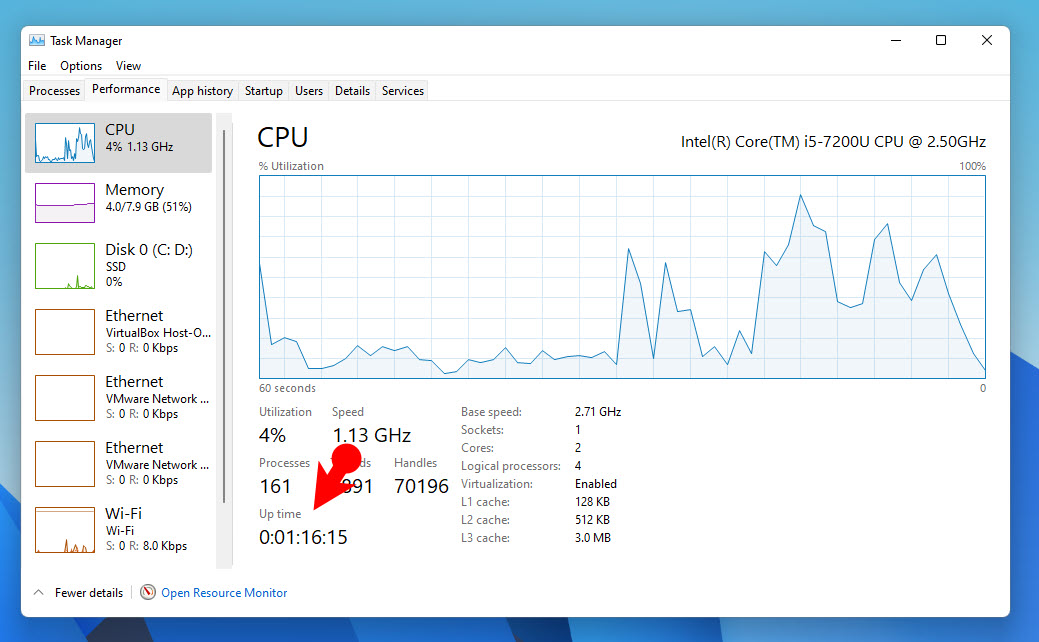
Check CPU Up time
There’s also the CMD that you can use to check the CPU uptime too, for that you have to run CMD and execute the following command.
net statistics workstationAfter executing the command, you will see a “statistics since” which is also highlighted on the screenshot too. You have to count the timing and the date since the CPU is running.
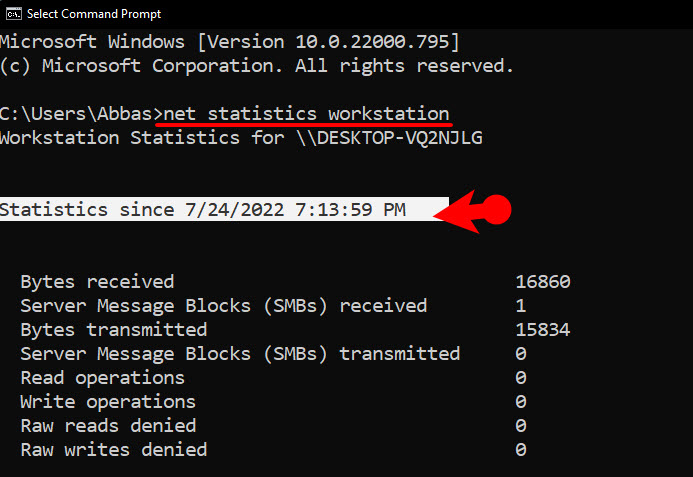
Check CPU Up time using CMD
Or the other way is you have to type systeminfo on this CMD and execute or after executing you have to find the system boot time. Yes, it includes calculating the time for how much long the CPU has been running, so you have to do the math yourself.
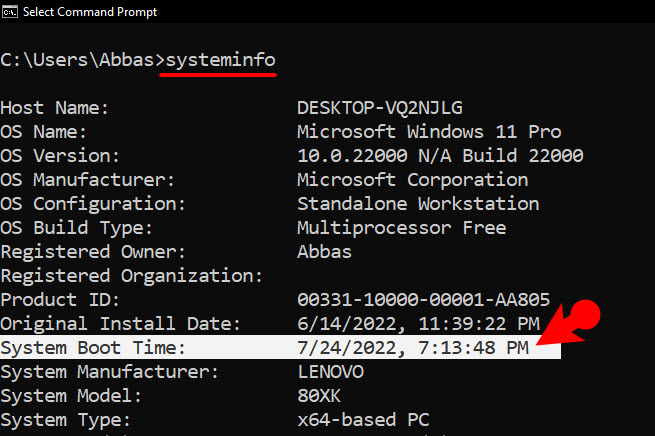
System Boot Time
How to Enable or Disable Fast Startup on Windows 11 and Windows 10?
In order to disable or enable fast startup on windows 11, there is not a direct option in the windows settings. Instead you have to use the old control panel which is still available in windows 11 to enable or disable the fast startup for the stop so here it is
Open control panel by typing control panel on the search box at the taskbar, once it is open click on view and change it from category to large icons. Or you have to simply search for power options in the taskbar and open it.
After accessing the power options, on the left panel click on what the power button does.
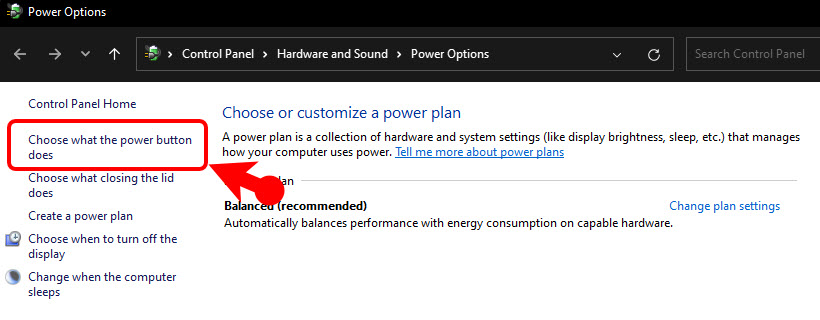
Choose What the Power Button Does
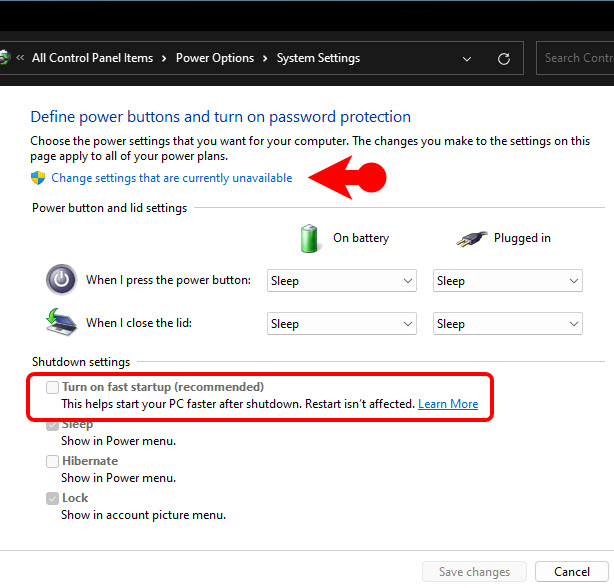
Next, click on change settings that are currently unavailable.
Then simply uncheck the box of turn on fast startup (Recommended).
Save the changes, shutdown the computer then simply than check the CPU Uptime.
Change the Settings that are currently unavailable
Conclusion
In this article basically you learn what is fast startup, how it works what are the pros and cons of this feature. You also learn how to check the CPU uptime and finally how to enable and disable the force startup on your windows 11 and Windows 10. I hope that this article has been helpful to you and let me know your thoughts about it in the comment section.
Leave a Reply