If you are shooting a lot of videos using your iPhone, perhaps you may run out of storage. What is exactly the solution to free some storage on your iPhone? The essential methods will be to remove unwanted videos, photos, applications, and other unwanted data. The solution to this problem is either you have to use cloud storage to upload your videos, move them into your hardware or reduce all the file sizes available on your iPhone. Also, what if I tell you that you can decrease the video size of video while shooting on your iPhone? In simple terms, you can compress the video size on your iPhone without losing any quality, and then later you can add it and upload it anywhere that you want. In any case, our main goal in this post is to guide you on how to reduce video size on iPhone.
Reduce Video size on iPhone 14, iPhone 13, etc.
iPhone always prefers to record videos with the best and highest resolution or frame rate. Based on your type of work, you can decrease or increase the frame rate to suit your need. In my case, if I have to decrease the resolution and frame rate, the result will be a lower video size with a different quality. For instance, the default resolution for video on iPhone is 1080P with 60 fps (frame rate per second). You can decrease the video resolution from full HD to HD resolution and select a frame rate of 30.
Here are the steps to change the video resolution on iPhone.
- Open the camera and tap on the settings.
- You must visit the record video settings.
- You will see the current settings for shooting videos. For now, you will have to choose 720P with the 30 FPS.
After implementing this setting, the video size will be reduced and it will save a lot of storage than you think.
Note: At the bottom of the record video settings, you will notice that apple has mentioned that 720P which is called HD resolution with 30 FPS is the space saver. Aside from that, you can see the other resolutions’ settings and sizes.
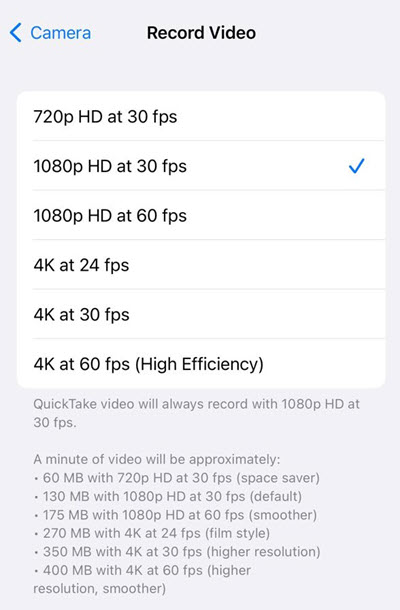
Record Video Settings on iPhone
Compress video size on iPhone using third-party apps
If you are not satisfied with the default feature of the iPhone to reduce video size, perhaps you may have to look into the App Store. Fortunately, there are many apps available across the App Store but I prefer the video compress app, InVideo(Filmr): Video Editor and Compress Videos & Resize Video, I am certain by using these applications you can compress the video size without losing quality.
Compress Video size using Video Compress App
Steps to reduce video size on iPhone using Video Compress:
- First, you have to download the video compress application from the App Store on your iPhone.
- Following that you have to launch the application and tap on the gear icon. It is going to open the settings.
- Tap on export file type and choose the video format that you need.
- Following that you have to allow access to the photos and videos on your iPhone for the application.
- Finally, you can choose the video that you want to reduce, select it and move on.
- The final step is to use the slider to reduce the video size as much as you want, whenever you are happy with it, tap on the save in the top right corner.
- Please wait a while until the application compresses the video.
- After the video is compressed, it is going to be saved automatically into your gallery on your iPhone. And in the final screen, the application is going to provide the option to delete the original video.
Reduce Video size on iPhone using InVideo(Filmr)
InVideo(Filmr) is a professional video editing application that is specifically available for App Store on the Apple ecosystem. Once the video is imported into this application, alongside the different experimentation, you can export it into different qualities without losing the quality.
Steps to reduce video size on iPhone:
- Get the application from the App Store.
- Tap on import video if you are opening the app for the first time and select the video that you want to reduce its size. However, if you are opening the app for the second time, tap on the camera roll at the bottom, select the video, and import it.
- You can apply changes that you want to the video, after that you have to tap on the share icon in the top corner of the screen.
- On the next page tap on save.
- Select the video resolution and FPS, then finally tap on export.
As I said earlier that there are many applications that you can use to use it to reduce the video size on your iPhone. The process is simple, you just have to install the application and then import the video, apply the settings that you want and finally save it.
Reduce Video size on iPhone using Online Tools
If you are not satisfied with the default options of video settings on your iPhone, or the applications on the App Store, then perhaps the last resort is to use the online tools to do the job. Please keep in mind you should not upload your sensitive information to online cloud websites that you do not trust. Tons of online websites available can reduce the video size but each one has its settings. For instance, you can upload up to 1GB of video, the other one will save the video for 1 hour.
Here are some of the websites that you can use to reduce the video size.
Conclusion:
These are the methods that you can use to reduce video size on your iPhone easily. Please keep in mind if there is another application or an online tool that is better than the tools mentioned in this article, mention it in the comment section.
Leave a Reply