
In this article, I am going to show you how to enable and setup iMessage on iOS devices. iMessage is an instant messenger service developed Apple Inc. It was announced by Scott Forstall in WWDC 2011 keynote on June 6, 2011. finally, it was included in the iOS 5 update on October 12, 2011.iMessage is supported by the messenger application in iOS 5 and later. iMessage is for Mac OS X also with version 10.8 and later. iMessage allows users to send texts, documents, photos, videos, audio and video messages and much more with internet access over Wi-Fi and mobile data. With iMessage, you can group chat and All iMessages are encrypted and can be tracked using delivery receipts. There is no SMS charge associated with the messaging. So follow this article step by step to enable and setup iMessage on iOS Devices.
Remember: iMessage are blue. when you sent a text message with iMessage it’s blue. If you see the green color, then that’s your Carrier SMS. Via iMessage, you will get a quicker response.
Enable and Setup iMessage on iOS Devices
Step #1. Go to Settings then scroll down to iMessage and tap on it.

Settings-Messages
Step #2. Turn on iMessage, then in order to use your Apple ID for iMessage Setup tap on“Use your Apple ID for iMessage.”
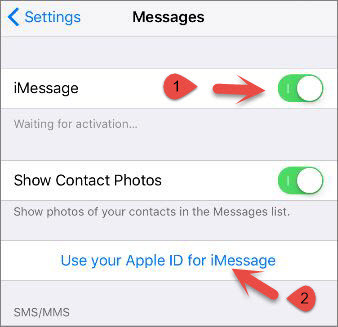
Enable iMessage Then Tap on Use your Apple ID for iMessage
Step #3. Enter your Apple ID with Password then tap Sign In button to use your Apple ID for iMessage, finally tap on Next.

Apple ID Sign In
Step #4. In order to allow iMessage to notify your messages to other people, as Read turn on or enable Send Read Receipts just by sliding the button to the right. Then turn on Send as SMS also it will send your messages as carrier SMS whenever iMessage is unavailable.
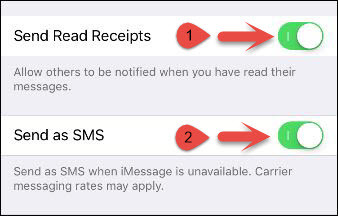
Send Read Receipts – Send as SMS
Step #5. Then tap on Send & Receive. Under “You Can Be Reached By iMessage AT” Choose which email addresses and phone numbers you want to people to use them to send you messages. and under “Start New Conversations From” choose which email address or phone number you’d like to use it, to send outgoing messages to your friends or other people.
Note: You can select only an email address or only a phone number for sending outgoing messages to your friends or others people.

Send & Receive
Step #6. MMS messaging is enabled by default. So in order to Show Subject Field while sending messages, enable it. And if you want to count your typed characters, then enable Character Count.

SMS – MMS
Step #7. Tap on Keep Messages then selected a time for keep messages. for example, I have selected 30 Days, so after 30 days my messages will be deleted automatically.

Keep Messages
Step #8. Choose an Expire time for AUDIO Messages and VIDEO Messages. so when you send, view or listen to an audio or video messages, it will automatically be removed from your conversation. at the end, you can enable Raise to Listen also if you want, raise to listen allows you to quickly listen and reply to incoming audio messages by raising the phone to your ear. it’s only for audio messages, not for video messages.
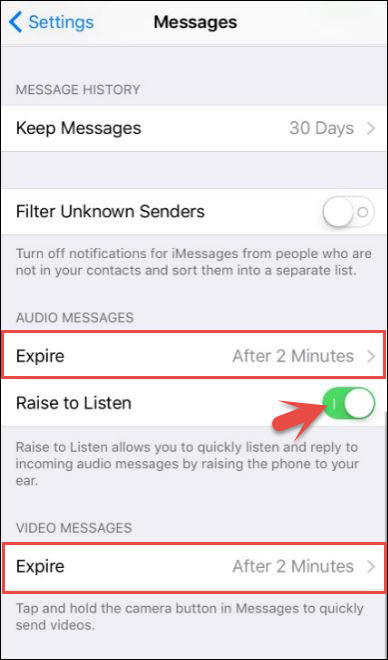
Message History
Wikigain recommended articles:
- How to Enable FaceTime on iOS Devices?
- How to Enable and Use Restrictions on iOS Devices?
- How to Add Passcode on iOS and Android?
- How to Enable and Customise AssistiveTouch on iOS Devices?
- Reset Disabled iPhone or iPad Passcode in an Easy Way?
- How to Set up Auto Apps Update on iOS Devices?
This was all about how to enable and setup iMessage on iOS devices. If you faced any problem tell us below by comment, feel free to tell us. we’re waiting for your suggestion.
Leave a Reply