
Installing various operating system is an interesting task and I enjoy it a lot. You might know that how to create bootable USB for Windows and also create a bootable USB for Mac OS. In this article, I’m going to show the easiest and better that you can create bootable USB for Kali Linux or Ubuntu. For this demonstration, I want to use the “Universal USB Installer” software. And you will get more information about this software. How It works and how to create bootable USB for Kali Linux using universal USB installer. Read this guide very cautiously.
What is Universal USB Installer?
Universal USB Installer aka UUI is a Live Linux USB creator that allows you to choose from a selection of Linux Distributions to put on your USB Flash Drive. The Universal USB Installer is easy to use. Simply choose a Live Linux Distribution, the ISO file, your Flash Drive and, click Install. Upon completion, you should have a ready to run bootable USB Flash Drive with your select operating system installed.
Create Bootable USB for Kali Linux
Before creating bootable USB for Linux, you have prepared the following requirements in order to create bootable USB for Kali Linux.
Once the download is completed, follow these instructions. Open the universal USB installer. This software is portable and does not need installation. Just click on the software then create bootable Flash drive for Kali Linux.
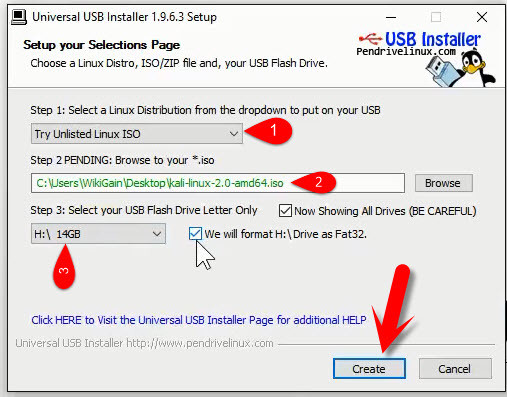
- Step #1. Select a Linux Distribution from the dropdown. Choose “Try Unlisted Linux ISO“.
- Step #2. Choose the Kali Linux ISO file that you have downloaded.
- Step #3. Select your USB thumb drive.
- Step #4. Check out the “We will format drive x”. And finally, click on the “Create” button.
Create Bootable USB for Kali Linux
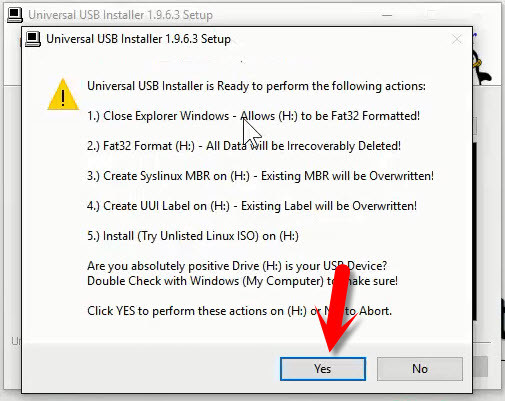
Now, you will see a warning message that pops up for you. This message is about the formatting USB flash drive. Click on “OK” button to continue the process.
Create Bootable USB Flash Drive for Linux
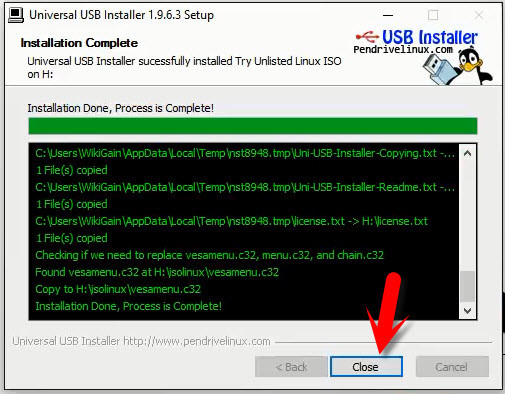
Right after clicking on the “OK” button on step 2, wait for some minutes to complete. It will take around 20 to 30 minutes.
Creating Bootable USB for Kali Linux
Conclusion
This was the simple and easy method that you can create bootable USB for Kali Linux. Creating bootable USB for Linux is not so difficult. If you have got any problem, feel free to share with us via the comment form below. Thanks for being with us.
can we follow the same instructions and run kali linux live from a sd inplace of a usb drive
I tried everything as you said, the process was simple indeed, but the bootable media could not be detected. Therefore it didn’t work on my laptop
PASSWORD AND USER NAME??
Thanks for the article. Easy to follow.
I did all that, booted my Dell laptop and it rejected the device/image at the (F12) boot menu because the boot device was not digitally signed. I dont know how to do that.
Also, I didnt verify the ISO download as it appears to be Linux commands and at moment I only have Win10 available…. any clues ? Thanks!
My PC is showing selected boot image did not authenticate.press enter to continue.
If I press enter it is booting with Windows 10, how to solve this
How much Storage is required of a Usb
Minimum 8 GB.
I did all things you mentioned.but i dont know how can i boot the usb in windows 8.1 please give me the answer.i s it necessary to download sha256 sums.gbg file
Try your boot menu key. If you don’t know your boot menu key just click on this link.
IS THERE ANY KALI LINUX DISK WHICH WE CAN INSTALL DIRECT TO MY COMPUTER ?
KIYA ASE KALI LINUX DISK HA JESA HUM WINDOW 7 ETC ISTIMAL KARTY KE INSTALL KROM ?
You can install Kali Linux on your real machine as well.
This is great article and helpful for new users
Is universal usb installer recommended or must?
If you have Kali Linux DVD, you don’t need USB Installer
I have done the things in your article, and I have also partitioned my USB drive to allow for kali linux persistence, but I have not been able to find how to actually boot up linux and set up persistence, and use linux, could you explain how this can be done?
We should format to fat32 or not? thanks
Yeah, It’s mentioned in the screenshot.