In this article let me guide you how to share files between windows and Kali Linux easily. Apparently, file sharing process between Windows and Kali Linux is not hard as you think, In fact it is really simple. The whole process is to share folder or a file from your windows and then access it on Linux. In between these two options, some settings must be configured. Settings such as the network discovery, setting up a shared folder, configuring permissions to the specific user, accessing the shared file on Linux and more.
Steps to Share Files Between Windows and Kali Linux Easily
Step #1. As I said earlier that you must make sure that both the Windows 10/11 and Kali Linux operating system should be running on the same network. The easiest method that you can use to check if they are on the same router is to simply check their IP address.
To check the IP address of your windows computer, open CMD and type ipconfig
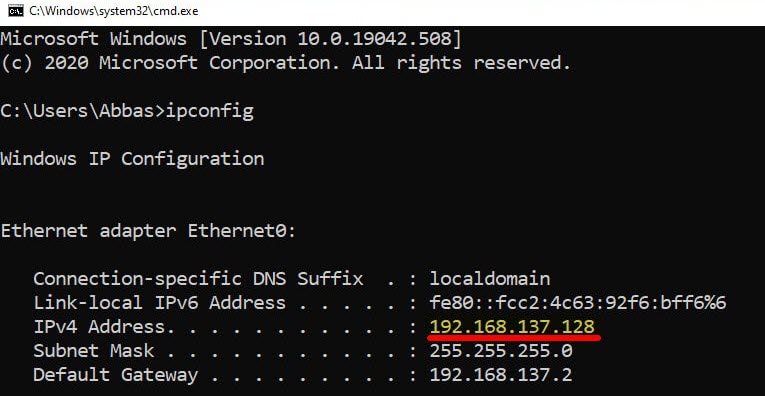
Check IP address in Windows
To check the IP address of your Kali Linux operating system, open terminal and type ifconfig
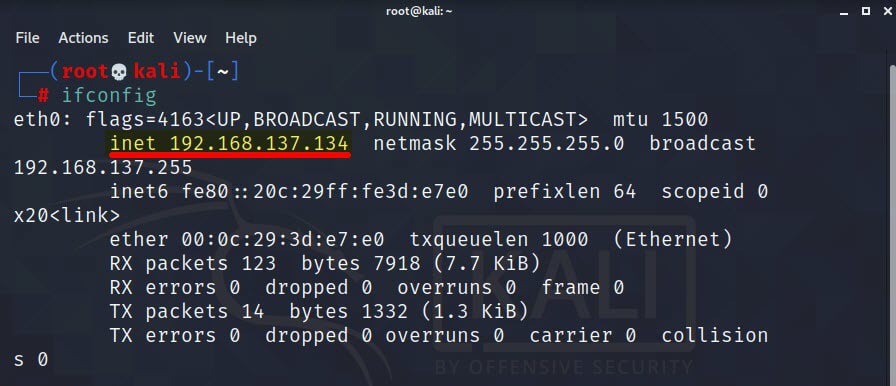
Check Kali Linux IP Details
Note: If you do not know if you are operating systems are on the same network then perhaps you do not know the fundamentals of IP address and its classes. That’s why it’s better for you to learn about IP address, the IP classes, this way you will know if your systems are on the same network or no.
Step #2. After checking if your both systems are on the same network, the second step is to share a folder from your windows computer. This also means that by now you have configured the network discovery, and the network sharing settings.
Steps to share a folder on Windows 10/11:
- To share a folder, rightly click on the folder and choose properties.
- Go to the sharing tab and click on advanced sharing.
- Check the box of share this folder.
- Click on Permission.
- After that click on add.
- Than type the name of local user that created earlier, and if you have not created a user, type everyone and click on check name.
- Than you have to grant the user full control.
Step #3. in order to access the share folder, you must create a folder on your desktop or any other location that in Kali Linux, name the folder anything that you want, I will name it Filessharing.
Launch Terminal and execute the below command.
mount.cifs //Win11/shared /root/Desktop/Filesharing -o user=kali
Note:
- Win11 is the name of my Windows computer, you have insert your own windows computer name.
- Desktop/Filesharing is the place where I have created the folder to access shared windows files. If you have created the folder anywhere else in Kali Linux, type that path.
- And also, replace kali with the user name of your Kali Linux operating system.
After inserting the command, Kali Linux asks for the root password, enter it and you will be able to access the shared Windows files.
Conclusion:
You got the idea that sharing file between Windows and Linux is really simple. Just make sure they are on the same network than share a folder, finally access the share file on Linux.
Watch the video:
https://youtu.be/xIWpO4LaKCU
Leave a Reply