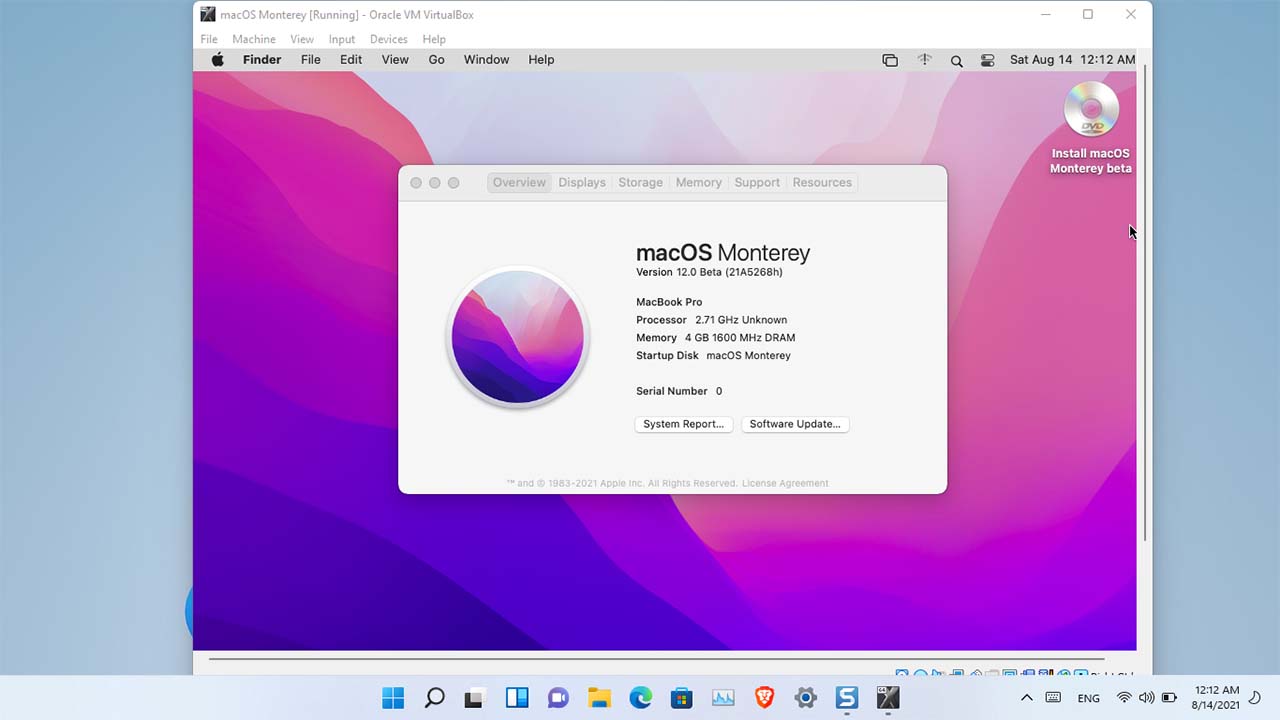
Do you want to try and install macOS Monterey on Windows 11 or other Windows operating systems, if yes follow this post to the end and find out How to Install macOS Monterey on VirtualBox on Windows 11?
macOS Monterey is the next operating system that is currently in the beta version and soon enough it is going to replace the macOS Big Sur on the apple operating computers on the market. This operating system is very cool and it has tons of new features and among them, it is very good for the developers that are interested to create something new. So, if you want to try and use the macOS Monterey on the actual PC, then you have to probably buy an Apple PC or you’ll have to build a Hackintosh from scratch. Now both of these scenarios cost a lot of money and for that scenario, in my mind, I propose a new idea and which is to install macOS Monterey on VirtualBox on Windows PC. There’s also the scenario of, not liking the macOS Monterey, so, it is better to test it in a virtual machine than to buy a new PC and test it there.
Steps to Install macOS Monterey on VirtualBox
- Download the Required files
- Install VirtualBox and create a new virtual machine
- Configure Virtual machine settings
- Install macOS Monterey on the VM on Windows PC
Step #1. Download the Required files
There are some files and software that you have to download before installing the macOS Monterey on the virtual machine. So, the first step is to download VirtualBox which is an open-source virtualization software and the other thing is that you have to download the VirtualBox codes to configure the VM. Finally, you’ll have to download the macOS Monterey ISO image, you can get all of them from the below links.
- Download VirtualBox
- Download VirtualBox Extension pack
- Download Codes to Configure the Virtual machine
- Download macOS Monterey ISO Image
- Create macOS Monterey ISO Image
Step #2. Install and Create a New VM
The second step of installing macOS Monterey on VirtualBox on Windows PC is to install the VirtualBox on the PC. Double-click on the setup, click next, next, and next finally install it on the PC. To be exactly sure the installation process is not very hard, in any let me know if you are stuck at someplace, I would be happy to help you.
After installing the virtual machine on the PC, double click on the VirtualBox extension pack and choose install. Or open the virtual machine go to the preferences, go to the extensions category and click on the plus icon and located the VirtualBox extension pack, and then simply install it.
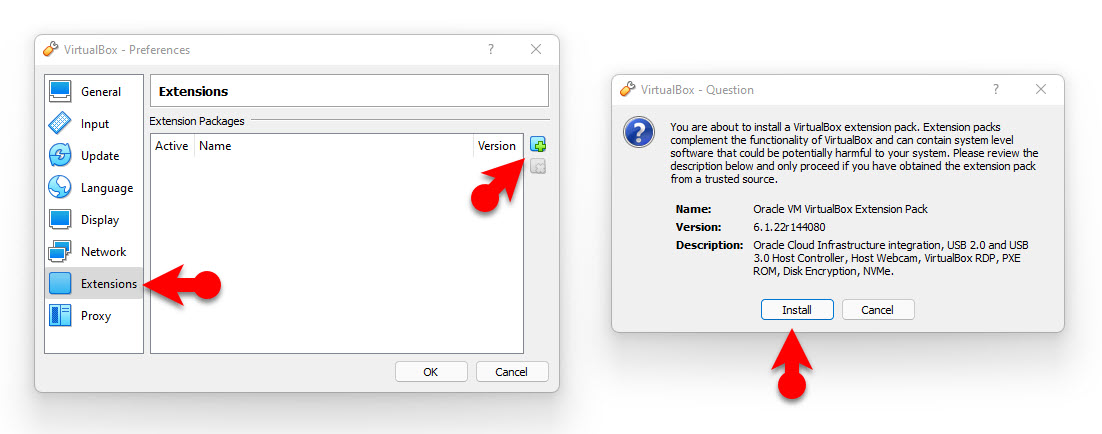
Install VirtualBox Extension Pack
Now to begin the real process of installing the macOS Monterey on Windows PC, you have to create a new virtual machine. On the home page of the VirtualBox click new, and then click on the expert mode.
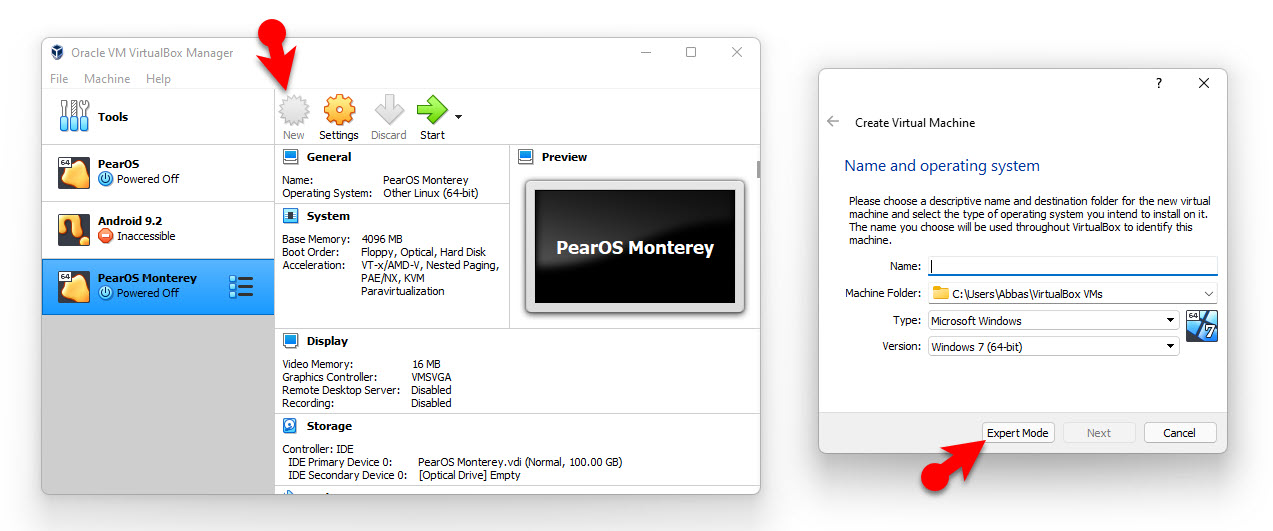
Enable expert mode
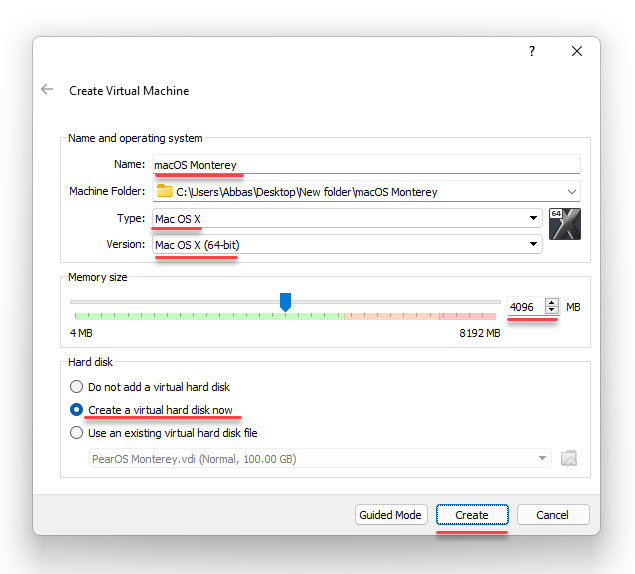
it is time for us to specify a name for the virtual machine and choose the guest operating system’s type and version. And do not forget the amount of ram that you have to put there, at least 4GB will be fine, and finally choose to create a virtual hard drive and click create.
Insert Guest Details
specify the amount of storage that you want in the macOS Monterey on the virtual machine. I’ll go with 100 GB and leave the rest of the settings by default as they are.

Configure Storage
Step #3. Configure Virtual machine Settings
To be exactly clear there are some settings that must be applied to the virtual machine specifically for the macOS. And besides, we will have to add the macOS Monterey ISO image to the virtual machine. To attach it, on the home page click on the VM settings that contain the macOS. Then go to the storage, click on the empty icon and then click on the CD icon and locate the macOS Monterey ISO image.

Add macOS Monterey ISO image
We also need to disable the floppy disk from the boot order, to disable it, go to the System tab and then uncheck the box of the floppy disk.
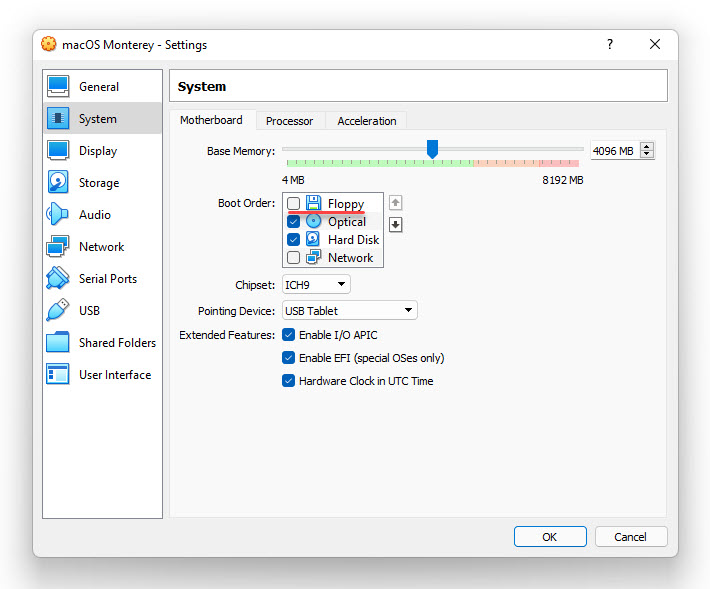
Uncheck Floppy Disk
Next, we need to increase the number of processors, under the system tab, there is a processor tab, go there and increase it to at least 2 processors.
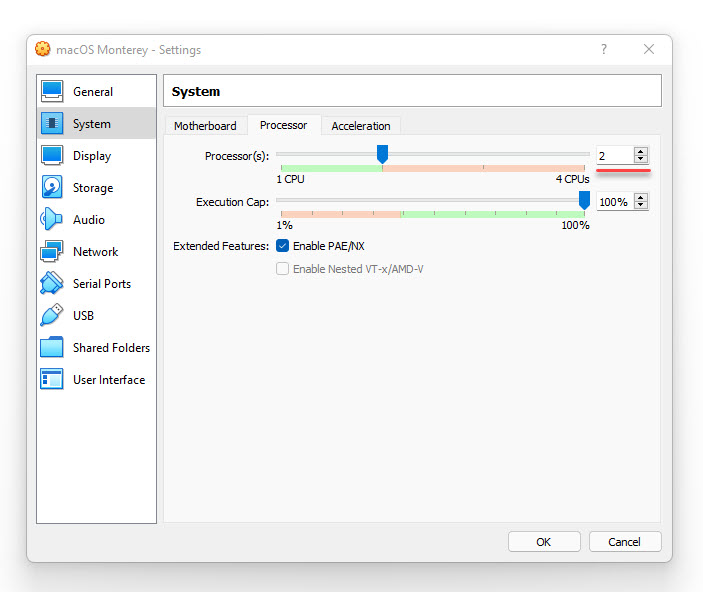
Increase Processor Number
we also need to increase the video memory for the macOS Monterey on the virtual machine. To increase it, go to the Display tab and take it all the way up to the last which is 128 MB.
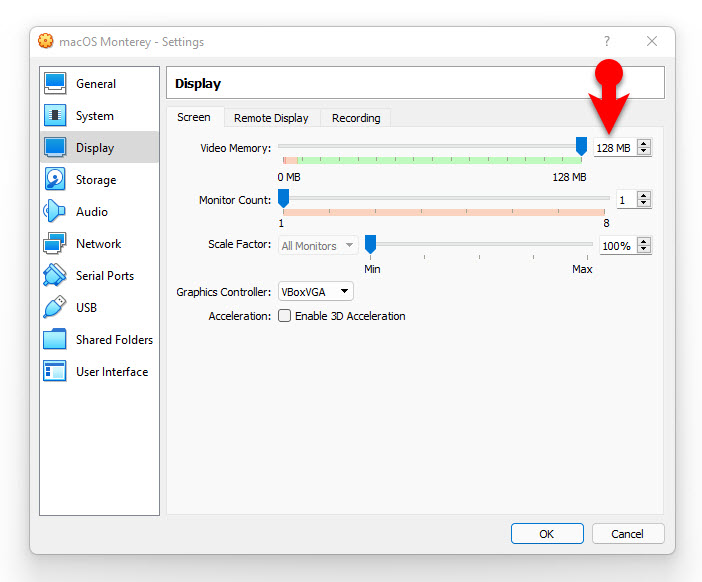
Increase Video Memory
Also, enable the USB 3,0 from the USB tab panel.
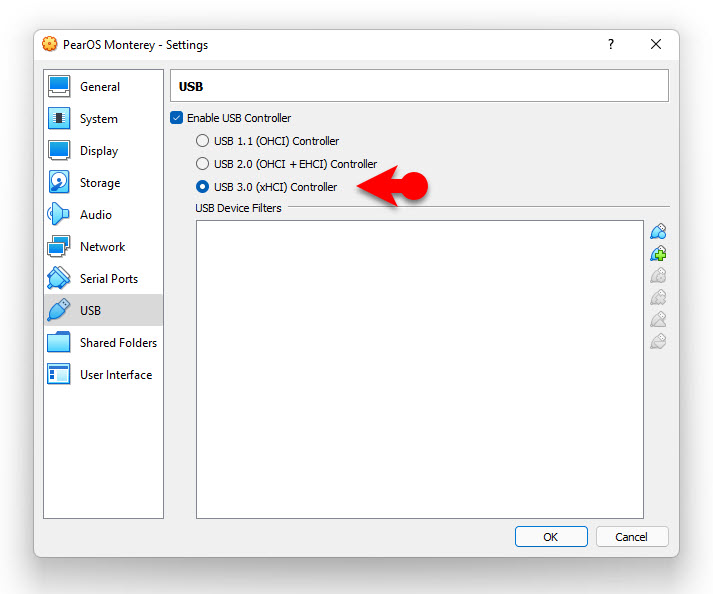
Enable USB 3.0
Once you are done with configuring all of these settings for the virtual machine, there is another setting that must be done from the CMD as administrator. So, go to the File menu and close the VirtualBox. Then opened the notepad file that you downloaded. Now replace the VM name with the name of the virtual machine that you inserted for the macOS Monterey.
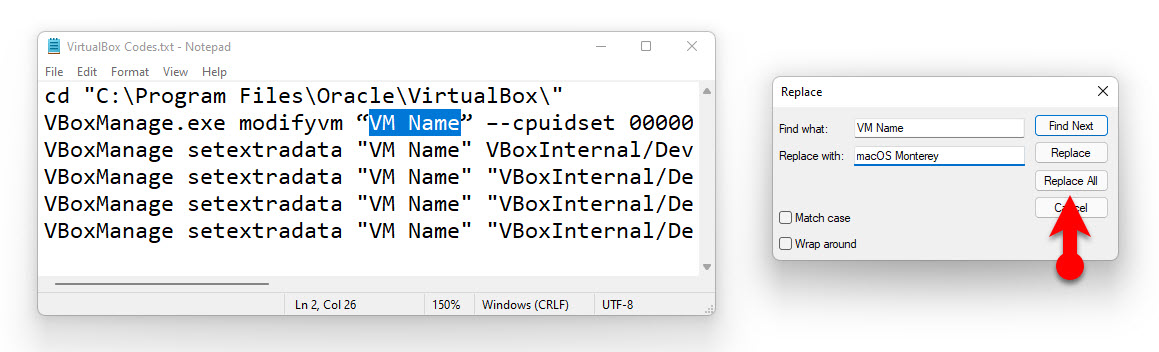
Modifying the VM name in the Notepad
Now launch CMD with the administrator privileges.
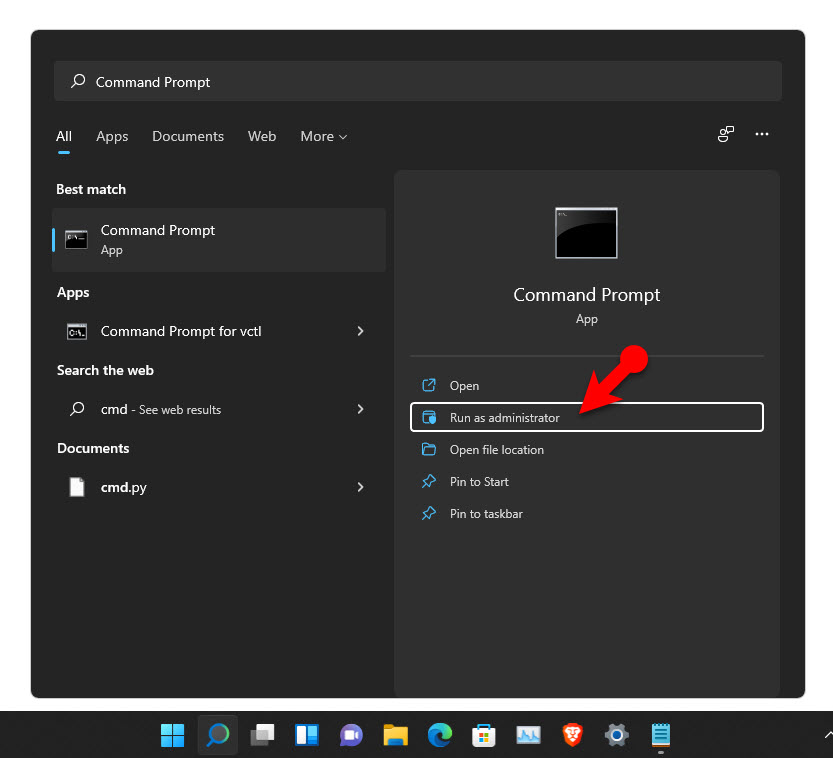
Run CMD as Admin
Copy all those lines of codes from the notepad and paste them one by one on the CMD and press enter.
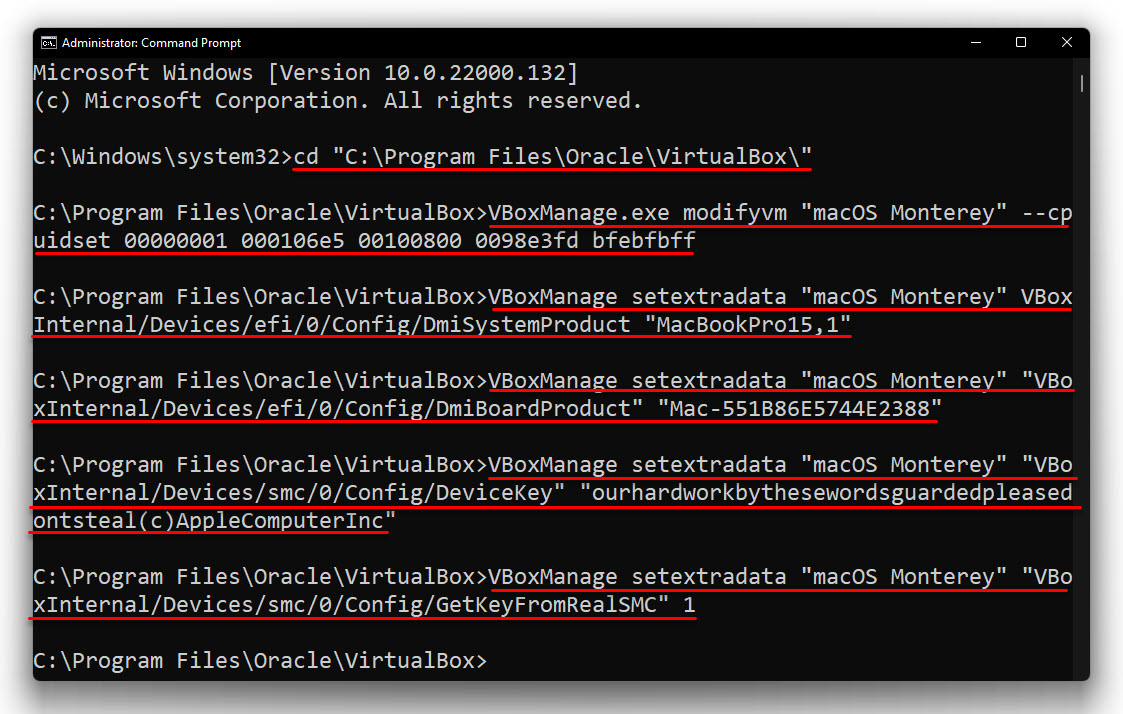
Run the codes in CMD
Step #4. Install macOS Monterey on the VM on Windows PC
It is time to begin the clean installation of the macOS Monterey on the virtual box on windows 11. So power on the virtual machine from the home page of the VirtualBox and wait until all those lines of codes should go away. After that one, you will be on a panel where you will have to choose a language.
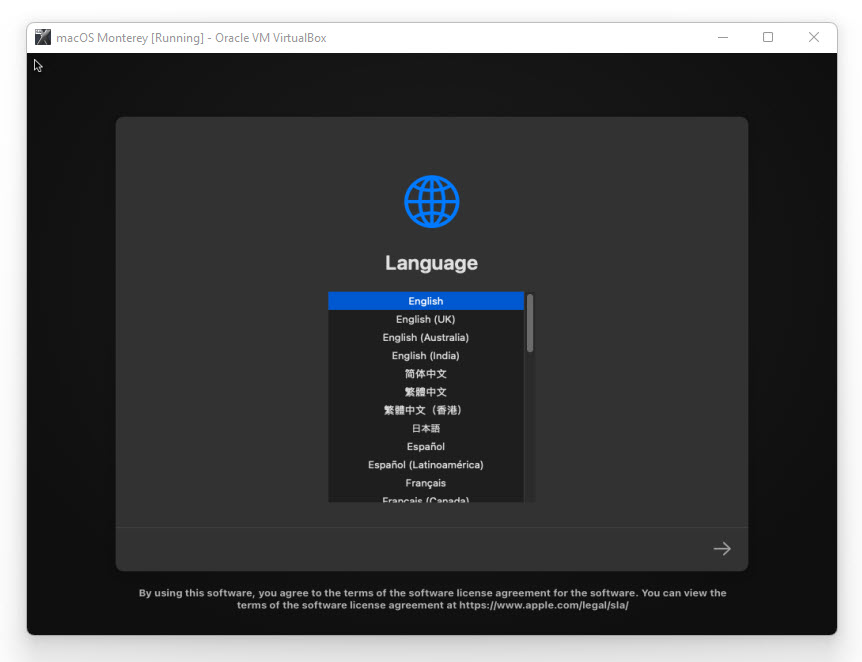
Choose a Language
Choose Disk Utility.
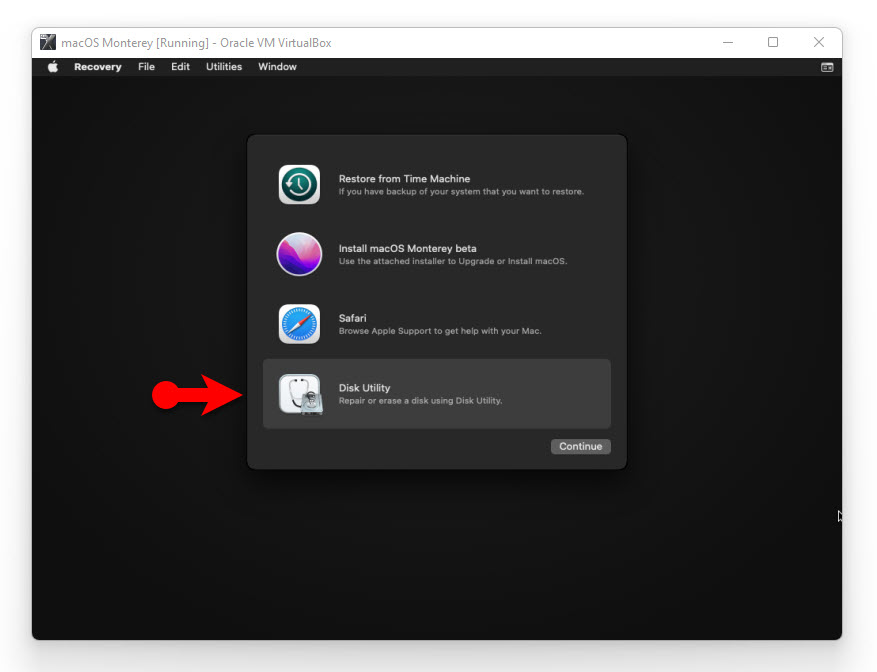
Choose Disk utility
Click on the erase icon.
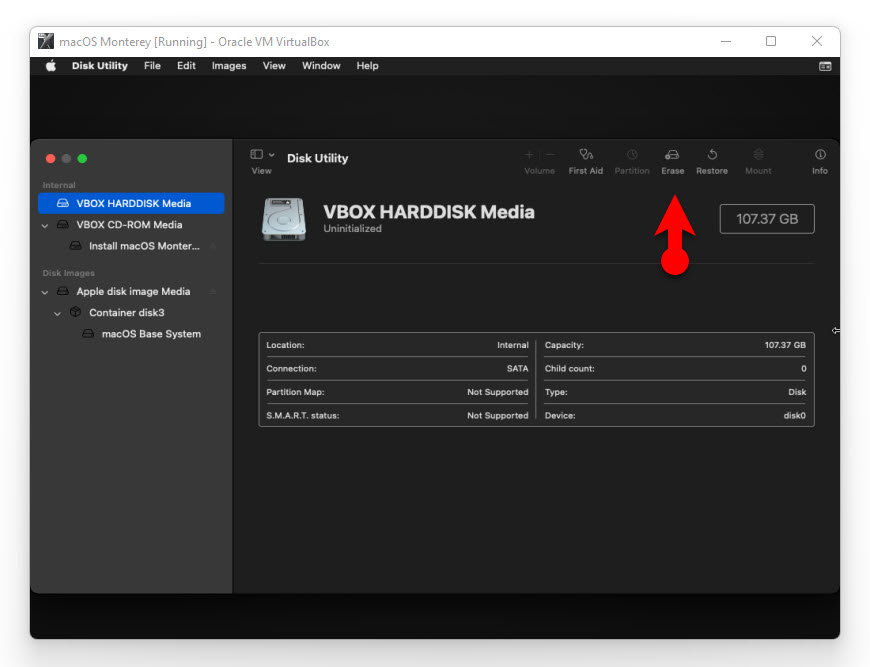
Erase the Disk
Name the Volume for the macOS Monetary and erase it with the following settings. After, that close the Disk utility.
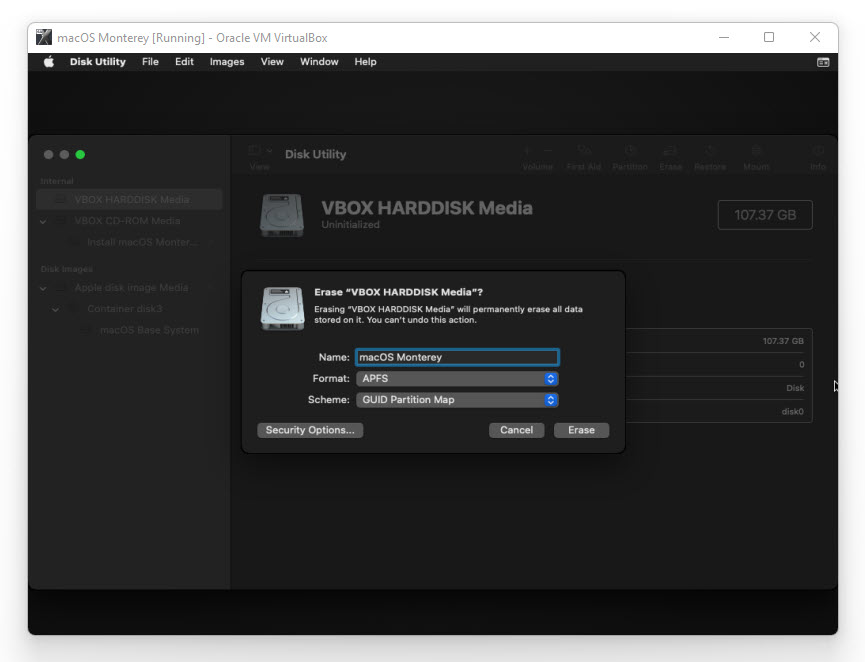
Partition type
This time instead of disk utility, choose Install macOS Monterey.
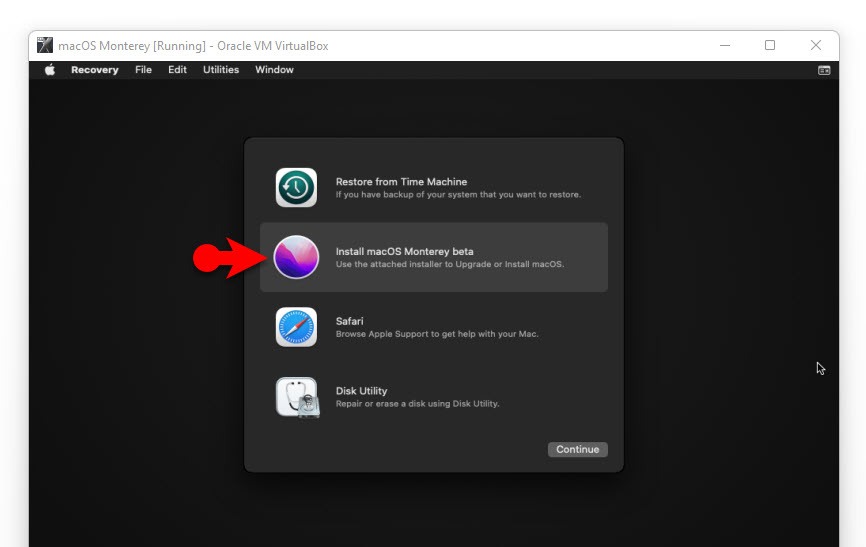
Install macOS Monterey.jpg
Click Continue.

Continue Installation
Agree to the terms and go on.
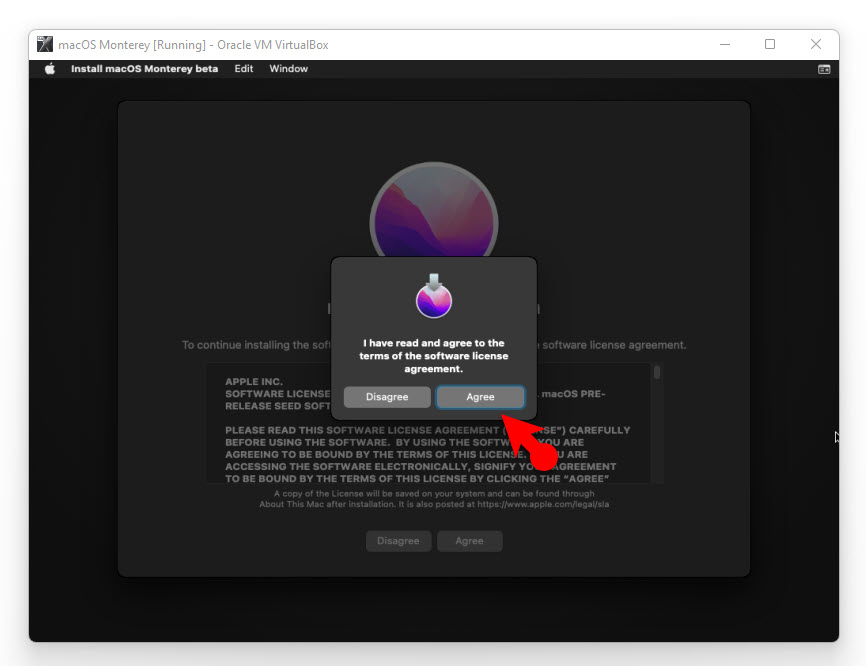
Agree to the terms
Choose the drive that was just erased a moment ago and click continue.
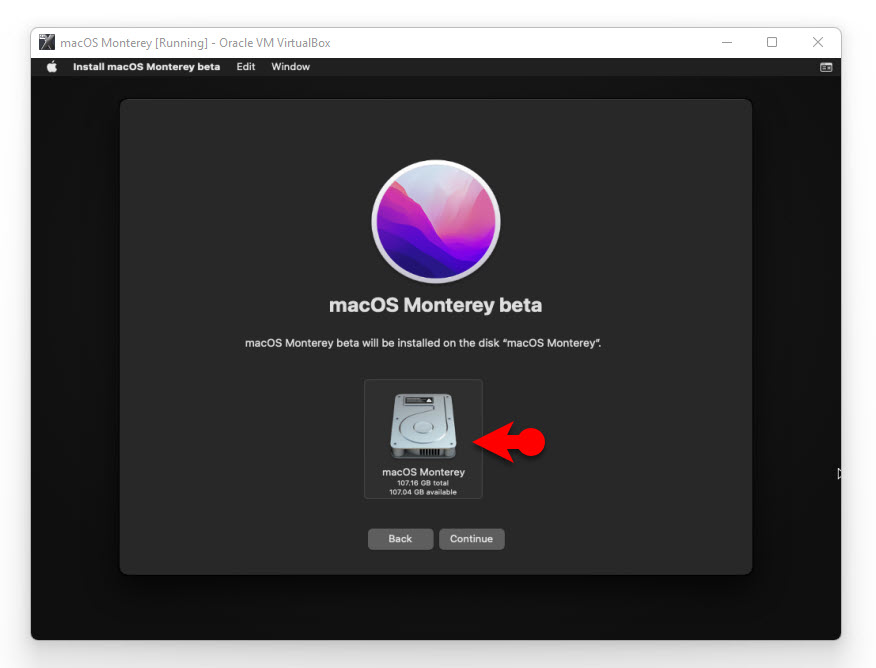
Choose the HDD to Install
OK, after this you’ll have to wait at least one hour to copy the files from the ISO into the hard drive. Remember that during this process the OS will restart several times, and once they are restarted finally you will be in the region panel.
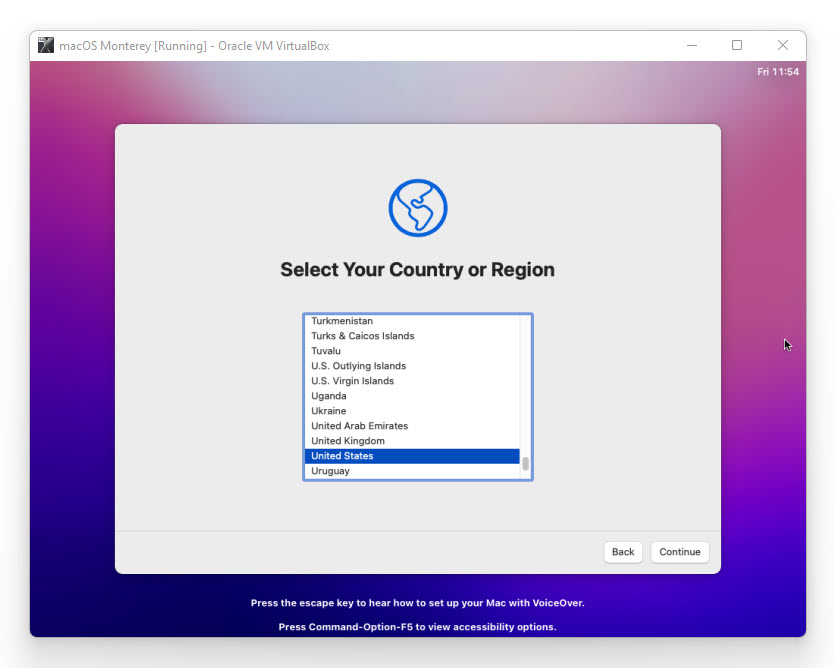
Choose Your Country
After this, the other settings are some basic settings that you can configure yourselves but I’m providing all these screenshots in the below slideshow so you can watch them if you are stuck in any step.
- Continue on the Written and spoken language panel.
- Choose Not Now on the accessibility window.
- Click continue on the data & privacy window.
- Choose Not now on the migration assistant window.
- Choose set up later if you are not interested in login with an Apple ID.
- Agree to the terms and conditions.
- Insert your user name and password to log in with.
- Choose to continue on the window known as Make this your new mac.
- Configure the screen time if you want.
- And finally, choose a theme for the macOS monetary.
Summary:
To Install macOS Monterey on VirtualBox on Windows PC, download the required files, install them, configure the settings and finally run it on the virtual machine. I hope this post is helpful to you.
Hi, somebody know how to fix? I have same issue: black screen with Apple logo, after few minutes restart and start again the black screen with Apple logo. I try on 3 different laptops and nothing change.
Thanks
1. Thank you.
2. I was able to successfully install and run Monterey from scratch image, using these instructions, paying very close attention to each detail.
3. I am not able to install the latest version of VirtualBox Extension Pack. It fails installation.
4. At seemingly random times, maybe 3-5 times a day, Monterery will crash/abend/panic, and restart. I’ve been dealing with it, but I wonder if there’s a fix?
Hi. Thank you very much for your good training.
I installed the macos mojave version according to your tutorial and it ran. Then by using the OS update, I wanted to install this version (Monterey) but after that the virtual machine would no longer run after installing the update.
I installed the Monterey version according to this tutorial (on this page), But after installation and before starting the final settings, a black screen with the Apple icon and the remaining time will be displayed and it may have restarted more than 10 times but the final settings page of the operating system was not displayed.
Where do you think the problem comes from?
hi there, i did exactly same what you talked about before. but unfortunately system doesnt’t start properly. there is no system is opening etc. letter in the screen. It says applekekey operation failed. what is the problem? what should I do?
hi, i am getting such error while installing extension pack. What is the reason?
VBoxExtPackRegister returned VERR_VERSION_MISMATCH, pReg=0000000000000000 ErrInfo=’Helper version mismatch – expected 0x3 got 0x30000′.
E_FAIL (0x80004005)
component:
ExtPackManagerWrap
interface:
IExtPackManager {70401eef-c8e9-466b-9660-45cb3e9979e4}