In this article, I am going to show you how to install android marshmallow on VMware workstation. Android 6.0 “marshmallow” is a version of the Android mobile operating system developed by Google, spanning versions between 6.0 in October 2015. Android Marshmallow is visually similar to its predecessor, Lollipop, in many ways. Google’s Material Design language is now more pervasive than ever before, and the main areas of the UI – settings, notifications shade, and navigation – remain the same. But Marshmallow does have some differences in appearance and new features.
Whenever your computer feels slow, or it is not working well, you have only two options for it, recovery or installing windows. Windows and Android OS are almost the same. VMware workstation or VirtualBox is also the same, both of them are for virtualisation.
Install Android Marshmallow on VMware
Firstly, Download the materials below:
Create Virtual Machine for Marshmallow
Step #1. When you have downloaded the source files, first install VMware. After installing, open VMware and click on Create a new Virtual Machine.
Step #2. Now select Typical (Recommended) and click next. Then select Installer disc image file (ISO) and click Browse to choose marshmallow android ISO file that you download from the link above. Finally, click Next.
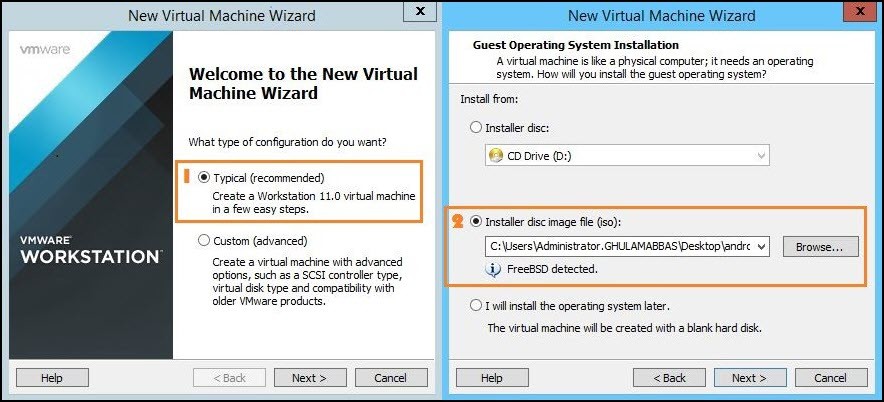
New Virtual Machine
Step #3. Give a name to your virtual Machine and browser the location of the virtual machine, where you want to save your VM. On next step, you need to specify the size for your disk. By Maximum its size is 20 GB. After specifying click next.
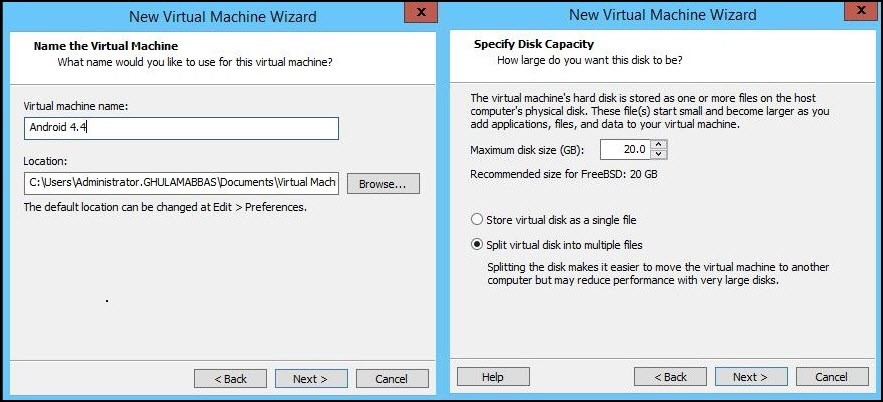
Name Virtual Machine
Play Marshmallow Virtual Machine
Step #4. If you have done all the above steps, after the specifying size of your disk, click Finish. The automatically virtual machine will power on, and you will face this window like the screenshot. In this window you have four options of the boot, you have to select the 4th which is Installation- Install Android-x86 to hard disk.
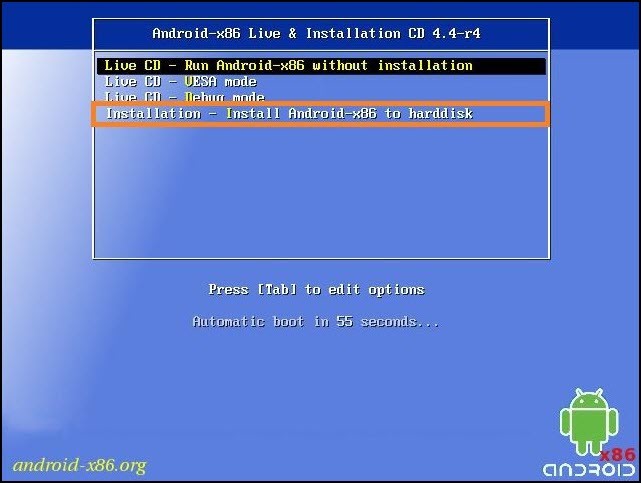
Install Page
Step #5. After reaching from boot options, you will be direct to partition window, in this window select Create/Modify Partitions and hit enter. In further steps, you will modify every step.
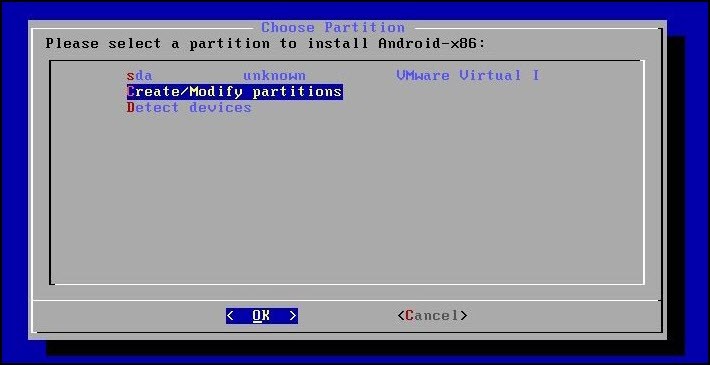
Choose Partition
Step #6. When it asks for GPT Partition, select No and hit enter.

Confirmed GPT
Step #7. From here, you are going to modify your partition. The first one is to create a new partition. Select New and hit enter on the keyboard.
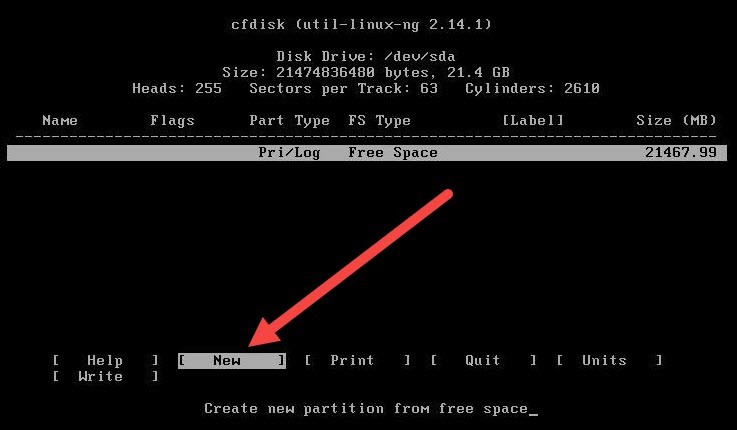
New Partition
Step #8. Now you need to verify type partition, select Primary and hit Enter. By Pressing Enter, you will be direct to the size of your disk, leave it as default and press enter again. And it will delete all the things on the drive which you had created.
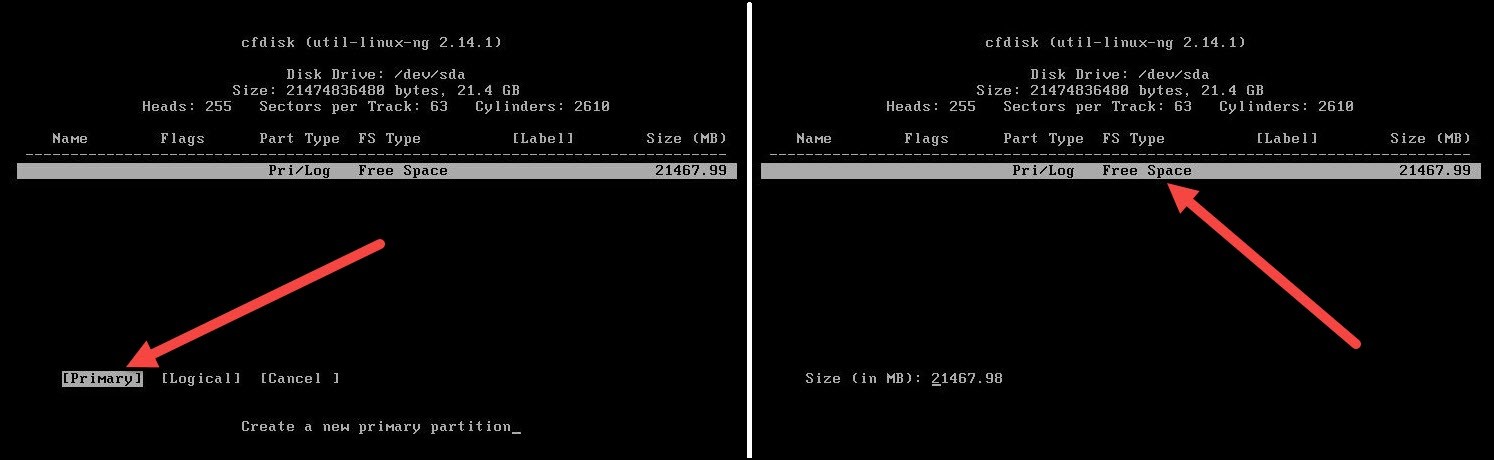
New Primary
Step #9. For the next four steps, follow the instructions in the image. With Arrows key move right and left select the option which is mentioned in the picture.

Select Bootable
Step #10. After selecting Quit, It will ask you again to verify the partition to install Android 86, what you need is to choose the first one which is sda1.
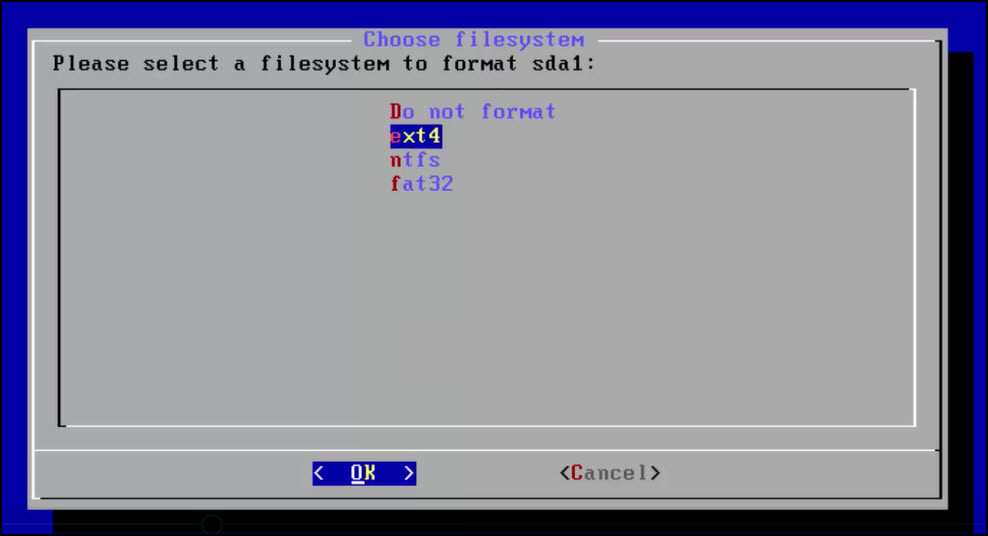
Step #11. This time for the filesystem to format the sad1 Disk, select ext4 and hit enter. Learn more about these types of format.
- FAT32: Read on Wikipedia
- NTFS: Read on Wikipedia
- Ext4: Read on Wikipedia
Format Style
Step #12. After selecting ext4 format style, it will ask you to confirm, select Yes and hit enter like the screenshot. Under that, you can see the format Process.
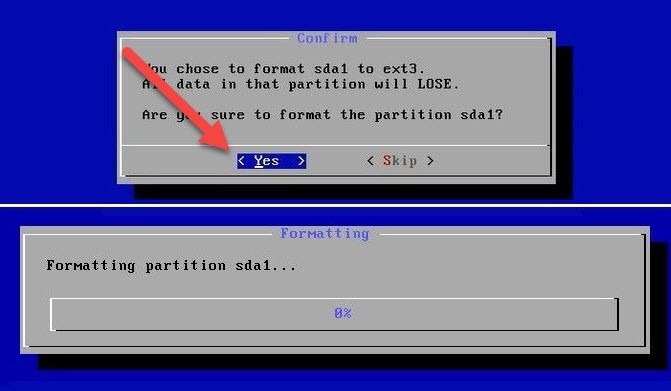
Format Process
Step #13. When formatting the disk was completed you need to install a Loader, for boot loader click, Yes but for EFI select skip, like the screenshot. Learn more about GRUBs and why I selected Grub.
- GRUB2 is a bootloader with support for modern-day computer systems. It is meant to replace the older GRUB boot loader (now referred to as “GRUB Legacy”). GRUB2 has an entirely separate code base from GRUB Legacy and boasts features such as a new shell-like syntax which permits advanced scripting capabilities. Current GRUB Legacy users are encouraged to migrate their systems to GRUB2.

Bootloader
Step #14. For the system, directory select Yes and the Process will move on like the screenshot. Learn more about System Directory.

System Directory & Android Installing
Step #15. Congratulations, you have installed Android Marshmallow on VMware. For the last step, select Reboot to restart the Guest OS in VMware.
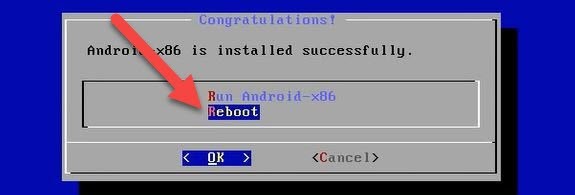
Reboot
Step #16. After rebooting you will need to confirm your name, Gmail account and some other essential things, then you are done.
Conclusion
This was all about, how to install android marshmallow on VMware workstation. I hope you have learned this article, and I hope you will ask your questions, give us your suggestions, opinion about what articles we have to write. If you faced any problem tell us below by comment, Feel free to tell us. We’re waiting for your suggestion.
Will it work on vmware workstation 9
google play service has been stopped on welcome screen. what to do??? plz help me
I installed 7.1 x64 on VMWare server 6.1 and had the issue where it stopped at the “root@x86:/ #” prompt after installation and would not start the graphical interface. Here is the fix for me: Arrow down and choose the install option, hit the tab key to edit, add “nomodeset” without the quotes at the end, and hit enter. Now when you install and reboot it should work just fine. Hope this helps.
Very good
Thanks
Why i stucked on “Just a sec…” screen right after the Language selection? It not even moved to the checking connection part…
solved, work right after several times reboothing… But why mine always showing black screen when i leave it for some minutes? Is that a screen server? But i cant make it work again, except i restart the VM-__- any suggestion?
How to get full screen?
You can’t get full screen because the VMware team does not support it.
After selecting ext4 (step 11) and “yes” (step 12) VMware shows “Error Cannot mount /dev/sda1” AND “Do you want to format it” I select “yes” and it returns to the “Choose filesystem” page and it loops. This is attempting install in VMware 6.0.3 build-1895310 in Windows 7 Home Premium.
Did you download Marshmallow?
i m getting error of “The CPU has been disabled by the guest operation system” while installing android marshmellow.
does not pass from android logo?
Enable 3D Graphic Acceleration
i enabled 3d graphics but stuck on android logo.
Make sure Virtualization Technolgy (VT) is enabled from BIOS of your system.
It worked when I used the Android 5.1 image. Didn’t work with the version 6. Also didn’t have to enable Accelerate 3D graphics, because VMware says it’s not supported on that OS anyways. https://www.fosshub.com/Android-x86.html/android-x86-5.1-rc1.iso
I had the same problem. I tried version 7.1 and 6.0 and it wouldn’t proceed past the android screen. I enabled 3D acceleration but it stated it is not supported in that version of OS. Tried 5.1 and it installs fine. What is the issue with Android 6 and 7?
I have officially created the fastest android device ever.
56 GB of ram, i have 64 on my host PC
128 gb Hard drive,
I have 3 tb
and everything runs great 😀
AAAAANNND i have to reinstall it.
My dumbass thought it would be a good idea to reboot without unmounting the ISO.
How do I unmount the ISO again? I forgot 😛
Disconnect it from the VM settings.
Wow 😉
Thanks for sharing your feedback.
http://prntscr.com/e9od9k
It is waiting on the android logo screen and it isn’t pass to this screen. What can i do ?
Enable 3D acceleration from VM settings.
(Answer from other forum). It worked for me.
asked same question in superuser and I found the way to start it. The correct answer is:
From the install/live CD, you just need to change the value of “androidboot.hardware” parameter in the grub command from “Android_x86” to “x86”. You can do this by pressing “Tab” in the boot menu or by editing “isolinux.cfg” file on the installation ISO Image.
If you installed Android-x86 on hard drive,you have to select desired boot option and press e to edit grub command
Thanks for you comprehensive answer dear William
How do you get WiFi to work?
You can’t make the Wi-Fi work but you can use the Internet via Nat on the VM.
Thanks man works great here I had a problem before but then I read your comment about accelerating 3D now it works perfect
Good luck and have Fun! 😀
Thank You for best Tutorial
and Faiz Orz thanks for feedback(3d)
😉
Welcome dear, We’re happy that you found this blog helpful.
Sorry for my bad spelling
writw = write
one more question how do you turn an application that locked in portrait view i is laying down in the guist window and mouse behavior are a bit awkward 🙂
Hey, I am sorry but to be honest I have no idea.
Hi Faiz Orz
Thank You for a nice Tutorial
how do you writw @ in the android guest
an can you also run the 64 bit version on VMware® Workstation 12 Pro 12.5.2 build-4638234
Hey dear, That’s easy you can simply write with your keyboard and if you have a touch screen laptop then it also works. Yes you can run 64 bit on VMware 12
I’m having difficulty figuring out how to install MVware tools on the Android 6 VM. I tried to find help on the internet but failed to locate any usable instructions. Any ideas?
No dear, You can’t install VMware Tools.
I do all steps but i get the message after reboot
Failed to find cpu0 device node
Can you send me the Screenshot?
Here is the screenshot
https://1drv.ms/i/s!At3_PErf4JJmg2kqLLBt-Ue_mFrK
I have the same issue on Workstation 12: stuck a prompt, flickering every three seconds. “accelerate 3d graphics” does not help.
Enable Accelerate 3D Graphics from Virtual machine settings once again and reboot your machine and computer then it should work correctly.
Thank you for the reply, but it won’t help. Maybe it is related to the host hardware (HP Elitebook 8440p, virtualisation in BIOS enabled, TXT disabled).
My VM settings are:
10 GB IDE hard disk
Display: Accelerate 3D graphics enabled, 256 MB graphics memory
I also installed Android 5.1, that one works.
Had the same issue of stalling at boot… followed suggestion to accelerate 3D graphics… Booted right up. Thanks.
Welcome dear, Thanks for sharing your feedback.
I had the same issue, stopped at prompt, screen flickering every 3 sec.
Per Faiz i did enable the ‘Accelerate 3D Graphics, reboot and it continues into Android
Thanks for sharing your feedback dear.
Happens to me as well. Screen is flickering every 3 seconds. I assume it has problems starting X or something like that. Can’t get it to run on my VMware Fusion 8.5.0 installation on MacBook Pro.
Boot stop at A N D R O I D root@x86
Why ????
Maybe you’re doing something wrong!
Same for me stop at root@x86:/ # and for the fourth time the same.
Enable Accelerate 3D graphics from Virtual machine settings.