In this article, I am going to show you how to install android 7.0 Nougat on VirtualBox. As the Google team says about Android 7.0 Nougat “Android Nougat is our sweetest release yet, with more ways to make Android your own”. Many new and fresh features are included in this big update. Like, over 1500 emoji including 72 new ones, multi Locale language settings, multi-window view, quick switch between apps, quick custom settings, direct notification reply, bundled notifications, notification controls and much more stuff like that. If you want to get more information, what’s new then click here.
Anyway, the new Android 7.0 Nougat is the lasted operating system from Google. Now if you want to know how to do, I install it on VirtualBox then follow the steps below step by step, and also check our article about, how to install Android Nougat on PC.
Install Android 7.0 Nougat on VirtualBox
Step #1. Firstly you have to download the VirtualBox and Android 7.0 Nougat iso file. If you have VirtualBox already installed on your PC, then that’s okay then download Android 7.0 Nougat iso file.
Step #2. If you have installed VirtualBox already then open it and if you don’t have then install and open it that you have nearly downloaded from the link above.
Create Android 7.0 Nougat Virtual Machine
Step #3. When the VirtualBox is opened on the home page, click New to create a new virtual machine(VM).
Create a New Virtual Machine
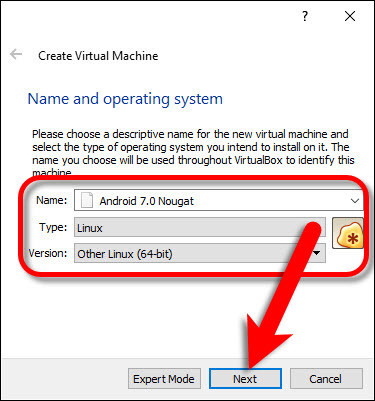
Step #4. On the “Name and operating system” windows, type any name that you would like to name your Android 7.0 Nougat VM then Choose Linux for type. For Version choose Other Linux (64-bit) then click Next.
Name and Operating System
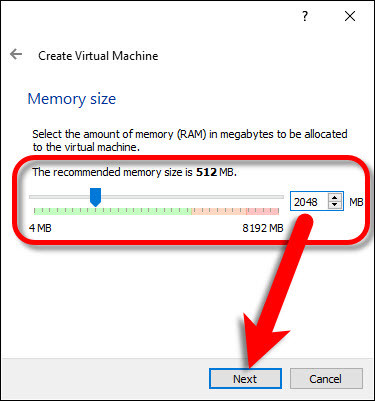
Step #5. Choose the Memory size to 2048 MB and click Next.
Memory Size
Step #6. After mentioning memory size, Select Create a virtual hard disk now on the Hard disk Windows and click Create.
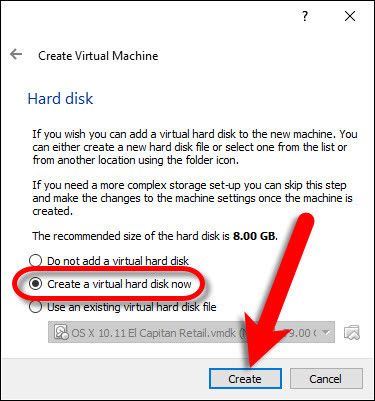
Hard Disk
Step #7. For hard disk file type, select VDI(VirtualBox Disk Image) and click Next.
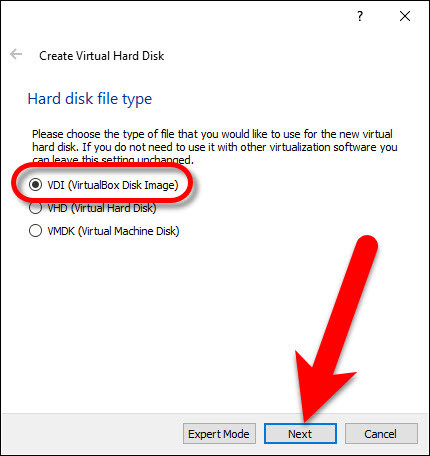
Hard Disk File Type
Step #8. Select Dynamically allocated on the Storage on physical hard disk window and click Next.
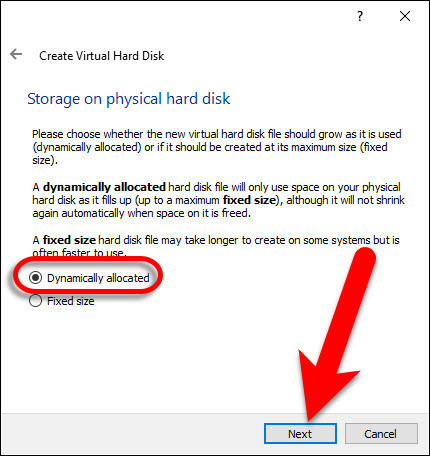
Storage on Physical Hard Disk
Step #9. Now Select the size of the virtual hard disk in megabytes. This size is the limit on the amount of file data that a virtual machine will be able to store on the hard drive. Then Name the new virtual hard disk and click on the folder icon to save where you want. But I suggest you leave it by default and click Create.
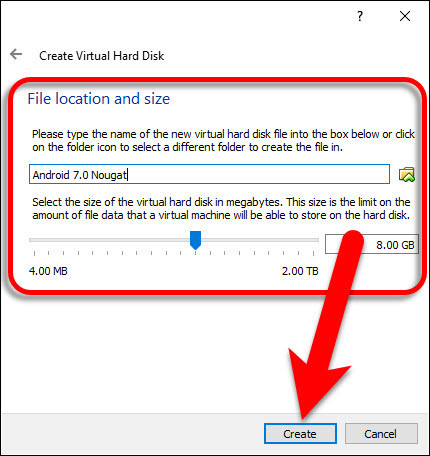
File Location and Size
Edit Android 7.0 Nougat Virtual Machine
Step #10. After the previous step, your virtual machine should be created. So now select the VM and click on the Settings button.

Edit Android 7.0-Nougat Virtual Machine
Step #11. From left-hand side panel select System and on the Processor tab change it from 1 CPU to 2 CPU and left the others by default.
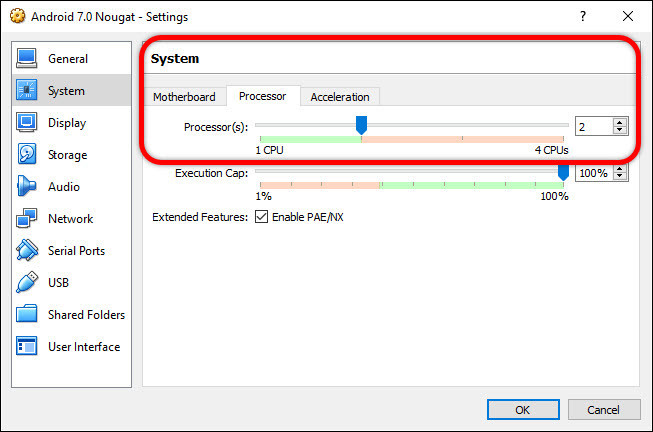
2 CPU Processor
Step #12. On Display panel, Change the video memory to 128 MB and leave the others by default.
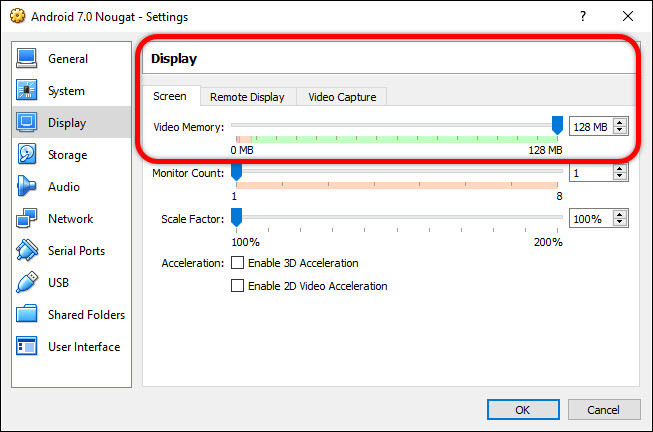
128 MB Video Memory
Step #13. Now Select Storage panel and choose the Controller: IDE and click on the (-) minus button from the bottom of the window to remove it.
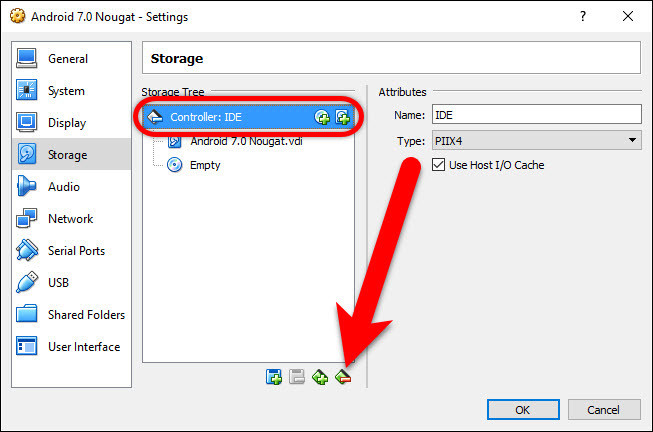
Remove Storage Controller IDE
Step #14. Again on the same panel, click the (+) Plus icon and Select Add IDE Controller.
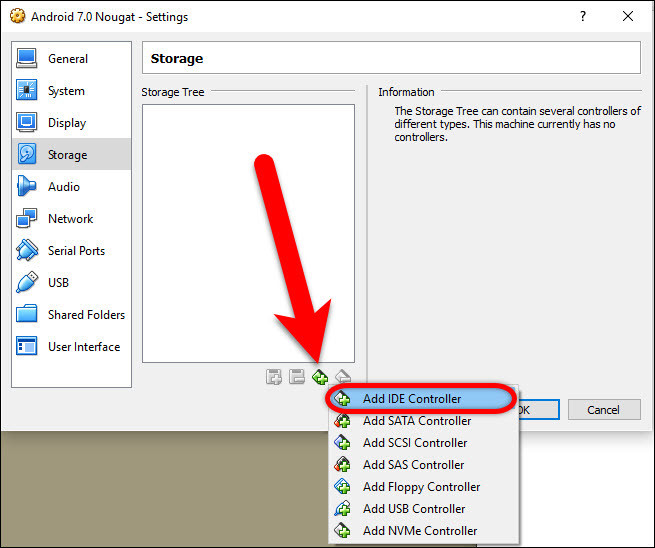
Add IDE Controller
Step #15. On the Small Dialog box click Choose existing disk.

Choose Existing Disk
Step #16. Now in this Step go to This PC > Local Disk (C:) > Users > username > VirtualBox VMs > Android 7.0 Nougat VM Name that you named on step 4, Finally when you found the VDI file, select that and click Open.
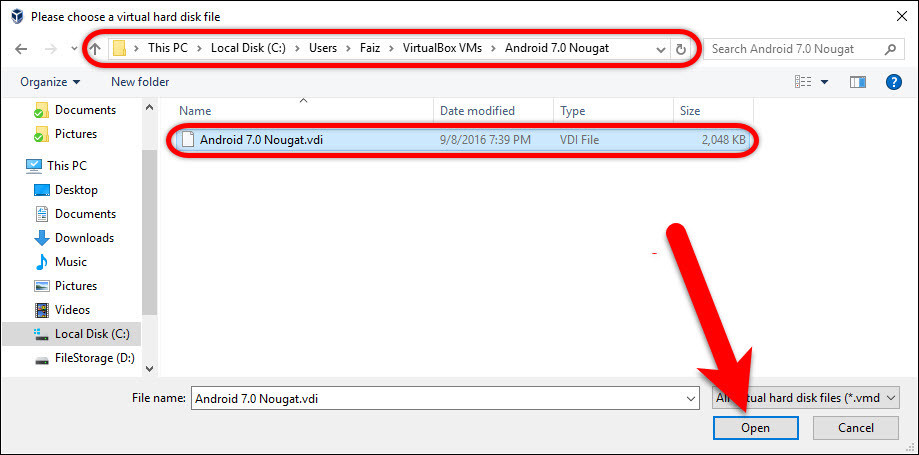
Select Android 7.0 Nougat-VDI
Step #17. This time, click on the (+) plus with CD icon and select Leave empty.
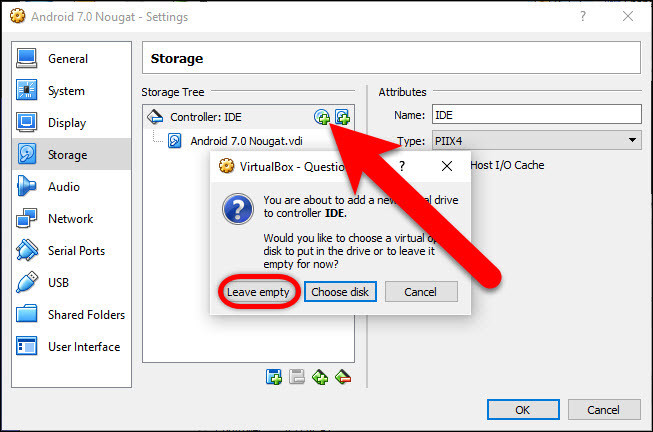
Leave the Controller Empty
Step #18. When you left the disk empty, then select Empty with CD icon and Select the Optical Drive to IDE Secondary Master then click on the small CD icon and select Choose Virtual Optical Disk File.
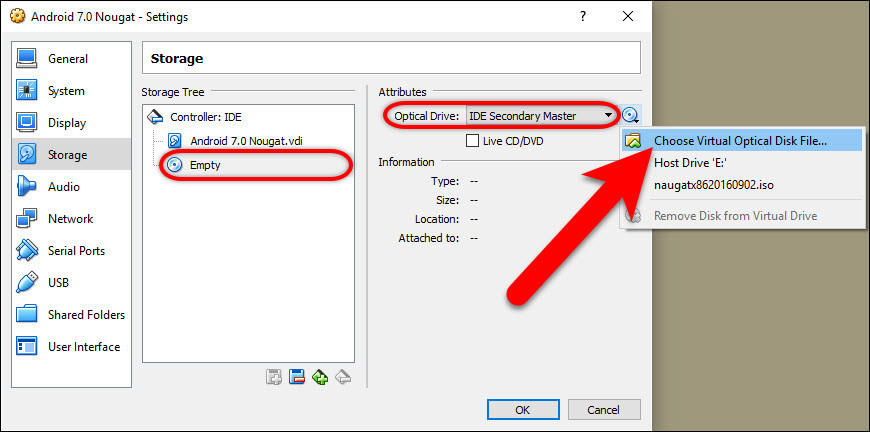
Choose Virtual Optical Disk File
Step #19. Now, this time, Drive to The Android 7.0 Nougat iso file that you download from the link above then select that and click Open.
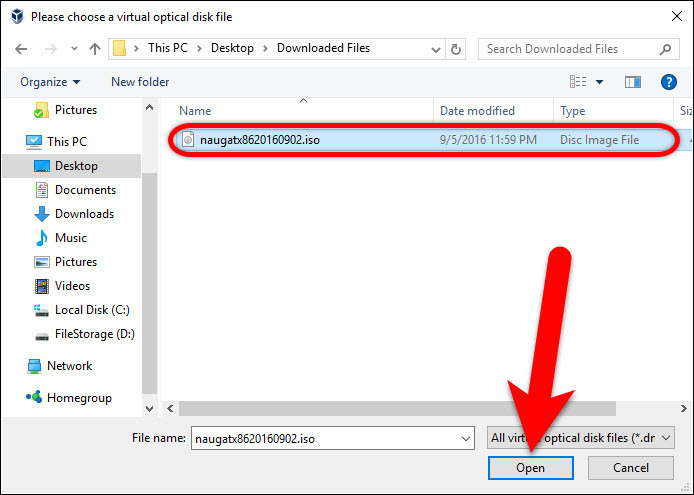
Select Android 7.0 Nougat ISO File
Step #20. When the file opened click OK and Save the Changes to that, you made to the Android 7.0 Nougat virtual machine. Finally, you must be ready to play the VM.
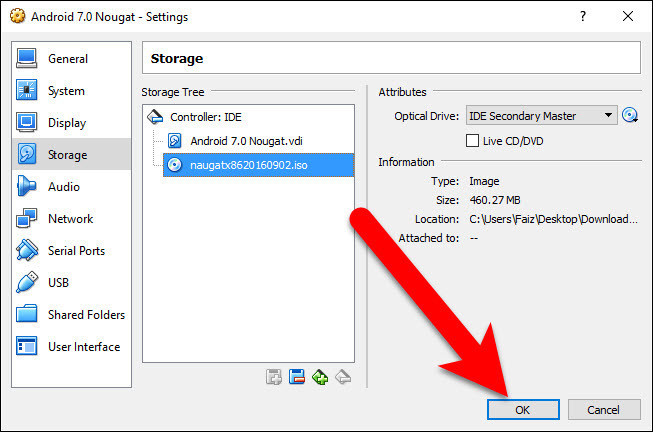
Save Changes
Play Android 7.0 Nougat Virtual Machine
Step #21. So after all the settings that are mentioned above completed, then you’re done to go on and play the virtual machine, to install it on your VirtualBox. So now select the Android 7.0 Nougat virtual machine and click on the Start button to turn it on.
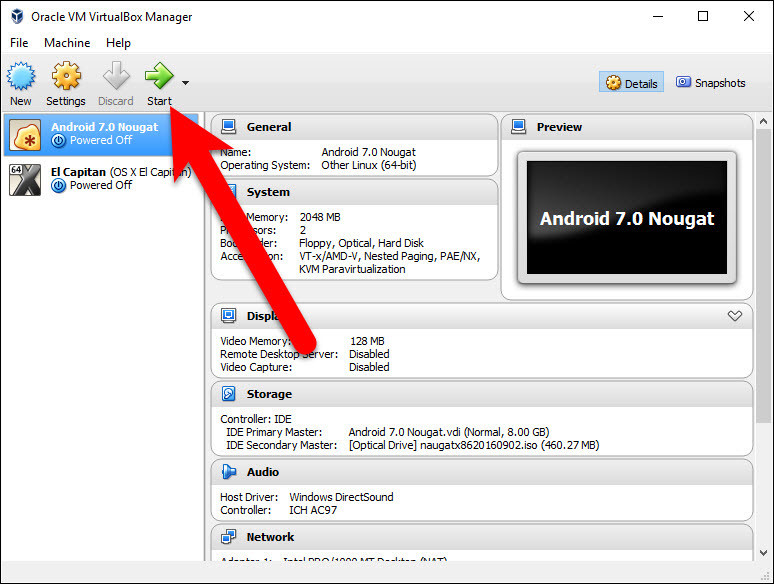
Play Android 7.0 Nougat Virtual Machine
Install Android 7.0 Nougat on Virtual Machine Hard Disk
Step #22. When the machine started, After some seconds it must be booted into Android boot menu. So now from here Select the last option Installation – Install Android-x86 to harddisk and hit enter from your keyboard. This options must drive you to the Installation windows of Android 7.0 Nougat.
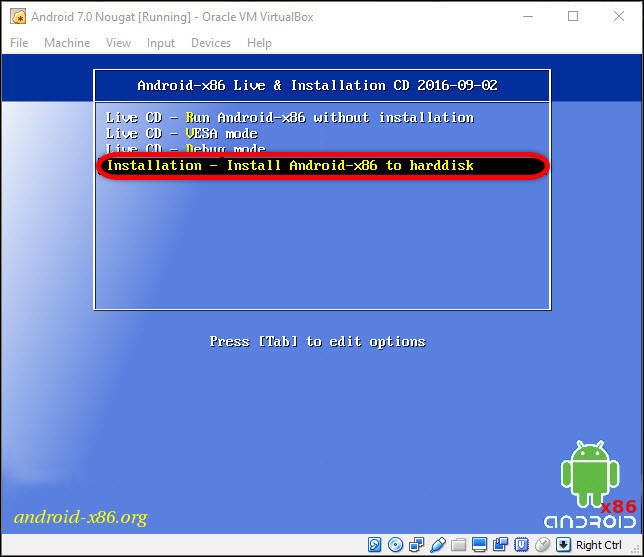
Install-Android-x86
Step #23. Now to install Android 7.0 Nougat on virtual machine hard disk you need a partition to install it on that. Select Create/Modify Partitions and hit enter from your keyboard.
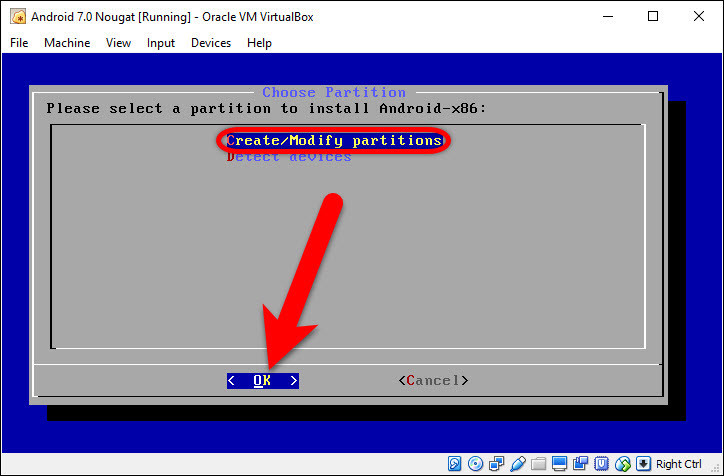
Create Partitions
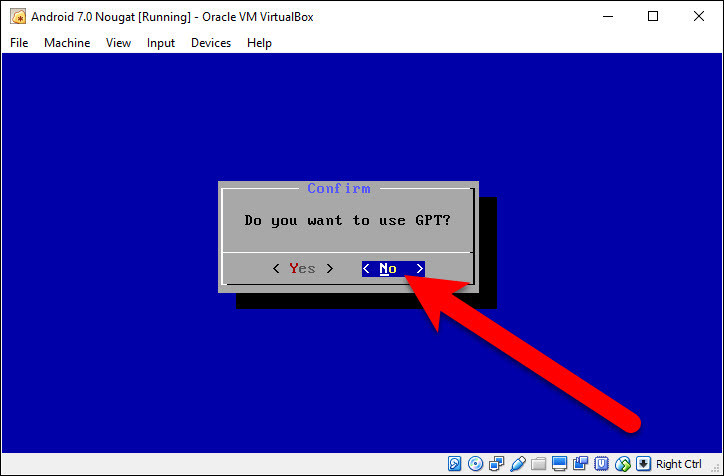
Step #24. When you are asked to want to use GPT partition select No and hit enter from your keyboard.
Don’t Use GPT
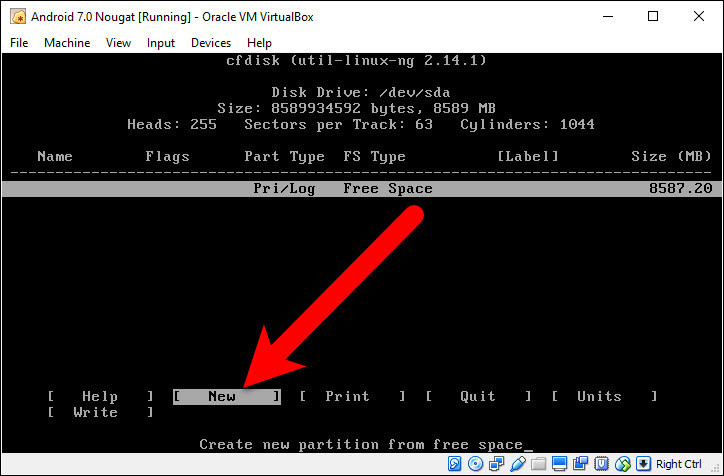
Step #25. To create a new partition, on the partition page, select New and hit enter from your keyboard.
New Partition
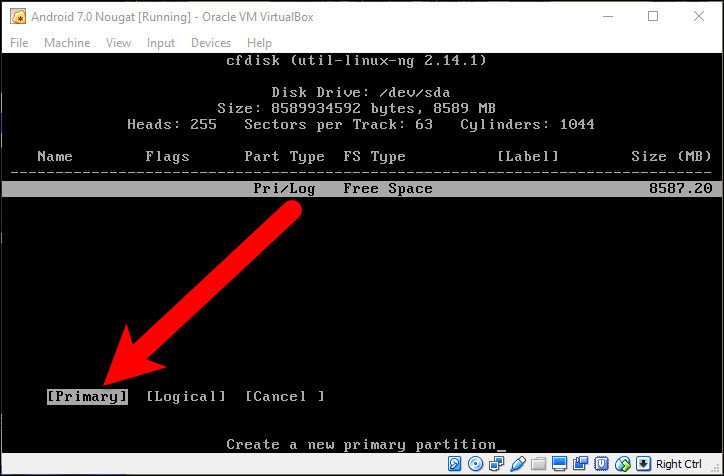
Step #26. Select Primary partition and hit enter from your keyboard.
Primary Partition
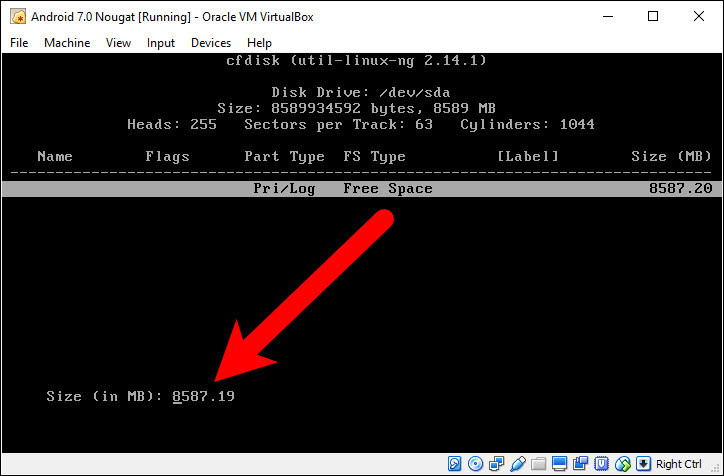
Step #27. Type the size of the partition that you want to create and hit enter from your keyboard.
Partition Size
Step #28. A partition has been created, Now to make it bootable select Bootable and hit enter from your keyboard.
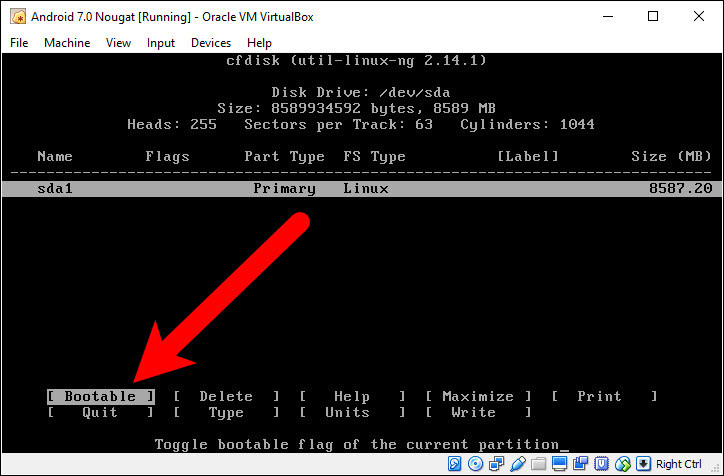
Make the Partition Bootable
Note: To make sure that the partition has been bootable, then you must see the Boot label under flags.
Step #29. After making the drive bootable, now select Write and hit enter from your keyboard.
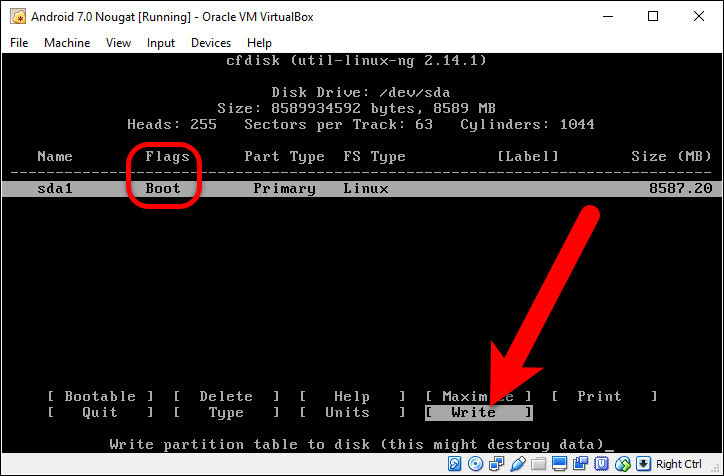
Write Partition
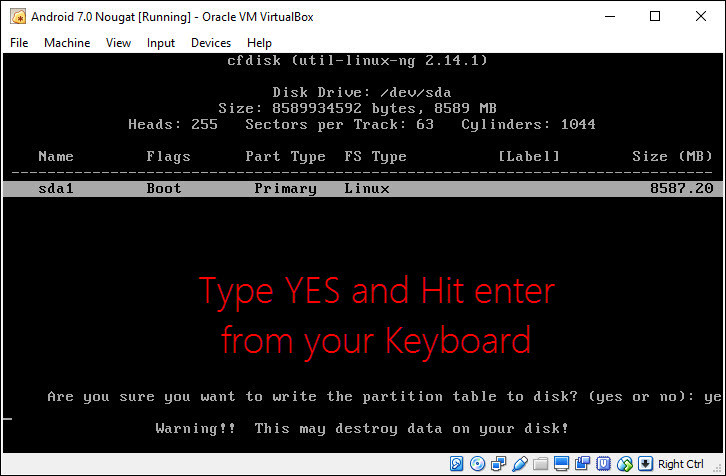
Step #30. In these steps to confirm it, you need to type YES and hit enter from your keyboard.
Confirm it
Step #31. After writing the disk, you are done from here, so select Quit and hit enter from your keyboard.
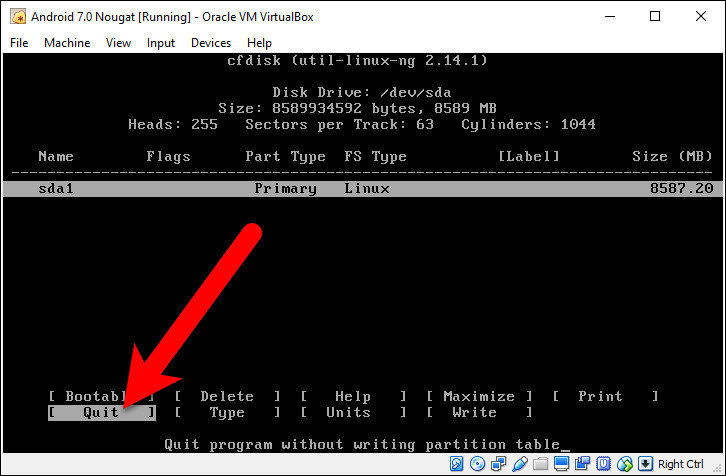
Quit Partitioning
Step #32. On the choose partition window, select the partition that you nearly created and hit enter from your keyboard.
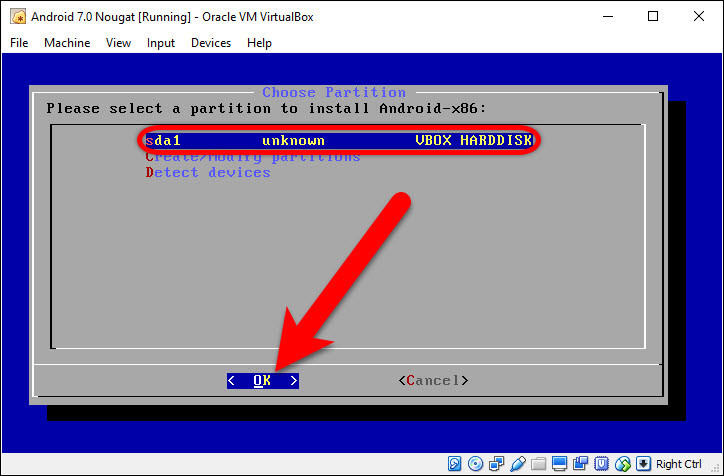
Select SDA 1 Partition
Step #33. For the partition file system format, select ext4 and hit enter from your keyboard.
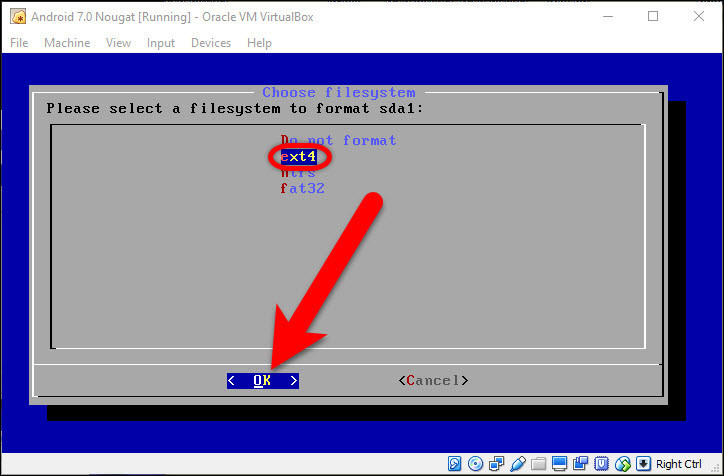
File System Format Type
Step #34. Select YES and hit enter from your keyboard to confirm it.
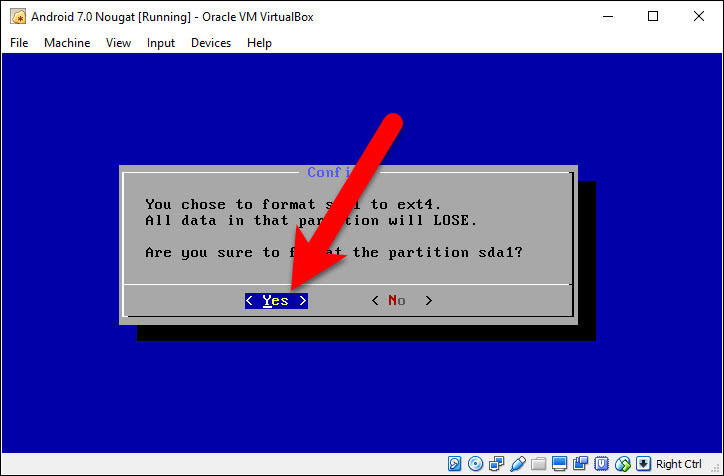
Confirm Formatting
Step #35. When you are asked to install Grub Bootloader, select YES and hit enter from your keyboard.
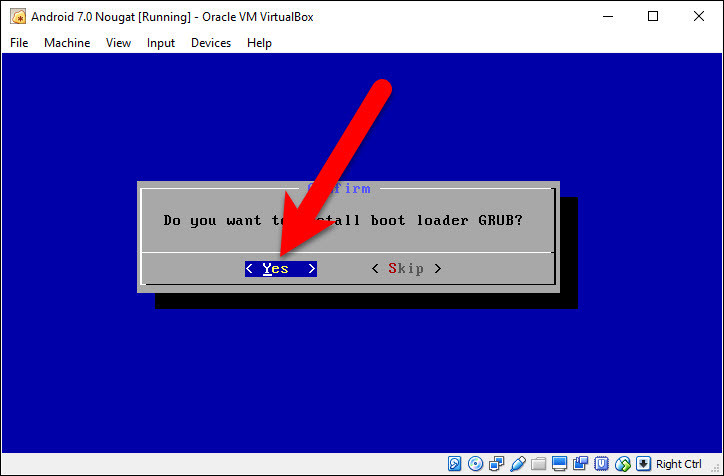
GRUB Bootloader
Step #36. For the EFI GRUB 2, select Skip and hit enter from your keyboard.
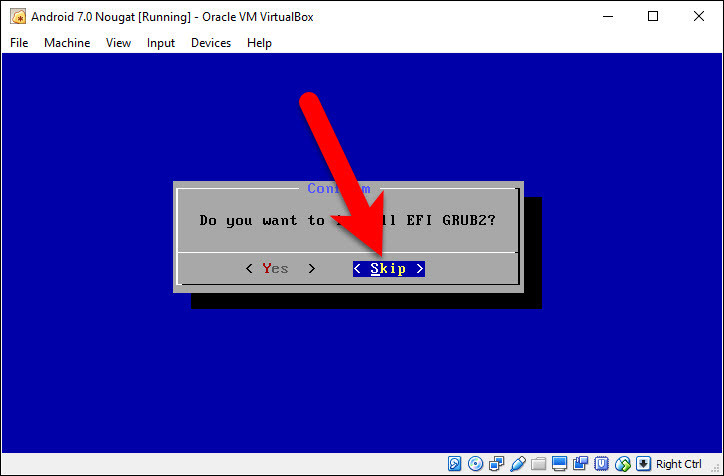
EFI GRUB 2
Step #37. For system directory as read-write select Yes and hit enter from your keyboard.
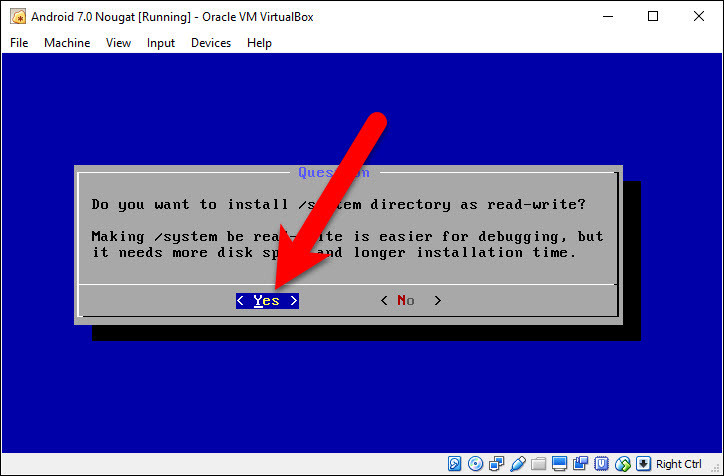
System Directory for Read-Write
Step #38. When the writes than on the screen below click on Devices > Optical Drivers > Remove disk from virtual drive.
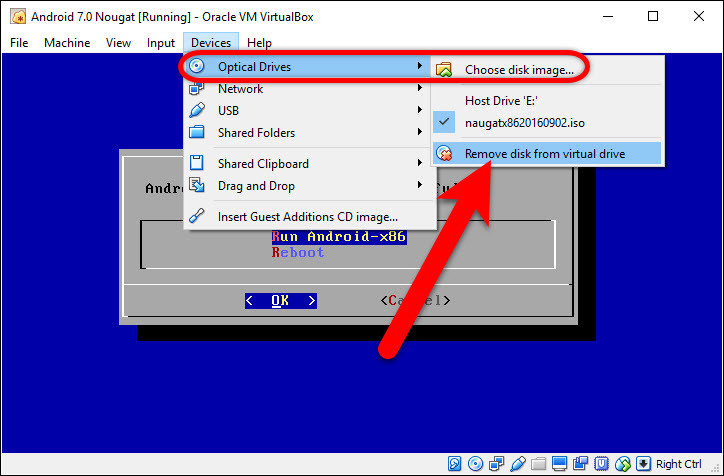
Remove Disk from Virtual Drive
Step #39. When you get the screen below, click Force Unmount.
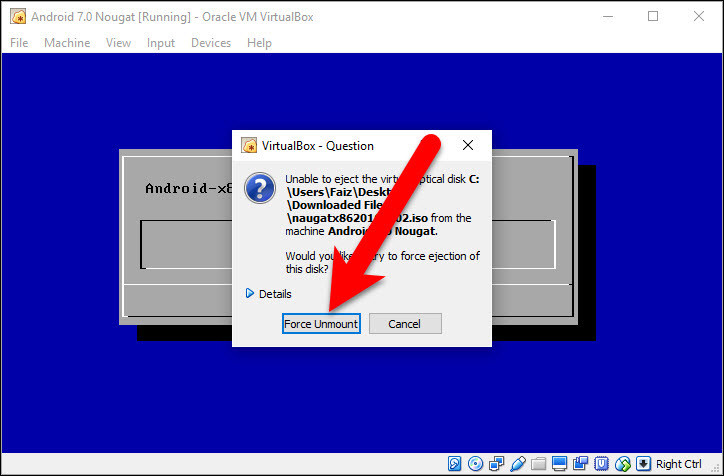
Force Unmount
Step #40. You should be done installing the Android 7.0 Nougat successfully. Now select Reboot and hit enter from your keyboard.
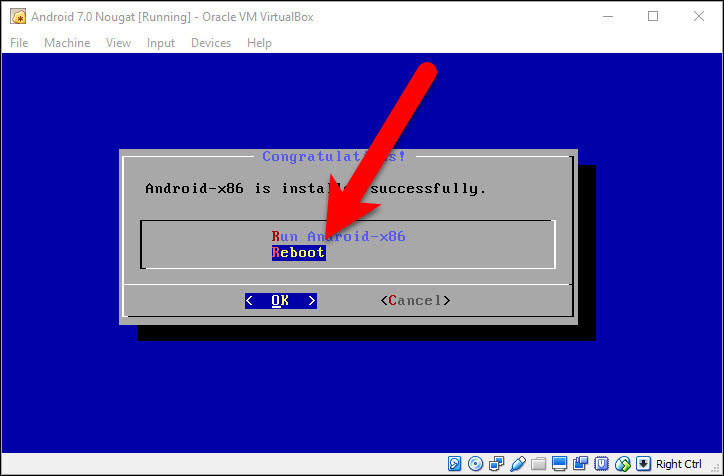
Android-x86-Installed Successfully
Step #41. Every time you boot the Android 7.0 Nougat, you will get this bootloader, leave it for some seconds or select Android-x86 2016-09-02 and hit enter from your keyboard.
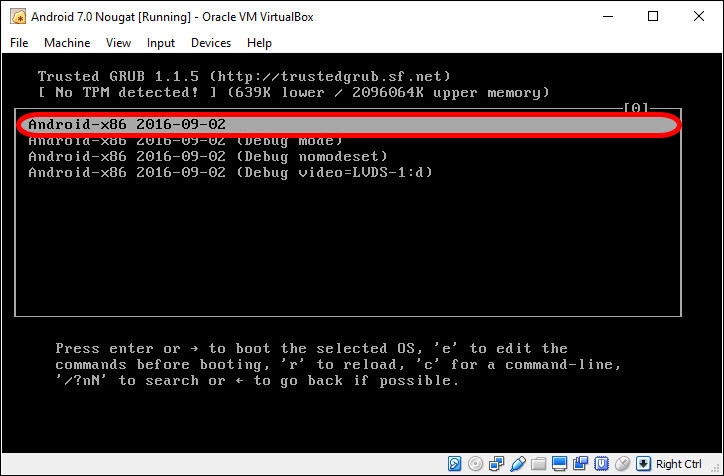
Select Android-x86 Nougat
Android 7.0 Nougat Installed on VirtualBox
Finally, that’s done, you have successfully installed Android 7.0 Nougat on VirtualBox. Here is the preview.
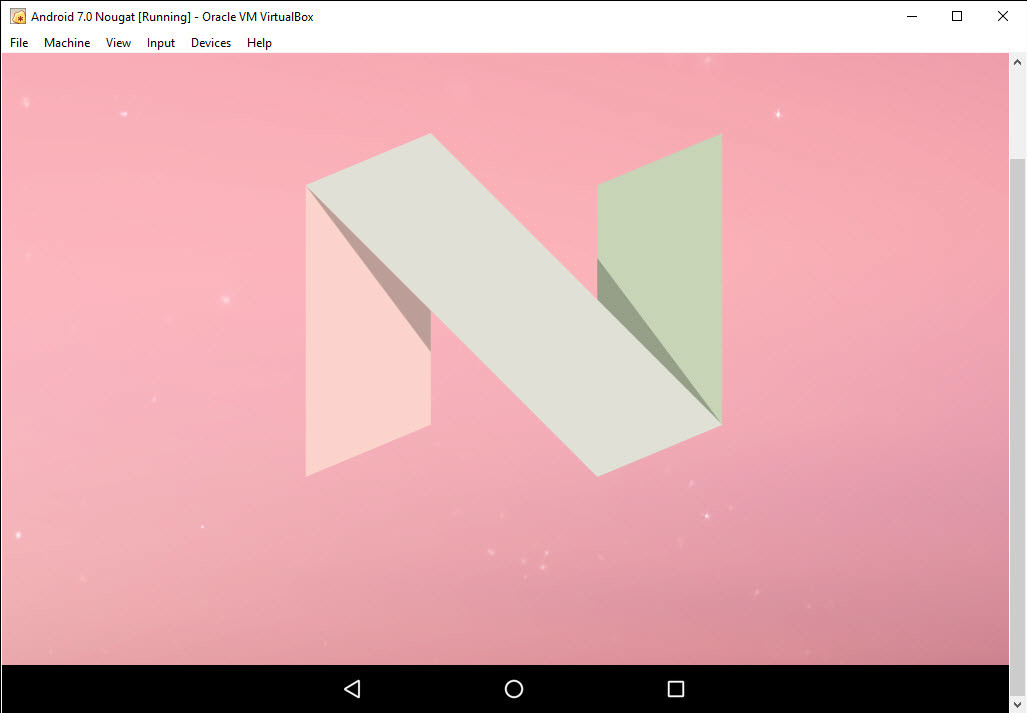
Android 7.0 Nougat Installed on VirtualBox
Conclusion
It was all about, how to install Android 7.0 Nougat on VirtualBox. I hope you have learned this article, and I hope you will ask your questions, give us your suggestions, opinion about what items we have to write. If you have got any question or query, feel free to share in the comment section below.
This documentation is only half of the story.
Once you got it installed — then what do you do with it? Like, how do you transfer those .apk files to the virtual Android OS?
It did not work for me. All I got I was black screen.
Great guide, a fully comprehensive and detailed guide finally
Hey, this is Dave,
It’s cool as you get a hold of this awesome “Internet Promotional Tools Crazy Offer and pocket the 100% gain to your chosen bank account.
Lot’s of software tools available with residual updates. This is certainly wonderful a onetime payment of $9,95 only.
Catch a glimpse at the website now and thus take some advantage of downloading all the tools you’ve already been looking ahead to these days.
See you inside
Absolut helpful, working, and detsailed instruction to install Android 7 on VBox. But, how can I use my mouse pointer in this virtual machine. As soon as I move the pointer into the Android window, it disappears and makes it hard or impossible to “click” to simulate a touch.
How can I boot again to windows
I am running VBox on
Fujitsu Lifebook A556
i5 6200u, 8 GB RAM, 256 GB SSD
internal WLAN
Everything works fine, BUT how to get WiFi working?
I tried a bridged adapter in VBox settings. To no avail…
Without network, the whole thing makes no sense.
Thank you so much
As a chinese my english is not good
but i also want to say thank you
you write every detail that i can’t get all this infomation from BaiDu.
Every search result From Baidu waste me a lot of time until meet this
so thank u
You’re welcome and thanks for sharing your feedback. We really appreciate your idea.
Hey I have downloaded Google play services as your given link but how to install it on virtual box please tell me steps to how to install Play services on the virtual box.
Also looking for an answer on that
Dear there is no browser and no play store form where i have installed apps please suggest me some tips to install play store.
Download it from here.
I have followed all the steps and read all above, but it restarts all the time, can’t do anything. The guide is excellent and very logic, but the Android system is real crap. Do anyone know were to find a working version?
Just Enable 3D Acceleration and try again
I have read everything above and nothing works, it just keep on with restart all the time! Do anyone know were to find a working version? The guide is excellent but the Android system is real crap.
Enable 3D Acceleration from the VirtualBox settings.
im on a 64 bit pc and it willonly let me use linux at 32bit so i cant load 2 cpus
how can i install new apps?
Download the APK of the app and install it.
All the steps and above suggestions have not stopped my resetting problem.
Hey, Did you Enable Viruzaltion technology(VT) from BIOS of your System?
Android keeps Restarting if I click the Home Button, 3D Acceleration is enabled.
Increase your video memory and the VM processor.
why it keep restaring when ever i hit back button?
Enable 3D Acceleration
This does not work for me.
Please do not use this version…there is no playstore and no use. you cant download anything or use offline files through file manager and no support at all.
If you suggest not to use this version, pls give the visitors any other version work and support everything.
How do i install the play store?
Download and Install this: http://download1026.mediafire.com/54uwi5545o7g/5s14racgc2jbawi/Google+Play+Services.apk
but how do you install it. file manager still does not work. its just a blank white screen with a blue bar along the top with nothing to interact with. ive tried to install from the webviewer browser but it does nothing when trying to install
I will try to find a new way to install it.
hello sir.. nougat not install my pc. what sould i do.. whereby this working..
In which step do you stuck?
Hi there.
This tutorial was very helpful for me. Can you give us some details to install GAPPS on this Nougat?. Thanks 🙂
Hello dear,
What do you mean by install GAPPS on this Nougat?
hi there I’m stock in the step before android logo android x86_64 :/ with option to write what I need to do
thx
Enable 3D Acceleration from VM Settings.
I have installed Andorid and works fine, but the touch screen of my PC does not correspond to the screen in the VM… Is there any way to calibrate this feature? thanks!
No, because the VMware team doesn’t support it.
Hi, i did all the steps.
But for me it keeps rebooting, like a dos prompt and reboot again in a loop
Did you enable 3D Acceleration?
I’m on macOS 10.12.3 and VirtualBox 5.1.18. I have other successful VMs (Windows and Linux). Following your instructions I get to step 22, but I can’t select “install Android to harddisk”. I’ve tried the TAB key, arrow keys, and clicking with the mouse (which causes the VM to capture the mouse). Nothing seems to select the “harddisk” option.
Sorry for that. It seems that the ISO and Article have some issue. ASAP I will update the article with a new ISO file. Until that time you can Leave installing Android 7.0 on VirtualBox.
I did all steps twice as you descriebed no error ocur but I only get black screen at last step
Enable 3D acceleration and wait for VM for a while to pass the black screen.
vdi file where is???????
Where you’ve downloaded the Android Nougat. The vdi file is on the extracted folder.
Hello
I have got the same problem as Karel.
Black screen and blinking cursor. 3D Acceleration enabled.
I’ve got other virtual systems on Virtualbox and no problem with that.
Try again step by step again but this time use this Nougat ISO: https://drive.google.com/open?id=0B-VXG64GOoM-V3Qxbkt5R1BkcVU
Watch the Video tutorial on your Youtube channel:
https://www.youtube.com
/watch?v=tYdQUVC5IhAUPDATE: Sorry, the links are removed from YouTube. Sorry for the inconvenience.Hello, I did everything exactly as is it in tutorial, but the same thing happened, only black screen with blinking cursor (in which i can type linux commands). I have 3d acceleration on, i installed file on top of this thread and installed nougat iso in your reply to Krzysiek. Then i ran from starting screen to debug mode, and there i saw services are trying to start (and it write these services doesn’t have SELinux domain defined)
Continue in next comment
______________________________________
Sorry for:
English
Not good at Linux
Lazyness
([time] init: starting service: {service name}),
[some time] init: couldn’t write 1530 to /sys/fs/cgroup/stune/foreground/tasks: no such file or directory
[time] traps: surfaceflinger[1530] trap invalid opcode ip:{long hexadecimal num} sp:{long hexadecimal num} error:0 in gallium_dri.so[{long hexadecimal num}+{some 6 long number}]
[time] init: service ‘surfaceflinger’ (pid 1530) killed by signal 4
[time] init: {same service} killing any children in process group
[time] init: service ‘zygote’ is being killed
[time] init: {same service} (pid 1524) killed by signal 9
[time] init: {same service} killing any children in process group
[time] init: write_file: Unable to open ‘/sys/android/request_state’ : no such …
[time] init: write_file: Unable to write to ‘/sys/power/state
{services being killed}
{services killed by signal 9 (pids: 1526,1527,1528,1529)}
[time] init: untracked pid {1578 or 1518 (next line appear only in 1518)}
[time] traps: {i dont remember}
{the same thing repeating}
The error message “init: couldn’t write 8982 to /sys/fs/cgroup/stune/foreground/tasks” comes out is because the SchedTune filesystem mount point was moved from /sys/fs/cgroup/stune to /dev/stune, as shown in the following link:
https://osdn.net/projects/android-x86/scm/git/system-core/commits/11cde567a8fd6fd37cd462e24dd97d0f57bb12a4Brs,
Alan
hi! i’ve got problem, after step 24, i press no to gdp, rhen it shows: FATAL ERROR: Bad primary partition 1: Partition ends in the final partial cylinder, pls help
p.s : i’m using mac
Try again and make you sure you followed all the steps correctly.
When i try to download any file (apk), it says ”Couldn’t download”. What can I do?
Try this link: http://www.mediafire.com/file/5s14racgc2jbawi/Google+Play+Services.apk
Hi, thanks for the tutorial. I have android up and running perfectly. But I cannot install any apps through Google Play. It says ‘insufficient storage’ even though ‘settings -> storage’ shows 2GB free.
Any ideas?
Thanks again
Once try the link down below to download any sort of Apps from play store
Download Apps from Play Store
Hello, I loved your tutorial, I was able to complete all procedures and install Nougat on my Viurtal machine. But almost everything I do inside an android of a slight reboot showing the logo and returning to the initial menu.
Forgive my English, I’m Brazilian.
Have Installed Nougat on virtual hard disk or Run live? If you have run live then it couldn’t save the settings and the files.
I did everything right but it takes me to a black screen
Enable 3D Acceleration from your VirtualBox. If did not work let us know.
Hi, I have the same issue, after following all your steps it just takes me to a black screen. I have 3D acceleration enabled. Any ideas?
Mostly, people when enable 3D Acceleration then it solves the error if the applied the steps correctly.
Also, make you sure that Virtual Technology (VT) is enabled from your computer BIOS.
How am I supposed to install the Play Services APK? There’s no web browser.
Download it from the below link
http://download1026.mediafire.com/54uwi5545o7g/5s14racgc2jbawi/Google+Play+Services.apk
When I create the new storage controller, the dialog box does not appear.
Update your VBox. Download the latest version of VirtualBox.
How do I install the Google Play Services APK? Every time I try to install it in withing the Android Nougat Virtual Machine, it does absolutely nothing.
getting error cannot mount /dev/sda1
Is this give any error?
yes it gives the error after i try to format it.
Send the snapshot
if i press no in this screen it redirects to the format ext,ntfs,fat32 screen. if i press yes, it prompts to restart or try again.
https://drive.google.com/file/d/0B4_M2sVvr0WcOG0ySnNFYm5DRnc/view?usp=sharing
I have the same problem like kotochan.
I avoid it by formating it by myself and continue the intallation progress with step #35 with no formating.
After reboot on step #41 the boot progress aborted and return to the bootloader.
After booting in debug mode it ends up with “kernel panic – not syncing: …”
See: https://picload.org/view/rwlidcca/virtualbox_android7.0nougat_18.png.html
I used VirtualBox 5.1.26
cant use the mouse in the vi..
how can i change the settings to make it run?
Power on your VM then from top menu bar click Input > Mouse Integration.
It doesn’t come with the Play Store or a browser and it seems to reboot any time I try to use google to download the Play Store.
Download and Install Google Play Service from here. http://download1026.mediafire.com/54uwi5545o7g/5s14racgc2jbawi/Google+Play+Services.apk
the android 7 format is .bz2 !!!
I manually change to .iso but VirtualBox, UltraISO, Power ISO, Winrar,7-zip can not open it!!!
I don’t know but the VirtualBox do support ISO and VMDK extension and check out this guide
https://www.vmware.com/support/ws5/doc/ws_vidsound_d3d_enabling_vm.htmlyou need to use an unzip program and once unzipped, it will show as a normal .iso file
Yeah
I used peazip and it worked fine.
It has to be extracted with a program like WinRAR. You can’t just rename it; the actual ISO’s inside of it.
Yes, you are right Larry Wilson.
Successfully installed, but it keeps showing ‘android’ logo (boot up splash screen) when I try to click or navigate.
The logo does not go away?
Same for me, and filemanager is ‘not responding’ when I try to start it.
we will get this to you ASAP
excellent work and tutorial – thx!
do You have a link to a Google Play Services apk running on this Nougat VM installation?
thx in advance!
thomas
Welcome dear, Download Google Play Services APK file
please, what’s the version of this virtual box?
It is VirtualBox-5.1.4.