In this article, I’m going to show you how to build vSphere Infrastructure on Windows Server 2008 R2 ESXi Host. According to Wikipedia “VMware ESXi is an enterprise-class, type-1 hypervisor developed by VMware for deploying and serving virtual computers. ESXi replaces Service Console (a rudimentary operating system) with a more closely integrated OS. ESX/ESXi is the primary component in the VMware Infrastructure software suite.”
Anyway, I’m not going into deep detail of ESXi that what is this so you’ve got the clue now. Here, I’ll show the step by step guide to show you how to install ESXi on a Virtual Machine and linked it to my vSphere vCenter server. If you want to complete this lab, then you should follow my two other guides which I outlined down below.
Related: How to Build vSphere Infrastructure on Windows Server 2008 R2 DC Part 1
Related: How to Build vSphere Infrastructure on Windows Server 2008 R2 vCenter Server Part 2
Build vSphere Infrastructure on Windows Server 2008 R2 ESXi
To get started, you should have VMware workstation up and running because I’m going to use VMware to complete this lab. Before I forget, I should mention that I use two ESXi hosts to demonstrate my lab. You can use as many ESXi as you required but keep in mind that you should have more RAM if you want to install 3 or 4 ESXi hosts.
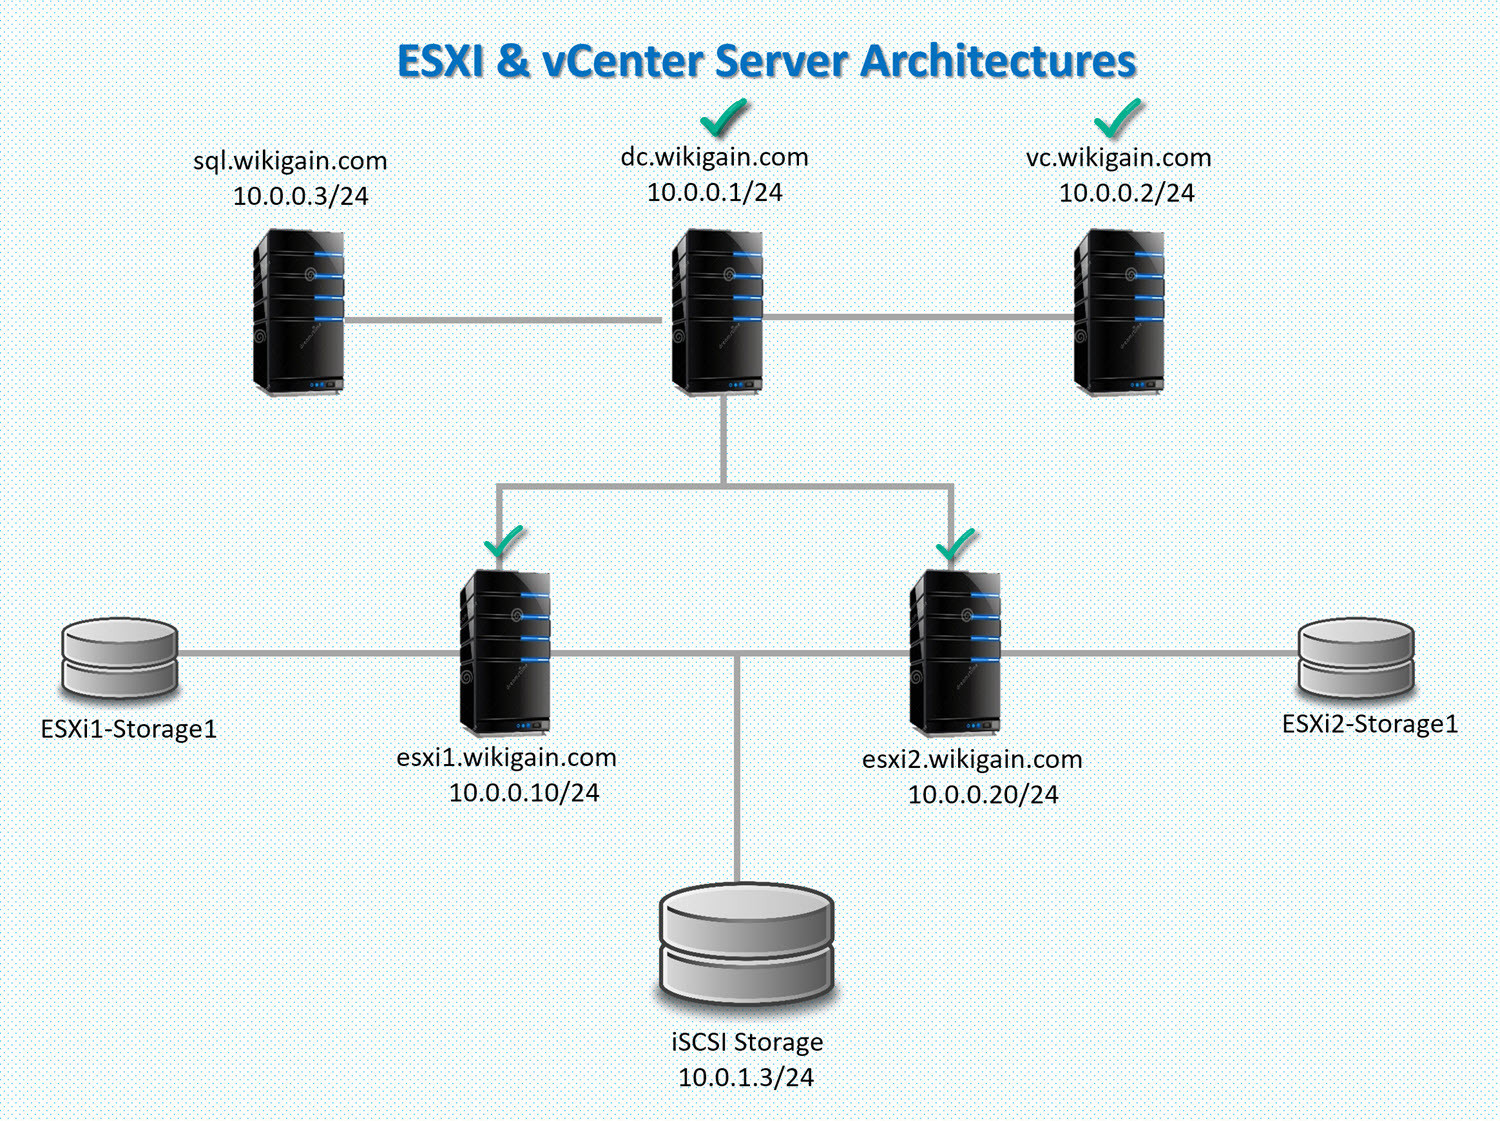
ESXi & vCenter Server Architectures
Requirements
- Minimum 16 GB RAM
- A high-speed processor (e.g. i7-7700K)
- ESXi Host ISO File
Note: It worth’s mentioning that you can have less memory and processor but it’s not working fine J. It’ll be stuck and you can’t work properly. Also, Solid State Drive is recommended.
So without any further explanation, let’s get the ball rolling.
#1. Creating VM for ESXi 1
Step #1. To create a new VM, you need to open up VMware and from the File, Tab selects New Virtual Machine. Select Custom and in the hardware compatibility select the right version. In the next window, Attach ESXi host ISO file and click Next. Name your VM ESXi1 and save it on your SSD drive if applicable.
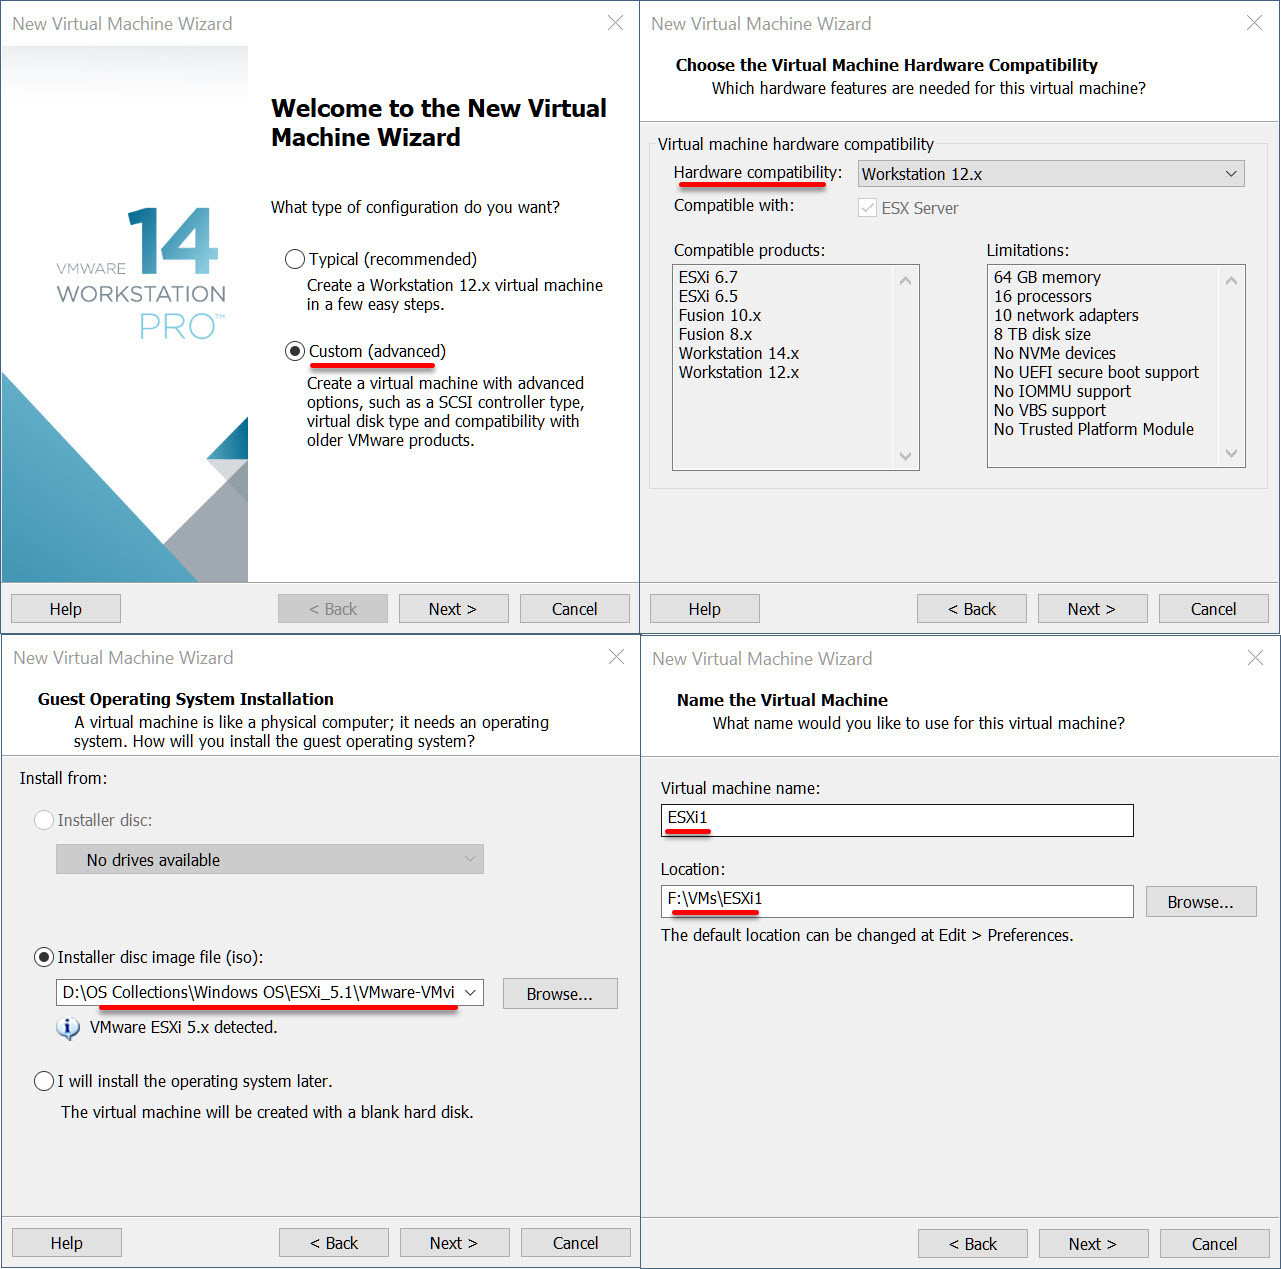
Choose the Virtual Machine Hardware Compatibility
Step #2. In Processor configuration choose 4 for total processor cores and click Next. For memory select around 9 to 10GB. If you don’t have this much memory, select 4 to 6GB. You can complete the installation but later on, you’ll need more RAM. You don’t need to have a Network work adapter now select Do not use a network adapter. Later on, we will add two network adapters so don’t worry about NA. Next step selects LSI Logic (recommended).
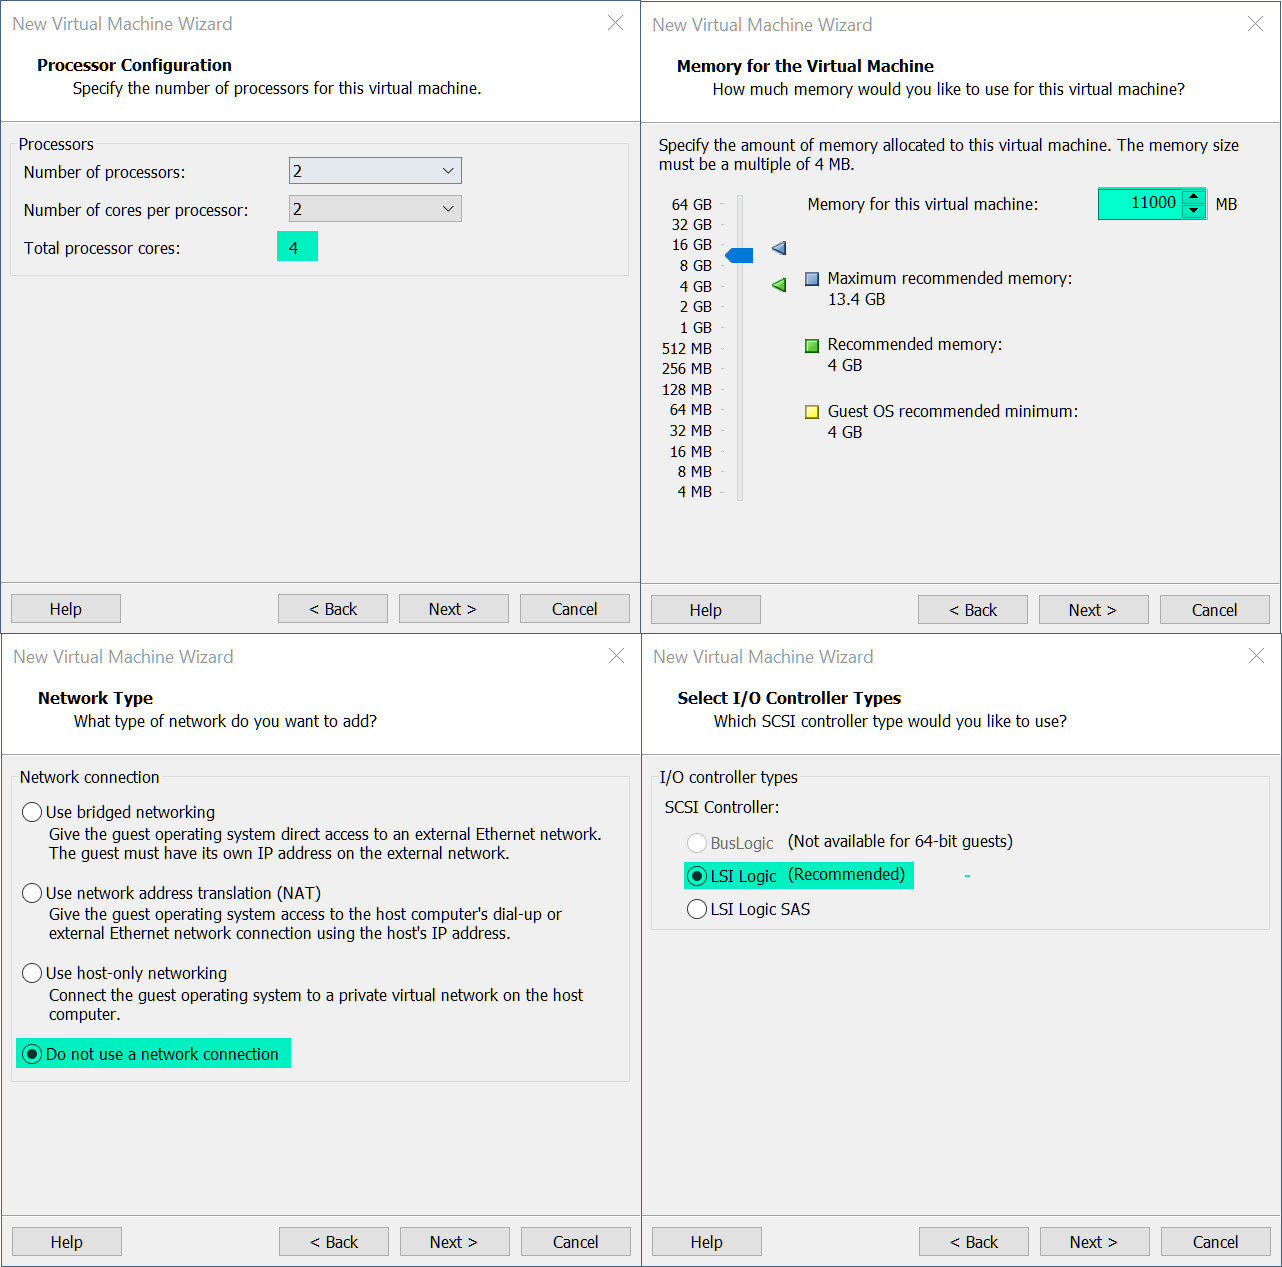
Select LSI Logic
Step #3. As Disk type select SCSI (Recommended) and as a Disk select create a new disk. Choose around 10GB for Disk space and finally, your settings should look like the screenshot below.
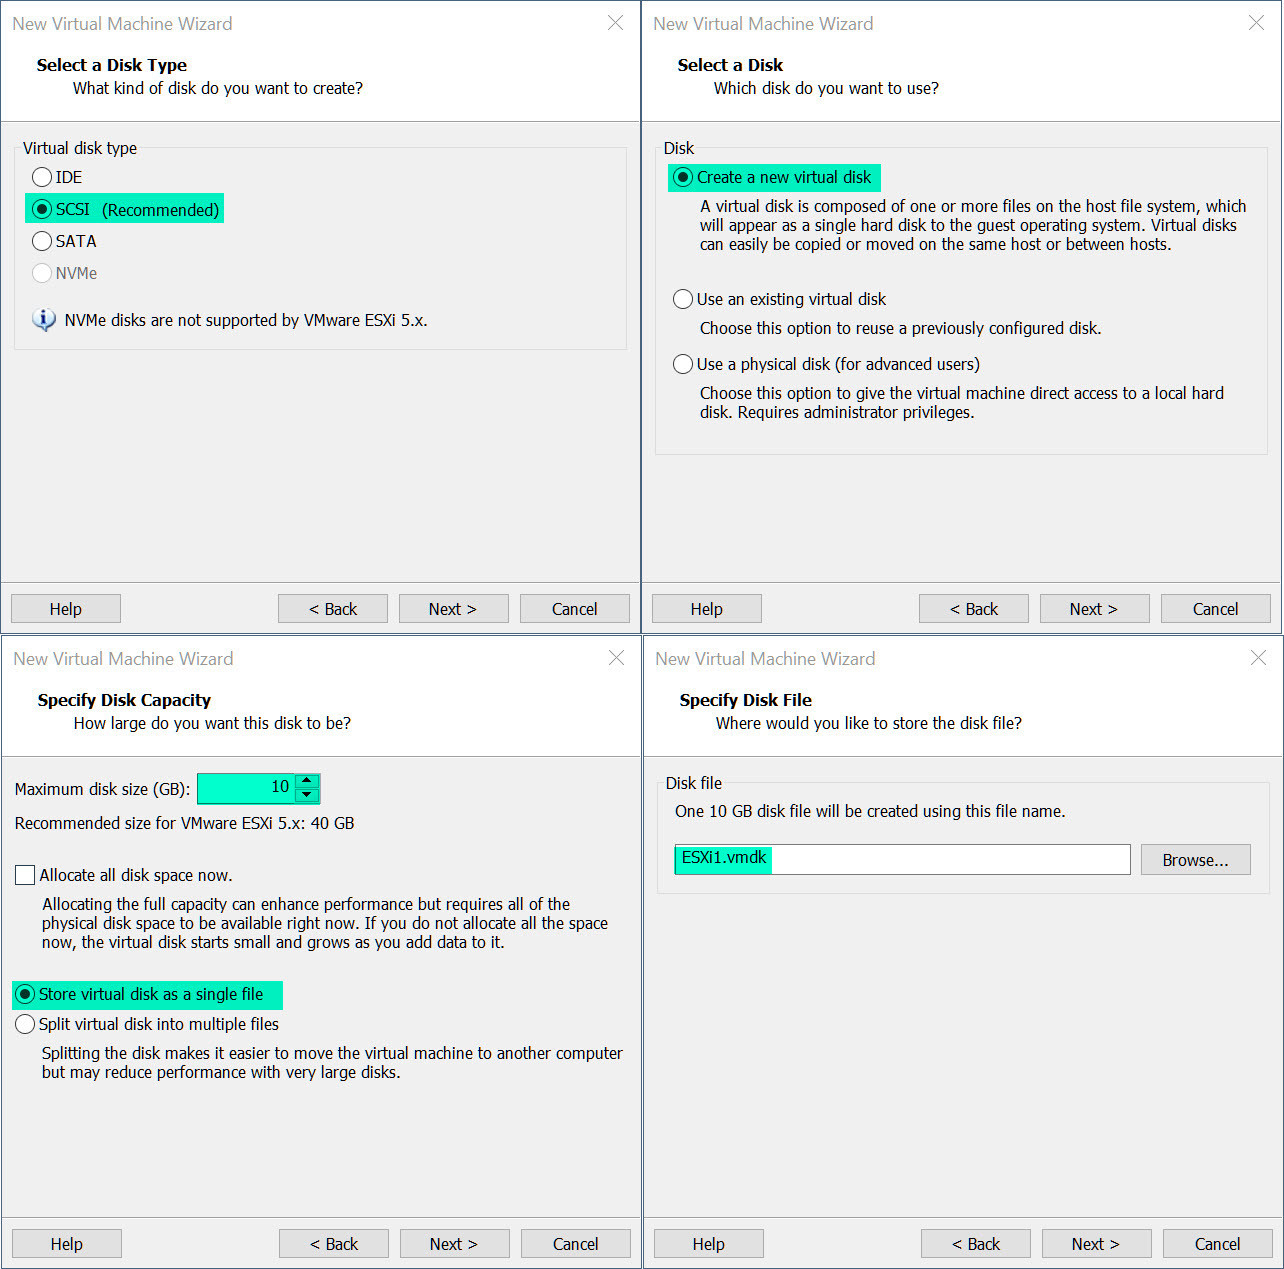
Disk Type SCSI
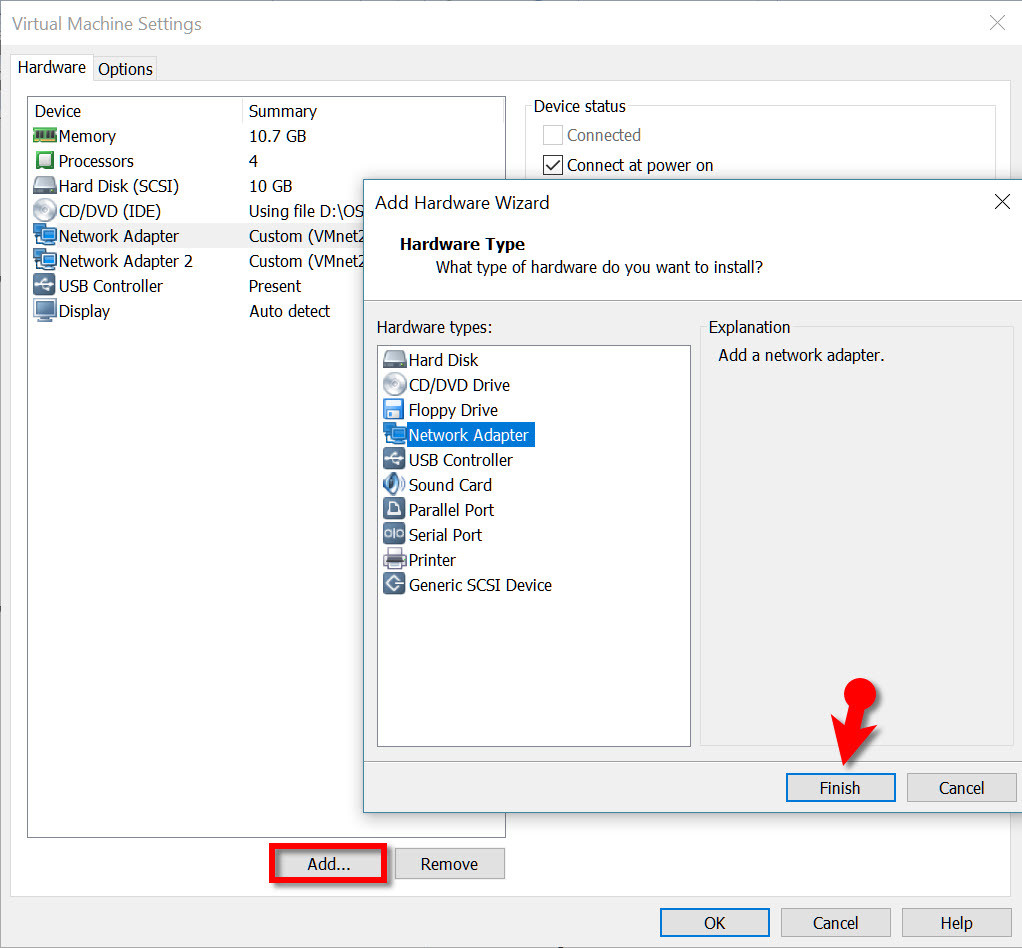
Step #4. Now it’s time to Add Network adapters. From the VMware settings, add two network adapter and as connection type select VMnet2. It should be on the same network to communicate with your DC and VC.
Step #5. By default, Virtualization Technology is ticked but again make sure it’s ticked. So under VM settings>Processors>Virtualize Intel VT-X/EPT or AMD-V/RVI.

Enable Virtualization Technology
Once You’re Done with creating ESXi VM, Do Not power on the machine yet because I’m going to show you how to clone this VM. You don’t need to do all those steps again for ESXi 2. Follow the next section to learn to clone.
#2. Creating VM for ESXi 2 (Cloning)
Cloning is a really cool idea to avoid wasting time. It means you don’t need to create a brand new VM from scratch so what you can do is cloning the created VM in just a few steps. Let’s get started.
Step #1. Right-Click on your ESXi1>Manage>Clone.
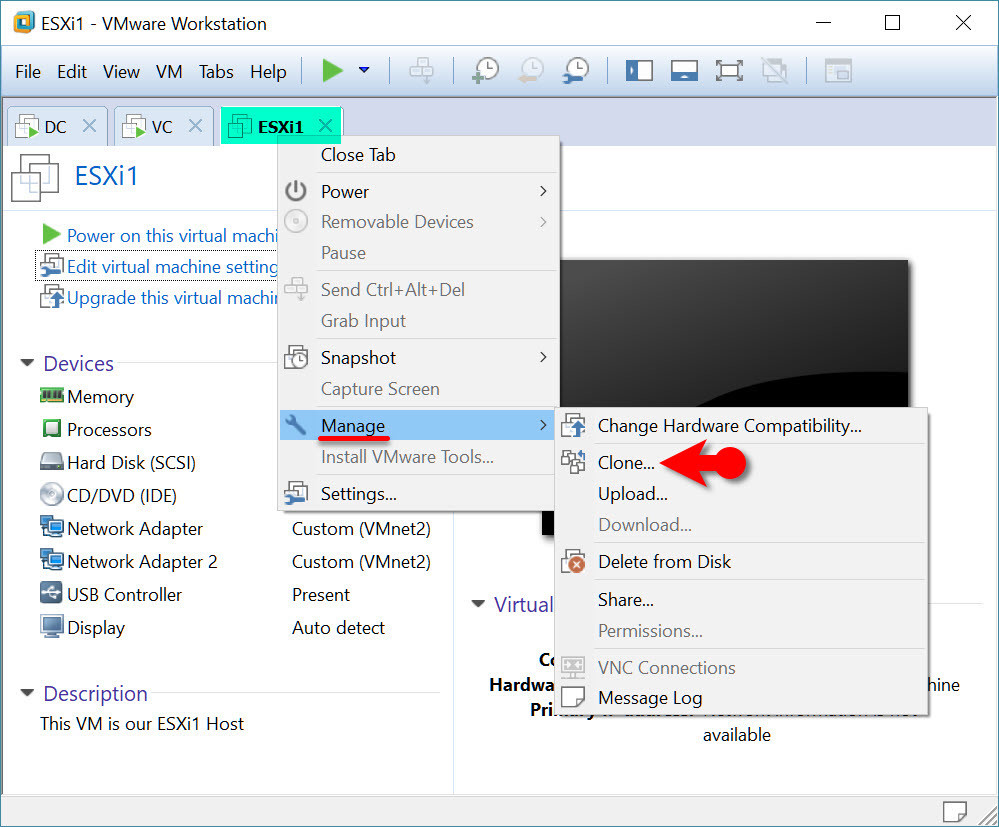
Clone VM
Step #2. Click Next and select “the current state in the virtual machine”. Select Create a Full Clone and then name it ESXi2, save it to the same folder where your DC, VC is stored.

Create Full Clone
#3. Installing ESXi on VMware
Once you’ve created VM for ESXi1 and ESXi2 then it’s time to start the installation process.
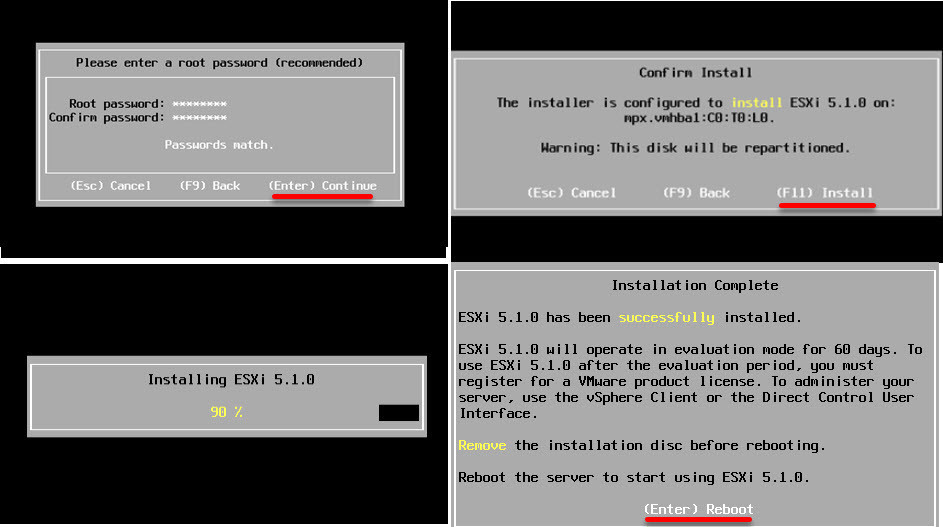
Step #1. Now, Power On virtual machine and follow screenshot below. Every step marked clearly.
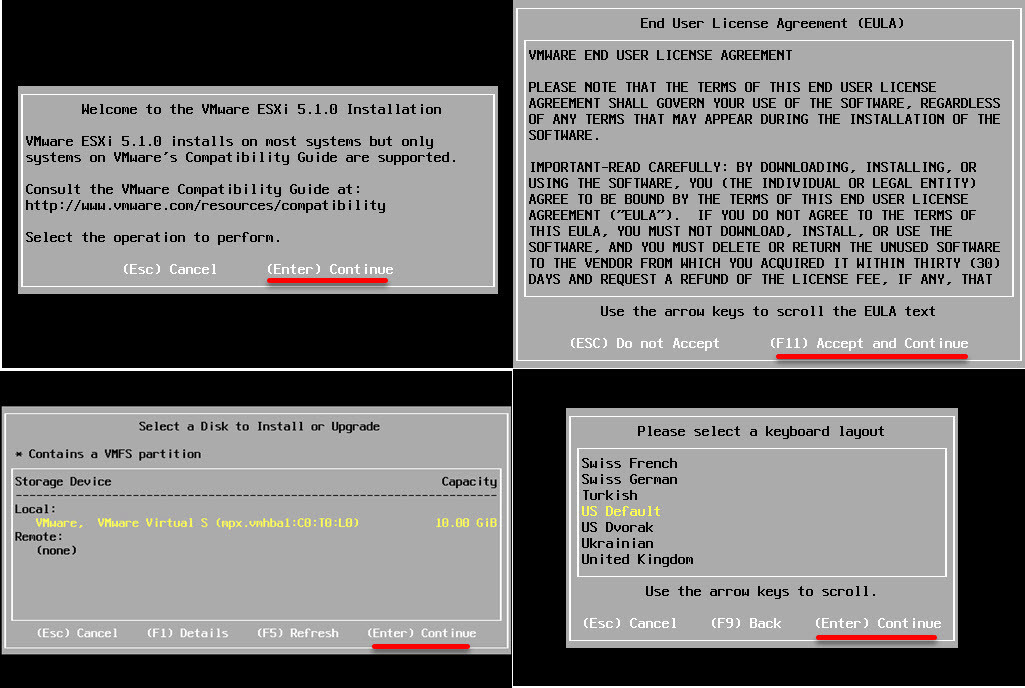
Welcome VMware ESXi
Step #2. Type a root password and write it somewhere because later on, you’ll need it. Press F11 to install ESXi and wait for a couple of minutes. Finally, enter to reboot your VM.
Enter root Password
Step #3. Once the VM restarted then press F2 to customize the settings. Type the password for root that you entered in step #2 and Press Enter.

Customize ESXi Host
Step #4. Under Configure Management Network>Network Adapters select vmnic1 by pressing the Space key on your keyboard.
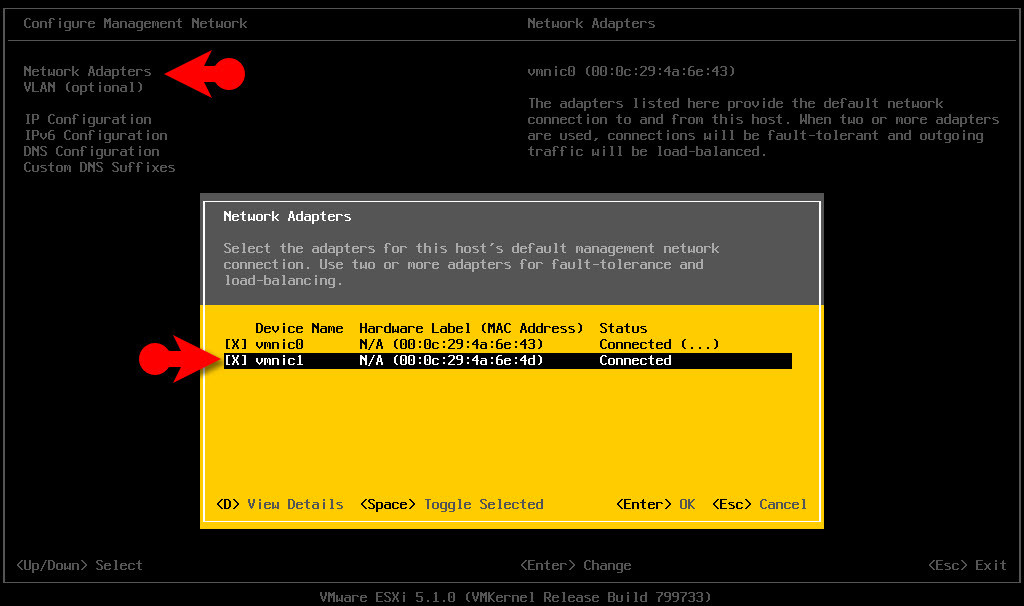
Enable VMNIC1
Step #5. From Configure Management Network list select IP Configuration>Set Static IP Address & Network Configuration. Use the IP Address 10.0.0.10 with Subnet Mask of 255.255.255.0 and Default gateway 10.0.0.1 and finally press OK button.
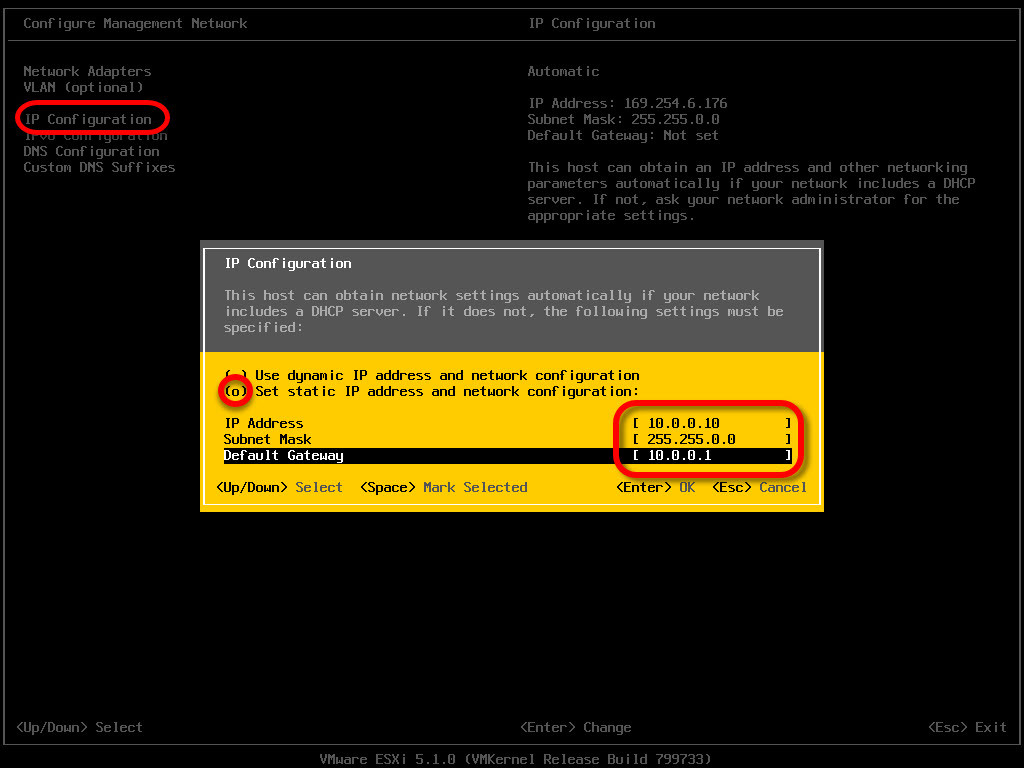
Set Static IP Address to ESXi Host
Step #6. Now select DNS Configuration from the list and select static DNS and Hostname. Type 10.0.0.1 as Primary DNS Server and esxi1.wikigain.com as a hostname.
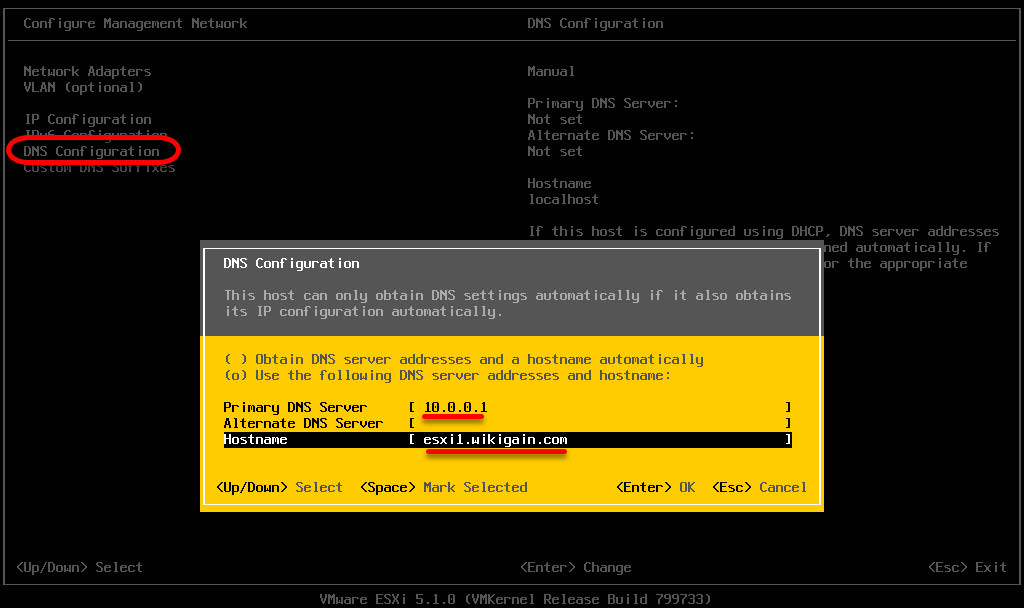
Enter a Valid Hostname and DNS Server
Step #7. Once you’ve done these modifications then press Esc key on your keyboard and press Y to apply the changes.

Confirm Network Configuration
Step #8. Under Troubleshoot Mode Option enable ESXi Shell.
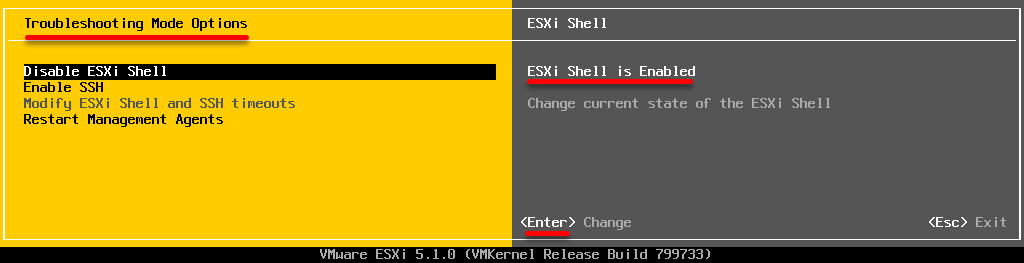
Enable ESXi Shell
Step #9. On your Domain Controller (DC VM) open up DNS console from Administrative Tools then select Forward Lookup Zones>wikigain.com (your one might be different). On the blank area Right-Click and select New Host (A or AAAA). Type esxi1 as Name and type 10.0.0.10 as IP Address. Also, don’t forget to tick “Create associated pointer record” and then click Add Host button.
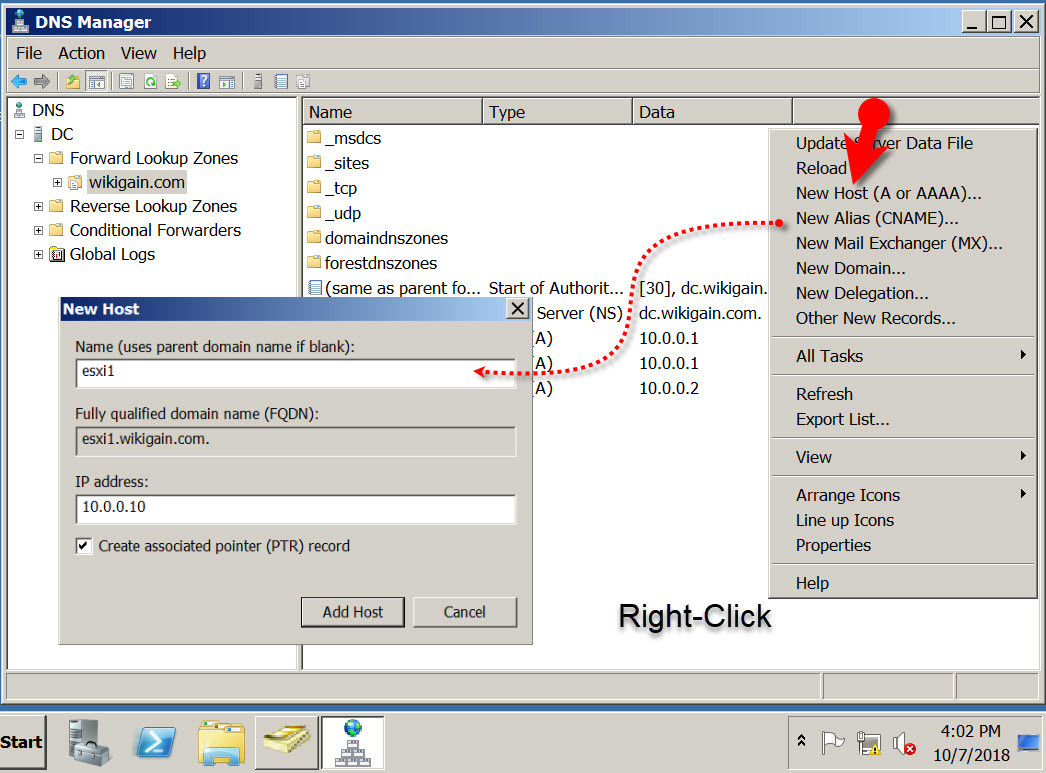
Create DNS New Host
Step #10. Now open your VC VM and on the command prompt type ping esxi1.wikigain.com or ping 10.0.0.10 then you should get a reply.
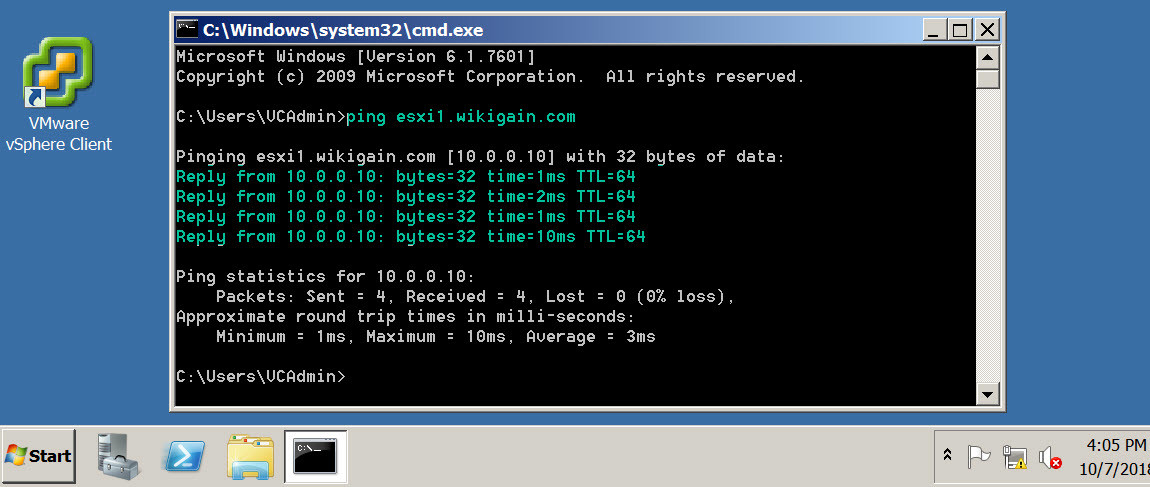
Ping to ESXi1
Now Install ESXi2
For ESXi2 repeat the same steps but use different IP Address and Hostname.
ESXi2 IP Address: 10.0.0.20
ESXi2 Hostname: esxi2.wikigain.com
Finally, your DNS records should look like the screenshot below. Please be advised that check your connectivity from VC VM using ping (hostname or IP) to make sure everything is set up correctly.
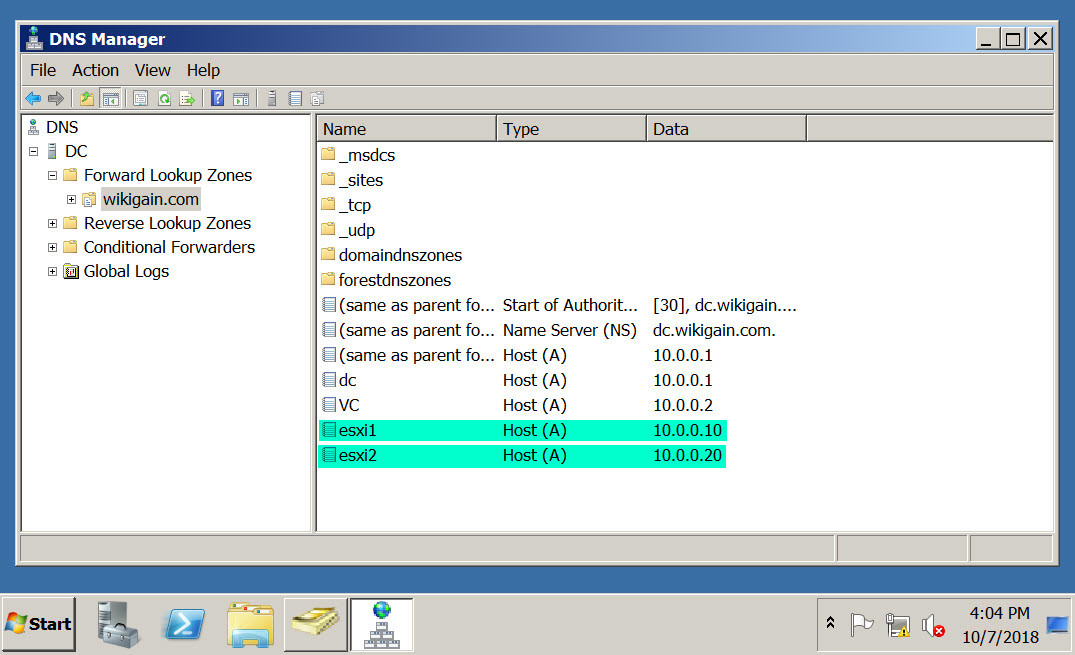
ESXi1 ESXi2 Added to DNS Record
#4. How to Add ESXi Hosts to vCenter Server
Now that your ESXi1 and ESXi2 are up and running, you should add them to your vCenter Server. Why do you add your ESXi hosts to your vCenter Server? The answer is to manage all the settings and other tasks from one place. You don’t need to navigate to ESXi again and again. Once you linked your ESXi host to vCenter Server then you can do every possible task from vCenter Client. So to begin the task follow the below procedures.
Step #1. Open your vSphere Client. Right-click on your domain name (vc.wikgian.com) and Create a New Database.
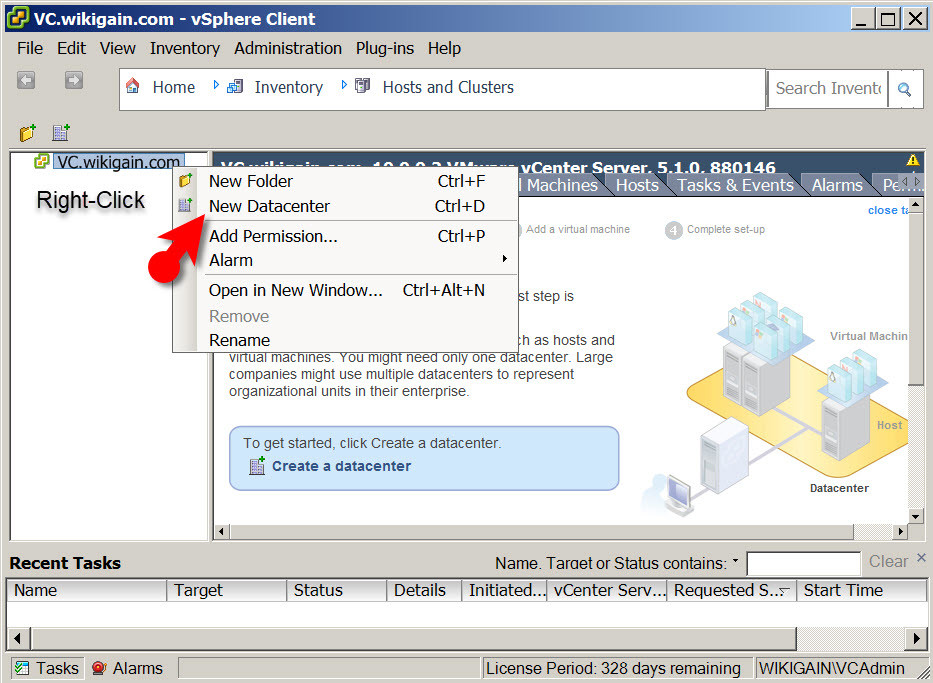
Create New Database
Step #2. Create a New Cluster under the newly created database. Name it anything you like and tick vSphere HA, DRS because later on, we are going to use them in our lab.
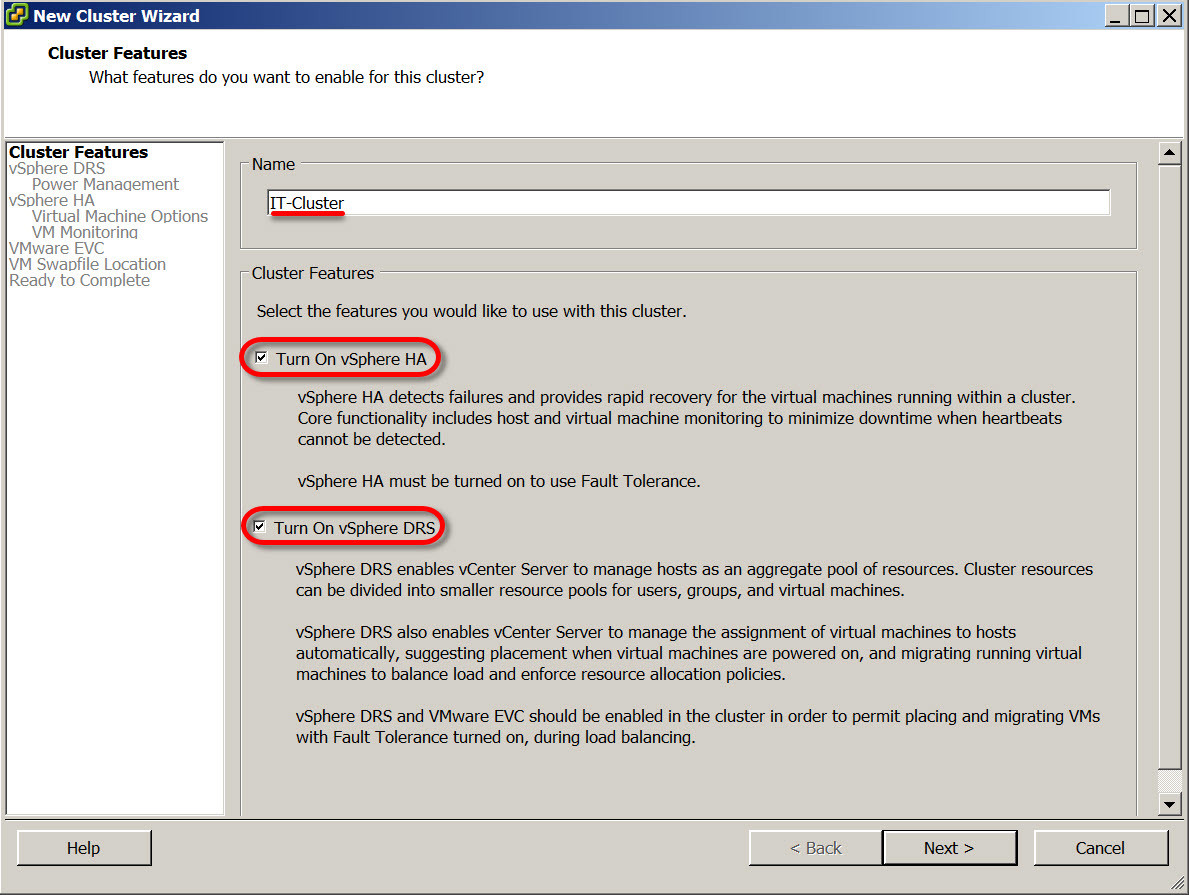
Name Cluster
Step #3. Click Next and put everything to default. Your final settings should look something like the screenshot below.
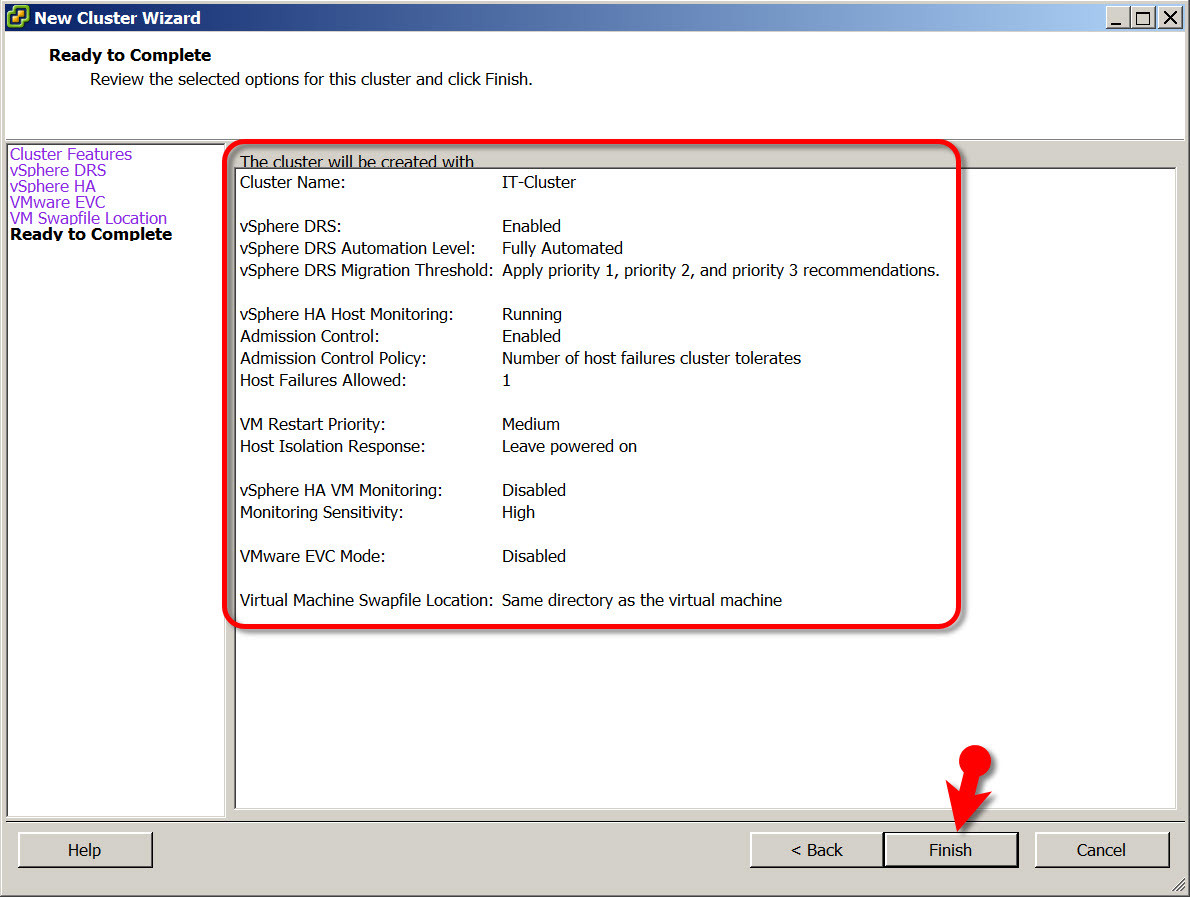
Final Setting for Cluster
Step #4. Now that you have your Database and Cluster ready then you need to Add a host to your cluster. I’m going to add ESXi1 and two to my IT-Cluster. Right click on Cluster and select Add Host.
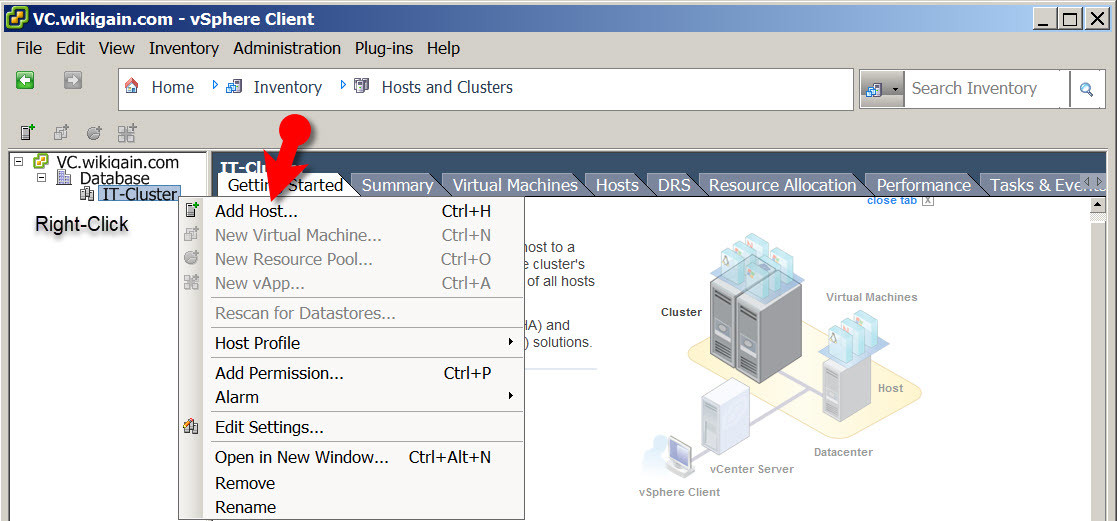
Add New Host
Step #5. Enter the following information
- Host: esxi1.wikigain.com
- Username: root
- Password: your ESXi1 password that you entered in step #2 of installing ESXi1
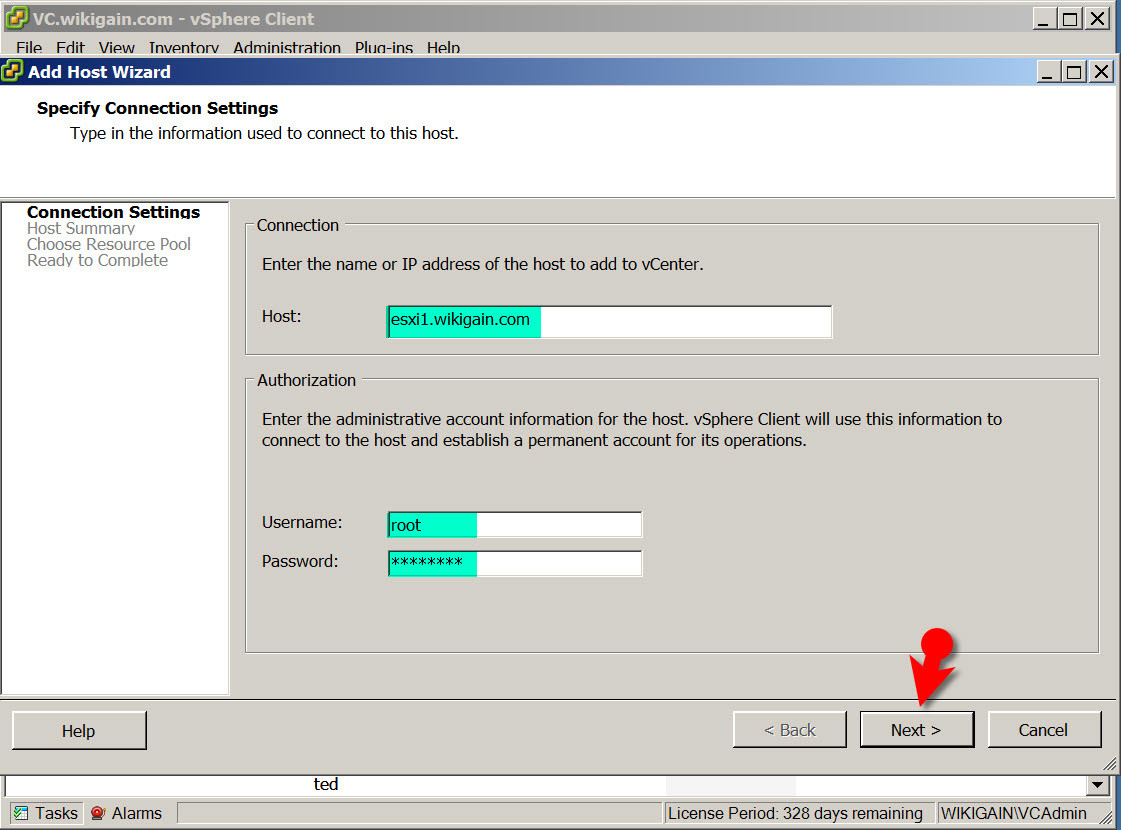
Name ESXi1
You might receive a warning that saying unable to verify the authentication. Don’t worry about this warning and click Yes.
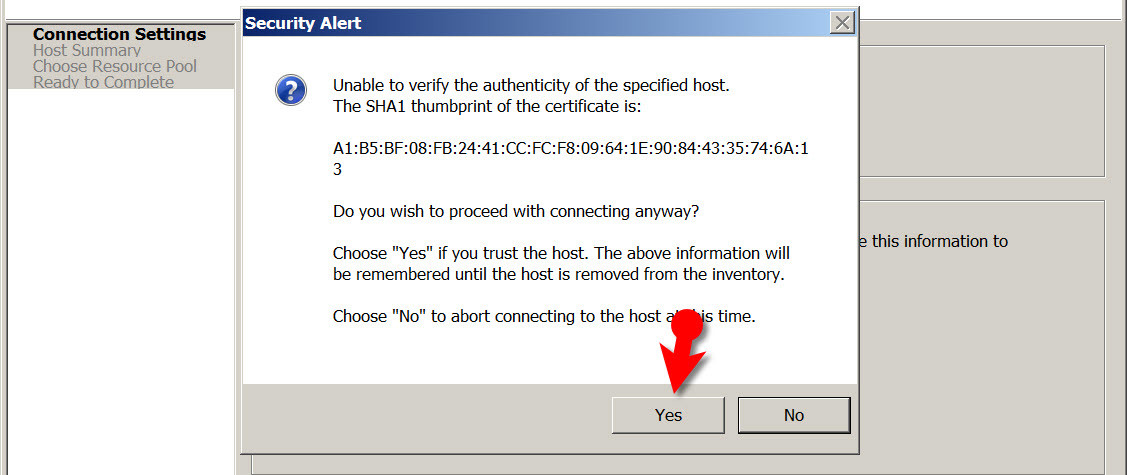
Accept the Warning
Step #6. Click Next and put every other setting to Default. Your final arrangements should look like the snapshot below.
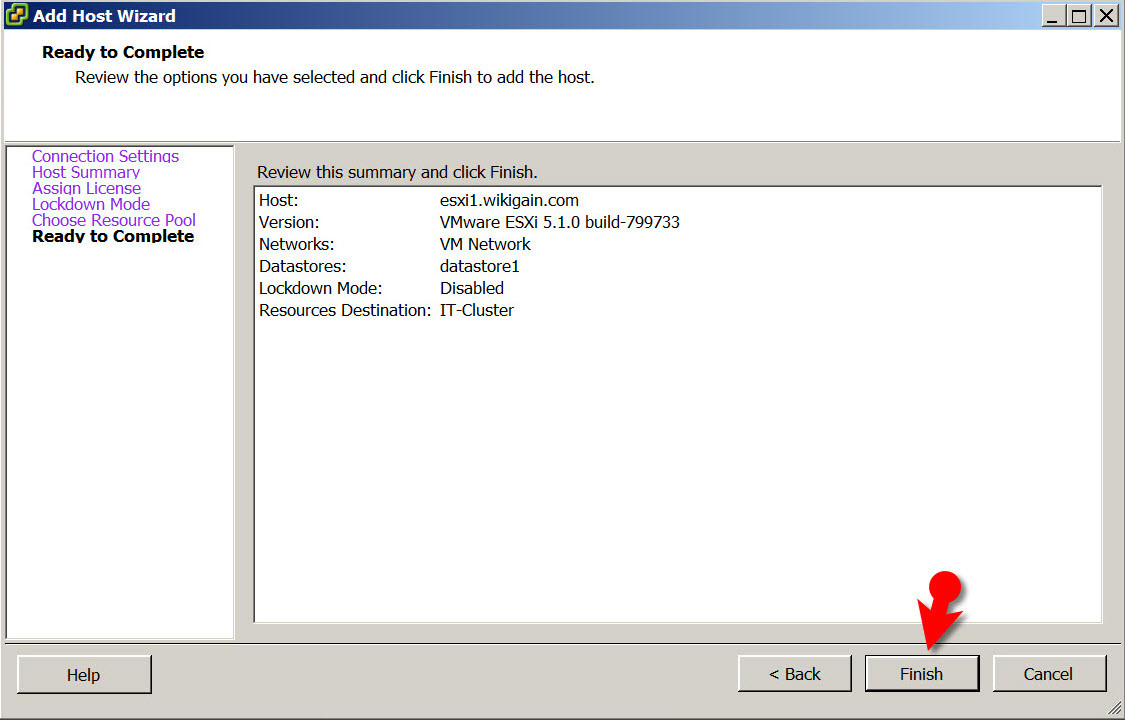
ESXi1 is Ready to Be Added
After completing Step #6, you should see your ESXi1 host is connected to your vCenter Server. Now, repeat these steps for ESXi2 to link to vCenter Server.
#5. Fixing Continuous Reboot
If you have got a problem with connection and your ESXi hosts’ reboot repeatedly then something you have to do to fix the issue. Follow the steps below.
Step #1. On your vSphere Client navigate to Administration>vCenter Server Settings.
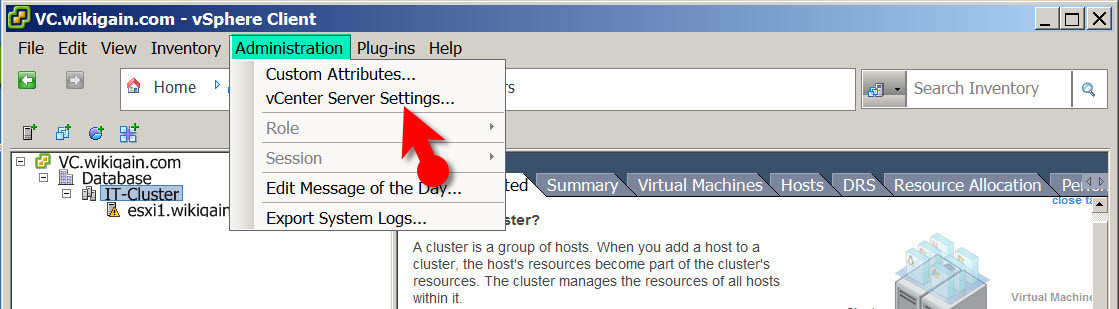
vCenter Server Settings
Step #2. From left-hand side select Runtime Settings, Add your vCenter Server IP Address. If you following my lab it should be 10.0.0.2. Again you can check it if you don’t know. Open the command prompt and type ipconfig.
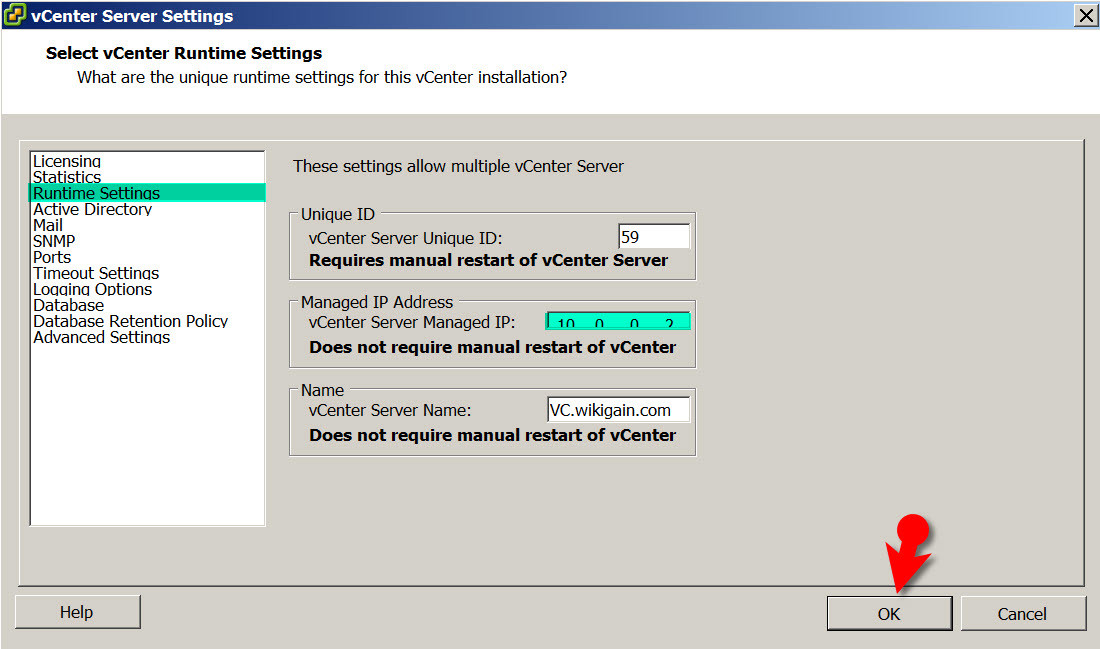
Select vCenter Runtime Settings
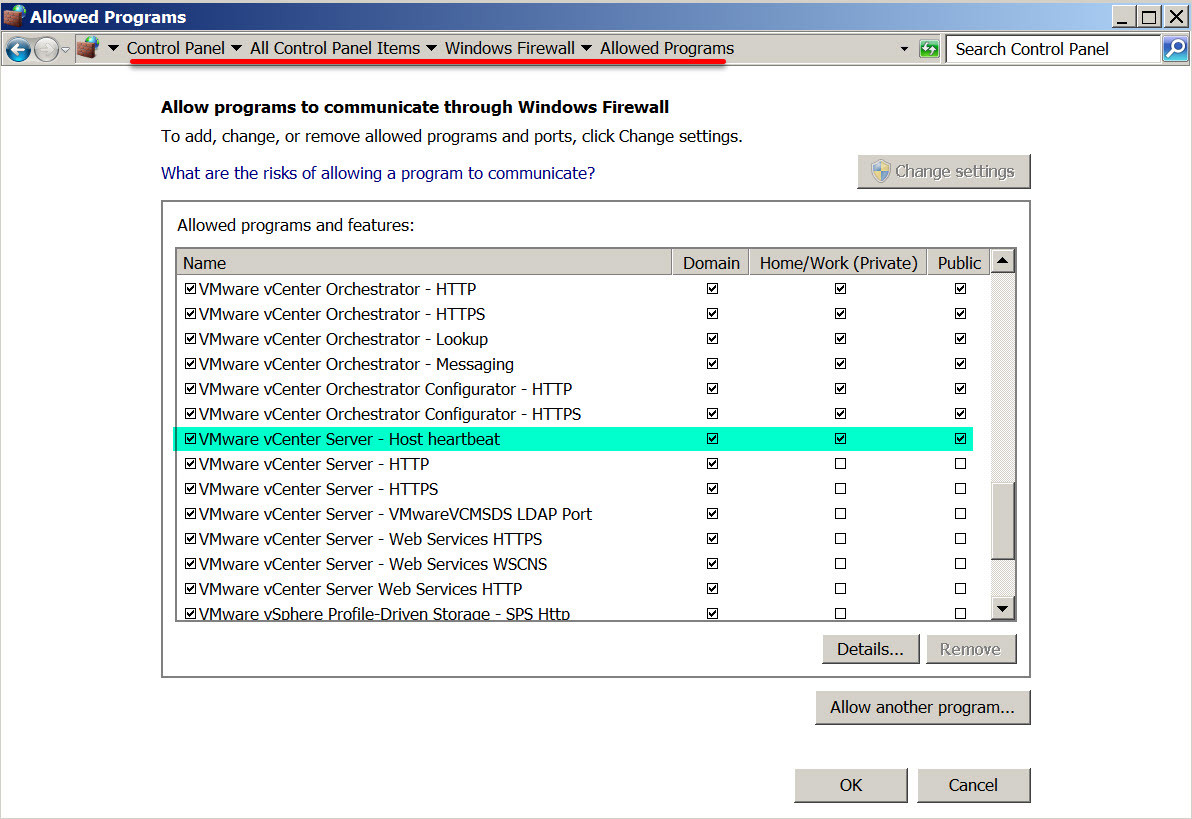
Step #3. Open Control Panel navigate to All Control Panel Items>Windows Firewall>Allowed Programs. Find VMware vCenter Server – Host heartbeat. Tick mark all three boxes.
VMware vCenter Server Host Heartbeat
Your final activity should look like the screenshot below. You should have connected your ESXi1 and ESXi2 hosts to your vCenter Server. Again if you stuck in any step please feel free to hit a command down below and we’ll answer them as soon as possible.
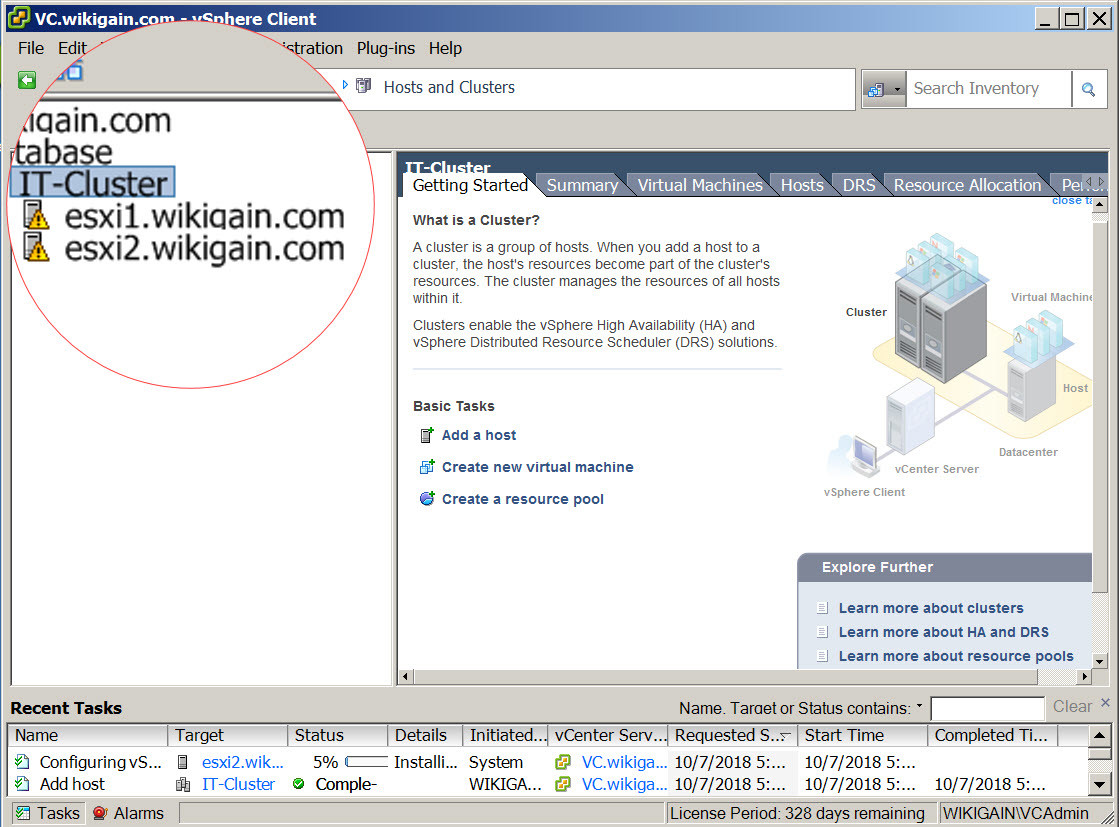
Final Look of ESXi1 ESXi2 on vCenter Server
Conclusion
I hope you guys have learned something useful from this guide and as well as our previous guides so overall, I’ve covered the following objectives in this article.
- Created ESXi VMs
- ESXi1 VM Cloning to create ESXi2 VM
- Added ESXi hosts to vCenter Server
- Fixed Continuous Reboot issue
Next Guide: How to Build vSphere Infrastructure on Windows Server 2008 R2 vStorage
Leave a Reply