Mac OS X El Capitan is the latest version of the Mac operating system right now. It is like the previous version “Yosemite” with some differences. In this article, we are going to show you the basic configuration of Mac OS X EI Capitan. Mac OS is one of the well-known operating systems that most of the Mac user use this OS. If you want to know which things are new on this operating system, visit Apple’s website. OS X El Capitan (version 10.11) is the twelfth major release of OS X, Apple Inc.’s desktop and server operating system for Macintosh computers. It is the successor to OS X Yosemite and focuses mainly on performance, stability and security.
Basic Configuration of Mac OS about this Mac
To start up the basic configuration of Mac OS X, you may follow out the below instructions. First, start up your Mac operating system then enter username plus password. Tap the apple icon button at the top left-hand corner of your laptop or desktop computer. The first option is “About This Mac” which you can get information about your Mac OS that how much is the RAM and many more. Don’t worry. We will cover these all for you to keep reading up to the end of this article.
About This Mac
In windows operating system when want to know some information about our device or computer we will right click on the My PC on Windows 10 and select properties to show some info about the computer. But Mac OS, we don’t have such kind of things. We have to go to the Apple menu icon and click on About This Mac to open up the new window. Now step by step, we will explain to you these steps.

About This Mac
In this step, you will know about the operating system of Mac, the version and as well as the version of OS. If you are going to get more info try to click on the System Report. As we have on windows dxdiag for getting more information about the Windows Operating System.
OS X El Capitan Version 10.11
- MacBook Pro (13-inch, Mid 2012)
- Processor 2.5 GHz Intel Core i5
- Memory 4 GB 1600 MHz DDR3
- Graphics Intel HD Graphics 4000 1536 MB
- Serial Number CPWJFGLXDTYE
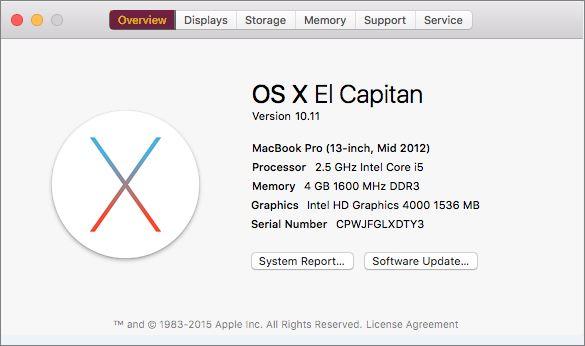
Overview
The second step is the Display button. It shows about Display and size of your laptop mostly. Here my laptop size is 13.3 inch (1280 x 800) and as well shows the Graphics card.

Mac Display
The third step is Storage, that shows Hard Drive of your Macintosh. Click on storage button to show you what you need. Mac has improved this functionality better than windows manufacturer. It will not only figure out the Hard Disk of your computer, but also it will show you how much space has taken by Movies, Apps, Photos, Audio, Backups and Other. This is an outstanding feature for Mac users if they want to know about their space of the hard disk.
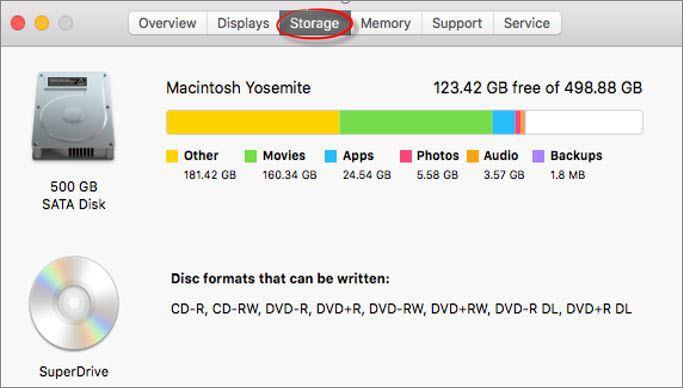
About this Mac Storage
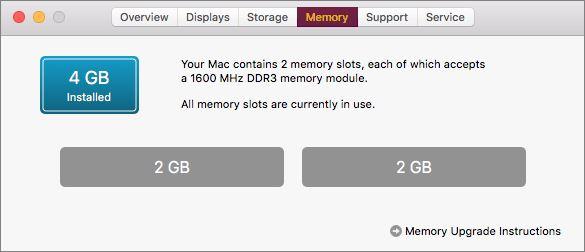
The fourth option is Memory, which is more helpful for Macintosh users. Because it shows the installed Memory on Mac OS X. Here in my laptop, I have installed 4 GB of memory which has two slots. It is the other Functionality of Mac computer that you can installed separate memory on it.
Mac Memory
The last two options are about the Mac support and services which you can get help about anything that happens on your Mac Operating system.
Basic Configuration of Mac OS Dock
First, you are going to click on apple icon at the left-hand corner of your Mac and select System Preferences. A new window will pop up. System preferences is like the control panel on windows operating system. As you settings windows from control panel here, you can do that from System Preferences.

System Preferences
Now you can see lots of features here that every one of them will do different things for you. We will start from the Dock that what does it do? Let me explain the Dock for you, what is it? The dock is functioning like the Taskbar on Windows operating systems. But it’s somehow better than that. You can magnify it in the way you want. On windows, you can’t magnify your Taskbar usually. If you wish, you can use third-party software.

System Preferences Dock
When you clicked on Dock, a new window will be shown for you. The first option is the Size of the Dock. You can resize it by dragging the small triangle button to the right and left-hand side. The Second option is Magnification, which you can Magnify your Dock and it will look exciting. As well as you can choose to wither the Dock should be Right, Left and Bottom. From this window, you can select how should be minimised your Dock by clicking on Effect option. By tapping the tick button for the rest, you can hide, animate and many more options are available.
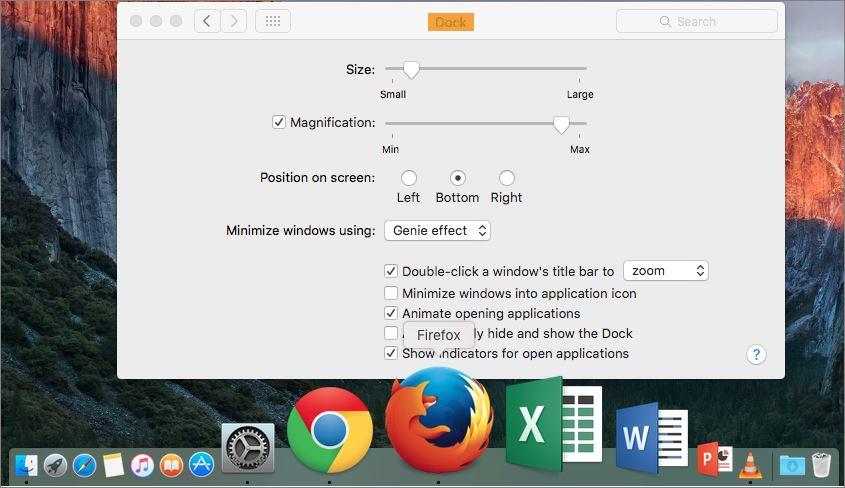
Dock Configuration
Basic Configuration of Mac OS Energy Saver
Next option from the system preferences is Energy Saver. As we have Power Option on Windows Operating systems. Tap on Energy Saver and set your laptop battery. When should this be logged off and when it should be Displayed? And as well you can tick mark the “Show battery status in menu bar”. You can do these things here.

Energy Saver
Basic Configuration of Mac OS Date & Time
Let’s know somehow about Time setting on Mac Operating system. In this article “Basic Configuration of Mac OS” we will not go so deep. Because it will be annoying for the readers and as well as take much time to read all this. Basic Configuration of Mac OS is an article which explains the essential things and the most useable features. Anyway, on System Preferences window click on Date & Time option. A window will pop up that you can see there three options. First, you can set a date and time automatically, and as well you can set the language and Region.
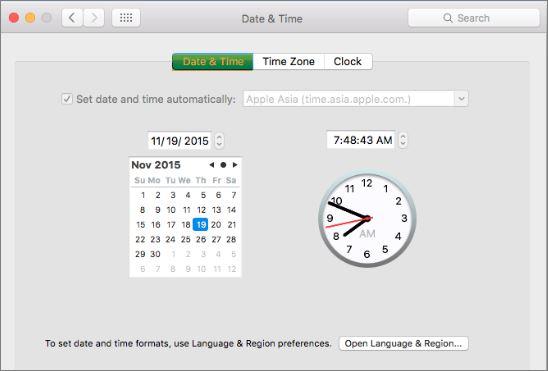
Mac Date and Time Configuration
Select second option Time Zone. To select a time zone, click the map near your location and choose a city from the closest city menu. You can also have the time zone change automatically, if possible, based on your current location.
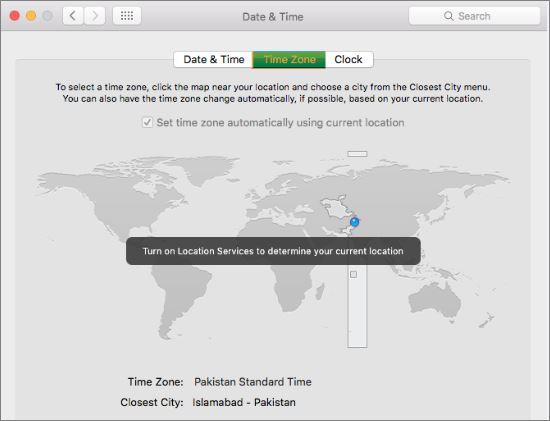
How To Change Mac Time Zone
Last Option From Date & Time window is Clock. First select Show date and time in the menu bar if you want. Second, there are two kinds of options for the clock. First one is Digital and the second one is Analog. You can select Display the time with second, Flash the time separators, Use a 24 hours clock, Show AM/PM, Show day of the week, and as well you can select the announce time which announces time after quarter and an hour or thirty minutes past.

How to Change Mac Clock
Basic Configuration of Mac Trackpad
A trackpad, also seen spelled trackpad, is a user interface which interprets pressure and translates it into the movement of a cursor. Laptops are commonly equipped with trackpads, and many drawing tablets and personal digital assistants (PDAs) use the same technology. While it can take some time to become accustomed to the trackpad interface, some computer users prefer using a trackpad to mousing. Many trackpads also offer additional programmable functions which can make them even more versatile.

System Preferences Trackpad
You have three options here to work with. The first option is Point & Click. Just tick mark all the options and go to the next option “Scroll & Zoom”. Here as well tick mark all. If you want to know what are they? Just move your cursor on each option at the right-hand side that will be shown to you. Gestures as well show some movement of your mouse and windows.

Point & Click

Scroll & Zoom

More Gestures
Showing the battery percentage, you may click on the battery icon and select Show Percentage.
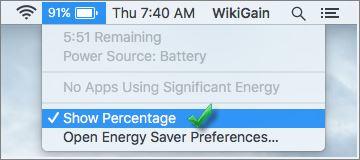
Show Mac Battery Percentage
The last thing that I’m going to show the Finder and that is the end of this article. Finder is functioning like File explorer in windows operating systems. You can manage your data by using Finder on Mac OS X. I hope that you guys enjoyed with this step by step Mac guide and thanks for being with us.
Applications
If you want to create a user on Mac OS, you can visit this article.
Create Local User Account on Mac OS
Dear Mukhtar Jafary,
Could you send Persian Keybord setup for Mac?
My Mac Details are
MacBook Air 2016
If you mean that how to add a Persian keyboard language, you can check the article, below. If you mean something else just let me know, please.
https://www.wikigain.com/how-to-add-language-on-mac-os/
I really like to work with on a virtual lab. Is there any way to install the latest version on VMWare using Windows?
Do you want to install the latest version of Mac Operating System on windows using VMware Workstation?