In this article, I’m going to show you how to change user account name in Windows 10. There are lots of topics and articles related to this topic on the internet but here you will find some useful tips & tricks that you might never see them. These methods are easy as well and complex as well. I hope you find this article helpful.
How to Change User Account Name in Windows 10
Most of people ask this question that “I can’t change the User Name in Windows 10″. As Ziggy has asked this question “After I installed Windows 10, I created a Microsoft online account to see what it was like. During the process, it changed the name on my local Windows 10 user account. I used the Control Panel to go to Users, but there seemed to be no way to change the name back to the original. It’s the only account on the computer. Surely changing the name is possible, but how? Will, I have to create a new administrator account and delete the old one?“.
This is actually somehow hard for the beginners that don’t know how to change user account name in Windows 10 or Windows 8. Again don’t worry about this problem because we have the very best solution for this error. I’ll show you 5 different ways to change user account name in Windows 10 that will work one of them for sure. If again the problem did not solve, let me know.
#1. Control Panel
As I mentioned above that you can change user account name in Windows 10 in 5 different ways. Now, I’ll explain each way and I hope you get something in here. One of the ways to change user account name in Windows 10 is “Control Panel“.
#1.1. Open “Control Panel” by “Windows key+X”. A small window will pop up. Choose “Control Panel” from the list. Or press the Windows key from the keyboard then type control panel.
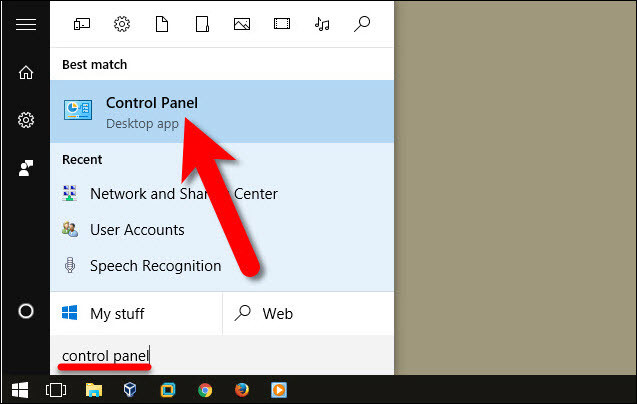
Open Control Panel
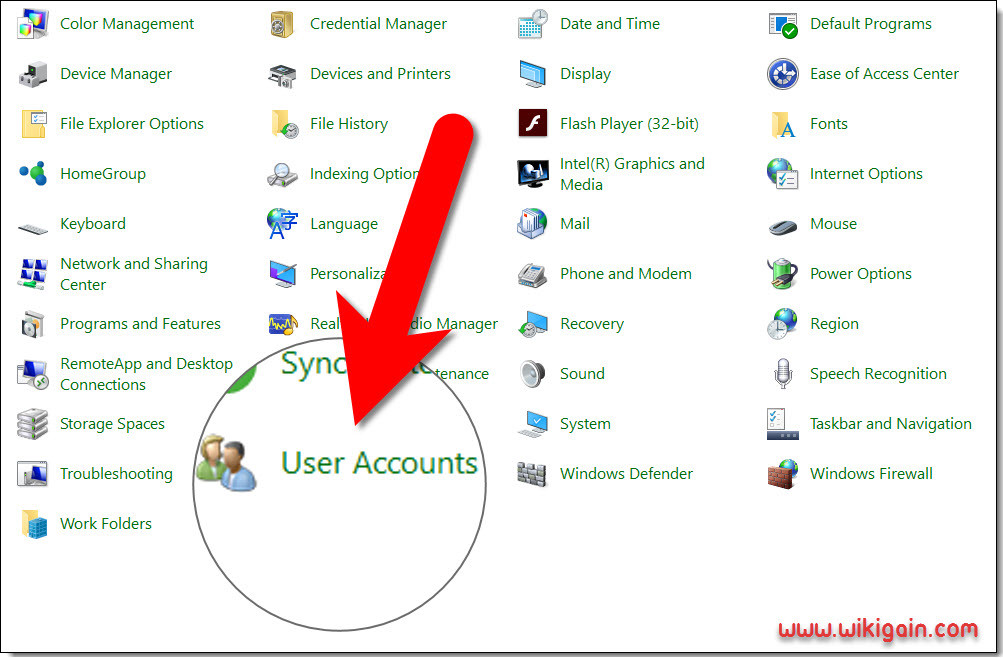
#1.2. Once you open control panel choose “User Accounts“.
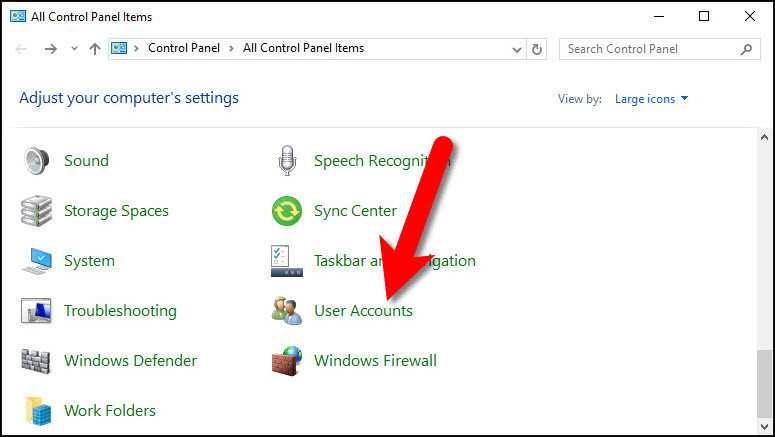
User Account
#1.3. If you want to change the user that you already logged in, so simply click on “Change your account name“. If you want to change someone else user account name, click on “Manage another account“.
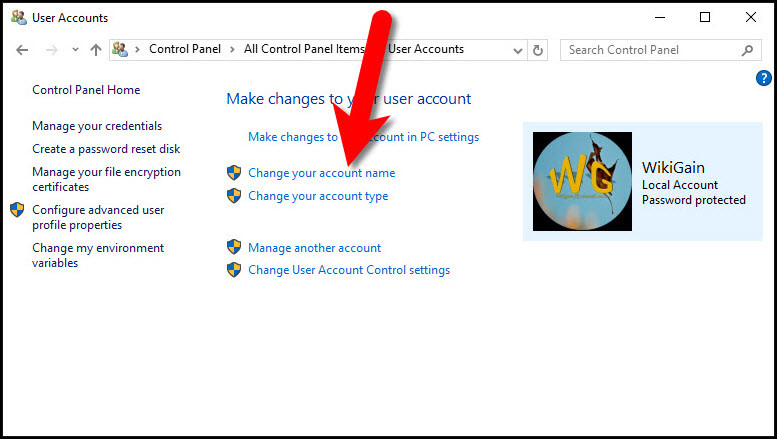
Change Your Account Name
#1.4. Choose the user account name you would like to rename it. Now, click “Change the account name“.
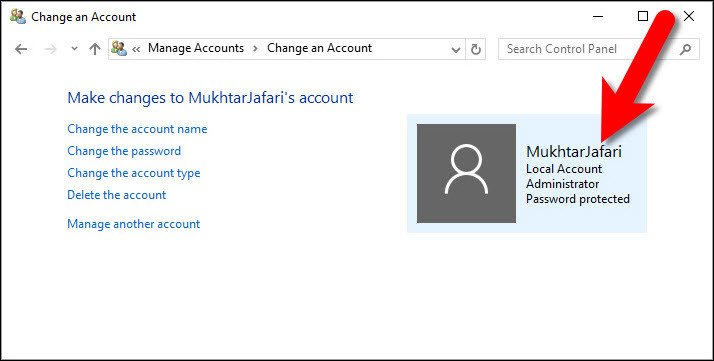
Changed User Name
#1.5. Type the new account name then taps on “Change Name“. This name will appear on the welcome screen and on the start screen. The first step is done.
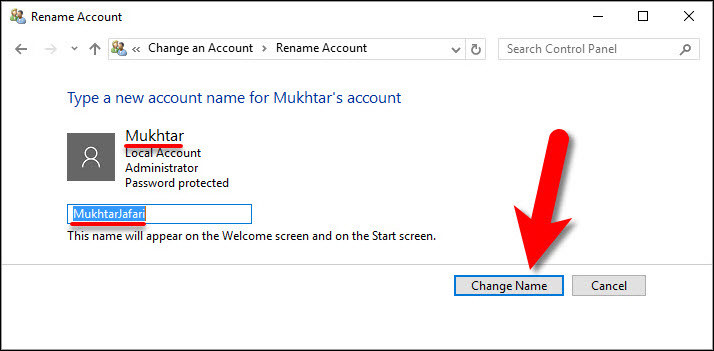
Change Name
#2. Local Users & Groups (lusrmgr.msc)
The second method is another way of changing user account name. Local users and groups tool is the best way to manage your clients.
#2.1. Open “Run” window by pressing the “Windows Key+R” then type “lusrmgr.msc“.
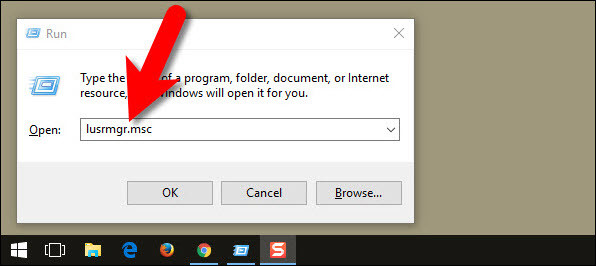
Lusrmgr.msc
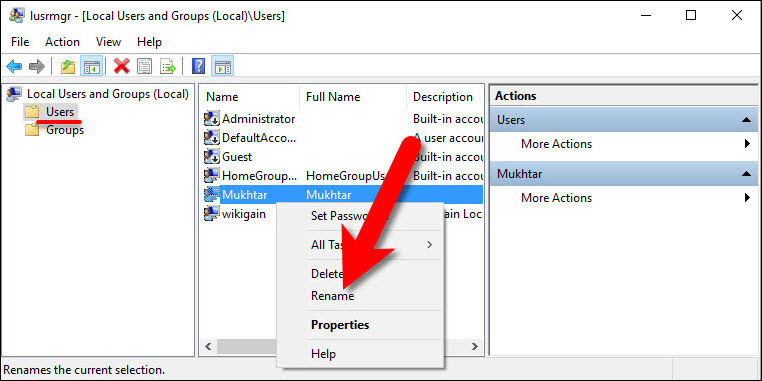
#2.2. From right-hand side, choose “Users” then select your account you would like to rename it.
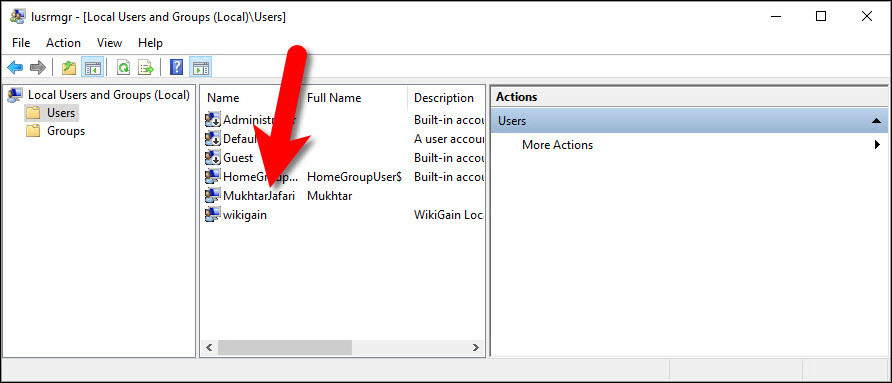
Change User Name with Local Users & Groups
#2.3. Right-click on the user then select “Rename“. Type the new account name then hit enter.
Change User Name with Local Users and Groups
#3. Registry Editor (Regedit)
Warning: This is not recommended to mess up with your registry as some of your visitors have got an issue with this method.
The Microsoft Registry Editor (regedit.exe) enables you to view, search for, and change settings in your system registry, which contains information about how your computer runs. Although you can use Registry Editor to inspect and modify the registry, doing so is not recommended, as making incorrect changes can damage your system.
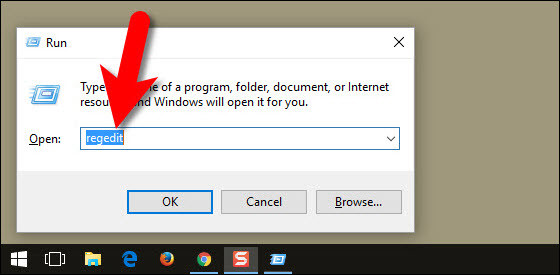
#3.1. Open “Run” window by pressing the “Windows Key+R” then type “Regedit“.
Regedit
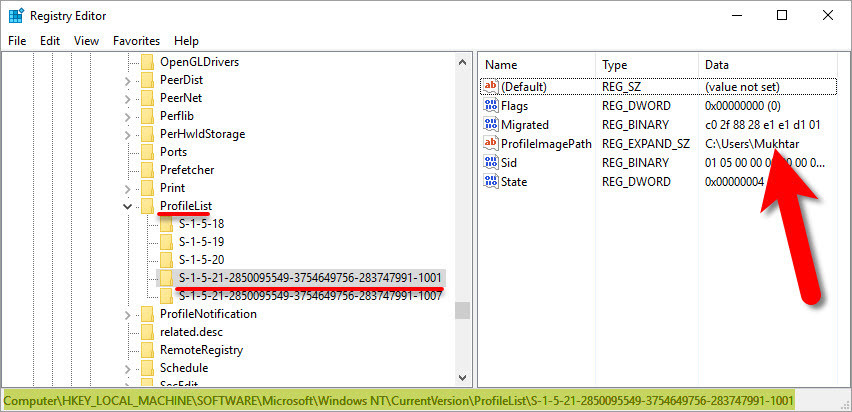
#3.2. This is very important that don’t commit a mistake here. Because your system may damage. Navigate to this path “Key_Local_Machine/Software/Microsoft/Windows NT/CurrentVersion/ProfileList“. Find your account from the list.
Registry Editor Window
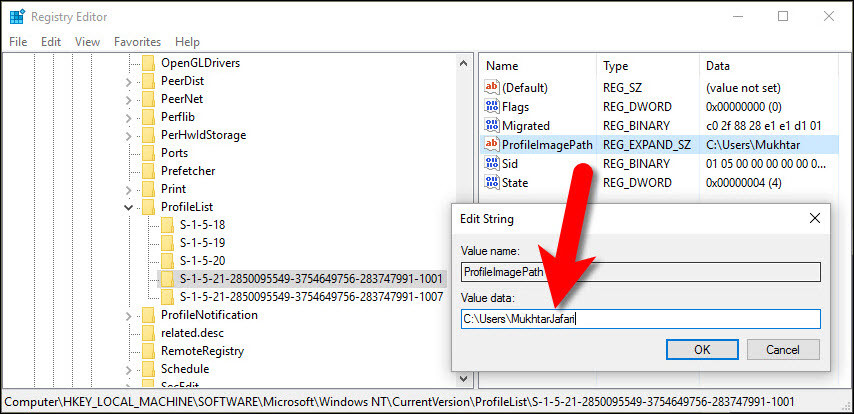
#3.2. Right-click on the account then tap “Modify“. A small window will appear. Type the new account name and hit the “OK” button.
Change User account name with Registry Editor
#4. Group Policy Editor (gpedit.msc)
Group Policy Editor is a tool that helps administrators manage policy settings in Microsoft Management Console (MMC) snap-ins. It can be found on all versions of Windows Server since the release of Windows Server 2003. Group Policy Objects (GPOs) store the policy settings set by administrators with GP Editor.
#4.1. Open “Run” window by pressing the “Windows Key+R” then type “gpedit.msc“.
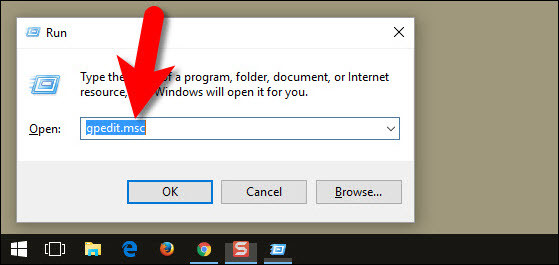
gpedit.msc
#4.2. Choose “Computer Configuration/Windows Settings/Security Settings/Local Policies/Security Options“.

Local Group Policy Editor
#4.3. Now, you’ll see policies “Rename administrator account and guest account“. Double-click on the account and start typing new account name. Finally, click “OK” button.
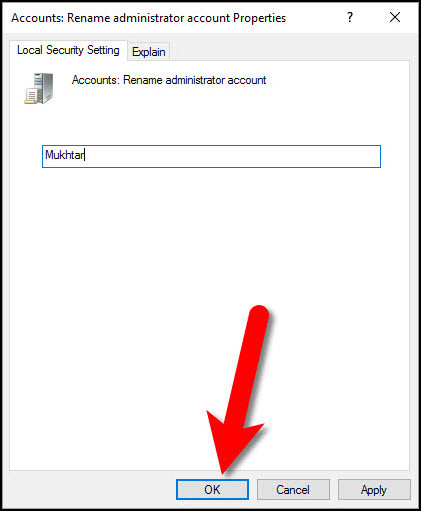
Rename Account name with GP
#5. User Management (netplwiz)
User Management is an authentication feature that provides administrators with the ability to identify and control the state of users logged into the network.
#5.1. Open “Run” window by pressing the “Windows Key+R” then type “Netplwiz“.
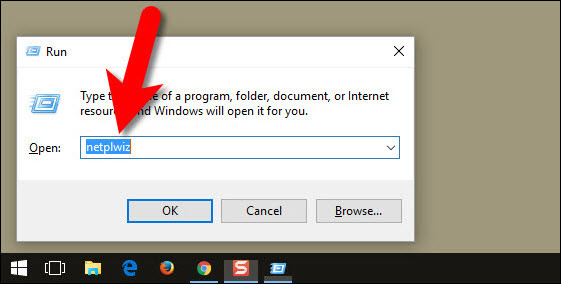
netplwiz
#5.2. Choose your user account you want to change the name. Click on “Properties” then type the new name for that account.
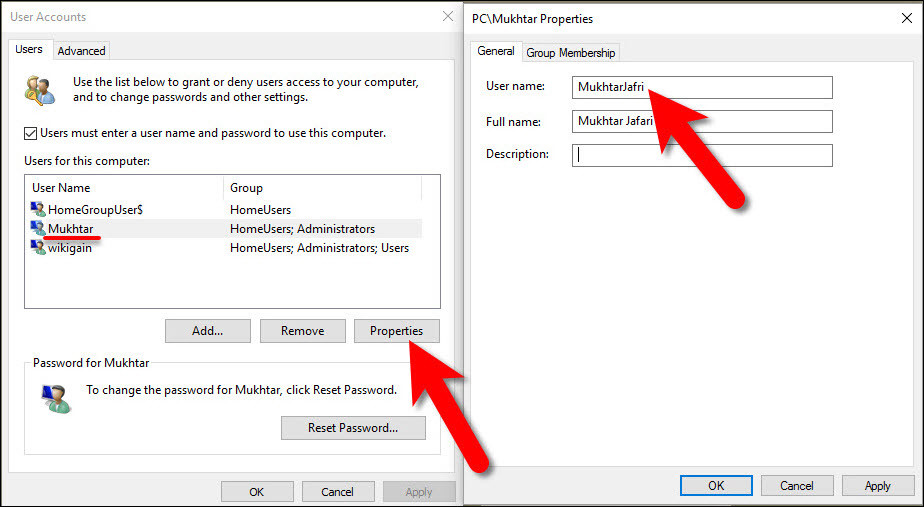
Change User Account name with Netplwiz command
Conclusion
These were the best method that you can change user account name in Windows 10 or the later versions. I hope you have learned something from this step by step guide. If you have any kind of question regarding this topic or related articles, you can hit a comment down below.
Thanks, the last method works for me :’)
I made the mistake of changing the username in Registry Editor and had a mild breakdown as it cased fatal error in all opened softwares and upon restart Windows showed a login error and it showed like it had no installed softwares. It was fixed by putting in an old username in the same place.
Thanks for your feedback.
This issue didn’t happen for us so anyway, we’ll add a warning before editing the registry editor.
Hi you did it the wrong way, follow these steps.
1) Open an elevated Command prompt and type this command “net user administrator /active:yes” (this command will activate the default administrator account)
2)Shutdown entirely, and sign in with the administrator account, you might see screens like “We are getting Windows ready for you… blabla.”
3) after it opens the desktop, go to “this PC” and double click the C:/ disk (the one with the Windows Icon. Then Select Users, you will see some accounts, then select the one whose username you have to change, Right Click that and press Rename, if you are prompted, press ok. Rename whatever you want the name to be, For example “Ibrahim_Imran” copy that name.
4) Now is the time to open the Registry Editor and do the above steps, only paste the new name into the path.
5) Shutdown and start the computer again, you will not encounter any Problems. The new name will appear on File Explorer and other apps, to further change the Username, use Step 5 in the above article (the netplwiz one)
A side effect of this method is that OneDrive Doesn’t work (by this I mean that in Settings and File Explorer), but don’t worry about losing files, so just setup OneDrive again with your old credentials.
Hope this Helped,
A geeky 13yr Old Whose name is Ibrahim, for further enquiries, contact me on my email for anything related to computers and Windows 10 etc. etc…
(my email is ibrahim_dynamicgenius9000@outlook.com )